Using Telerik Barcode with the Windows Phone 8 Wallet
Summarize with AI:
With the introduction of RadBarcode in the Q1 2013 release it is now trivial to generate a barcode for use with the Windows Phone Wallet.
The Wallet is a hub for credit cards, coupons, memberships, loyalty cards and more. It allows end-users to manage their payment methods which makes shopping in the app and music stores a breeze. Also, the information contained in the Wallet can be linked to apps which manage it or provide other related information. Finally the Wallet has a feature that allows quick, easy and secure wireless transactions via NFC (an NFC example is, unfortunately, beyond the scope of this post). In this blog post we’ll explore a part of the Wallet API and how to use RadBarcode with it.
The first thing we need to do after we create a new Windows Phone project in Visual Studio is to add a using declaration for the Microsoft.Phone.Wallet namespace. It resides in the Microsoft.Phone.dll which is added by default.
With the namespace in place, we’re now interested in the PaymentInstrument class. In this case we’ll use the barcode to encode the information of a (fictional) credit card. So what information do we need?
Card number – 1234 5678 9101 11213
Name – Jane Doe
Security code - 321
Expiration date – 04/03/2016
Now we can create a payment instrument like this:
Finally we have to add this payment instrument to the Wallet. This is done with the AddWalletItemTask which resides in the Microsoft.Phone.Tasks namespace. All we have to do, is to set the Item property of the task to our payment instrument and then subscribe to the Completed event. The event arguments will then tell us whether the user added the wallet item or not.
Now if we try to add the payment instrument by calling the Show() method of our AddWalletItemTask it will crash because there are several mandatory properties that must be set on our payment instrument, which we have not set. These are:
DisplayName
PaymentInstrumentKinds
Logo99x99
Logo159x159
Logo336x336
We will set these as well as one last but very important property. The BarcodeImage property. It will be a QR code that contains the information for the credit card. To create a barcode image, we need a RadBarcodeQR instance of which we will take a snapshot with WriteableBitmap. An important constraint is that the QR code must have a concrete size - 278x278.
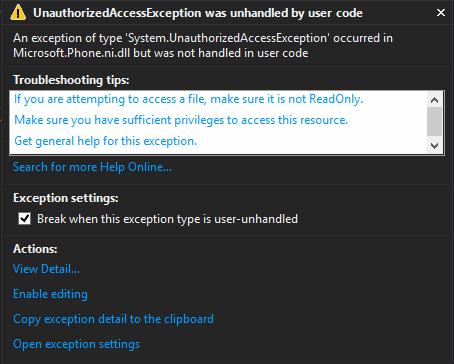
What happens now?

Catastrophic Failure. Lovely exception. We didn’t get it, but our app doesn’t work nonetheless… We forgot one last thing. We need to declare the wallet capabilities in our app manifest.
<Capability Name="ID_CAP_WALLET" />
<Capability Name="ID_CAP_WALLET_PAYMENTINSTRUMENTS" />
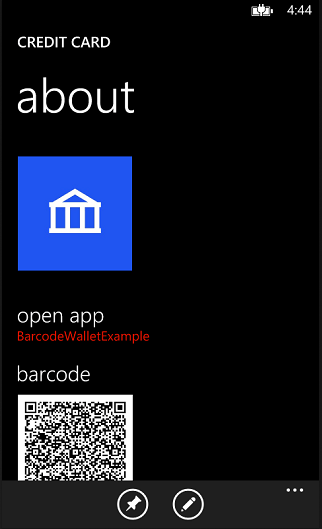
And presto!

We added our credit card to the Wallet and it has a QR code. Neat no?
Be sure to check the example’s source code and let us know what you think in the forums.
Cheers.
The Wallet is a hub for credit cards, coupons, memberships, loyalty cards and more. It allows end-users to manage their payment methods which makes shopping in the app and music stores a breeze. Also, the information contained in the Wallet can be linked to apps which manage it or provide other related information. Finally the Wallet has a feature that allows quick, easy and secure wireless transactions via NFC (an NFC example is, unfortunately, beyond the scope of this post). In this blog post we’ll explore a part of the Wallet API and how to use RadBarcode with it.
The first thing we need to do after we create a new Windows Phone project in Visual Studio is to add a using declaration for the Microsoft.Phone.Wallet namespace. It resides in the Microsoft.Phone.dll which is added by default.
using Microsoft.Phone.Wallet;Card number – 1234 5678 9101 11213
Name – Jane Doe
Security code - 321
Expiration date – 04/03/2016
Now we can create a payment instrument like this:
PaymentInstrument creditCard = new PaymentInstrument("creditCard");Now if we try to add the payment instrument by calling the Show() method of our AddWalletItemTask it will crash because there are several mandatory properties that must be set on our payment instrument, which we have not set. These are:
DisplayName
PaymentInstrumentKinds
Logo99x99
Logo159x159
Logo336x336
We will set these as well as one last but very important property. The BarcodeImage property. It will be a QR code that contains the information for the credit card. To create a barcode image, we need a RadBarcodeQR instance of which we will take a snapshot with WriteableBitmap. An important constraint is that the QR code must have a concrete size - 278x278.
private void AddWalletItem(BitmapSource image){ PaymentInstrument creditCard = new PaymentInstrument("creditCard"); // Mandatory properties creditCard.DisplayName = "Credit Card"; creditCard.PaymentInstrumentKinds = PaymentInstrumentKinds.Credit; creditCard.Logo99x99 = new BitmapImage(new Uri("CreditCardSmall.png", UriKind.RelativeOrAbsolute)) { CreateOptions = BitmapCreateOptions.None }; creditCard.Logo159x159 = new BitmapImage(new Uri("CreditCardMedium.png", UriKind.RelativeOrAbsolute)) { CreateOptions = BitmapCreateOptions.None }; creditCard.Logo336x336 = new BitmapImage(new Uri("CreditCardLarge.png", UriKind.RelativeOrAbsolute)) { CreateOptions = BitmapCreateOptions.None }; // Set barcode image creditCard.BarcodeImage = image; AddWalletItemTask task = new AddWalletItemTask(); task.Completed += this.OnTaskCompleted; task.Item = creditCard; this.Dispatcher.BeginInvoke(() => task.Show());}What happens now?
Catastrophic Failure. Lovely exception. We didn’t get it, but our app doesn’t work nonetheless… We forgot one last thing. We need to declare the wallet capabilities in our app manifest.
<Capability Name="ID_CAP_WALLET" />
<Capability Name="ID_CAP_WALLET_PAYMENTINSTRUMENTS" />
And presto!
We added our credit card to the Wallet and it has a QR code. Neat no?
Be sure to check the example’s source code and let us know what you think in the forums.
Cheers.
About the Author
Viktor Skarlatov
Software Developer,
Windows Phone Team
Windows Phone Team
Comments
Comments are disabled in preview mode.
