Telerik Reporting Modern UI: Report Viewer Demo

Summarize with AI:
This is the third and final post in a series detailing how to style application across platforms, writing once and delivering everywhere. This post is about applying our custom theme to Report Viewers in our web and desktop applications.
Series Outline
This is the third and final post in a series detailing how to style application across platforms, writing once and delivering everywhere. This post is about applying our custom theme to report viewers in our web and desktop applications.
- Sleek and Customizable UI for Any Design System and Technology
- Telerik and Kendo UI Theme Customization: Web and Desktop Demo
- Telerik Reporting Modern UI: Report Viewer Demo (this post)
Introduction
Up to this point in the series, we have conceptually reviewed the importance of sleek and customizable themes, created a custom theme, and used this theme in various web and desktop applications. However, I wager that an application is never complete without a reporting feature. This is where Telerik Reporting comes in handy.
Reports in Telerik Reporting can be designed and styled in an infinite number of ways. We will leave how to do that for a more dedicated article. In this case, we want to understand how to add a custom-styled reporting component that enables viewing reports in each of our applications. To do this, we’ll need to understand Report Viewers. Let us review Report Viewers next.
Report Viewers Overview
Report Viewers are UI components that are used to display reports in applications. We deliver a plethora of report viewers for the web and desktop. The web report viewers are built on the base HTML5 viewer. The desktop report viewers are built natively into the desktop application.
Additionally, our Report Viewer applications in the demo will require the use of the Reporting REST Service. This is because Report Viewers are clients for displaying the reports and the Reporting REST Service is a service for processing and rendering the report. Report Viewers cannot render a report without the REST Service. This means we will also need to add the Reporting REST Service to our Blazor Application to work with our client applications. As a result, we will make a slight detour and add this to our solution next.
Creating the Reporting REST Service
To get started, I am just going to copy over my end result from the Post 02 Source Code Repository to a Post 03 folder. Next, we’ll start with a basic ASP.NET Core WebApi project (fig. 01).
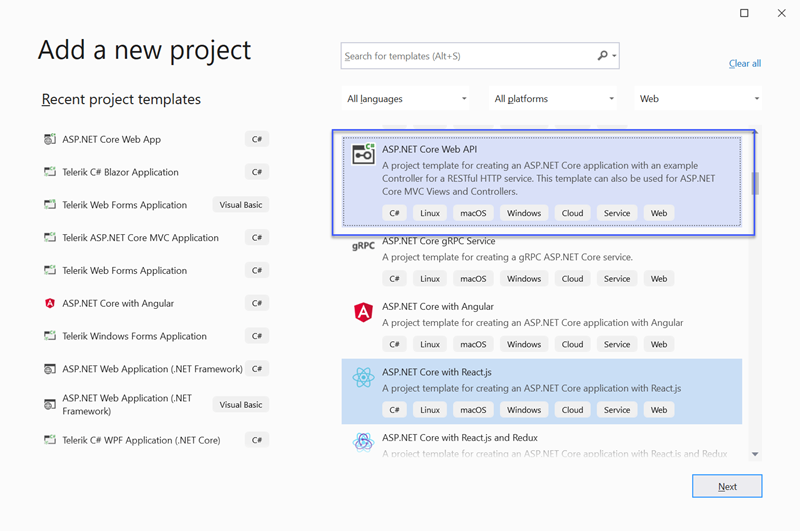 Figure 01: Create Empty ASP.NET Core
WebApi Project
Next, there are three general steps to create the Reporting REST Service in ASP.NET Core 5.0. These are Add NuGet Packages, Update Startup.cs Class and Implement the ReportsController. For more detailed steps, see How to Host Reports Service in ASP.NET Core in .NET 5. Let us review the general steps below.
Add NuGet Packages
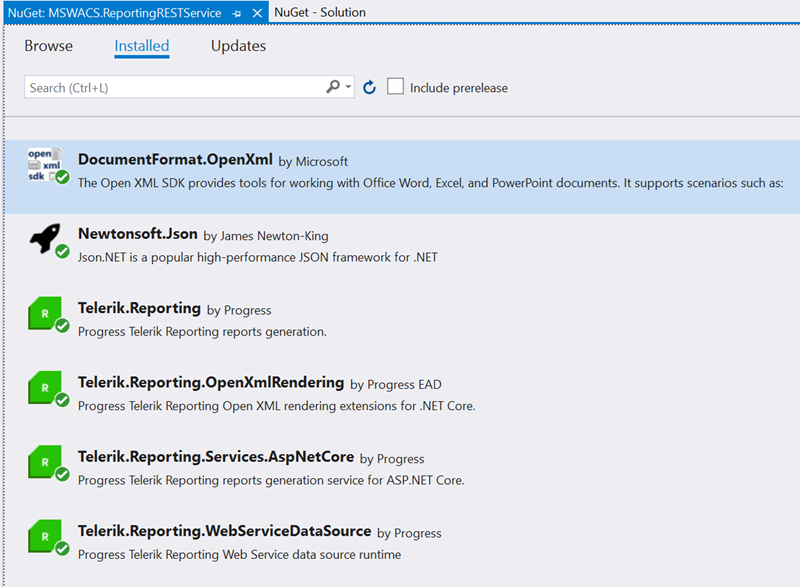
We will add the Telerik.Reporting, Telerik.Reporting.OpenXmlRendering, Telerik.Reporting.WebServiceDataSource, Newtonsoft.Json and the DocumentFormat.OpenXmL NuGet packages (fig. 02).
It is important to note that not all the above packages are required for the Reporting REST Service but including all will provide the most capabilities. For example, the WebServiceDataSource is only required if reports will use a WebServiceDataSource and the OpenXML packages are only required if rendering reports in Microsoft’s OpenXML Format (DOCX, PPTX, XLSX).
Update the Startup.cs Class
We are using clients separated by domains so we will need to use CORS in this scenario. Additionally, we’ll make the necessary changes to add Newtonsoft JSON Serialization and configure the Reporting REST Service in the ConfigureService Method (code 01).
01.public void ConfigureServices(IServiceCollection services)02.{03. // Add Cors04. services.AddCors(opts =>05. {06. opts.AddDefaultPolicy(p =>07. {08. p.AllowAnyMethod();09. p.AllowAnyHeader();10. p.AllowAnyOrigin();11. });12. });13.14. // Add Newtonsoft JSON Serialization15. services.AddControllers().AddNewtonsoftJson();16.17. // Configure dependencies for ReportsController.18. services.TryAddSingleton<IReportServiceConfiguration>(sp =>19. new ReportServiceConfiguration20. {21. ReportingEngineConfiguration = sp.GetService<IConfiguration>(),22. HostAppId = "Net5RestServiceWithCors",23. Storage = new FileStorage(),24. ReportSourceResolver = new UriReportSourceResolver(25. System.IO.Path.Combine(sp.GetService<IWebHostEnvironment>().ContentRootPath, "Reports"))26. });27.}Code Snippet 01: Startup.cs ConfigureServices Method
In the configure method we need to use CORS and ensure the MapControllers is added to the EndPoints (code 02).
01.public void Configure(IApplicationBuilder app, IWebHostEnvironment env)02.{03. if (env.IsDevelopment())04. {05. app.UseDeveloperExceptionPage();06. }07.08. // Add UseCors09. app.UseCors();10.11. app.UseRouting();12.13. app.UseAuthorization();14.15. app.UseEndpoints(endpoints =>16. {17. // Add MapControllers18. endpoints.MapControllers();19. });20.}Code Snippet 02: Startup.cs Configure Method
Implement the ReportsController
In the WebApi project we can use Visual Studio Scaffolding to add the API controller. Select the empty API Controller and name it ReportsController (fig. 03).
![]() Figure 03: Add Empty ReportsController
Figure 03: Add Empty ReportsController
After the ReportsController has been scaffolded, inherit the ReportsControllerBase and implement the Base constructor (code 03).
1.[Route("api/[controller]")]2.[ApiController]3.public class ReportsController : ReportsControllerBase4.{5. public ReportsController(IReportServiceConfiguration reportServiceConfiguration)6. : base(reportServiceConfiguration)7. { }8.}Code Snippet 03: ReportsController.cs
Finally, we can run the API Project. A good way to test if our REST Service is working is by navigating to api/reports/formats. This will produce a JSON array of the available report formats (code 04).
01.[02. {"name":"PDF","localizedName":"Acrobat (PDF) file"},03. {"name":"CSV","localizedName":"CSV (comma delimited)"},04. {"name":"XLSX","localizedName":"Excel Worksheet"},05. {"name":"PPTX","localizedName":"PowerPoint Presentation"},06. {"name":"RTF","localizedName":"Rich Text Format"},07. {"name":"IMAGE","localizedName":"TIFF file"},08. {"name":"DOCX","localizedName":"Word Document"}09.]Code Snippet 04: Available Report Formats
With the Reporting REST Service now implemented, we can deliver our reports remotely to our clients. In the remainder of the post, I will be following the same order from Post 02. We’ll continue with the Angular Report Viewer, the Blazor Report Viewer and finish with the WPF Report Viewer. The overall goal of this post is to review how our custom client theme works in the Telerik Reporting Report Viewers, walk through adding a Report Viewer to each client application and use it to display reports.
Custom Theming for Web Report Viewers
The real benefit here is the custom styling that has been added to our web client applications will work without any additional steps. This illustrates the power of custom styling and theming in Telerik and Kendo UI. We can just add the Report Viewers and reap the benefits of our previous efforts.
Ultimately, this works because the web-based Report Viewers are all built around the same underlying HTML5/JavaScript/CSS implementation which also uses the Kendo UI styles out of the box. Let us review creating the Angular Report Viewer next.
Creating the Angular Report Viewer
Creating the Report Viewer in an Angular application is as simple as adding the required resources, preparing the App Module imports and declarations, and creating a report viewer component. For the full details of this, refer to our How To Angular Report Viewer with Angular CLI article.
Add jQuery and Telerik Angular Report Viewer
To do this, we can use npm install jQuery @progress/telerik-angular-report-viewer
--save from the command line. Additionally, we’ll need to update
the Angular build scripts declaration to include the jQuery distribution (fig.
04).
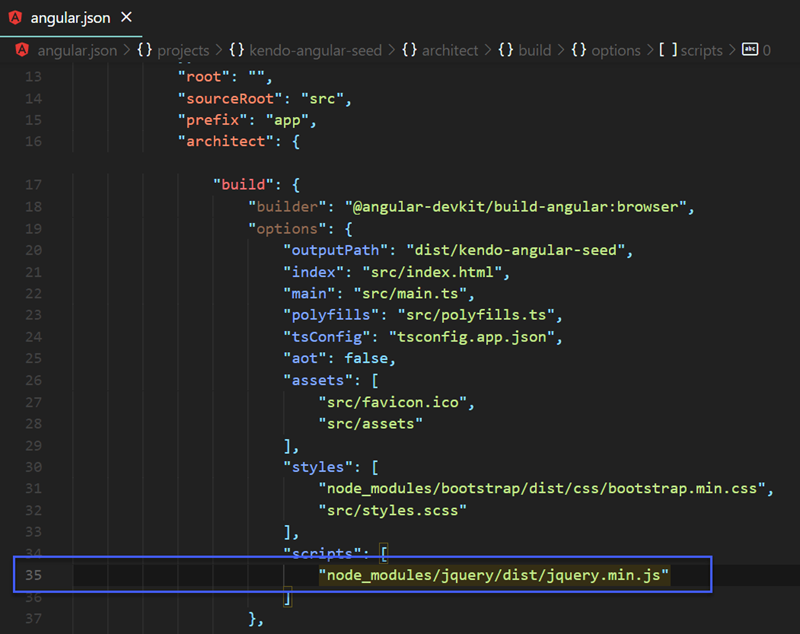 Figure 04: Add jQuery to Angular Build
Create the Reports Component
Here we can use the Angular scaffolding to add our new
component as well. We can run ng generate component reports from the src/app/components
folder.
Add Imports and Declarations to AppModule
To add the Angular Report Viewer to our project, we need to import the TelerikReportingModule and declare the newly created ReportsComponent within the AppModule. This should also include a new route as we’re going to need to navigate to the component (code 05). Note lines 20, 21, 27, 38 and 50 in the following code snippet.
01.import { BrowserModule } from '@angular/platform-browser';02.import { NgModule } from '@angular/core';03.import { RouterModule, Routes } from '@angular/router';04.import { BrowserAnimationsModule } from '@angular/platform-browser/animations';05.import { ReactiveFormsModule, FormsModule } from '@angular/forms';06.import { AppComponent } from './app.component';07.import { MenuModule } from '@progress/kendo-angular-menu';08.import { GridModule } from '@progress/kendo-angular-grid';09.import { ChartsModule } from '@progress/kendo-angular-charts';10.import { DropDownsModule } from '@progress/kendo-angular-dropdowns';11.import { PopupModule } from '@progress/kendo-angular-popup';12.import { InputsModule } from '@progress/kendo-angular-inputs';13.14.import 'hammerjs';15.16.import { HeaderComponent } from './components/header/header.component';17.import { HomeComponent } from './components/home/home.component';18.import { FooterComponent } from './components/footer/footer.component';19.import { GridComponent } from "./components/grid/grid.component";20.import { ReportsComponent } from './components/reports/reports.component';21.import { TelerikReportingModule } from '@progress/telerik-angular-report-viewer';22.23.const routes: Routes = [24. { path: '', redirectTo: 'home', pathMatch: 'full' },25. { path: 'home', component: HomeComponent },26. { path: 'grid', component: GridComponent },27. { path: 'reports', component: ReportsComponent},28. { path: '**', redirectTo: 'home' }29.];30.31.@NgModule({32. declarations: [33. AppComponent,34. HeaderComponent,35. HomeComponent,36. GridComponent,37. FooterComponent,38. ReportsComponent39. ],40. imports: [41. BrowserModule,42. ReactiveFormsModule,43. FormsModule,44. MenuModule,45. BrowserAnimationsModule,46. GridModule,47. ChartsModule,48. RouterModule.forRoot(routes),49. DropDownsModule, PopupModule, InputsModule,50. TelerikReportingModule51. ],52. bootstrap: [AppComponent]53.})54.export class AppModule { }Code Snippet 05: Angular Grid app.module.ts
Create the Angular Report Viewer Component
At last, we can create our Angular Report Viewer. We
need to make sure we reference our new Reporting REST Service in the serviceUrl
component property (code 06 & code 07).
Angular Report Viewer Markup
01.<kendo-dropdownlist [data]="reportFiles" (selectionChange)="selectionChange($event)" [(ngModel)]="selectedReport"></kendo-dropdownlist>02.<br/>03.<br/>04.<tr-viewer #viewer1 05. [containerStyle]="viewerContainerStyle"06. [serviceUrl]="'https://localhost:44395/api/reports'"07. [viewMode]="'INTERACTIVE'"08. [scaleMode]="'SPECIFIC'"09. [scale]="1.0"10. [ready]="ready"11. [viewerToolTipOpening]="viewerToolTipOpening"12. [enableAccessibility]="false">13.</tr-viewer>Code Snippet 06: AngularGrid reports.component.html
Angular Report Viewer Component Code
01.import { Component, AfterViewInit, ViewChild} from '@angular/core';02.import { reportFiles } from 'src/app/common/files';03.import { TelerikReportViewerComponent } from '@progress/telerik-angular-report-viewer';04.05.@Component({06. selector: 'app-reports',07. templateUrl: './reports.component.html'08.})09.export class ReportsComponent implements AfterViewInit {10. @ViewChild('viewer1', { static: false }) viewer: TelerikReportViewerComponent;11. 12. public selectedReport = "Dashboard.trdp";13. public reportFiles: string[] = reportFiles;14.15. title = "Report Viewer";16.17. viewerContainerStyle = {18. position: 'absolute',19. left: '5px',20. right: '5px',21. top: '200px',22. bottom: '5px',23. overflow: 'hidden',24. clear: 'both',25. ['font-family']: 'ms sans serif'26. };27.28. constructor() {29.30. }31.32. ngAfterViewInit() {33. var rs = {34. report: this.selectedReport35. };36.37. this.viewer.setReportSource(rs);38. }39.40. public selectionChange(value: any):void {41. var rs = {42. report: value43. };44.45. this.viewer.setReportSource(rs);46. }47.}Code Snippet 07: Angular Grid reports.component.ts
As a bonus, I used a dropdown to select and change the
Report Source of the Angular Report Viewer component. I also added a route to
the Reporting REST Service project that will produce a JSON list of the
available files. However, instead of creating a Service in the Angular project,
I just hard-coded this in the src/app/common/files.ts export.
The output of the Angular Report Viewer follows our material theme and elements can also be seen from the dropdown component as well (fig. 05) .
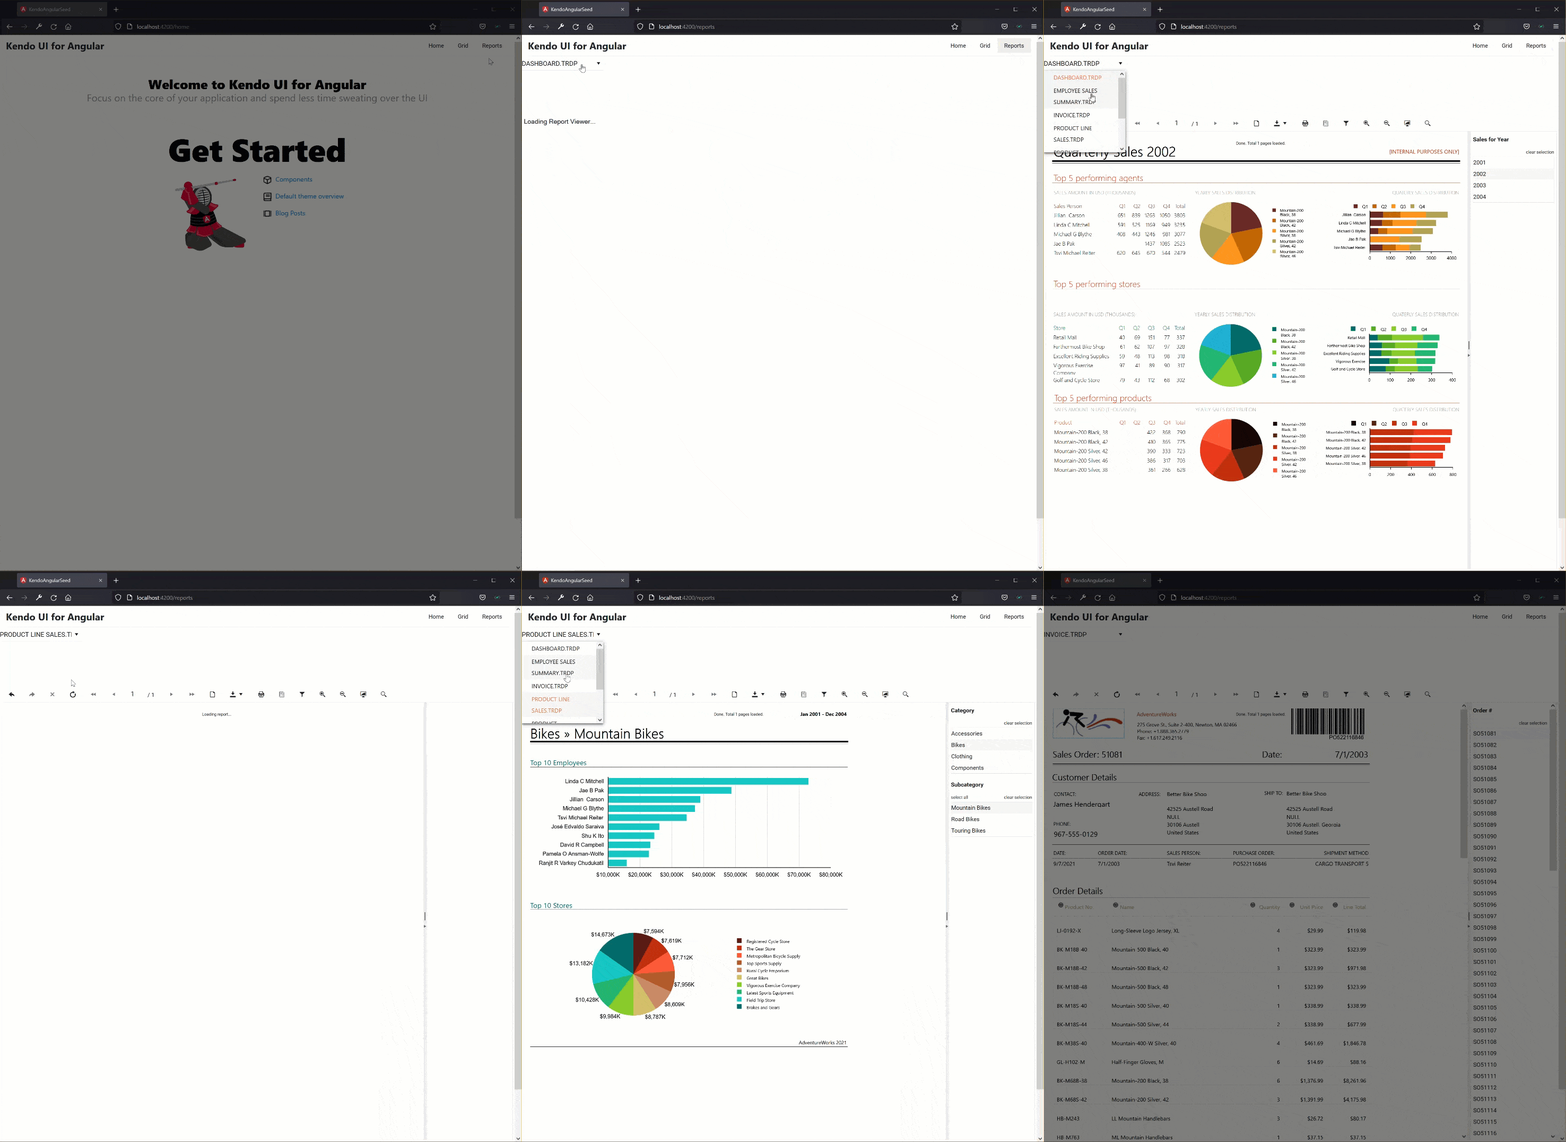 Figure 05: Angular Report Viewer Animation
This concludes creating the Angular Report Viewer. We have reviewed how our existing custom theme is applied within the Angular Report Viewer and walked through the implementation. Next, we will review the Blazor Report Viewer.
Creating the Blazor Report Viewer
In the R3 2021 Telerik Reporting Release, we added the Blazor Report Viewer Visual Studio Item Template which will create the Report Viewer for us. However, for this project we need to do this manually to illustrate the process. Creating the Blazor Report Viewer is like creating the Angular Report Viewer. Add the dependencies, create the component, create the Report Viewer and take advantage of our previous efforts. Since we’re using the Reporting REST Service, we only need to update the Wasm Client. Let us begin.
Add the Telerik.ReportViewer.Blazor Reference
We will start by adding the Telerik.ReportViewer.Blazor NuGet package which is available through the Telerik NuGet Feed (fig. 06). For reference, this can be set up within Visual Studio or through the command-line interface as shown in the Telerik Private NuGet Feed documentation.
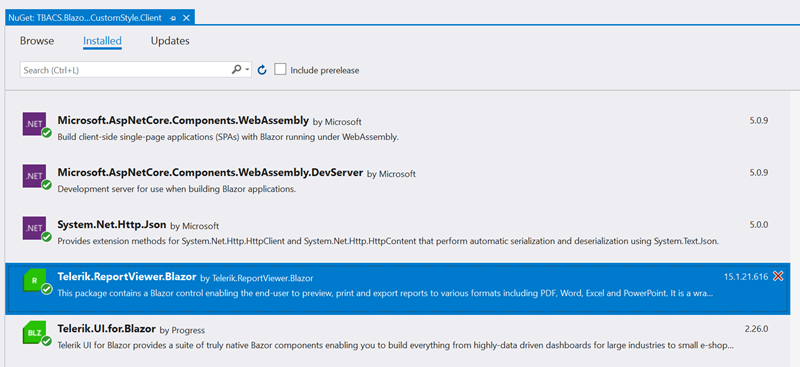 Figure 06: Add the
Telerik.ReportViewer.Blazor Package
Add Dependencies to Index.html
There are three dependencies that need to load in the index.html file. These are the interop.js, jQuery and the Telerik Report Viewer scripts (code 08). Note lines 17, 18 and 31 in the below code snippet.
01.<!DOCTYPE html>02.<html>03.<head>04. <meta charset="utf-8" />05. <meta name="viewport" content="width=device-width, initial-scale=1.0, maximum-scale=1.0, user-scalable=no" />06. <title>BlankClientAspNetHostedBlazorApp</title>07. <base href="/" />08. <link rel="stylesheet" href="https://fonts.googleapis.com/css?family=Roboto:300,400,500,700" />09. <style>10. body {11. font-family: Roboto, sans-serif;12. }13. </style>14. <link href="css/site.css" rel="stylesheet" />15. <link href="css/main.css" rel="stylesheet" />16.17. <script src="https://ajax.googleapis.com/ajax/libs/jquery/3.3.1/jquery.min.js"></script>18. <script src="/api/reports/resources/js/telerikReportViewer"></script>19. <script src="_content/Telerik.UI.for.Blazor/js/telerik-blazor.js" defer></script>20.</head>21.<body>22. <div id="app">Loading...</div>23.24. <div id="blazor-error-ui">25. An unhandled error has occurred.26. <a href="" class="reload">Reload</a>27. <a class="dismiss">🗙</a>28. </div>29.30. <script src="_framework/blazor.webassembly.js"></script>31. <script src="_content/Telerik.ReportViewer.Blazor/interop.js" defer></script>32.</body>33.</html>Code Snippet 08: Blazor Wasm Grid index.html
Create a Reports Razor Page
Next, we can add a new Reports Razor Component through visual studio (fig. 07).
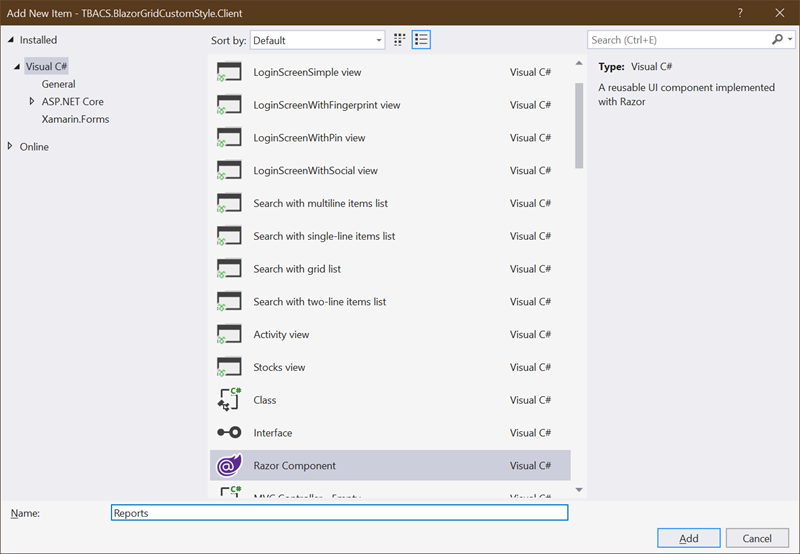 Figure 07: Add New Razor Component in
Visual Studio
Create the Blazor Report Viewer Component
Finally, we can add the Blazor Report Viewer usings, styles, markup and code blocks.
Blazor Report Viewer Markup
Because we’re using the Reporting REST Service, we need to inject the HttpClient (code 09). This is a common pattern with Wasm.
01.@page "/reports"02.@using Telerik.ReportViewer.Blazor03.@inject HttpClient HttpClient;04.05.<h2>Reports</h2>06.07.<style>08. #rv1 {09. position: relative;10. width: 1000px;11. height: 800px;12. }13.</style>14.15.<TelerikDropDownList Data="@ReportList" Value="@SelectedReport" OnChange="ReportSelection"></TelerikDropDownList>16.<br />17.<br />18.<!-- 19. The Report Viewer ServiceURL is set to the localhost and port of the TBACS.BlazorGridCustomStyle.Server project20. This may change for each development environment.21. See the launchSettings.json in that project for reference.22.-->23.<ReportViewer @ref="rv1" ViewerId="rv1"24. ServiceUrl="/api/reports"25. Parameters="@(new ParametersOptions { Editors = new EditorsOptions { MultiSelect = EditorType.ComboBox, SingleSelect = EditorType.ComboBox } })"26. ScaleMode="@(ScaleMode.Specific)"27. Scale="1.0" />Code Snippet 09: Blazor Wasm Grid Markup
Blazor Report Viewer Code Block
We have also implemented selecting the Report Source from a dropdown as well (code 10).
01.public string SelectedReport { get; set; }02.public List<string> ReportList { get; set; }03.public ReportViewer rv1;04.public ReportSourceOptions RSO { get; set; }05.06.protected async override Task OnInitializedAsync()07.{08. ReportList = await HttpClient.GetFromJsonAsync<List<string>>("/api/files");09.10. SelectedReport = "Dashboard.trdp";11.12. RSO = new ReportSourceOptions13. {14. Report = SelectedReport15. };16.17. await rv1.SetReportSourceAsync(RSO);18. await rv1.RefreshReportAsync();19.}20.21.private async Task ReportSelection(object report)22.{23. SelectedReport = report.ToString();24.25. RSO = new ReportSourceOptions26. {27. Report = SelectedReport28. };29.30. await rv1.SetReportSourceAsync(RSO);31.}Code Snippet 10: Blazor Wasm Grid Code Block
Below is the output of the Blazor Report Viewer and how it works with our custom styling (fig. 08).
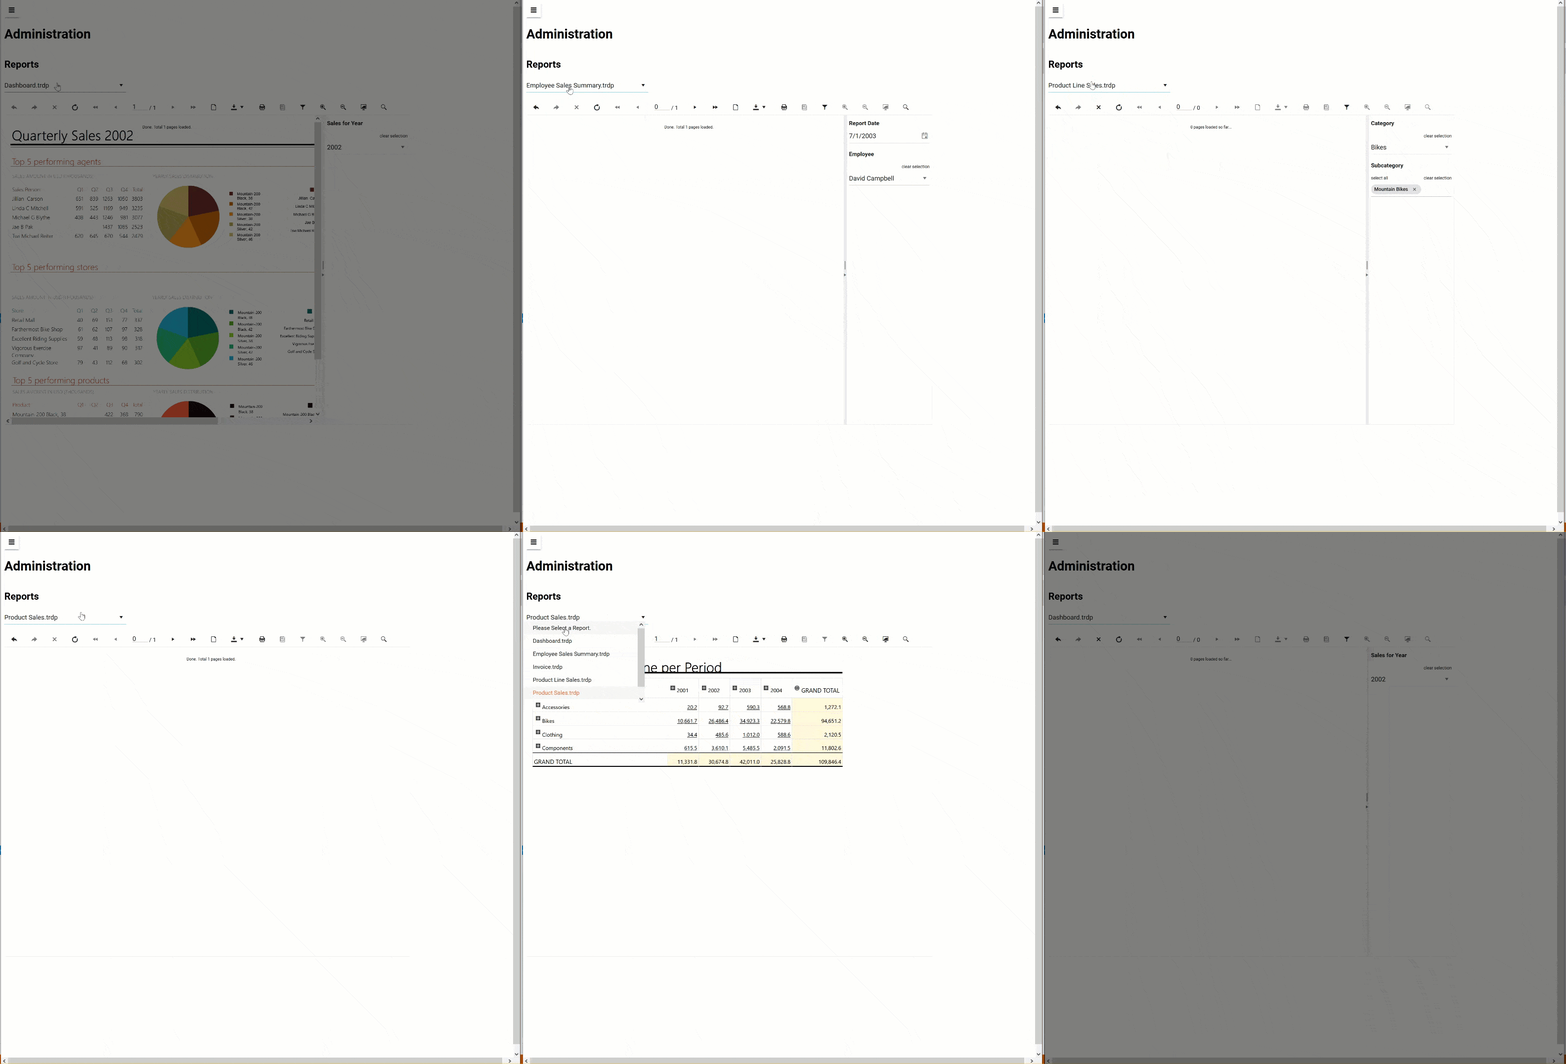 Figure 08: Blazor Report Viewer Animation
This wraps up adding the Blazor Report Viewer to our sample project. In this section, we walked through setting up the Blazor Report Viewer and we didn’t have to make any changes to our styling. Everything worked right out of the box as expected.
Overall, theming across our web frameworks and web report viewers is quite easy. This is by design because they use the same styles and resources. We were able to walk through setting up the report viewers in Angular and Blazor. However, these same concepts can be applied to ASP.NET MVC, ASP.NET AJAX, a plain HTML5/CSS/JS application, React or Vue. In the next section, we will do the same for our desktop application.
Custom Theming for Desktop Report Viewers
Like when we created our custom themes for our WPF desktop application, adding the WPF Report Viewer is more involved. However, we still get to reap the benefits of our custom styles within the Report Viewer like the Web Report Viewers.
The reason for this is because we used Implicit Styling. For the WPF Report Viewer, we will also use Implicit Styling but with the Reporting-provided Theme references. Let’s walk through creating the WPF Report Viewer next.
Creating the WPF Report Viewer
As with the web applications, the general process is similar. We will add references, update the app.xaml and then create the markup and code-behind. For reference, the entire process is detailed in How to Add a Report Viewer to a WPF .NET Core Project.
Add Required Assembly References
There are several assemblies that need to be added for the WPF application. Below is an outline of each and they can all be found in the Private Telerik NuGet Feed as before (fig. 09).
- Required References
- Telerik.Reporting.Services.HttpClient
- Telerik.ReportViewer.Wpf
- Telerik.ReportViewer.Wpf.Themes
- Telerik.Windows.Controls
- Telerik.Windows.Controls.Input
- Telerik.Windows.Controls.Navigation
- Telerik.Windows.Data
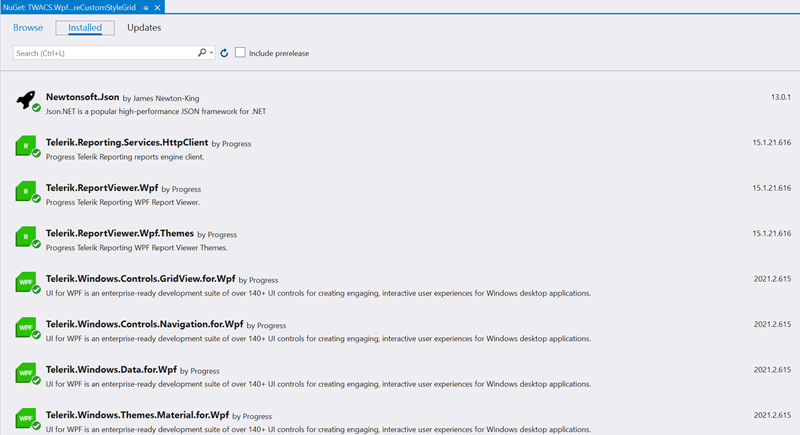 Figure 09: WPF Report Viewer Assembly
References
Merge Theme Resources in App.xaml
To reuse our custom styling and add the WPF Report Viewer, we need to update the referenced theme resources in the App.xaml (code 11).
We only need to use the Telerik.ReportViewer.Wpf.Themes dictionaries for the control references that are used in the Report Viewer. For example, the Telerik.Windows.Controls.GridView isn’t used by the report viewer and will use the existing theme reference on line 10.
01.<Application x:Class="TWACS.WpfNetCoreCustomStyleGrid.App"03. xmlns:x="http://schemas.microsoft.com/winfx/2006/xaml" xmlns:telerik="http://schemas.telerik.com/2008/xaml/presentation"04. StartupUri="MainWindow.xaml">05. <Application.Resources>06. <ResourceDictionary>07. <ResourceDictionary.MergedDictionaries>08. <ResourceDictionary Source="/Telerik.ReportViewer.Wpf.Themes;component/Themes/Material/System.Windows.xaml" />09. <ResourceDictionary Source="/Telerik.ReportViewer.Wpf.Themes;component/Themes/Material/Telerik.Windows.Controls.xaml" />10. <ResourceDictionary Source="/Telerik.Windows.Themes.Material;component/Themes/Telerik.Windows.Controls.GridView.xaml" />11. <ResourceDictionary Source="/Telerik.ReportViewer.Wpf.Themes;component/Themes/Material/Telerik.Windows.Controls.Input.xaml" />12. <ResourceDictionary Source="/Telerik.ReportViewer.Wpf.Themes;component/Themes/Material/Telerik.ReportViewer.Wpf.xaml" />13. </ResourceDictionary.MergedDictionaries>14. </ResourceDictionary>15. </Application.Resources>16.</Application>Code Snippet 11: WPF App.xaml File
Add Namespace to the MainWindow Declaration
Since we are adding new references and will use them on our MainWindow, we also need to include the declaration at the top of the page (code 12). We will add Telerik.ReportViewer.Wpf and Telerik.Reporting namespaces to the page on lines 6 and 7.
01.<Window x:Class="TWACS.WpfNetCoreCustomStyleGrid.MainWindow"03. xmlns:x="http://schemas.microsoft.com/winfx/2006/xaml"04. xmlns:mc="http://schemas.openxmlformats.org/markup-compatibility/2006"05. xmlns:d="http://schemas.microsoft.com/expression/blend/2008"06. xmlns:tr="clr-namespace:Telerik.ReportViewer.Wpf;assembly=Telerik.ReportViewer.Wpf"07. xmlns:telerikReporting="clr-namespace:Telerik.Reporting;assembly=Telerik.Reporting"08. xmlns:telerik="http://schemas.telerik.com/2008/xaml/presentation"09. xmlns:local="clr-namespace:TWACS.WpfNetCoreCustomStyleGrid"10. mc:Ignorable="d" 11. Title="Main Window" Height="800" Width="700">Code Snippet 12: MainWindow.xaml Declarations
Create the Report Viewer Control
To keep the user experience similar where the end user selects the report from a dropdown, we have used two additional controls—the WPF Tab control and the WPF ComboBox control (code 13 & code 14).
WPF MainWindow.xaml Markup
01.<Window x:Class="TWACS.WpfNetCoreCustomStyleGrid.MainWindow"03. xmlns:x="http://schemas.microsoft.com/winfx/2006/xaml"04. xmlns:mc="http://schemas.openxmlformats.org/markup-compatibility/2006"05. xmlns:d="http://schemas.microsoft.com/expression/blend/2008"06. xmlns:tr="clr-namespace:Telerik.ReportViewer.Wpf;assembly=Telerik.ReportViewer.Wpf"07. xmlns:telerikReporting="clr-namespace:Telerik.Reporting;assembly=Telerik.Reporting"08. xmlns:telerik="http://schemas.telerik.com/2008/xaml/presentation"09. xmlns:local="clr-namespace:TWACS.WpfNetCoreCustomStyleGrid"10. mc:Ignorable="d" 11. Title="Main Window" Height="800" Width="700">12. <Grid>13. <telerik:RadTabControl>14. <telerik:RadTabControl.Items>15. <telerik:RadTabItem Header="Grid">16. <telerik:RadGridView x:Name="RadGridView1" Loaded="RadGridView1_Loaded" AutoGenerateColumns="False" IsFilteringAllowed="False">17. <telerik:RadGridView.Columns>18. <telerik:GridViewDataColumn DataMemberBinding="{Binding Id}" IsVisible="False" IsFilterable="False" IsSortable="False" IsGroupable="False"></telerik:GridViewDataColumn>19. <telerik:GridViewDataColumn DataMemberBinding="{Binding Name}" Header="Product Name" IsFilterable="False" IsSortable="False" IsGroupable="False"></telerik:GridViewDataColumn>20. <telerik:GridViewDataColumn DataMemberBinding="{Binding UnitPrice}" Header="Price" DataFormatString="{}{0:c}" IsFilterable="False" IsSortable="False" IsGroupable="False"></telerik:GridViewDataColumn>21. <telerik:GridViewDataColumn DataMemberBinding="{Binding Discontinued}" Header="Discontinued" IsFilterable="False" IsSortable="False" IsGroupable="False"></telerik:GridViewDataColumn>22. <telerik:GridViewDataColumn DataMemberBinding="{Binding UnitsInStock}" Header="Units In Stock" IsFilterable="False" IsSortable="False" IsGroupable="False"></telerik:GridViewDataColumn>23. <telerik:GridViewDataColumn>24. <telerik:GridViewDataColumn.CellTemplate>25. <DataTemplate>26. <StackPanel Orientation="Horizontal">27. <telerik:RadButton Content="Edit" Margin="0,0,10,0" />28. <telerik:RadButton Content="Cancel"/>29. </StackPanel>30. </DataTemplate>31. </telerik:GridViewDataColumn.CellTemplate>32. </telerik:GridViewDataColumn>33. </telerik:RadGridView.Columns>34. </telerik:RadGridView>35. </telerik:RadTabItem>36. <telerik:RadTabItem Header="Reports">37. <Grid>38. <Grid.RowDefinitions>39. <RowDefinition Height="50px"></RowDefinition>40. <RowDefinition></RowDefinition>41. </Grid.RowDefinitions>42. <telerik:RadComboBox x:Name="RadComboBox1" Grid.Row="0" Loaded="RadComboBox1_Loaded" SelectionChanged="RadComboBox1_SelectionChanged"></telerik:RadComboBox>43. <!-- 44. The Report Viewer ReportEngineConnection URI is set to the localhost and port of the TBACS.BlazorGridCustomStyle.Server project45. This may change for each development environment.46. See the launchSettings.json in that project for reference.47. -->48. <tr:ReportViewer x:Name="reportViewer1" Grid.Row="1" HorizontalAlignment="Stretch" EnableAccessibility="False"49. ReportEngineConnection="engine=RestService;uri=https://localhost:44395/api/reports">50. <tr:ReportViewer.ReportSource>51. <telerikReporting:UriReportSource Uri="Dashboard.trdp" />52. </tr:ReportViewer.ReportSource>53. </tr:ReportViewer>54. </Grid>55. </telerik:RadTabItem>56. </telerik:RadTabControl.Items>57. </telerik:RadTabControl>58. </Grid>59.</Window>Code Snippet 13: MainWindow.xaml Markup
WPF MainWindow.xaml.cs Code-Behind
01.using Newtonsoft.Json;02.using System;03.using System.Collections.Generic;04.using System.Net.Http;05.using System.Threading.Tasks;06.using System.Windows;07.using System.Windows.Navigation;08.using TBACS.BlazorGridCustomStyle.Shared;09.using Telerik.Reporting;10.11.namespace TWACS.WpfNetCoreCustomStyleGrid12.{13. /// <summary>14. /// Interaction logic for MainWindow.xaml15. /// </summary>16. public partial class MainWindow : Window17. {18. public MainWindow()19. {20. InitializeComponent();21. }22.23. public async Task<List<Product>> GetDataAsync()24. {25. string json = await new HttpClient().GetStringAsync("https://sampledataapi.azurewebsites.net/api/v1/Products");26. return JsonConvert.DeserializeObject<List<Product>>(json);27. }28.29. public async Task<List<string>> GetReportFilesAsync()30. {31. /* 32. The HttpClient RequestURI is set to the localhost and port of the TBACS.BlazorGridCustomStyle.Server33. This may change for each development environment.34. See the launchSettings.json for what to change this to 35. */36. string json = await new HttpClient().GetStringAsync("https://localhost:44395/api/files");37. return JsonConvert.DeserializeObject<List<string>>(json);38. }39.40. private async void RadComboBox1_Loaded(object sender, RoutedEventArgs e)41. {42. RadComboBox1.ItemsSource = await GetReportFilesAsync();43. RadComboBox1.SelectedIndex = 1;44.45. reportViewer1.ReportSource = new UriReportSource46. {47. Uri = RadComboBox1.SelectedItem as string48. };49. }50.51. private async void RadGridView1_Loaded(object sender, RoutedEventArgs e)52. {53. RadGridView1.ItemsSource = await GetDataAsync();54. }55.56. private void RadComboBox1_SelectionChanged(object sender, System.Windows.Controls.SelectionChangedEventArgs e)57. {58. reportViewer1.ReportSource = new UriReportSource59. {60. Uri = RadComboBox1.SelectedItem as string61. };62. }63. }64.}Code Snippet 14: MainWindow.xaml.cs Code-Behind
The output of the new WPF application is below (fig. 10).
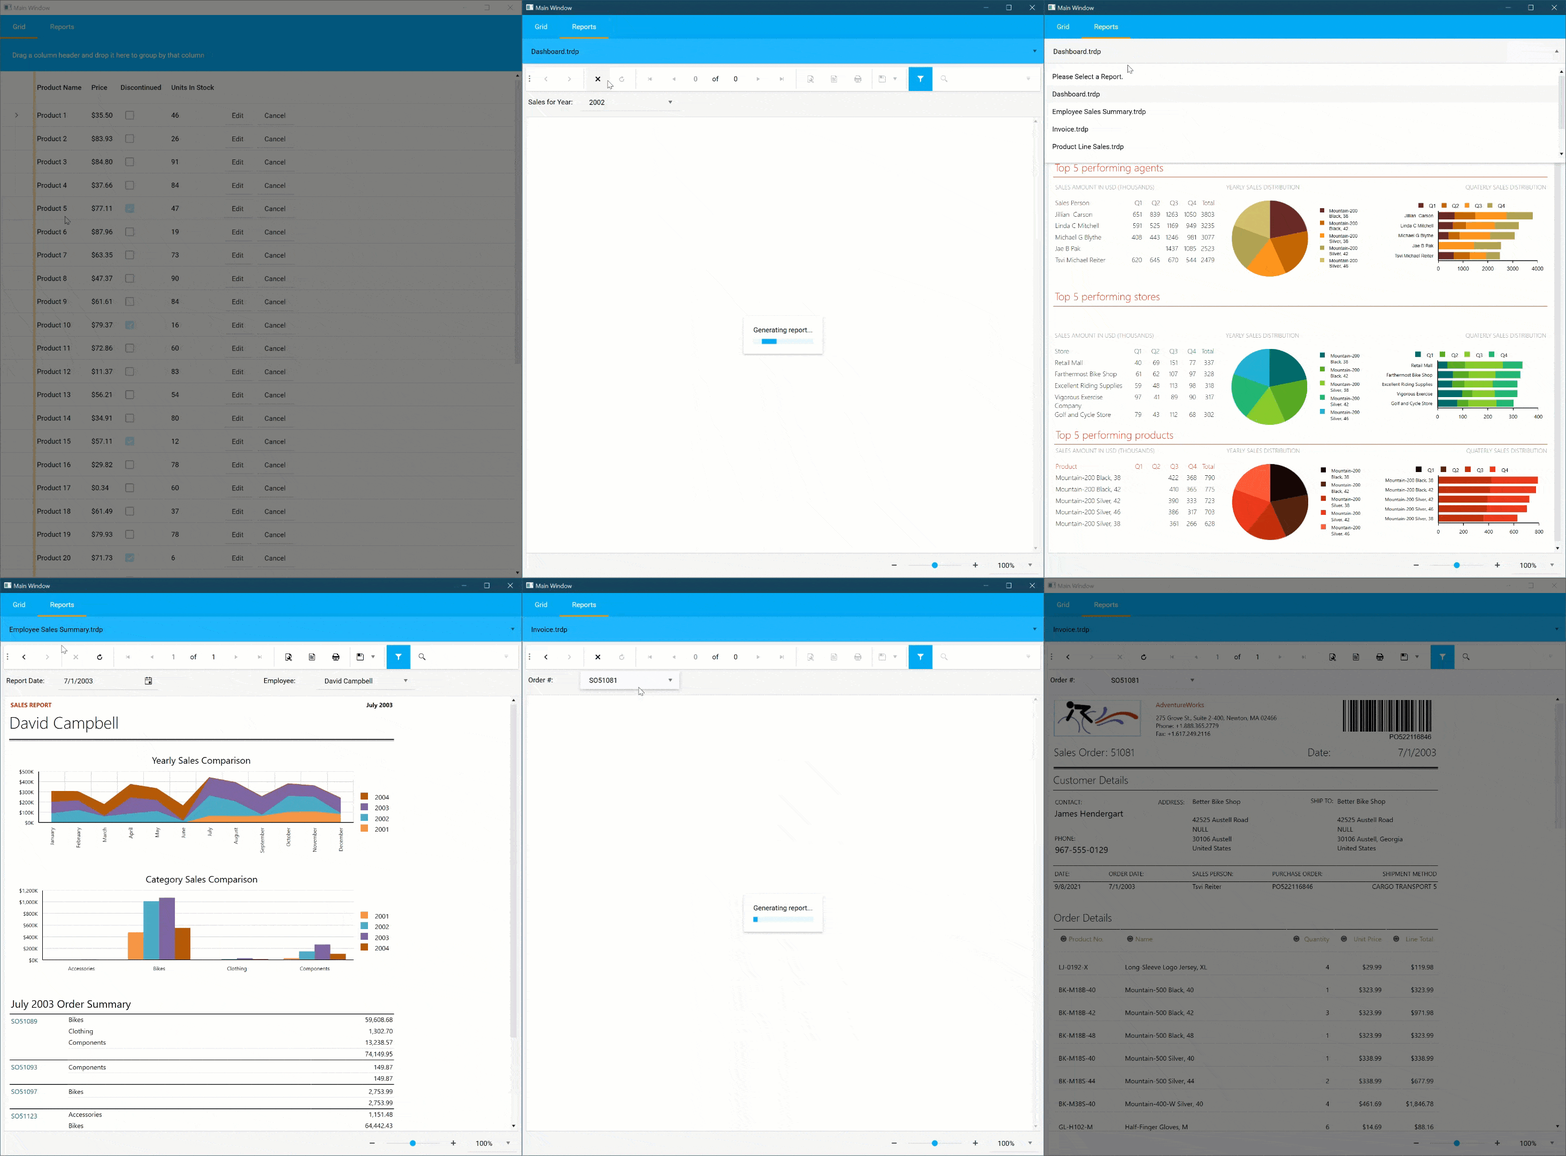 Figure 10: WPF Report Viewer Animation
This completes adding the WPF Report Viewer to our WPF Application. We talked about how can use the custom theme and walked through adding the Report Viewer. We found that the overall process is conceptually similar to adding the Report Viewers to our web applications. This is by design and will allow for our users to have some familiarity when using custom styling across products.
Conclusion
In this post, we walked through adding a Report Viewer to our Angular, Blazor and WPF applications. Because theming across products is designed to be simple, we were able to achieve our custom styling right out of the box in each application. This is an important concept behind the Telerik UI and Kendo UI suites. We like to keep everything as simple as possible.
This brings our series for styling across products to a close. I hope the content was enjoyable, and please feel free to comment below or create any issues in the corresponding GitHub repository as well.
Try DevCraft Today
Get started with a Telerik DevCraft Trial today! Our DevCraft tooling is the most powerful collection of Telerik .NET and Kendo UI JavaScript developer tools. It includes modern, feature-rich, professionally designed UI components for web, desktop and mobile applications; embedded reporting and report management solutions; document processing libraries; automated testing and mocking tools.
DevCraft will arm your developers with everything needed to deliver outstanding applications in less time and with less effort. With award-winning technical support delivered by the developers who built the products and a ton of resources and trainings, you can rest assured that you have a stable provider to rely on for your everyday challenges along your software development journey.

Eric Rohler
Eric was a Technical Support Engineer at Progress.

