Kendo UI for jQuery Is Transformed to ECMAScript Modules

Learn why we transformed our source code from ADM to ESM and see how you can benefit from dynamic script imports with modern browsers in your applications.
With the November release of Kendo UI for jQuery, our source code is transformed from AMD to ECMAScript modules (ESM). You can learn here why we transformed our own source code to ESM and see how you can use dynamic script imports with modern browsers and get huge benefits from this in your applications.
While the current blog post outlines the changes in Kendo UI, the actual benefits from the ESM modules will be available to Telerik UI for ASP.NET Core and MVC server wrappers as well.
If you are relying on the AMD modules, don’t be scared—they are still here and they are shipped in the same locations where they have always been.
Why Did We Move to ESM?
The team invested serious time and effort when rewriting the Kendo UI for jQuery source code to ESM to ensure proper completion and smooth distribution of our pipeline. With that, we managed to come up with a solution to both move to a new, more recent module system without breaking changes for anyone who might want to use the good old AMD/UMD modules with the Kendo UI bundles distributed.
You can also find some useful information about that in our documentation: ECMAScript Modules.
Briefly, the benefits from moving to ESM are:
- Using modern module loaders and bundlers and support the modern bundling concept within Kendo UI for jQuery.
- Compiling JavaScript modules so that you can let the browser take care of script dependencies and dynamically load them (check out more: The JavaScript Modules).
- Using the distributed Kendo UI bundles and utilizing dynamic script loading can lead to better performance for your applications (check out more: How to Improve Performance).
- Updating the NPM packages with different types of module systems to match ES, CommonJS and AMD/UMD (check out more: Updates in the NPM packages).
- And the best part is that using ECMAScript opens the doors for more possible improvements in the Kendo UI for jQuery based products (check out more: The Future).
How To Use the New Modules
The JavaScript Modules
The JavaScript modules are scripts that the browser will address as ECMAScript modules and enable dynamic loading. Shortly, enable
import and export statements so that the browser can load script dependencies on its own.
How is this so different from the good old JavaScript files? The difference is huge when using large libraries like Kendo UI for jQuery. If you want all the code from the library, you would need to load the kendo.all.js file which, honestly,
is a large one. That causes the browser to load one tremendous file while you might need only a portion of it for your page to work.
If you had the requirement to optimize the page load—the kendo.all.js would be a pain. And you would need to go in and trim out dependencies according to the components you are using and their feature-sets you need. And you would refer
to our documentation (Creating Your Own Custom Bundles) in order to either create a custom bundle, which would output again a large
bundle. Or add only the specific pre-bundle scripts that you would need, which would end up to a list of more than 10 or 20 js files.
What JavaScript modules enable you is to have one single file as a script reference (e.g., <script src="./js/index.js" type="module"></script>) and use import and export statements to dynamically load
all other dependencies.
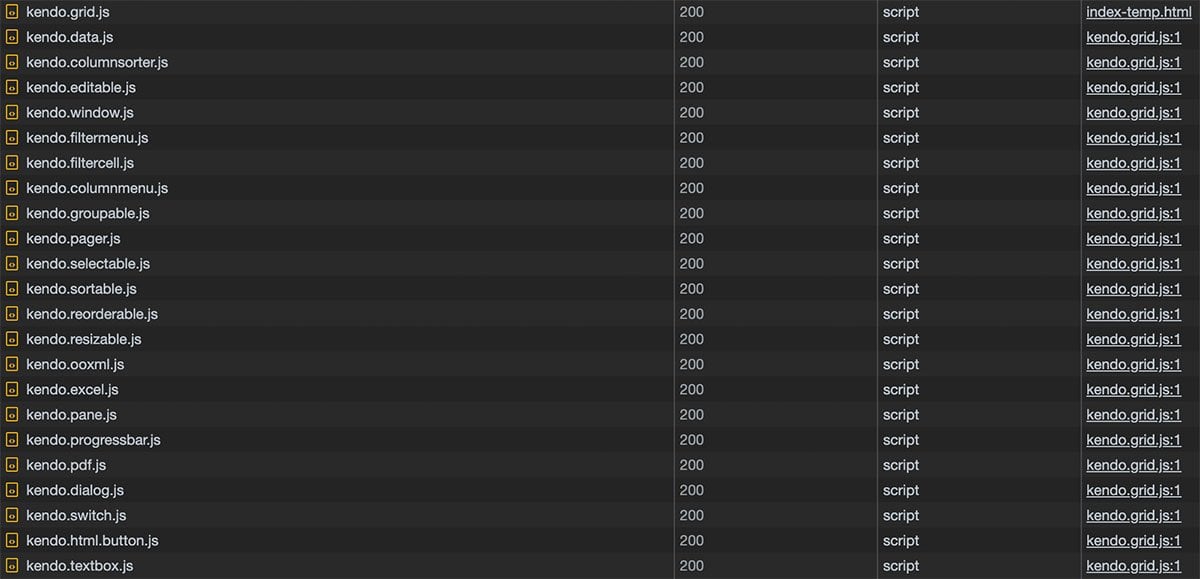
Let’s take the Kendo UI Grid as an example. In order to load the Grid component with all the features, you would need to list 70ish js files (you can check the list here: Data Management Components). With the JavaScript modules, you are required to add a reference or import only one file—the main bundle: <script src="./mjs/kendo.grid.js" type="module"></script>.
And this will let the browser load all other dependencies by itself.

And, yes, a module is loaded only once. That means that if you load another component that relies on an already loaded dependency it will not be fetched again—it is already loaded by the browser and it will be directly used.
All our major distributions (zip bundles, CDN and so on) include compiled JavaScript modules.
1. Using the JavaScript Modules from CDN
In the CDN, the JavaScript Modules are located in the /mjs/ folder.
You can use them like so:
<script src="https://kendo.cdn.telerik.com/2022.3.1109/mjs/kendo.grid.js" type="module"></script>
 <script type="module">
    $("#grid").kendoGrid({
        ...
    });
</script>
or
import 'https://kendo.cdn.telerik.com/2022.3.1109/mjs/kendo.grid.js';
 $("#grid").kendoGrid({
    ...
});
2. Using the JavaScript modules from a downloaded distribution
You can download the distributed bundles from your Telerik account in the download section. In the mjs folder you will find the modules readily available for you to copy to your application and use them.
<script src="./mjs/kendo.grid.js" type="module"></script>
 <script type="module">
    $("#grid").kendoGrid({
        ...
    });
</script>
or
import './mjs/kendo.grid.js';
 $("#grid").kendoGrid({
    ...
});
How To Improve Performance
I think we are all on the same page now—JavaScript modules are cool. But let’s see how they can improve our applications and the loading performance.
Let’s say we have a very simple application with a button that opens a dialog/window and loads a grid with a bunch of data in it. Using the Kendo UI for jQuery components and the plain JS files will look something like this:
index.html
<html>
    <head>
        <meta content="initial-scale=1.0, maximum-scale=1.0, user-scalable=no" name="viewport">
    </head>
    <body>
        <button id="openBtn">Open</button>

        <div id="gridDialog">
        </div>

        <link async href="./styles/kendo/web/kendo.default-ocean-blue.css" rel="stylesheet" media="screen" />
        <script defer src="./js/jquery/jquery.min.js"></script>
        <script defer src="./js/kendo/js/kendo.all.min.js"></script>
        <script defer src="./js/products.js"></script> <!-- The data for the grid -->
        <script defer src="./js/index.js" type="module"></script>
    </body>
</html>
index.js
$('#openBtn').kendoButton({
    click: openDialog
});

function openDialog() {
    const gridDialog = $("#gridDialog").kendoDialog({
        width: 400,
        content: '<div id="dialogContent"></div>'
    }).data("kendoDialog");

    gridDialog.one("show", async () => {
        const gridElm = $('<div id="grid"></div>').appendTo("#dialogContent");
        initGrid(gridElm);
    });

    gridDialog.open();
}

function initGrid(gridElm) {
    gridElm.kendoGrid({
        dataSource: {
            data: products,
            schema: {
                model: {
                    fields: {
                        ProductName: { type: "string" },
                        UnitPrice: { type: "number" },
                        UnitsInStock: { type: "number" },
                        Discontinued: { type: "boolean" }
                    }
                }
            },
            pageSize: 20
        },
        height: 550,
        scrollable: true,
        sortable: true,
        filterable: true,
        pageable: {
            input: true,
            numeric: false
        },
        columns: [
            "ProductName",
            { field: "UnitPrice", title: "Unit Price", format: "{0:c}", width: "130px" },
            { field: "UnitsInStock", title: "Units In Stock", width: "130px" },
            { field: "Discontinued", width: "130px" }
        ]
    });
}
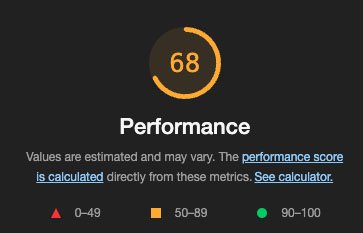
Quite a simple example that loads fast and everything works fine. Let’s check the performance score by running a check with the Lighthouse tool in Chrome’s dev console.

At this point, if load performance is a thing for you, you should attempt to optimize the application. With the plain JS Kendo UI bundles, you could more or less save the day by listing only the script that you need, create a custom Kendo UI bundle with only the code you need, and come up with a score of 85-90. You could also apply dynamic loading by using third-party methods or some other magic and possibly get a bit higher than 90. But all this requires a lot of back and forth with the code. Not to mention that it makes it unreadable and unmaintainable (in most cases).
Now let’s see how we can use the browser’s module system to make things better. First, we will need to step back and separate all code into modules that rely on dependencies.
index.html
<html>
    <head>
        <meta content="initial-scale=1.0, maximum-scale=1.0, user-scalable=no" name="viewport">
    </head>
    <body>
        <button id="openBtn">Open</button>

        <div id="gridDialog">
        </div>

        <link async href="./styles/kendo/web/kendo.default-ocean-blue.css" rel="stylesheet" media="screen" />
        <script async  src="./js/index.js" type="module"></script>
    </body>
</html>
index.js
import './jquery/jquery.min.js';
import './kendo/mjs/kendo.button.js';

$('#openBtn').kendoButton({
    click: async () => {
        const { openDialog } = await import("./dialog.js");

        openDialog();
    }
});
dialog.js
import './kendo/mjs/kendo.dialog.js';

export function openDialog() {
    const gridDialog = $("#gridDialog").kendoDialog({
        width: 400,
        content: '<div id="dialogContent"></div>'
    }).data("kendoDialog");

    gridDialog.one("show", async () => {
        const { initGrid } = await import("./grid.js");
        const gridElm = $('<div id="grid"></div>').appendTo("#dialogContent");

        initGrid(gridElm);
    });

    gridDialog.open();
}
grid.js
import './kendo/mjs/kendo.grid.js';

export async function initGrid(gridElm) {
    const { products } = await import("./products.js");

    gridElm.kendoGrid({
        dataSource: {
            data: products,
            schema: {
                model: {
                    fields: {
                        ProductName: { type: "string" },
                        UnitPrice: { type: "number" },
                        UnitsInStock: { type: "number" },
                        Discontinued: { type: "boolean" }
                    }
                }
            },
            pageSize: 20
        },
        height: 550,
        scrollable: true,
        sortable: true,
        filterable: true,
        pageable: {
            input: true,
            numeric: false
        },
        columns: [
            "ProductName",
            { field: "UnitPrice", title: "Unit Price", format: "{0:c}", width: "130px" },
            { field: "UnitsInStock", title: "Units In Stock", width: "130px" },
            { field: "Discontinued", width: "130px" }
        ]
    });
}
products.js
export const products = [{
    ProductID : 1,
    ProductName : "Chai",
    SupplierID : 1,
    CategoryID : 1,
    QuantityPerUnit : "10 boxes x 20 bags",
    UnitPrice : 18.0000,
    UnitsInStock : 39,
    UnitsOnOrder : 0,
    ReorderLevel : 10,
    Discontinued : false,
    Category : {
        CategoryID : 1,
        CategoryName : "Beverages",
        Description : "Soft drinks, coffees, teas, beers, and ales"
    }
},
    ....
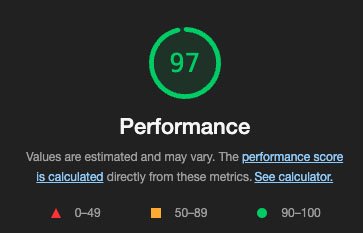
Now let’s run a performance check once more.

This score is more satisfactory. And now we have more readable code with good separation, which makes it better than before. Plus, we can take advantage and reuse parts of the code we write in our applications.
A bit more drilling down will explain more why using dynamic loading and modules save the day. In the example above, we see that none of the huge scripts (kendo.dialog.js and kendo.grid.js) are loaded until the button is clicked.
Therefore, scripts are loaded only when the end user requires a specific functionality in your application. In short, with initial load, only the CSS and the scripts for the Button are loaded. The rest is handled by the browser.
Using JavaScript Modules in Telerik UI for ASP.NET MVC and Core
The new modules are available in the Telerik UI for ASP.NET MVC and Core bundles as well. You can find them in the mjs folder. Using them requires deferred initialization.
This is an example how to use a Telerik UI for ASP.NET Core Grid component with the module system:
(Html.Kendo().Grid<My_App.Models.ProductViewModel>()
    .Name("Grid")
    .Columns(columns =>
    {
        columns.Bound("productName");
        columns.Bound("unitPrice");
    })
    .DataSource(dataSource => dataSource
        .Custom()
        .Transport(tr => tr.Read("Products_Read", "Grid"))
        .Schema(sc => sc.Data("data"))
    )
    .Deferred()
)

@section Scripts {
<script type="module">
    import '@Url.Content("/js/mjs/kendo.grid.js")';
    import '@Url.Content("/js/mjs/kendo.aspnetmvc.js")';

    @Html.Kendo().DeferredScripts(false)
</script>
}
Updates in the NPM Packages
The NPM packages (@progress/kendo-ui and kendo-ui-core) are extended with module and browser fields so that you can include scripts according to the module system of your project.
That means that now you can instruct the module loader/bundler (according to its specific configuration) to get the specific module system from the NPM package so that you do not need to alter the preferred compiler/transpiler.
Note that WebPack uses the
browserfield with priority. You can check that from here as well: WebPack docs.
For example, using WebPack with ECMAScript-based application, you can set up the mainFields option to get the module field:
...
  resolve: {
    mainFields: [ 'module', 'browser', 'main' ]
  },
...
or make an alias:
  resolve: {
    alias: {
      '@progress/kendo-ui': path.resolve(__dirname, 'node_modules/@progress/kendo-ui/esm/kendo.all.js')
    },
  },
Or you can configure it to use CommonJS modules:
...
  resolve: {
    mainFields: [ 'main', 'browser', 'module' ]
  },
...
or make an alias:
  resolve: {
    alias: {
      '@progress/kendo-ui': path.resolve(__dirname, 'node_modules/@progress/kendo-ui/js/kendo.all.js')
    },
  },
Every module loader is different, and you should check the documentation to see how you can set it up according to your needs.
The Future
With this effort, we are looking into new ways to improve the Kendo UI for jQuery and Telerik UI for ASP.NET MVC and Core products. And this step opens new ways to tackle features, functionalities and provide better support.
For example, a small disclosure on what we are working on after releasing the module system is towards better CSP support and an alternative template mechanism.
As always, we are open to feedback. So if you happen to have a suggestion or idea that would make your life better with our products do not hesitate to contact us through our support channels, Feedback Portal, forums or comments.

Yanko Dzhemerenov
Yanko is a software developer in the Kendo UI team. He started as a support engineer for the ASP.NET AJAX and Kendo UI for jQuery products and later became a developer contributing to the JavaScript Kendo UI and .NET Telerik UI products. Besides his passion for web technologies, he loves being with his family and enjoys his photography hobby.

