Improving Performance With Distributed Caching

Summarize with AI:
Applications that have a large amount of data traffic are subject to performance loss if they do not use some mechanism to reduce the high consumption of access to the database. One way to solve this problem is to use distributed caching.
Using distributed cache can be a great choice to working with applications that transfer a large amount of data, because through it we can greatly reduce the workload, resulting in performance gains.
In this article, we’ll see in practice how to improve the performance of an ASP.NET Core application with distributed caching.
What Is a Distributed Cache?
A distributed cache is a cache shared by multiple app servers. It typically is maintained as an external service and is available for all of the server apps.
A distributed cache has several advantages and can improve the performance and scalability of an ASP.NET Core app. Some of these advantages are:
- Data coherent (consistent) across requests to multiple servers.
- Survives server restarts and app deployments.
- Doesn’t use local memory.
This article uses Redis to configure the distributed caching, but other resources can be used too.
What Is Redis?
Redis is an open-source (BSD licensed), in-memory data structure store used as a database, cache and message broker.
Redis provides many data structures like strings, hashes, lists, queries and complex types. It is a NoSQL-based database storing data in an extremely fast key-value format. With high popularity, Redis is used by companies like Stackoverflow, Twitter and Github.
For the example used in this article, Redis is a great choice, as it makes it possible to implement a high-availability cache and reduce data access latency and improve application response time.
Installing Redis
There are two ways to run Redis. Let’s look at both.
1. Running Redis Manually
The first way is to run Redis manually. To do this, go to this link Redis download and download the file “redis-x64-3.0.504.zip,” then extract it on your machine and run the file “redis-server.exe.”
A window will open and Redis will be running on your machine as long as you don’t close the window.
2. Running Redis in a Docker Container
Another way is to run Redis in a Docker container. As a prerequisite, you need to have Docker installed. Then, on the PowerShell console run the following command:
docker run --name my-redis -p 6379:6379 -d redis
If you want to check if the container is running, you can use the command below:
docker container ps
As in the image below, you can check the execution of the newly created container.
Creating the Application and Integrating With Redis Cache
To make use of the distributed cache using Redis, let’s create an ASP.NET Core minimal API application, available in .NET 6.
Through an endpoint, our application will access the Orders table from RavenDB’s Northwind database and return the list of all orders. We will have almost 1,000 records and we will be able to compare performance using the Redis cache.
You can access the complete source code of the project at this link: Source Code.
Prerequisites
In this article, we will be using RavenDB as the database, so you need to set up the local RavenDB server and load the sample data.
To do this, you can use this tutorial: Configuring RavenDB. It’s very easy to follow.
Creating the Application
To create the application, use the command below:
dotnet new web -o OrderManagerOpen the project with your favorite IDE. In this example, I will be using Visual Studio 2022.
Double-click on the project (OrderManager.csproj) and add the code below to install the dependencies. Next, recompile the project.
  <ItemGroup>
    <PackageReference Include="RavenDB.Client" Version="5.3.1" />
  </ItemGroup>
Creating the Global Usings
“Global usings” are features available on C# 10 and make it possible to use references for any class in the project. To use this feature, create a folder called “Helpers” and inside it, create a class called “GlobalUsings.” Replace the generated code with the code below. Don’t worry about import errors—later we’ll create the namespaces that don’t exist yet.
global using OrderManager.Models;
global using OrderManager.Raven;
global using Newtonsoft.Json;
global using Raven.Client.Documents;
global using Microsoft.Extensions.Caching.Distributed;
global using System.Text;
Next, let’s create our database entity. So, create a folder called “Models” and inside it, add a class called “Order” and paste the following code into it:
namespace OrderManager.Models;

public record Order
{
    public string Company { get; set; }
    public string Employee { get; set; }
    public double Freight { get; set; }
    public List<Line> Lines { get; set; }
    public DateTime OrderedAt { get; set; }
    public DateTime RequireAt { get; set; }
    public ShipTo ShipTo { get; set; }
    public string ShipVia { get; set; }
    public object ShippedAt { get; set; }

    [JsonProperty("@metadata")]
    public Metadata Metadata { get; set; }
}

public class Line
{
    public double Discount { get; set; }
    public double PricePerUnit { get; set; }
    public string Product { get; set; }
    public string ProductName { get; set; }
    public int Quantity { get; set; }
}

public class Location
{
    public double Latitude { get; set; }
    public double Longitude { get; set; }
}

public class ShipTo
{
    public string City { get; set; }
    public string Country { get; set; }
    public string Line1 { get; set; }
    public object Line2 { get; set; }
    public Location Location { get; set; }
    public string PostalCode { get; set; }
    public string Region { get; set; }
}

public class Metadata
{
    [JsonProperty("@collection")]
    public string Collection { get; set; }

    [JsonProperty("@flags")]
    public string Flags { get; set; }
}
Configuring Connection With RavenDB
Now let’s create the configuration with RavenDB. So, create a new folder named “Raven” and inside it, create a new class called “DocumentStoreHolder” and paste the following code in it:
namespace OrderManager.Raven;

public static class DocumentStoreHolder
{
    private static readonly Lazy<IDocumentStore> LazyStore = new Lazy<IDocumentStore>(() =>
    {
        IDocumentStore store = new DocumentStore
        {
            Urls = new[] { "http://localhost:8080/" },
            Database = "Northwind"
        };

        store.Initialize();

        return store;
    });

    public static IDocumentStore Store => LazyStore.Value;
}
Configuring the Endpoints
The last part of the implementation will be to create the endpoints to consume the data. In the “Program.cs” file, replace the existing code with the code below:
var builder = WebApplication.CreateBuilder(args);

builder.Services.AddDistributedMemoryCache();

var app = builder.Build();

app.MapGet("/orders", () =>
{
    using (var session = DocumentStoreHolder.Store.OpenSession())
    {
        var orders = session.Query<Order>().ToList();

        return orders;
    }
});

app.MapGet("/orders/redis", async (IDistributedCache distributedCache) =>
{
    try
    {
        using (var session = DocumentStoreHolder.Store.OpenSession())
        {
            var orders = session.Query<Order>().ToList();

            var cacheKey = "orderList";

            string serializedOrders;

            var orderList = new List<Order>();

            var redisOrders = await distributedCache.GetAsync(cacheKey);

            if (redisOrders != null)
            {
                serializedOrders = Encoding.UTF8.GetString(redisOrders);
                orderList = JsonConvert.DeserializeObject<List<Order>>(serializedOrders);
            }
            else
            {
                orderList = orders.ToList();

                serializedOrders = JsonConvert.SerializeObject(orderList);

                redisOrders = Encoding.UTF8.GetBytes(serializedOrders);

                var options = new DistributedCacheEntryOptions()
                      .SetAbsoluteExpiration(DateTime.Now.AddMinutes(10))
                      .SetSlidingExpiration(TimeSpan.FromMinutes(2));

                distributedCache.SetAsync(cacheKey, redisOrders, options);
            }
            return orderList;
        }
    }
    catch (global::System.Exception ex)
    {
        throw;
    }
});

app.Run();
In the “/orders/redis” endpoint, a check is made if the data exists in the cache. If any does, it is returned instantly, which makes the query very fast. If not, the query is made in the database, and then the data is written to the Redis cache so that in the next query, it can be accessed in the cache.
Testing Query Time With Fiddler
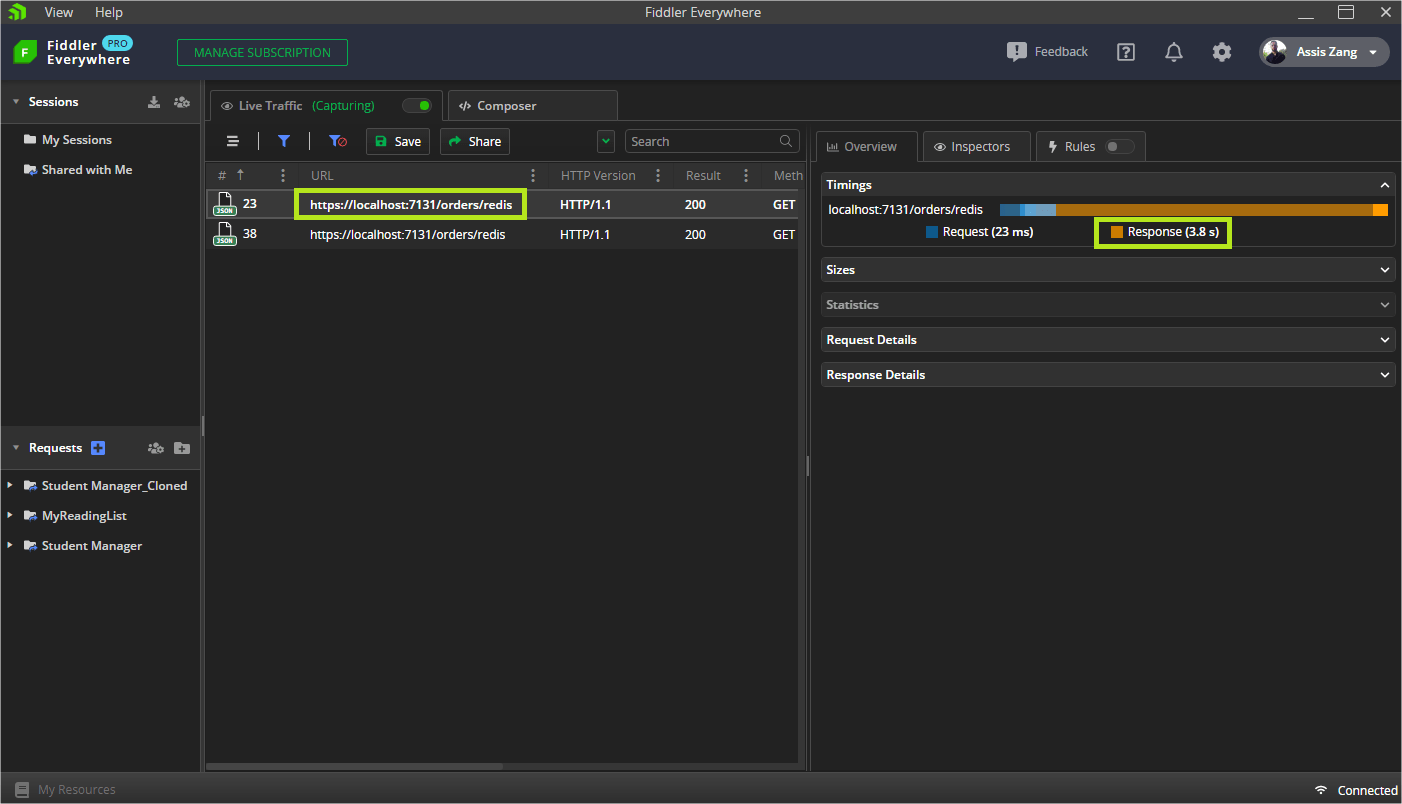
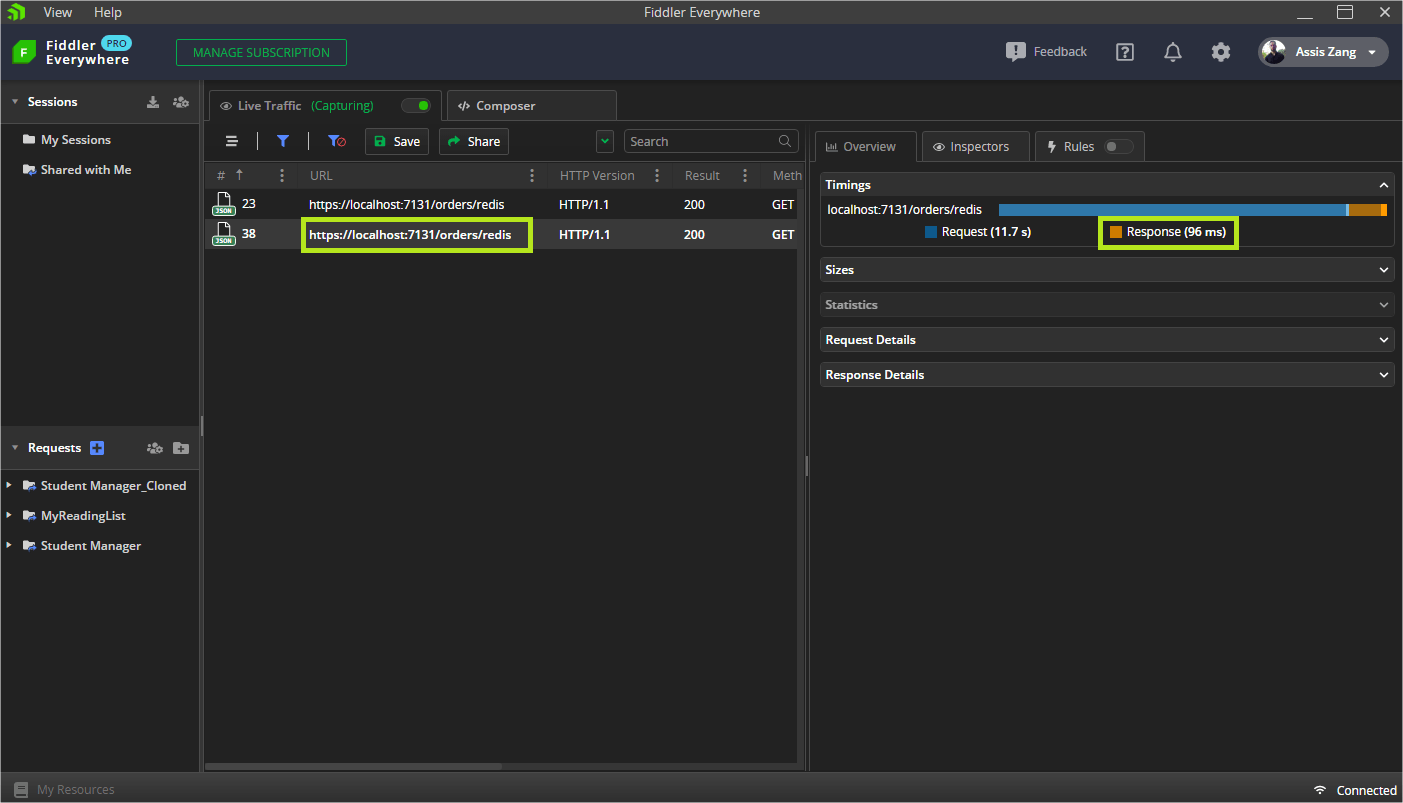
In this example, Fiddler Everywhere will be used to perform the request.
In the first image, we make the request to the application on the Redis endpoint. In this case, the data doesn’t exist in the cache yet, so the response time was 3.8 seconds.
In the second image, the data already exists in the cache, as the first request made the recording, so the response was much faster (96 milliseconds).
Conclusion
In this article, we saw what a distributed cache is, its advantages in the use of fast and consistent data, and some features related to it with Redis to record the data.
Also, we created an application to demonstrate the use of distributed cache and we checked how fast the queries are when using it.
The greater the data mass, the greater the performance when using a distributed cache. So feel free to use it in your applications.


