Connecting a .NET Application With MongoDB Atlas

Summarize with AI:
You have probably heard of MongoDB, one of the most popular NoSQL databases today. In this article, we are going to create an application in .NET 6 and connect it to MongoDB Atlas simply and objectively.
Something that is strictly linked to software development is databases, so software developers must be familiar with this subject. A database that has been standing out in recent years is MongoDB, which is a NoSQL database and has a valuable resource, the MongoDB Atlas.
In this article, we’ll have an introduction to MongoDB Atlas, we’ll build a .NET 6 application from scratch, and we’ll connect it to the database in the Atlas cluster.
Creating the .NET 6 Application
You can access the complete source code of the project at this link: Source Code.
The application used in the example will be a minimal API available in .NET 6. So, you need to have the .NET 6 SDK installed. Link to download: .NET 6 SDK.
To create the application, use the command below:
dotnet new web -o StudentManagerOpen the project with your favorite IDE. In this example, I will use Visual Studio 2022.
Double-click on the project (StudentManager.csproj) and add the following code to install the dependencies, next recompile the project.
  <ItemGroup>
	<PackageReference Include="MongoDB.Driver" Version="2.13.2" />
	<PackageReference Include="Swashbuckle.AspNetCore" Version="6.2.3" />
	<PackageReference Include="Swashbuckle.AspNetCore.Swagger" Version="6.2.3" />
	<PackageReference Include="Swashbuckle.AspNetCore.SwaggerGen" Version="6.2.3" />
	<PackageReference Include="Swashbuckle.AspNetCore.SwaggerUI" Version="6.2.3" />
  </ItemGroup>
Creating the Global Usings
“Global usings” are features available in C# 10 and they make it possible to use references for any class in the project.
To use this feature, create a folder called “Helpers” and inside it, create a class called “GlobalUsings.” Replace the generated code with the code below. Don’t worry about import errors—later we’ll create the namespaces that don’t exist yet.
global using StudentManager.Models;
global using StudentManager.Data;
global using StudentManager.Services;
global using MongoDB.Bson;
global using MongoDB.Bson.Serialization.Attributes;
global using MongoDB.Driver;
global using Microsoft.Extensions.Options;
global using Microsoft.OpenApi.Models;
Next, let’s create our database entity. So, create a folder called “Models” and inside it, add a class called “Student” and paste the following code into it:
namespace StudentManager.Models;

public record Student
{
    [BsonId]
    [BsonRepresentation(BsonType.ObjectId)]
    public string _id { get; set; }

    [BsonElement("student_name")]
    public string StudentName { get; set; }

    [BsonElement("school")]
    public School School { get; set; }

    [BsonElement("marks")]
    public int[] Marks { get; set; }
}

public record School
{
    [BsonElement("school_id")]
    public int SchoolId { get; set; }

    [BsonElement("name")]
    public string Name { get; set; }

    [BsonElement("address")]
    public string Address { get; set; }

    [BsonElement("city")]
    public string City { get; set; }

    [BsonElement("state")]
    public string State { get; set; }

    [BsonElement("zipcode")]
    public string Zipcode { get; set; }
}
MongoDB Atlas
What is MongoDB Atlas?
MongoDB Atlas is one of the most popular non-relational databases today. As a database service, it provides all of the features of MongoDB, in addition to automating database administration tasks such as database configuration, infrastructure provisioning, patches, scaling events, backups and more.
Configuring MongoDB Atlas
After creating the example application in .NET and implementing the database entity, we will configure MongoDB Atlas. If you are new to MongoDB Atlas, I recommend this guide for creating and configuring your first cluster: MongoDB Atlas Getting Started.
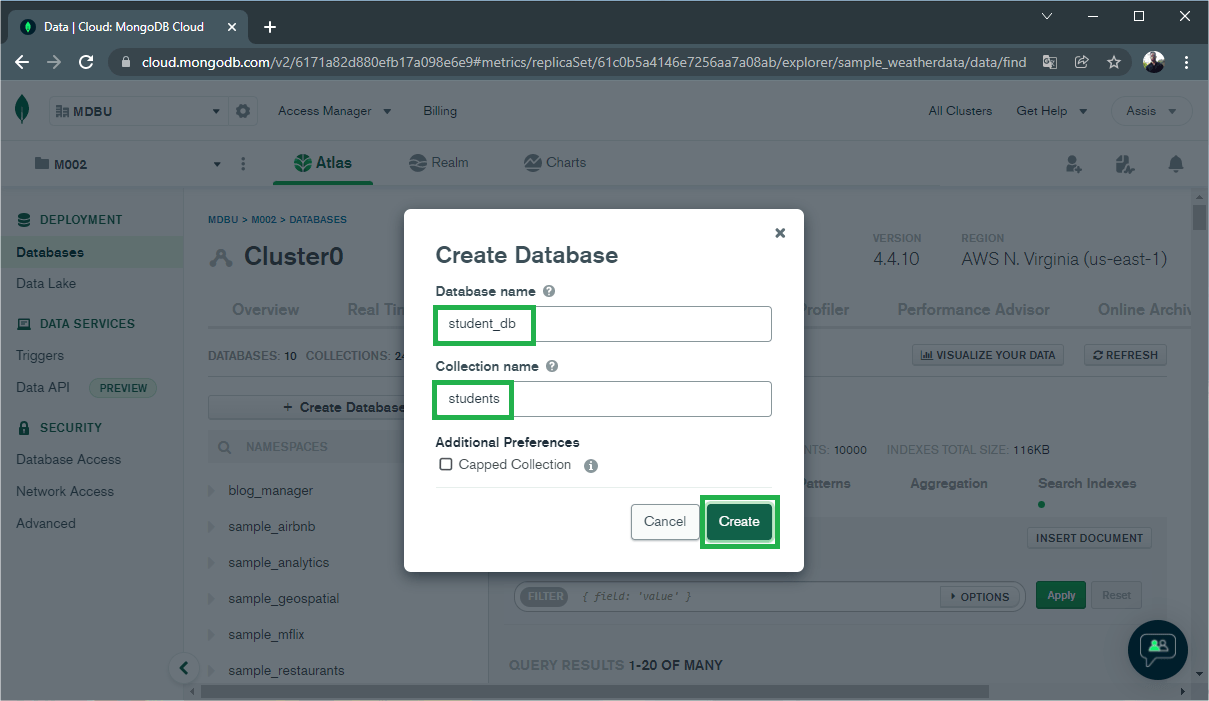
With the cluster configured, we can create a database “student_db” and a collection “students” as in the image below:
Getting the Cluster Connection
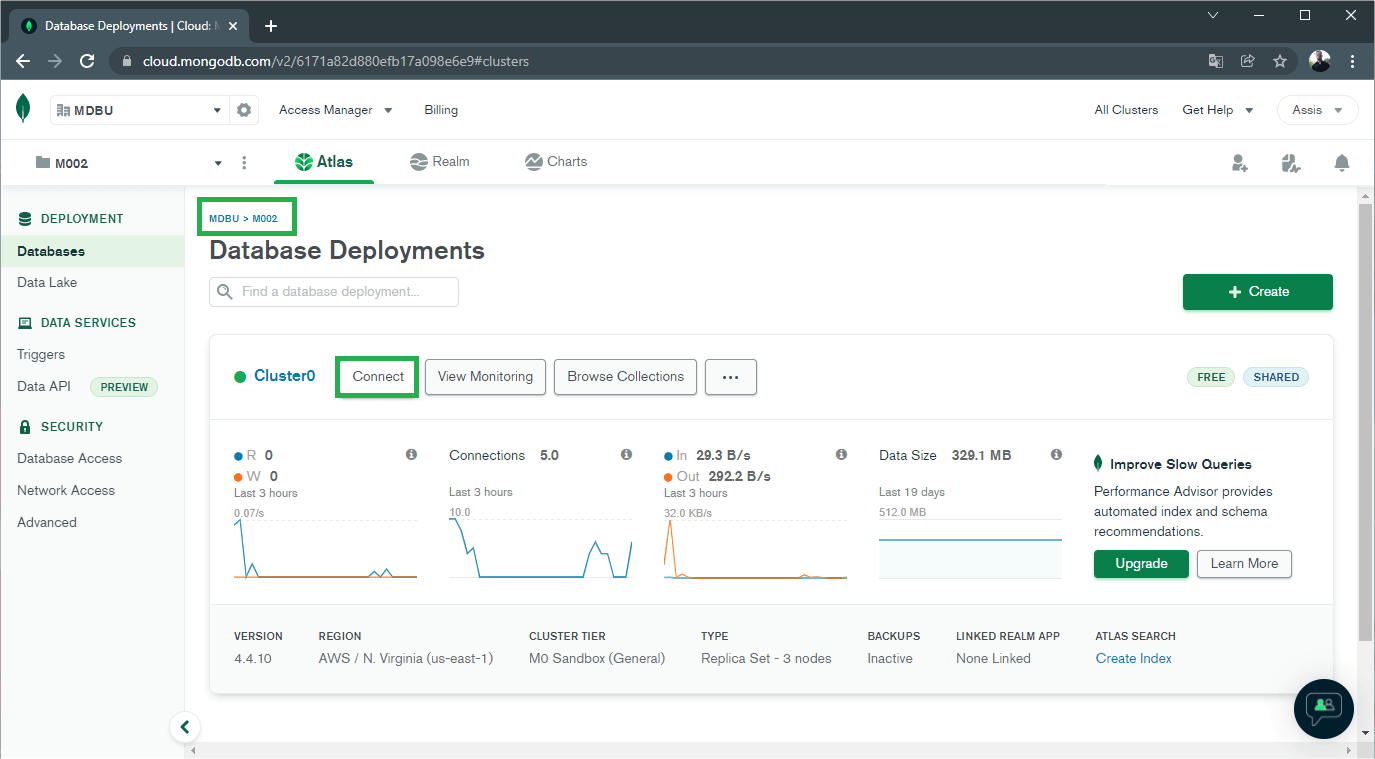
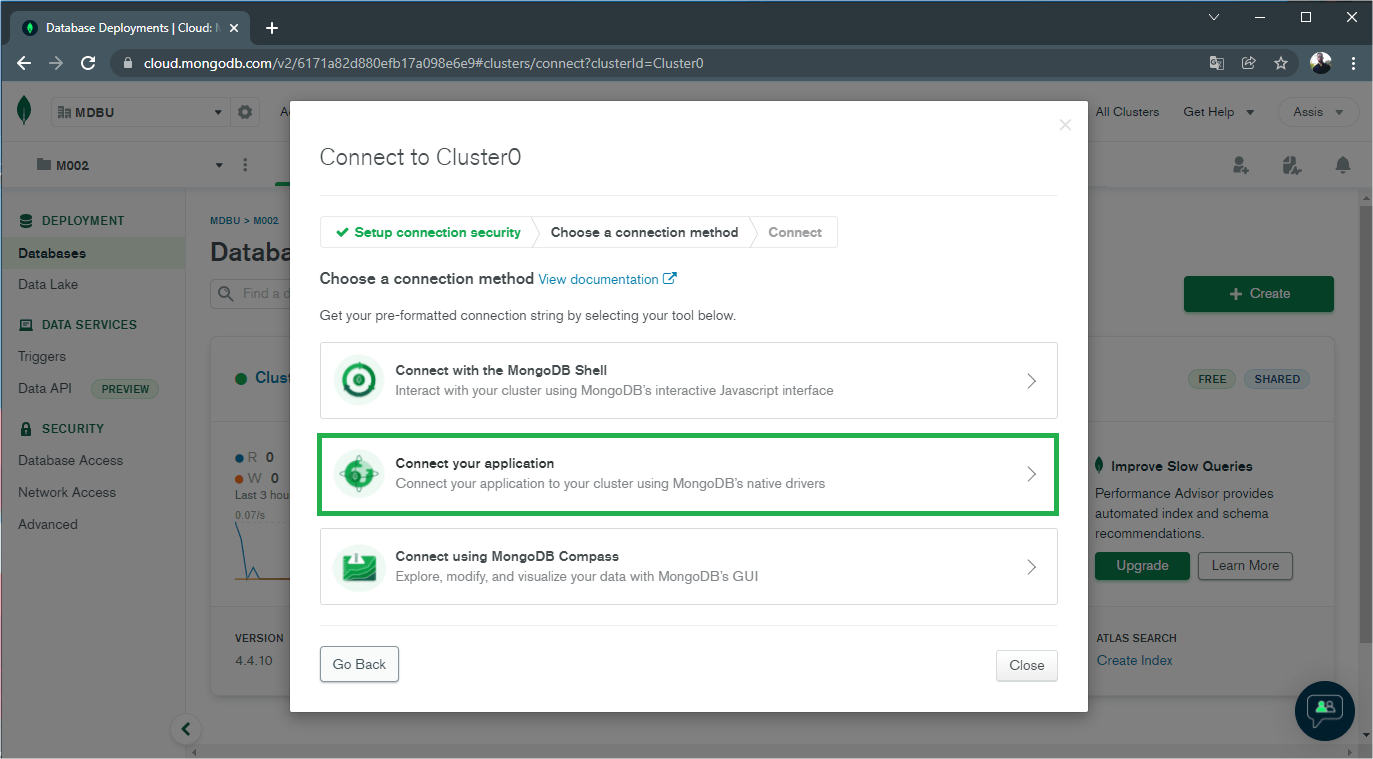
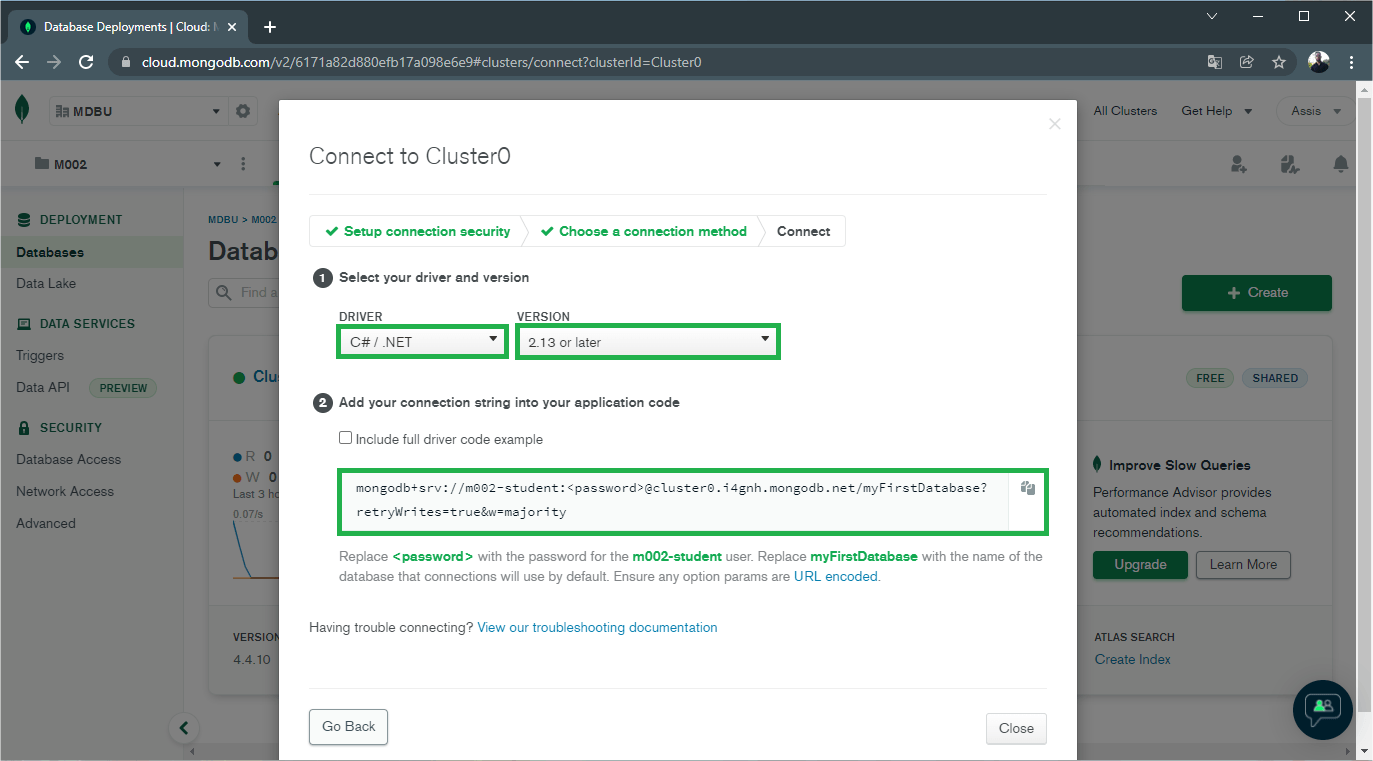
To connect our application with the cluster and have access to the created database, we need to obtain the connection string, which we will use later on. To get it, just follow the steps as shown in the images below:
On your database, click “Connect.”
Select “Connect your application.”
Select driver C#/.NET version 2.13 or later, and you’ll get your connection string.
Setting the Connection String
Now that we have the connection to the cluster, let’s implement the configuration in the project.
So, replace the code from the “appsettings.json” file with the code below:
{
  "StudentDatabaseSettings": {
    "ConnectionString": "<your cluster connection>",
    "DatabaseName": "student_db",
    "CollectionName": "students",
    "IsSSL": true
  },
  "Logging": {
    "LogLevel": {
      "Default": "Information",
      "Microsoft.AspNetCore": "Warning"
    }
  },
  "AllowedHosts": "*"
}
Important! In your cluster connection, replace “<password>” with the password for your cluster user, and replace “myFirstDatabase” with “student_db”. In the code above, replace “<your cluster connection>” with your cluster connection.
Creating the Database Settings
Now, let’s create the class that will contain the variables responsible for storing the values of the connection string created earlier.
So, create a folder called “Data,” and inside it create a new class called “StudentDatabaseSettings” and put the following code in it:
namespace StudentManager.Data;
public class StudentDatabaseSettings
{
    public string ConnectionString { get; set; } = string.Empty;
    public string DatabaseName { get; set; } = string.Empty;
    public string CollectionName { get; set; } = string.Empty;
}
Creating the Service
Now, let’s create a “service” class that will be responsible for creating a database connection and performing CRUD operations.
So, create a new folder called “Services” and inside it, create a new class called “StudentService” and put the code below inside it:
namespace StudentManager.Services;

public class StudentService
{
    private readonly IMongoCollection<Student> _students;

    public StudentService(IOptions<StudentDatabaseSettings> options)
    {
        var mongoClient = new MongoClient(options.Value.ConnectionString);

        _students = mongoClient
            .GetDatabase(options.Value.DatabaseName)
            .GetCollection<Student>(options.Value.CollectionName);
    }

    public async Task<List<Student>> GetAll() =>
        await _students.Find(_ => true).ToListAsync();

    public async Task<Student> Get(string id) =>
        await _students.Find(s => s._id == id).FirstOrDefaultAsync();

    public async Task Create(Student student) =>
        await _students.InsertOneAsync(student);

    public async Task Update(string id, Student student) =>
        await _students.ReplaceOneAsync(s => s._id == id, student);

    public async Task Delete(string id) =>
        await _students.DeleteOneAsync(s => s._id == id);
}
Creating the Endpoints and Configuring the Swagger
Now let’s create the settings to enable the swagger and add the endpoints that will use the Service methods created earlier, plus the dependency injection of the “StudentService” class and the configuration that will fill the values of variables of the database.
In the Program.cs file, replace the existing code with the code below:
var builder = WebApplication.CreateBuilder(args);

// Register your services
RegisterServices(builder.Services);

var app = builder.Build();

// App configurations
ConfigureApp(app);

app.Run();

void RegisterServices(IServiceCollection services)
{
    services.Configure<StudentDatabaseSettings>(builder.Configuration.GetSection("StudentDatabaseSettings"));
    services.AddSingleton<StudentService>();

    services.AddControllers();
    services.AddEndpointsApiExplorer();
    services.AddSwaggerGen(c =>
    {
        c.SwaggerDoc("v1", new OpenApiInfo
        {
            Title = "Contacts API",
            Description = "Storing and sharing contacts",
            Version = "v1"
        });
    });
}

void ConfigureApp(WebApplication app)
{
    // Configure the HTTP request pipeline.
    if (app.Environment.IsDevelopment())
    {
        app.UseSwagger();
        app.UseSwaggerUI();
    }

    app.UseHttpsRedirection();

    app.UseAuthorization();

    app.MapControllers();

    app.MapGet("/api/student", async (StudentService service)
        => await service.GetAll());

    app.MapGet("/api/student/{id}", async (StudentService service, string id)
        => await service.Get(id));

    app.MapPost("/api/student", async (StudentService service, Student student) =>
    {
        await service.Create(student);
        return Results.Created($"/student/{student._id}", student);
    });

    app.MapPut("/api/student/{id}", async (StudentService service, string id, Student updateStudent) =>
    {
        var student = await service.Get(id);

        if (student is null)
            return Results.NotFound();

        updateStudent._id = student._id;

        await service.Update(id, updateStudent);

        return Results.NoContent();
    });

    app.MapDelete("/api/students/{id}", async (StudentService service, string id) =>
    {
        var student = await service.Get(id);

        if (student is null) return Results.NotFound();

        await service.Delete(id);

        return Results.NotFound();
    });
}
Testing the API With Fiddler Everywhere
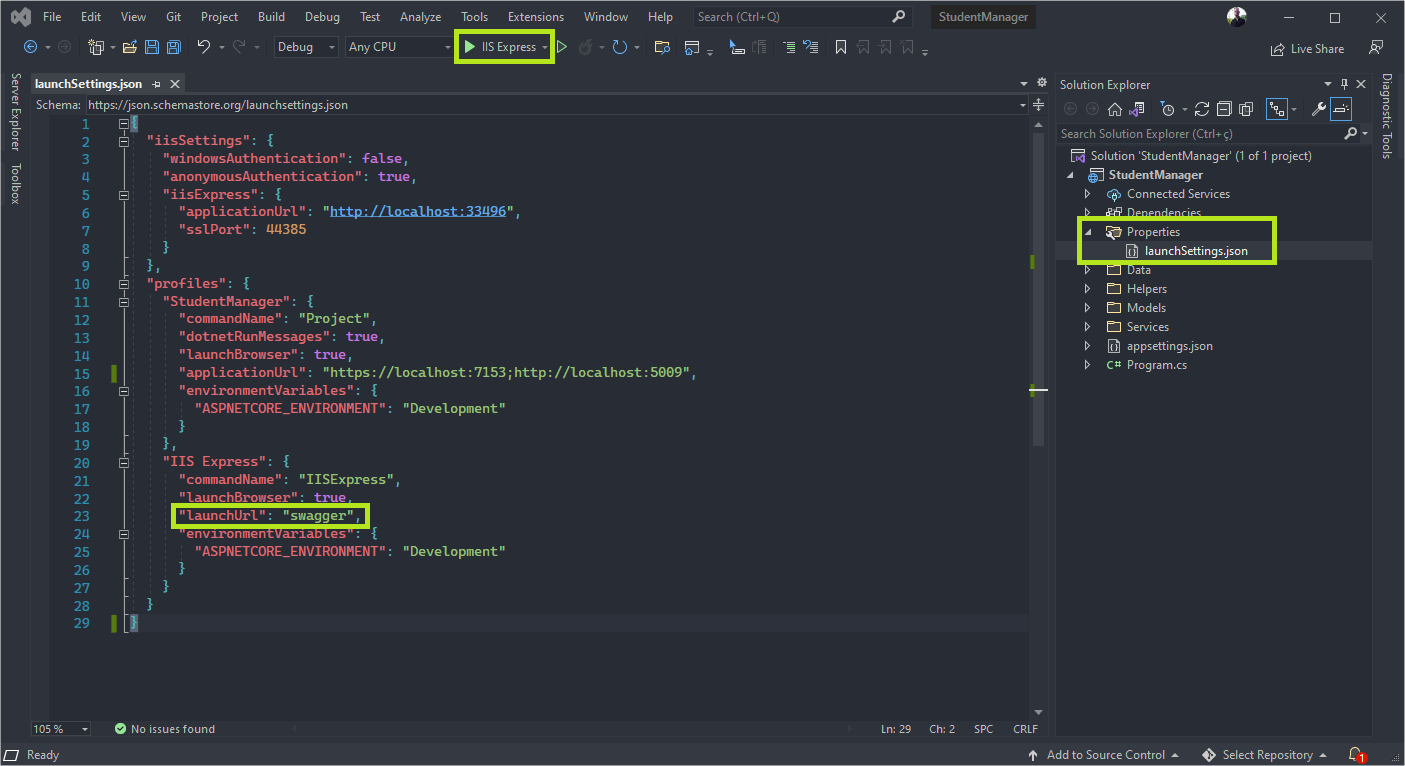
If you followed the previous steps, our application is ready to run and test. For the Swagger page to be displayed when starting the application, you will need to add the configuration as shown in the image below:
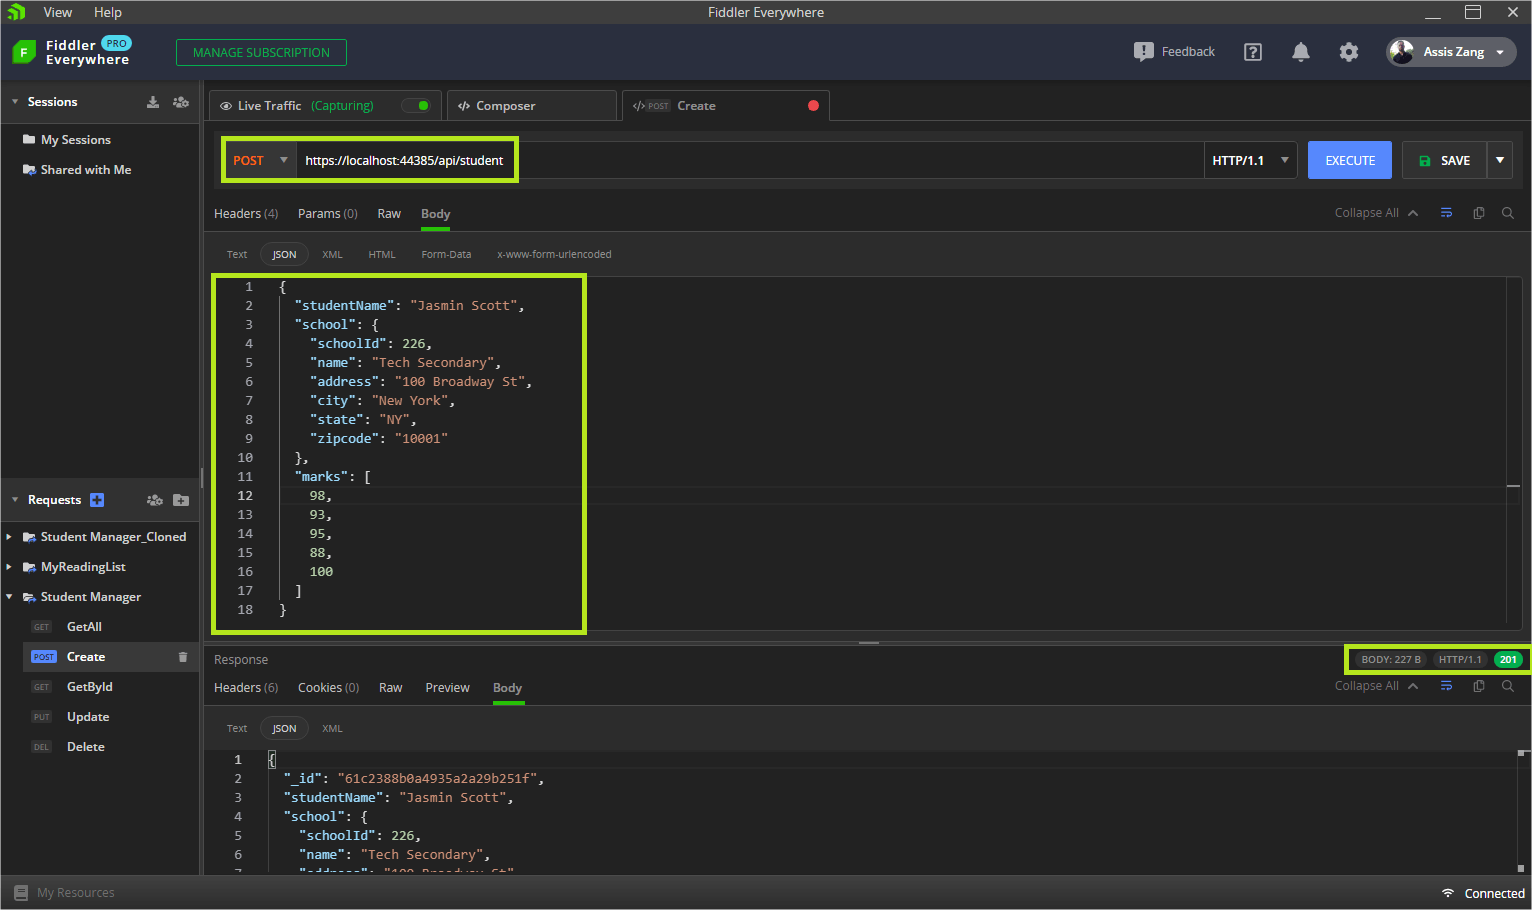
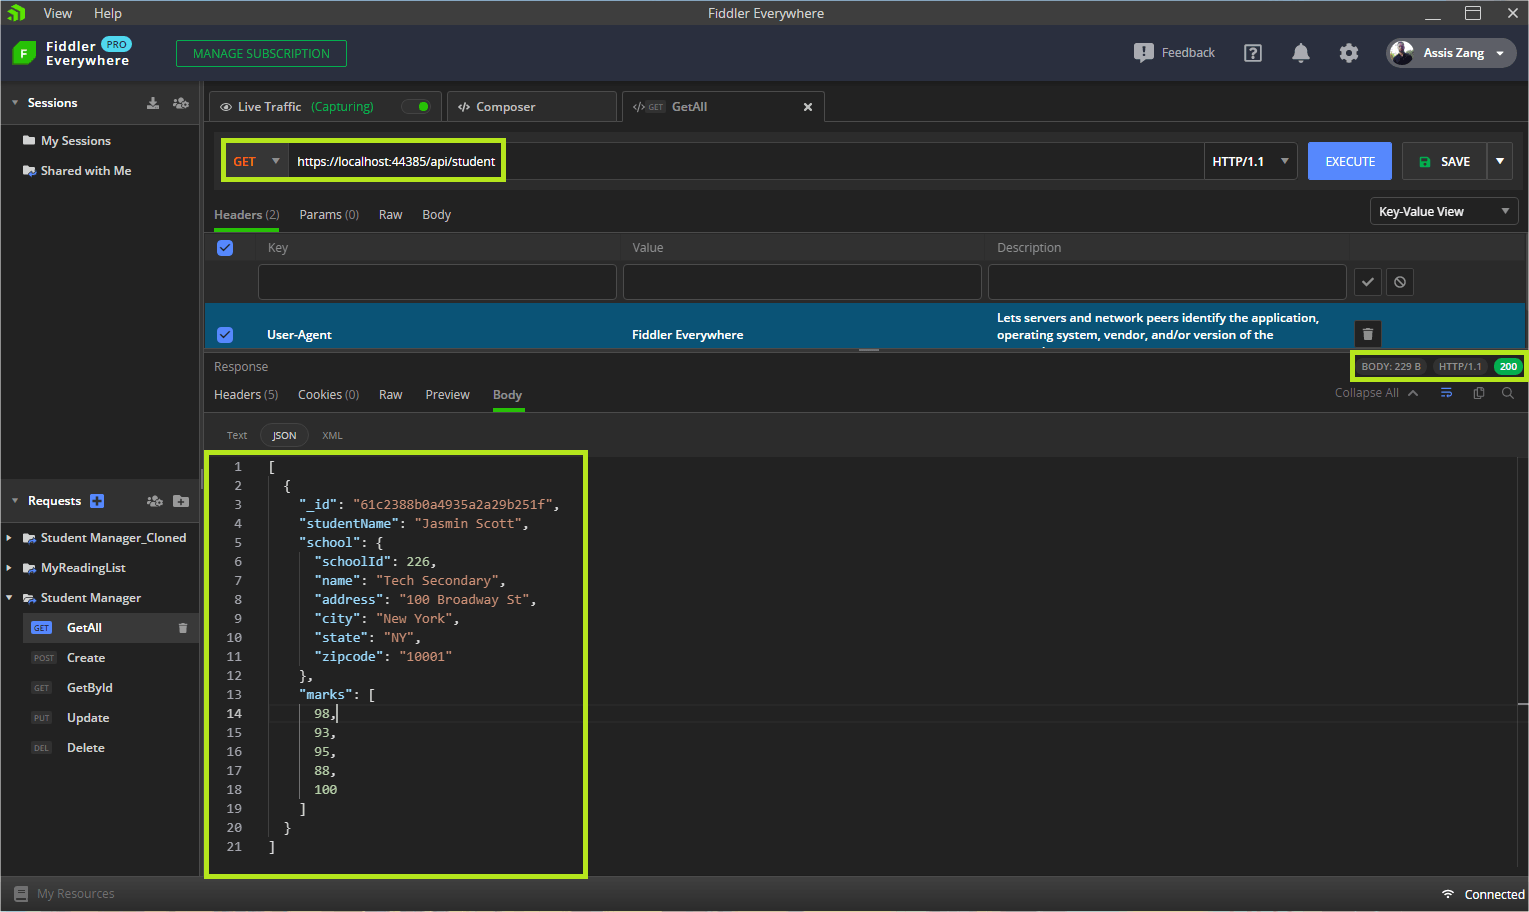
After starting the application, we can do CRUD operations. In this tutorial, I’m using Fiddler Everywhere.
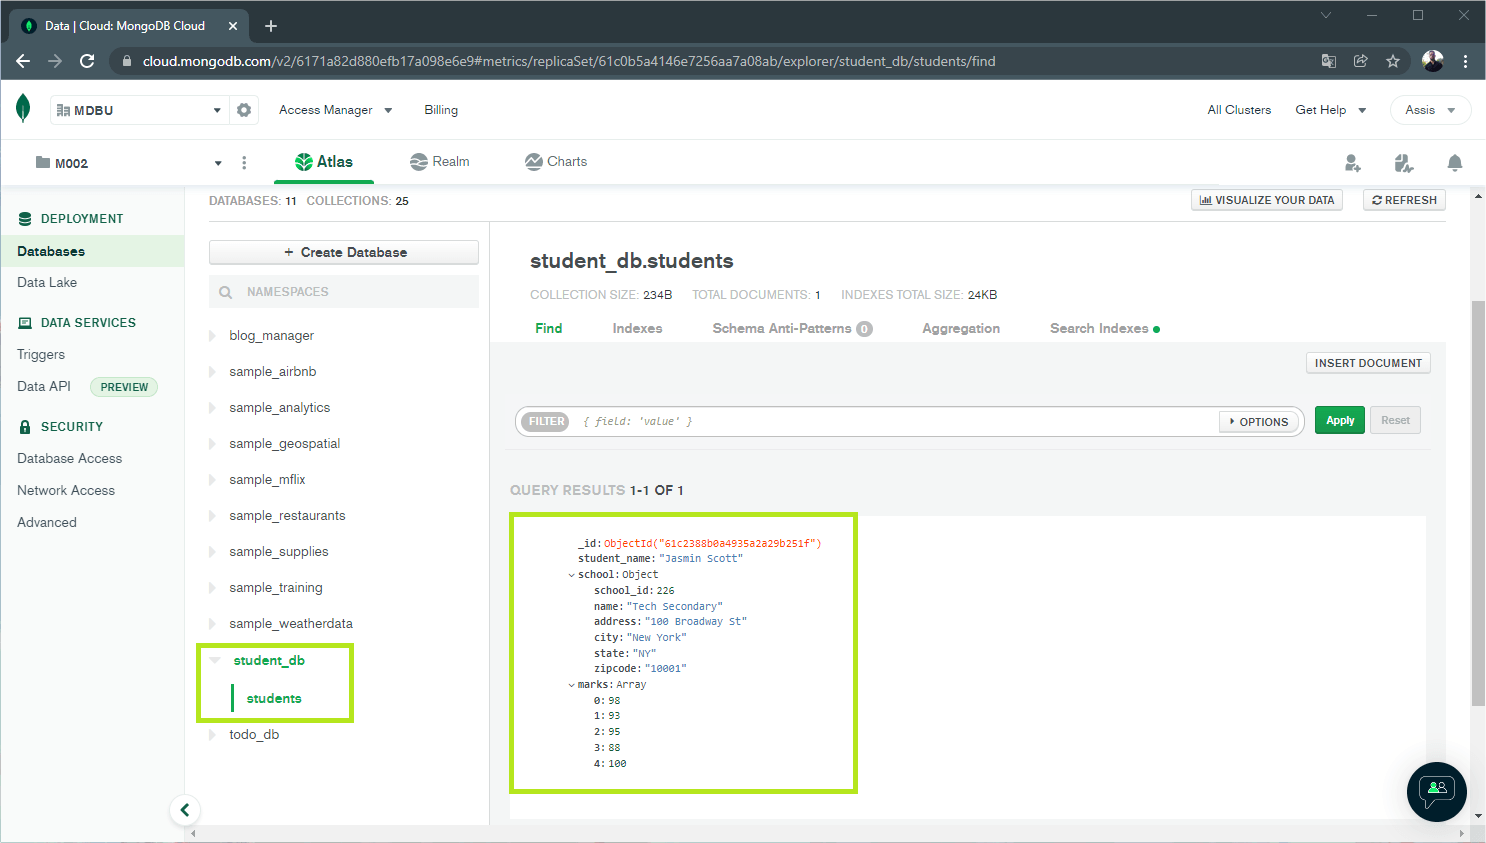
Below is the entry in the MongoDB Atlas database:
Conclusion
In this article, we created a .NET 6 application that performs CRUD operations and uses the MongoDB Atlas as its database.
The advantages of using MongoDB Atlas are many and the union with .NET makes it an even more amazing tool. Feel free to suggest improvements—your feedback is always welcome!

