
Implementing SSO in Vue.js with nuxt-auth and GitHub: A Comprehensive Guide

Summarize with AI:
Single sign-on is a convenient means of authenticating users without the trouble of remembering passwords, but it can be daunting to implement SSO flows with various identity providers. In this guide, I'll show you how to implement SSO in 30 minutes.
Authentication measures are designed to protect systems and user data—however, they often involve steps that can feel cumbersome or tedious. For example, users are advised to use different passwords for each website or app—it’s good advice but, in reality, most users will use one password for several websites/apps.
The truth is, user authentication shouldn’t be complicated. No one should have to remember too many passwords anymore. The introduction of single sign-on (SSO) changed the entire narrative.
SSO allows users to authenticate themselves on multiple applications by logging in only once from an identity provider—what that means is that as a user, with your GitHub account (the identity provider), you can log in to any application without providing a password. This improves user experience, enhances protection and reduces the need for users to remember multiple login credentials.
This guide is designed to walk you through the process of implementing SSO in Vue.js applications using nuxt-auth and GitHub OAuth.
Nuxt-auth is an open-source library for building robust authentication solutions for Nuxt 3 applications. It’s built on the Auth.js library, and it allows you to use diverse authentication strategies, such as:
- OAuth providers (GitHub, Google, Twitter, and Azure)
- Custom OAuth protocols (write it yourself)
- Traditional username and password combinations
- Email Magic URLs
As stated earlier, the focus of this guide is on implementing SSO using GitHub as the OAuth provider. In the end, what we’ll build will look like this:
Prerequisites
The only requirement to follow along with this guide is a basic knowledge of Vue.js and a GitHub account.
Setting up a Nuxt App
We’ll be building the sample application with the Nuxt.js framework, a robust open-source framework based on Vue.js, designed to make building server-side rendering applications (SSR) a lot easier. Let’s get started with setting up a brand new Nuxt app.
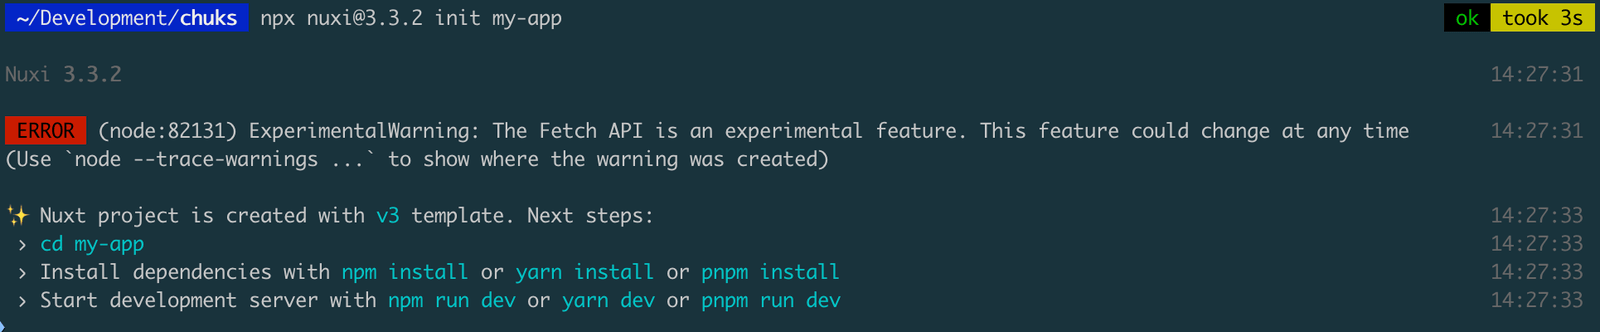
Run the command below to set up a Nuxt application.
npx nuxi@3.3.2 init my-app
You should see an output like the one below when you run the above command:
The file structure should look like this:
.
├── README.md
├── app.vue
├── nuxt.config.ts
├── package.json
├── public
│   └── favicon.ico
├── server
│   └── tsconfig.json
└── tsconfig.json
Move to the project directory using cd my-app and run either npm install (or pnpm install, or yarn depending on your preferred package manager) to install the dependencies.
After completing the steps above, it’s time to test our setup. You can start your local server by running the command npm run dev. Once the server starts, open a new browser tab and navigate to http://localhost:3000.
If the setup process was successful, you will see the default landing page for a Nuxt.js application. It should resemble the following screenshot:
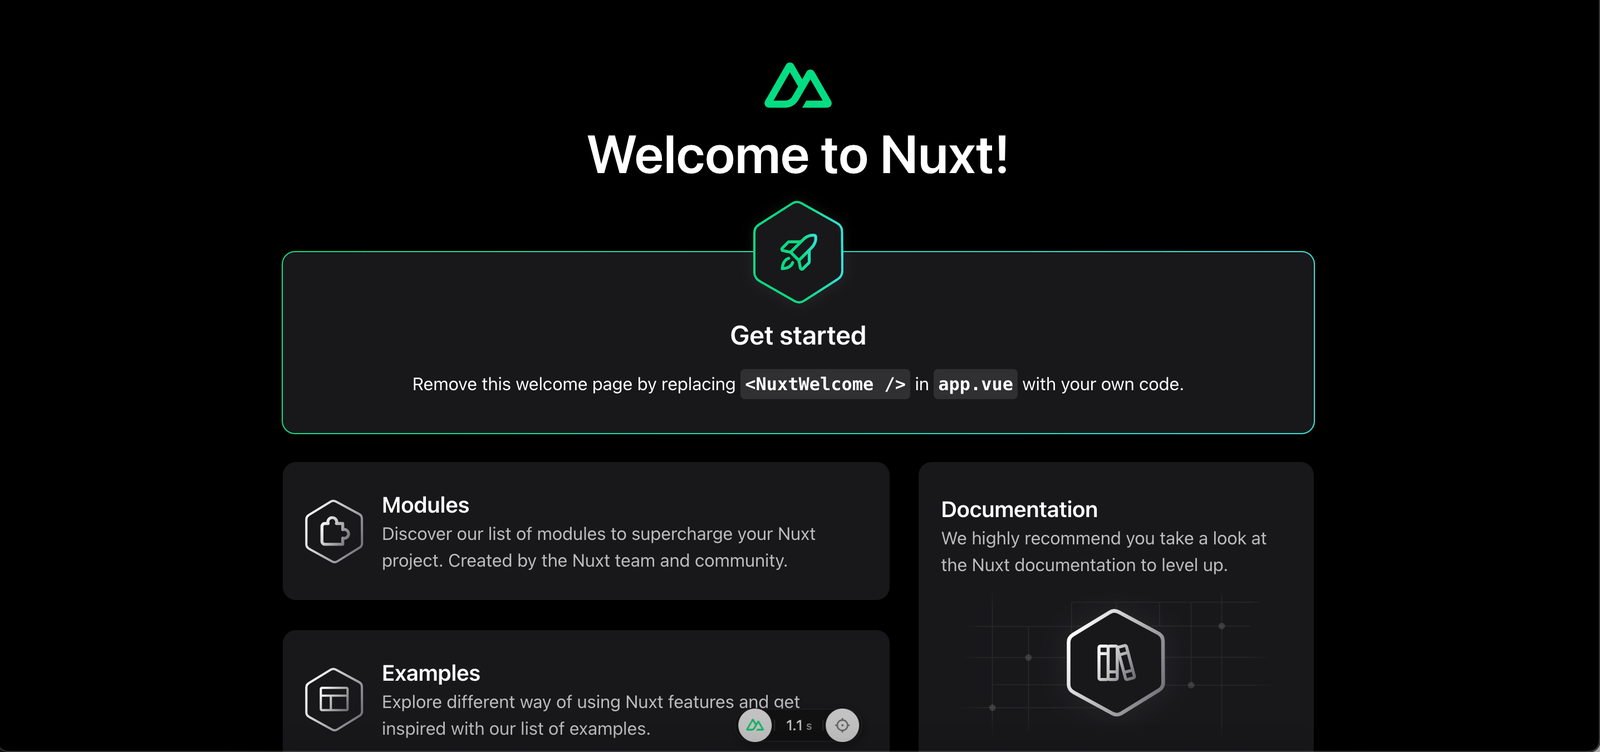
This confirms that your application is running as expected. If you encounter an error or the page doesn’t load, it might be necessary to go back and review the previous steps to check that everything was set up correctly. Now that we have the basic setup done, let’s go ahead and start the integration of nuxt-auth. 👨🏽💻
Integrating nuxt-auth
To integrate nuxt-auth into your Nuxt application, we need to install it alongside its peer dependency, next-auth. Nuxt-auth is the main library we’ll use to build our robust authentication solution, while next-auth is required to provide necessary functionalities like the next-auth providers under the hood. Run the following commands to install these libraries:
npm install @sidebase/nuxt-auth next-auth@4.21.1
It’s important to note that nuxt-auth
0.5.0-rc.0which is the current version as of the time of this writing only supports Nuxt 3 applications.
Once that is done, your next task is to create a server route file that will serve as a catch-all server route for authentication requests. Create a file named [...].ts, which should be in the server/api/auth/ directory of your project.
This file plays an important role in your application: It automatically configures an authentication API that responds to all incoming requests targeting http://localhost/api/auth/.
For this setup to function properly, it’s essential that this file exports the NuxtAuthHandler. To accomplish this, you should include the following code snippet in your [...].ts file:
import { NuxtAuthHandler } from '#auth'
import GithubProvider from 'next-auth/providers/github'

const runtimeConfig = useRuntimeConfig()

export default NuxtAuthHandler({
  pages: {
    signIn: '/login'
  },
  providers: [
    GithubProvider.default({
      clientId: runtimeConfig.public.GITHUB_CLIENT_ID,
      clientSecret: runtimeConfig.GITHUB_CLIENT_SECRET,
    }),
  ],
})
The NuxtAuthHandler function allows you to configure different aspects of the authentication flow, like setting up the supported providers and changing the default login page—in case you want to create a custom login page.
Notice that we’ve added the path to our login page as /login. The providers key takes an array which makes it possible to add multiple providers at once easily. We only have the GitHub provider. However, adding another provider is as simple as importing the provider from the module and adding it to the array. For example, this is how you can add a Twitter provider:
import TwitterProvider from "next-auth/providers/twitter"
...
providers: [
  TwitterProvider({
    clientId: process.env.TWITTER_ID,
    clientSecret: process.env.TWITTER_SECRET
  })
],
...
To see more providers and how you can add them check the Auth.js documentation on adding OAuth providers.
Setting up a GitHub provider requires that we get the GitHub GITHUB_CLIENT_ID and the GITHUB_CLIENT_SECRET. Let’s get done in the next section.
Setting up GitHub OAuth
To get these credentials, go to your GitHub developer settings page and create a new 0Auth app.
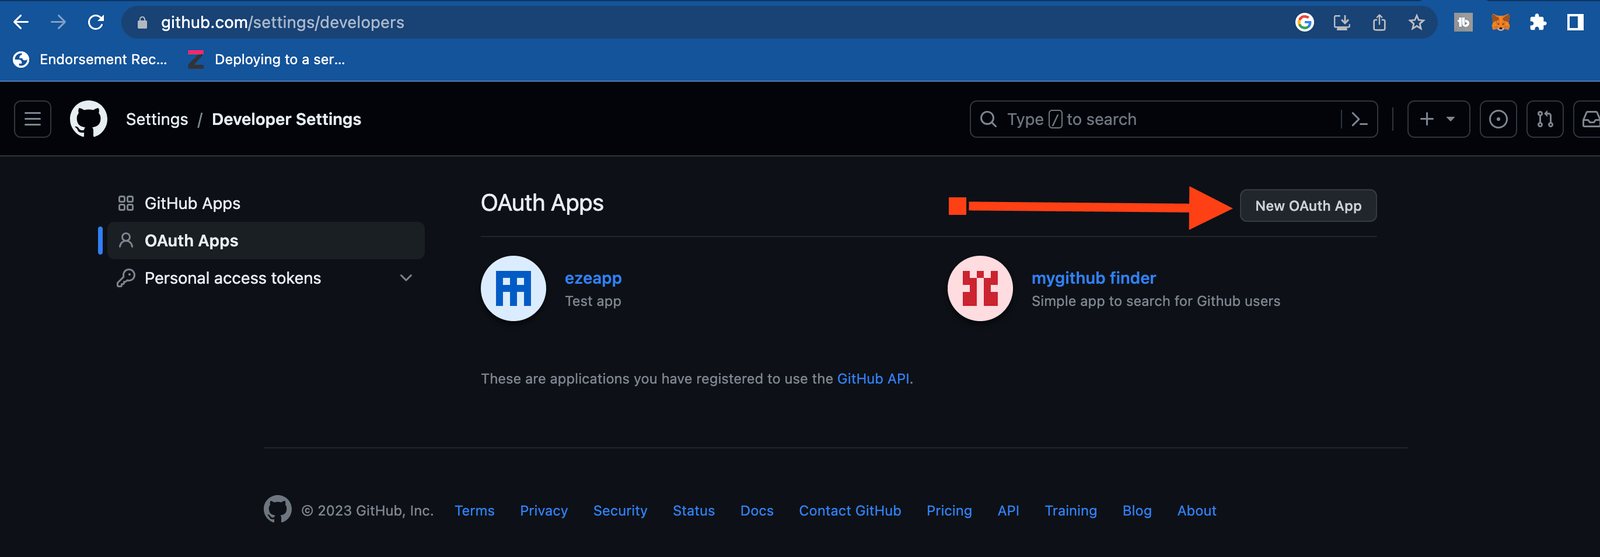
A form will be presented to you it should look like the one below:
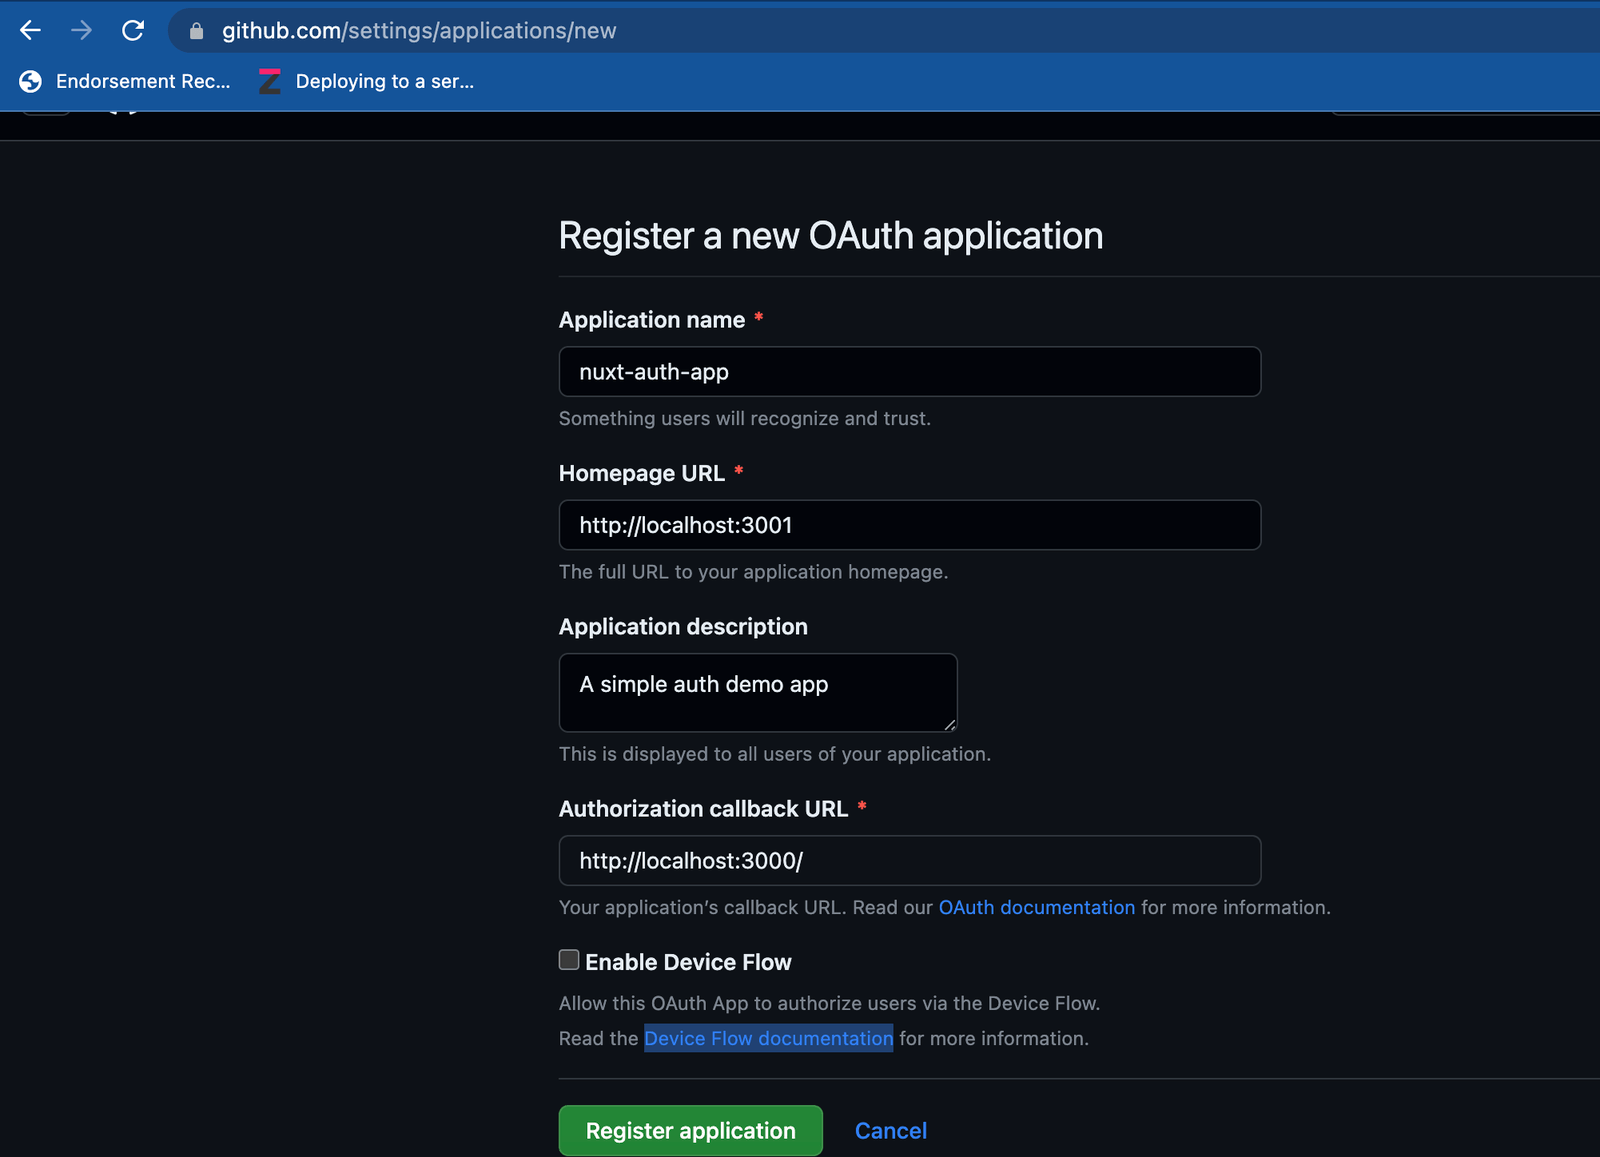
Once you fill out the form and submit it, you’ll see the client id and you can also click on the generate client secret button to create a client secret as shown below:
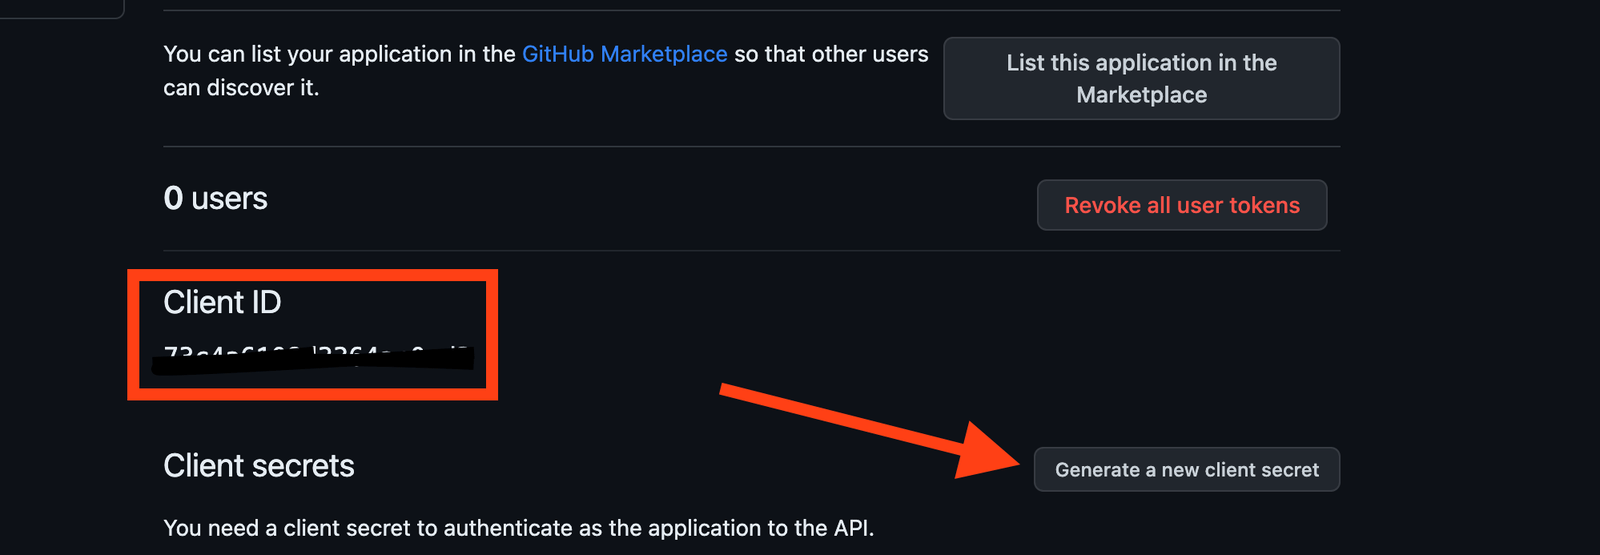
Now, copy the client id and secret to your .env
GITHUB_CLIENT_ID=XXXXXXX
GITHUB_CLIENT_SECRET=XXXXXXX
Done with that? Perfect. There is a special nuxt.config.ts file that was created for you when we generated the base code, let’s replace its content with the following piece of code:
export default defineNuxtConfig({
  modules: ['@sidebase/nuxt-auth'],
  auth: {
    enableGlobalAppMiddleware: true,
  },
  runtimeConfig: {
    GITHUB_CLIENT_SECRET: process.env.GITHUB_CLIENT_SECRET,
    public: {
      GITHUB_CLIENT_ID: process.env.GITHUB_CLIENT_ID,
    },
  },
})
In the code above, we added @sidebase/nuxt-auth to the nuxt modules array to see that Nuxt includes nuxt-auth and its functionality to the project.
Then the auth section allows you to add customized configurations to the authentication, notice the:
auth: {
  enableGlobalAppMiddleware: true,
},
This section enables you to control the default behavior of the nuxt-auth module for page protection. The default setting is false, implying that all pages are publicly accessible unless specifically configured for protection at the individual page level.
However, for our purposes, we will adjust this setting to true. This modification implies that nuxt-auth will safeguard all pages by default unless explicitly configured otherwise. In essence, the pages will remain private until we set them as public.
Remember, there are additional configuration options available with
nuxt-auth. To explore these possibilities further, I recommend checking thenuxt-authdocumentation.
Creating the Pages
Your website will consist of lots of pages, some will be private while others will be public. Let’s see how to handle those pages, starting with the login page.
Login Page
The login page is usually the entry point to every application that has protected pages. With nuxt-auth, you can set protected pages and redirect all non-logged-in users to the login page. The default login page will be like the one below:

However, you can specify a custom login page, as we did earlier and nuxt-auth will use that one instead. Remember we added that customization earlier in the NuxtAuthHandler config function.
export default NuxtAuthHandler({
  pages: {
    signIn: '/login'
  },
....
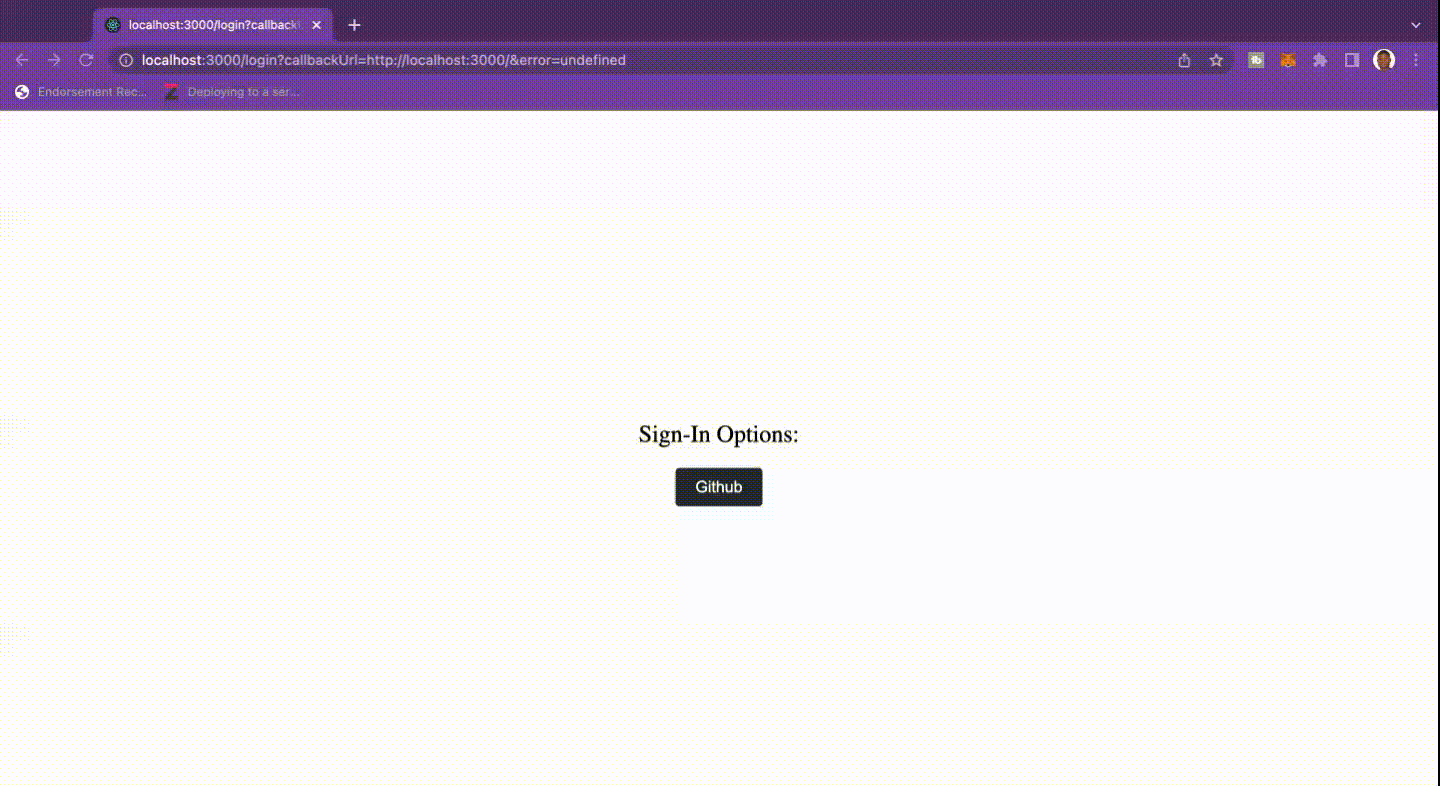
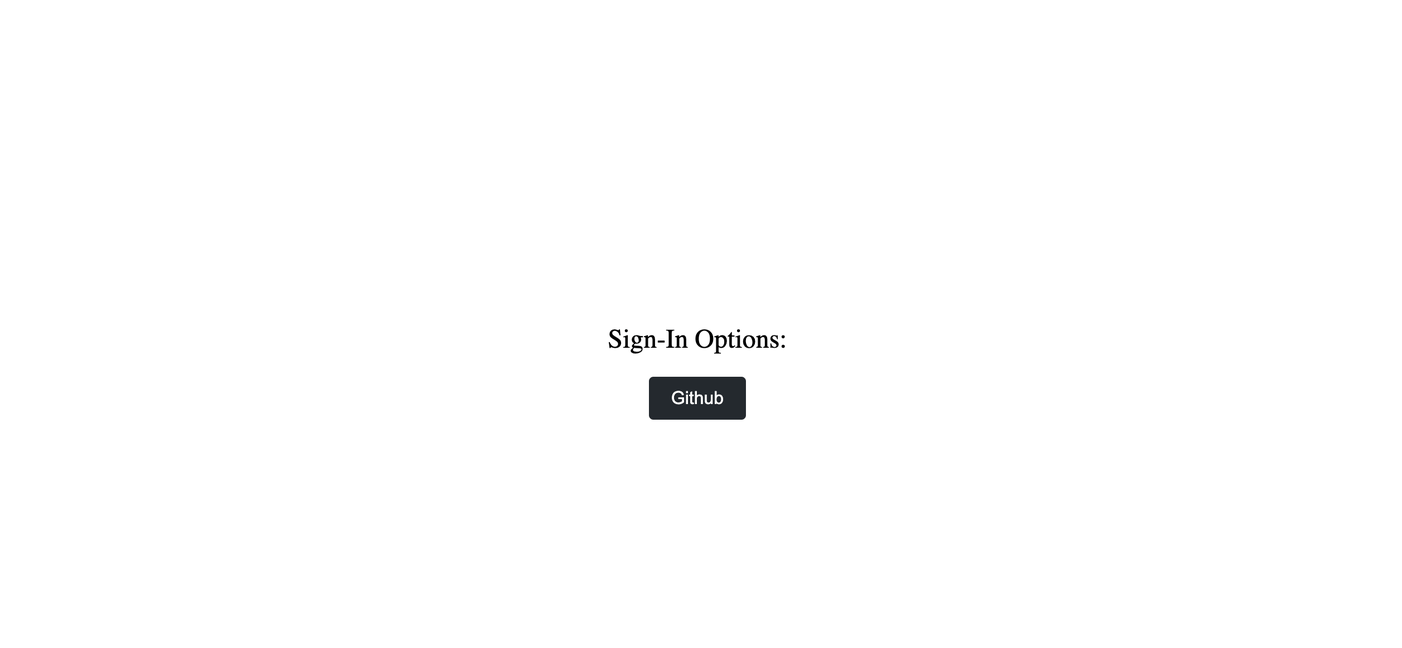
Now, we are going to create that page inside the page folder. Let’s call it login.vue. One of the reasons to use a custom login page is that, in a real-world application, you’d design it to follow your brand design. Here’s the code for login.vue:
<template>
    <div class="login-container">
        <p class="title">Sign-In Options:</p>
        <div class="form-container">
            <button class="btn github" @click="signIn('github')">Github</button>
        </div>
    </div>
</template>
<script setup lang="ts">
definePageMeta({
    auth: {
        unauthenticatedOnly: true,
        navigateAuthenticatedTo: '/',
    }
})
const { signIn } = useAuth()
</script>
In the login.vue file above, we defined a Single File Component (SFC). This component contains both the template for the login page and the script to handle user interactions.
In the template section of the code, there is a button to log in with GitHub. When a user clicks that button, the signIn method from the useAuth hook is used to trigger the authentication process. We passed github as a parameter to the signIn method to indicate that we’re using GitHub’s OAuth service provider for this authentication process.
Remember that in the configuration, we set the enableGlobalAppMiddleware to true which means all pages are protected.
So, in this part of the login script we are removing the protection on it (which means everyone can view it) and sending the user to the homepage if they are logged in already. That’s how simple it is to create a customized login page. It’s a basic login page, you can customize it as much as you want.
definePageMeta({
    auth: {
        unauthenticatedOnly: true,
        navigateAuthenticatedTo: '/',
    }
})
Here is what our login page looks like when you run the application:
Let’s see how to view the user’s data in the dashboard after the login was successful.
Dashboard Page
Let’s consider the dashboard to be the users’ backend, where they can see all their information and perform actions they are allowed to perform. Create the dashboard file in the pages directory and name it index.vue. Then go ahead to add the following code to it:
<script setup lang="ts">
const { status, signIn, signOut, data } = useAuth()
const loggedIn = computed(() => status.value === 'authenticated')

async function handleSignIn() {
  await signIn()
}

async function handleSignOut() {
  await signOut()
}

</script>
<template>
  <section class="dashboard" aria-label="User Dashboard">
    <aside class="dashboard-sidebar">
      <figure class="profile-picture-container">
        <img class="profile-picture"
             :src="data.user.image"
             :alt="`Profile Picture of ${data?.user?.name}`" />
      </figure>
      <nav class="dashboard-nav">
        <ul>
          <li><a href="#overview">Overview</a></li>
          <li><a href="#settings">Settings</a></li>
          <li><a href="#reports">Reports</a></li>
        </ul>
      </nav>
      <div class="dashboard-actions">
        <button v-if="loggedIn"
                class="btn sign-out"
                    @click="handleSignOut"
                aria-label="Sign Out Button"
        >Sign Out</button>
      </div>
    </aside>
    <main class="dashboard-main">
    <h1 class="dashboard-title">Hi, <span v-if="data?.user?.name">{{data.user.name}},</span> welcome to your dashboard</h1>
    <div class="dashboard-content">
      <div class="analytics-section">
        <h2>Website Traffic</h2>
        <div class="bar-chart-placeholder">Bar Chart</div>
      </div>
      <div class="analytics-section">
        <h2>Recent User Signups</h2>
        <table>
          <tr>
            <th>Name</th>
            <th>Email</th>
            <th>Signup Date</th>
          </tr>
          <tr>
            <td>John Doe</td>
            <td>john.doe@example.com</td>
            <td>2023-06-15</td>
          </tr>
        </table>
      </div>
    </div>
  </main>
  </section>
</template>
Most of the template is HTML. Let’s go over some key parts of the code. We’ve used the useAuth hooks again—the useAuth hooks provide a couple of utility functions and properties that give you insights into the current state of the user’s authentication state.
For example, when the status.value is equal to authenticated, it indicates that the user is authenticated and the data property will contain the user’s information.
const { status, signIn, signOut, data } = useAuth()
const loggedIn = computed(() => status.value === 'authenticated')
This is why we are able to get the user’s profile picture in this part of the code and display it in
<figure class="profile-picture-container">
  <img class="profile-picture"
       :src="data.user.image"
       :alt="`Profile Picture of ${data?.user?.name}`" />
</figure>
Also, we are able to sign out using the signOut method from the useAuth hook as demonstrated in this part of the code:
<div class="dashboard-actions">
  <button v-if="loggedIn"
          class="btn sign-out"
          @click="handleSignOut"
          aria-label="Sign Out Button"
  >Sign Out</button>
</div>
When the user is logged in, the dashboard should look similar to the screenshot below:
Congratulations, you’ve succeeded in integrating GitHub OAuth into your Nuxt application and giving your users a means for single sign-on.
To test your implementation, go ahead and start the application by running the command below:
npm run dev
Open it in the browser and try out the authentication flow.
Conclusion
Single sign-on is a convenient means of authenticating users without the trouble of remembering passwords, but it can be daunting to implement SSO flows with various identity providers. However, there are open-source libraries that make the integration easier by abstracting common OAuth flows and strategies.
In this guide, we went through what SSO is and how to integrate it into your workflow using GitHub as the identity provider, and nuxt-auth as the authentication library. We’ve also seen how easy it is to add other authentication providers without much code change.
For further studies, please, check the Nuxt.js documentation, and you can find the code on GitHub. You should check it out, it has the styles as well. 🙂
This post was prepared by Peter Mbanugo in their personal capacity. The opinions or representations expressed herein are the author’s own and do not necessarily reflect the views of Progress Software Corporation, or any of its affiliates or subsidiaries. All liability with respect to actions taken or not taken based on the contents of this post are hereby expressly disclaimed. The content on this posting is provided "as is" with no representations made that the content is error-free.

Peter Mbanugo
Peter is a software consultant, technical trainer and OSS contributor/maintainer with excellent interpersonal and motivational abilities to develop collaborative relationships among high-functioning teams. He focuses on cloud-native architectures, serverless, continuous deployment/delivery, and developer experience. You can follow him on Twitter.