How to Create a Cloud-Powered Windows Phone App with Telerik Cloud Controls - Part 1
Summarize with AI:
"Telerik Cloud Controls is the first ever set of cloud-powered controls for Windows Phone. Integrated with the Telerik Everlive Cloud services, these components help you build and take your application to the cloud as quickly as possible. Using the Telerik Cloud Controls you can now execute app scenarios that previously required a lot of preliminary work - secure and reliable user management mechanism, application error reports, developer<->customer communication mechanism, image management and more."
Last month we released the first ever cloud-powered controls for Windows Phone. They help you create an application that stores its data on the cloud and can be easily accessed by the users on multiple devices. In this blog series we will walk you through each of the cloud-powered controls and teach you how to use them in your app. For our learning purposes we’ll create an app called Memories, which allows users to store information and pictures about important events in their lives, such as a birthday party, a New Year celebration, etc.
Now that the app is created and connected to the cloud service, let’s add the controls. First add a folder Views and then add three pages Login.xaml, Registration.xaml and Memories.xaml inside this folder. Map the telerikCloud prefix to the Telerik.Windows.Controls.Cloud namespace on all pages:
Registration.xaml:
Registration.xaml.cs:
Login.xaml
Login.xaml.cs
Memories.xaml
Memories.xaml.cs

In our online documentation you can read more about the customization options for RadCloudLogin and RadCloudRegistration.
Learn more about Telerik Cloud Controls
Last month we released the first ever cloud-powered controls for Windows Phone. They help you create an application that stores its data on the cloud and can be easily accessed by the users on multiple devices. In this blog series we will walk you through each of the cloud-powered controls and teach you how to use them in your app. For our learning purposes we’ll create an app called Memories, which allows users to store information and pictures about important events in their lives, such as a birthday party, a New Year celebration, etc.
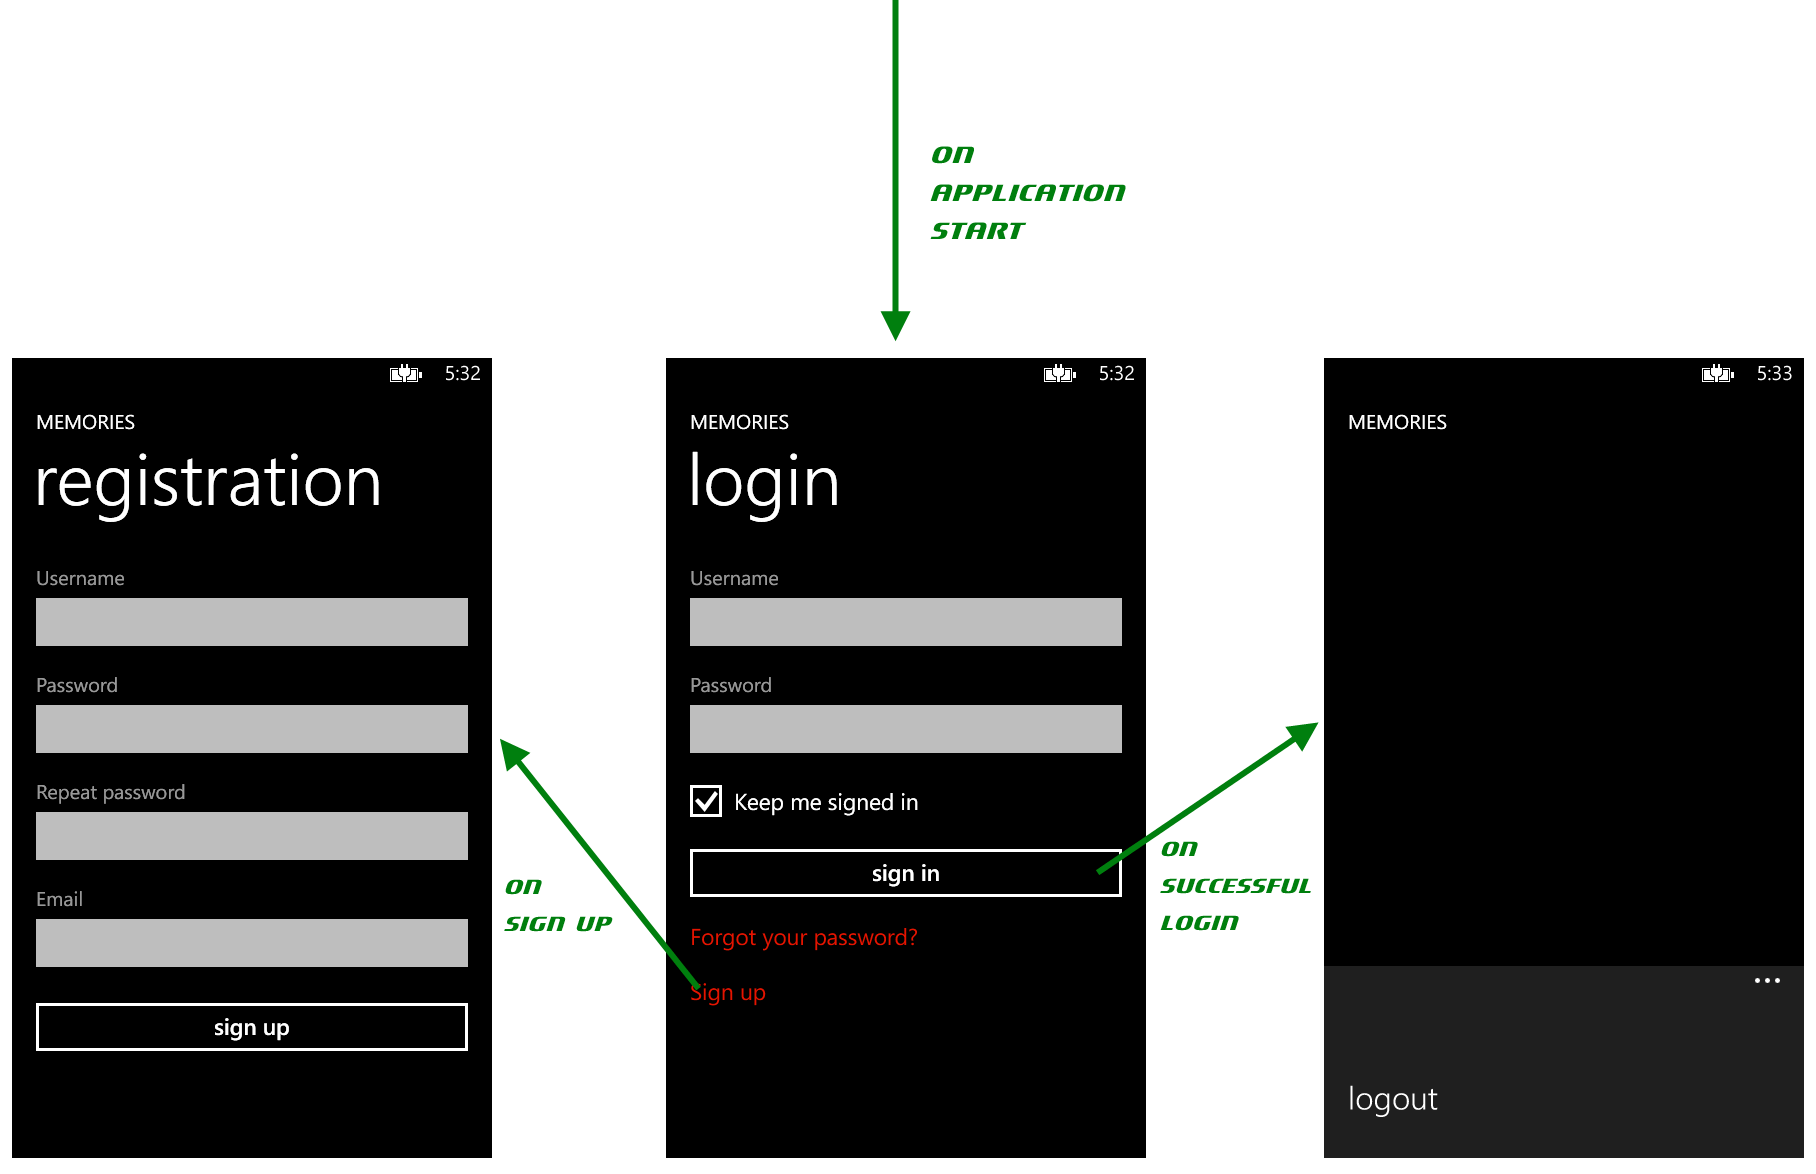
We start with RadCloudLogin and RadCloudRegistration controls. These components enable the application users to create profiles, login with valid credentials and access only the data they are authorized to.
The Memories App
If you still haven't downloaded the cloud-power release, you can see the exact steps to get the controls here. The next step is to create the Memories application and its data storage. This documentation article contains the instructions to use the wizard integrated in visual studio to create a new application that is connected to the cloud storage provided by Telerik or to create the connection manually.Now that the app is created and connected to the cloud service, let’s add the controls. First add a folder Views and then add three pages Login.xaml, Registration.xaml and Memories.xaml inside this folder. Map the telerikCloud prefix to the Telerik.Windows.Controls.Cloud namespace on all pages:
xmlns:telerikCloud="clr-namespace:Telerik.Windows.Controls.Cloud;assembly=Telerik.Windows.Controls.Cloud"Registration
Add RadCloudRegistration on the registration page and add appropriate handlers for the RegistrationSuccess and RegistrationFailed events:Registration.xaml:
<Grid x:Name="LayoutRoot" Background="Transparent"> <Grid.RowDefinitions> <RowDefinition Height="Auto"/> <RowDefinition Height="*"/> </Grid.RowDefinitions> <!--TitlePanel contains the name of the application and page title--> <StackPanel Grid.Row="0" Margin="12,17,0,28"> <TextBlock Text="MEMORIES" Style="{StaticResource PhoneTextNormalStyle}"/> <TextBlock Text="registration" Margin="9,-7,0,0" Style="{StaticResource PhoneTextTitle1Style}"/> </StackPanel> <!--ContentPanel - place additional content here--> <Grid x:Name="ContentPanel" Grid.Row="1" Margin="12,0,12,0"> <telerikCloud:RadCloudRegistration RegistrationFailed="OnRegistrationFailed" RegistrationSuccess="OnRegistrationSuccess"/> </Grid></Grid>Registration.xaml.cs:
private void OnRegistrationSuccess(object sender, EventArgs e){ this.NavigationService.GoBack();}private async void OnRegistrationFailed(object sender, RegistrationFailedEventArgs e){ await RadMessageBox.ShowAsync("Registration failed.");}Login
Add RadCloudLogin to the login page with the RegisterNavigationUri and SuccessNavigationUri properties properly set to the related pages. You can also add an event handler for the Failed event:Login.xaml
<Grid x:Name="LayoutRoot" Background="Transparent"> <Grid.RowDefinitions> <RowDefinition Height="Auto"/> <RowDefinition Height="*"/> </Grid.RowDefinitions> <!--TitlePanel contains the name of the application and page title--> <StackPanel Grid.Row="0" Margin="12,17,0,28"> <TextBlock Text="MEMORIES" Style="{StaticResource PhoneTextNormalStyle}"/> <TextBlock Text="login" Margin="9,-7,0,0" Style="{StaticResource PhoneTextTitle1Style}"/> </StackPanel> <!--ContentPanel - place additional content here--> <Grid x:Name="ContentPanel" Grid.Row="1" Margin="12,0,12,0"> <telerikCloud:RadCloudLogin Failed="OnLogin_Failed" RegisterNavigationUri="/Views/Registration.xaml" SuccessNavigationUri="/Views/Memories.xaml"/> </Grid></Grid>Login.xaml.cs
private async void OnLogin_Failed(object sender, LoginFailedEventArgs e){ await RadMessageBox.ShowAsync("Login failed.");}Logout
The last step is to allow the users to logout once they have logged in. This can be done by an ApplicationBarMenuItem in the Memories page:Memories.xaml
<Grid x:Name="LayoutRoot" Background="Transparent"> <Grid.RowDefinitions> <RowDefinition Height="Auto"/> <RowDefinition Height="*"/> </Grid.RowDefinitions> <!--TitlePanel contains the name of the application and page title--> <StackPanel Grid.Row="0" Margin="12,17,0,28"> <TextBlock Text="MEMORIES" Style="{StaticResource PhoneTextNormalStyle}"/> </StackPanel> <!--ContentPanel - place additional content here--> <Grid x:Name="ContentPanel" Grid.Row="1" Margin="12,0,12,0"> </Grid></Grid> <phone:PhoneApplicationPage.ApplicationBar> <shell:ApplicationBar> <shell:ApplicationBar.MenuItems> <shell:ApplicationBarMenuItem Text="logout" Click="OnLogout_Click"/> </shell:ApplicationBar.MenuItems> </shell:ApplicationBar></phone:PhoneApplicationPage.ApplicationBar>Memories.xaml.cs
private async void OnLogout_Click(object sender, EventArgs e){ bool logoutSuccess = await RadCloudLogin.LogoutAsync(); if (logoutSuccess) { this.NavigationService.GoBack(); }}Now you just need to update the WMAppManifest.xml file so that the Navigation Page is “Views/Login.xaml”.
Now we can run the application and see how it looks so far:
In our online documentation you can read more about the customization options for RadCloudLogin and RadCloudRegistration.
Conclusion
The next blog post will show you how to add more Cloud Controls to this sample and will give you more information about how you can successfully integrate these controls with your applications. Here you can read the next blog post of the series.
You can download the Memories application with its current progress here.
If you still haven't tried Cloud Controls for Windows Phone, you can read how to download the CTP here.Learn more about Telerik Cloud Controls

About the Author
Todor Petrov
Todor Petrov has been with Telerik since 2011, working on the Android and Windows Phone UI suites. He is passionate about technologies, movies and music.
Related Posts
Comments
Comments are disabled in preview mode.
