
Telerik Report Design with Blazor WebAssembly and REST API

In this post, I will show you how to use Telerik Reporting in design mode in a Blazor WebAssembly app. I will use Telerik UI for Blazor to walk you through the process.
Start by learning about Progress Telerik Reporting and Telerik UI for Blazor and their benefits.
What Is Telerik Reporting?
Telerik Reporting is an all-in-one .NET embedded reporting tool that is light and easy to use. It was made for both web and desktop apps. This solid tool makes it easy to turn data into practical, appealing and reusable business reports.
The tool is handy for developers and dev managers because it speeds up the process of making reports by letting business users write and edit reports independently, encouraging speed, flexibility and independence.
Telerik Reporting makes integration easy by working with many frameworks and technologies, such as ASP.NET Core, Blazor, ASP.NET MVC, ASP.NET AJAX, HTML5, Angular, React, Vue, WPF and WinForms. It also works well with many data sources, including OLAP cubes, databases, Excel and XML files and business objects. It helps the reporting process to stay secure and scalable and running at its best.
Reporting software from Telerik is an excellent tool for business users because it lets them create, change and view reports at their own pace. It makes business workflows more flexible. This flexibility is essential for making better decisions and creating an adaptable work environment. With simple report viewer settings, users can easily add reports to any web or desktop business app. When the reports are ready, they can be exported in more than 15 different formats (Word, Excel, PDF, PPT, image, CSV, etc.) to meet different business needs. Overall, Telerik Reporting is a tool that saves time and makes it easier for business users to see how data is being used.
What Is Telerik UI for Blazor?
Telerik UI for Blazor offers a professional suite of Blazor UI components to facilitate the development of feature-rich modern applications. Boasting over 100 built-in components, it simplifies frontend development by providing pre-constructed UI elements for immediate use. These components are native Blazor parts, not merely wrappers for jQuery widgets, and are compatible with both server- and client-run Blazor applications (WebAssembly).
For developers working on single-page web applications using Blazor WebAssembly (WASM), Telerik UI for Blazor proves invaluable. Blazor WASM, a segment of the .NET Core framework, utilizes C# to create dynamic content, enhancing the client experience through rich, interactive elements. Although Blazor WebAssembly apps are initially downloaded to the client’s browser—potentially resulting in larger downloads than Blazor Server—all processing occurs on client hardware for quick response times. This suite of native UI components thus allows developers to craft engaging, feature-packed user experiences with minimal effort.
What Will We Do?
I’ll reproduce the steps to edit the report named SampleReport.trdp hosted in our solution and guide you to skip the pitfalls.
Telerik Reporting allows us to let the end users edit their reports, in this case, in a Blazor WebAssembly project. Blazor WebAssembly has no backend, so we need an API to host Telerik Reporting. In our case, we will use the Telerik Reporting REST project template.
Let’s get to work!
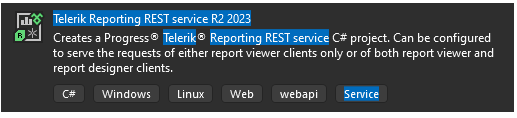
- Start creating a new Telerik Reporting REST service project from Visual Studio:
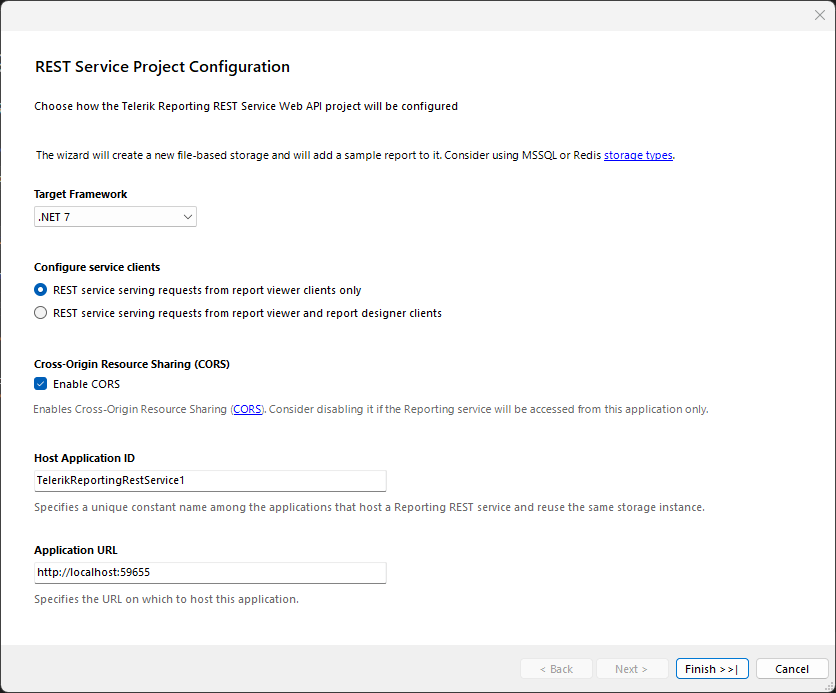
- Choose your target framework version. I left the other values in their defaults.
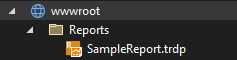
- This is how the project files will look.
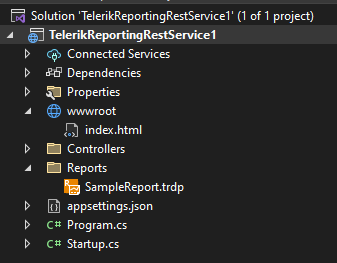
Note the location of the Reports folder. It should be hosted on the wwwroot folder for being accessed. This error will be raised while running the Blazor WebAssembly if it is missing in wwwroot:
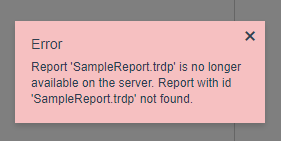
And the log will return a 404 error. This is not a cross-origin policy issue but an application configuration failure.

So, change the location of Reports from root to wwwroot:
- In the Setup.cs file, add the
IReportServiceConfigurationandIReportDesignerServiceConfigurationafterservices.AddServerSideBlazor();.
1.	   services.AddServerSideBlazor();
2.
3.	   services.TryAddSingleton<IReportServiceConfiguration>(sp => new ReportServiceConfiguration
4.	   {
5.	       ReportingEngineConfiguration = sp.GetService<IConfiguration>(),
6.	       HostAppId = "BlazorWebReportDesignerDemo",
7.	       Storage = new FileStorage(),
8.	       ReportSourceResolver = new UriReportSourceResolver(Path.Combine(sp.GetService<IWebHostEnvironment>().WebRootPath, "Reports"))
9.	   });
10.
11.	   services.TryAddSingleton<IReportDesignerServiceConfiguration>(sp => new ReportDesignerServiceConfiguration
12.	   {
13.	       DefinitionStorage = new FileDefinitionStorage(Path.Combine(sp.GetService<IWebHostEnvironment>().WebRootPath, "Reports")),
14.	       SettingsStorage = new FileSettingsStorage(Path.Combine(Environment.GetFolderPath(Environment.SpecialFolder.ApplicationData), "Telerik Reporting")),
15.	       ResourceStorage = new ResourceStorage(Path.Combine(sp.GetService<IWebHostEnvironment>().WebRootPath, "Resources")),
16.	       SharedDataSourceStorage = new FileSharedDataSourceStorage(Path.Combine(sp.GetService<IWebHostEnvironment>().WebRootPath, "Reports", "Shared Data Sources")),
17.	   });
In IReportDesignerServiceConfiguration, the folder name for “Reports” can be customized, altering the property DefinitionStorage. Also, you have other options to customize SettingsStorage, ResourcesStorage and the SharedDataSourceStorage.
- Create the Blazor WebAssembly project using the Visual Studio template and add it to the solution:

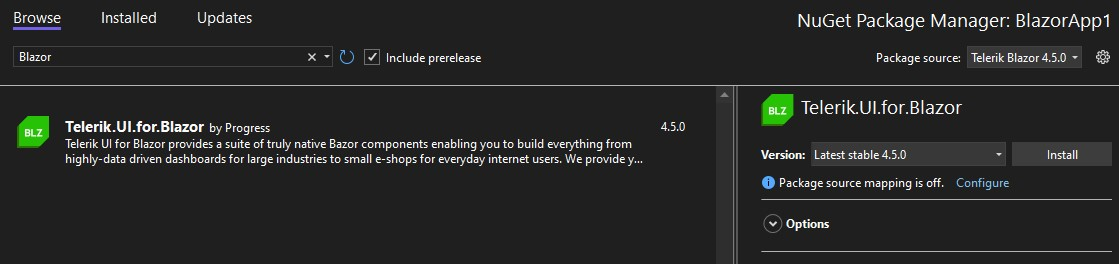
- Add Telerik UI for Blazor. You need to download and set up this package using the Progress Control Panel App. This will enable you to use Telerik UI for Blazor in the Web Assembly application. You may need to set up the Telerik Blazor NuGet manually. Learn how to do this at https://docs.telerik.com/blazor-ui/installation/nuget.
- Register for the Telerik service on the Program.cs file:
1.	// Register the Telerik services.
2.	builder.Services.AddTelerikBlazor();
3.
- Add Telerik to _Imports.razor file.
1.	@using Telerik.Blazor
2.	@using Telerik.Blazor.Components
3.	@using Telerik.FontIcons
- Add the scripts to index.html:
1.	    <script src="https://ajax.googleapis.com/ajax/libs/jquery/3.3.1/jquery.min.js"></script>
2.	    <script src="https://kendo.cdn.telerik.com/2023.2.829/js/kendo.all.min.js"></script>
3.	    <script src="./scripts/js/kendo-ui-license.js"></script>
4.	    <script src="http://localhost:59655/api/reportdesigner/resources/js/telerikReportViewer"></script>
5.	    <script src="http://localhost:59655/api/reportdesigner/designerresources/js/webReportDesigner/"></script>
6.	    <script src="_content/Telerik.WebReportDesigner.Blazor/telerikWebReportDesignerInterop.js" defer></script>
Tips and pitfalls you may face:
- If you already have your license file, add the license after the kendo.all.min.js file. Download it from https://docs.telerik.com/kendo-ui/intro/installation/using-license-code.
- Use the path of the API REST URL. In this case, it is http://localhost:59655.
- You need to set up the version of kendo.cdn according to your installed version, in this case: 2023.2.829, https://kendo.cdn.telerik.com/2023.2.829/js/kendo.all.min.js. You can check the last version of Kendo UI at https://www.telerik.com/support/whats-new/release-history.
- Add the Telerik Web Report Designer for Blazor from the Telerik NuGet repository. Learn how to set up Telerik private NuGet: https://docs.telerik.com/reporting/getting-started/installation/adding-private-nuget-feed.

Tip: Take note of the version. You will need it soon.
- On the Index.razor or your target razor page, add these code lines:
Using:
1. @using Telerik.WebReportDesigner.Blazor
CSS:
1.	<style>
2.	    #wrd1 { position: relative; width: 1300px; height: 880px; padding-right: 50px; }
3.	</style>
Add the WebReportDesignerWidget:
1.	<WebReportDesigner DesignerId="wrd1"
2.	                   ServiceUrl="http://localhost:59655/api/reportdesigner"
3.	                   Report="SampleReport.trdp"
4.	                   ReportViewerOptions="@(new ReportViewerOptions() {
5.	    templateUrl = "http://localhost:59655/api/reportdesigner/resources/templates/telerikReportViewerTemplate-17.1.23.718.html",
6.	    scaleMode = ScaleMode.Specific,
7.	    scale = 1.0,
8.	    pageMode = PageMode.ContinuousScroll,
9.	    viewMode = ViewMode.Interactive
10.	})"
11.	        ToolboxArea="new ToolboxAreaOptions() { Layout = ToolboxAreaLayout.List }"
12.	        PropertiesArea="new PropertiesAreaOptions() { Layout = PropertiesAreaLayout.Categorized }" />
Observe the path to your Telerik Reporting service: http://localhost:59655, at ServiceUrl and templateUrl.
For the templateUrl property, we have the file version 17.1.23.718. You get the version number from the WebReportDesigener NuGet package.

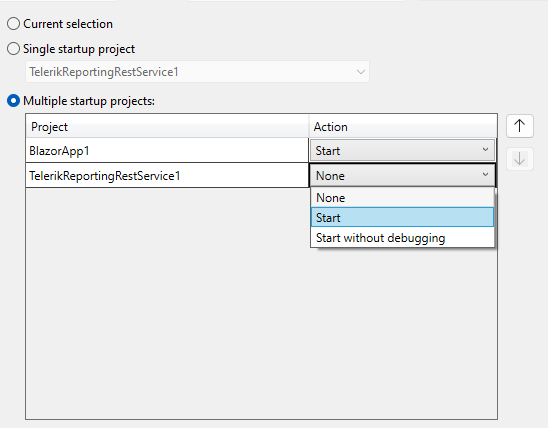
- Set up projects to run together on start:

Select “Multiple startup projects” and set Action to Start in the projects.
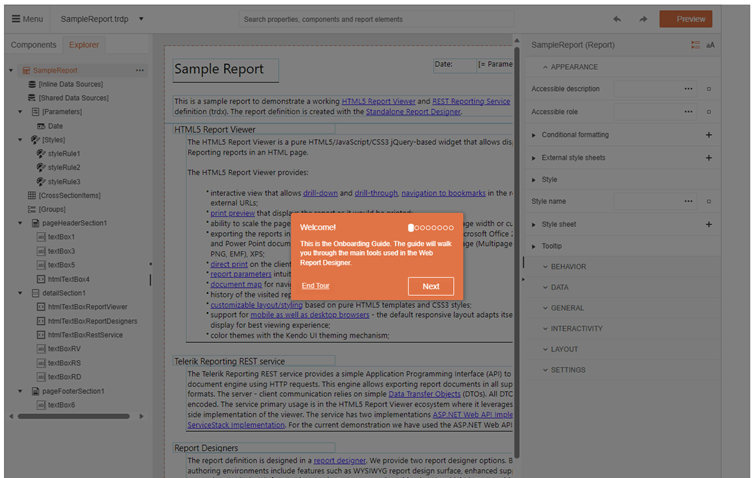
- Press F5 on Visual Studio, and voilà—if everything is in its place, you will get this page on the browser:
Conclusion
Take advantage of Telerik Reporting’s powerful features to change how you visualize and report on data! With its easy integration, controls focused on the user, and wide range of reporting choices, Telerik Reporting is an excellent tool for all your data projects that you want to be successful and efficient. Telerik Reporting can help you accelerate report creation, make sharing functional and aesthetically pleasing reports easier, or improve decision-making based on data.
Start a journey that will change your life where data is turned into clear, usable insights that help you make smart decisions and plan your future. Check out this dynamic solution on my GitHub. And get your free trial today at Progress Telerik’s official site https://www.telerik.com/try/devcraft-ultimate to start making data solutions that are worth using. Plus, get unbeatable support from the famous Progress Telerik team, even during your trial period.
References
- Main page: https://www.telerik.com/products/reporting.aspx
- License: https://docs.telerik.com/kendo-ui/intro/installation/using-license-code
- Telerik NuGet: https://docs.telerik.com/reporting/getting-started/installation/adding-private-nuget-feed
- Blazor UI NuGet: https://docs.telerik.com/blazor-ui/installation/nuget
- Release history: https://www.telerik.com/support/whats-new/release-history
- Setup: https://docs.telerik.com/reporting/designing-reports/report-designer-tools/web-report-designer/how-to-set-up-in-blazor-application
- Host Design Report: https://docs.telerik.com/reporting/embedding-reports/host-the-report-engine-remotely/asp.net-core-web-api-implementation/host-reports-service-in-.net-6-with-minimal-api
- GitHub: https://github.com/jssmotta/telerikBlazorDesignReport23

Jefferson S. Motta
Jefferson S. Motta is a senior software developer, IT consultant and system analyst from Brazil, developing in the .NET platform since 2011. Creator of www.Advocati.NET, since 1997, a CRM for Brazilian Law Firms. He enjoys being with family and petting his cats in his free time. You can follow him on LinkedIn and GitHub.
Related Posts
Comments
All articles
Topics

Latest Stories
in Your Inbox
Subscribe to be the first to get our expert-written articles and tutorials for developers!
All fields are required