Demystifying Loaders and Actions in React Router 6 (Part 2)

Summarize with AI:
React Router 6 introduced a wide range of new features that revolutionized data fetching and submission in React applications. Learn how to use loaders and actions to create, update, delete and read users’ data in this two-part series.
In the first part of this series, we covered how to use React Router Loaders to implement data fetching and Actions to handle submitting form data and sending it via an API request. Now we will implement edit and delete functionality and explore how to add pending state UI feedback so users know the form is being processed.
Editing a User
Let’s start by adding a new route in the main.tsx file.
src/main.tsx
import React from "react";
import ReactDOM from "react-dom/client";
import App from "./App.tsx";
import "./index.css";
import { createBrowserRouter, RouterProvider } from "react-router-dom";
import Users from "./views/user/Users.tsx";
import { usersLoader } from "./views/user/Users.loader.ts";
import EditUser from "./views/user/EditUser.tsx";
import { editUserLoader } from "./views/user/EditUser.loader.ts";
import { editUserAction } from "./views/user/EditUser.action.ts";
import CreateUser from "./views/user/CreateUser.tsx";
import { createUserAction } from "./views/user/CreateUser.action.ts";

const router = createBrowserRouter([
  {
    path: "/",
    element: <App />,
    children: [
      {
        index: true,
        element: <Users />,
        loader: usersLoader,
      },
      {
        path: "/user/create",
        element: <CreateUser />,
        action: createUserAction,
      },
      {
        path: "/user/:id",
        element: <EditUser />,
        loader: editUserLoader,
        action: editUserAction,
      },
    ],
  },
]);

ReactDOM.createRoot(document.getElementById("root") as HTMLElement).render(
  <React.StrictMode>
    <RouterProvider router={router} />
  </React.StrictMode>
);
The EditComponent will be loaded when the URL matches /user/:id path. The :id param is dynamic, so it will match anything with an exception of create, which is already used for the add user route. In contrast to other routes, the new edit route has defined both a loader and an action because we need to fetch the matching user’s data, and we need an action to submit the data. Let’s add them next.
src/views/user/EditUser.loader.ts
import { LoaderFunctionArgs, redirect } from "react-router-dom";
import { z } from "zod";
import { userSchema } from "../../schema/user.schema";

export const editUserLoader = async ({ params }: LoaderFunctionArgs) => {
  try {
    const response = await fetch(`http://localhost:4000/users/${params.id}`);
    const user = await response.json();
    return {
      user: userSchema.parse(user),
    };
  } catch (error) {
    return redirect("/");
  }
};

export type EditUserLoaderResponse = Exclude<
  Awaited<ReturnType<typeof editUserLoader>>,
  Response
>;
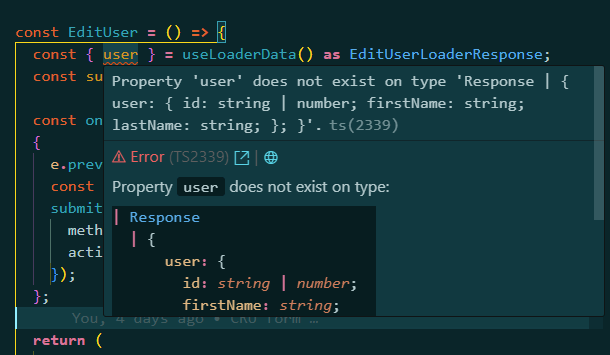
In the editUserLoader, we take the id parameter and use it to fetch details about the user. When we have the response, we validate the received user data. If there are any issues, the user is redirected to the users page. Note how we exclude the Response interface from the EditUserLoaderResponse type. The reason for it is that we want to use EditUserLoaderResponse to assert the type of data returned by the loader inside of a component. However, while the object returned in the try block contains the user property, the redirect method returns the Response type. Hence, the awaited return type of the editUserLoader is something like this:
type EditUserLoaderResponse = {
  user: { id: string | number; firstName: string; lastName: string; }
} | Response
The image below shows the error that would happen with the above type.

We can exclude the Response type because we know that if the loader returns a redirect, then the matching route component for the current URL will not be rendered at all. Therefore, it’s safe to assume that what is returned by the useLoaderDatahook will be the object with the user property. Let’s add the route action next.
src/views/user/EditUser.action.ts
import { ActionFunctionArgs, redirect } from "react-router-dom";

export const editUserAction = async ({ request }: ActionFunctionArgs) => {
  const formData = await request.formData();
  const payload = Object.fromEntries(formData.entries());
  await fetch(`http://localhost:4000/users/${payload.id}`, {
    method: "PATCH",
    headers: {
      "Content-Type": "application/json",
    },
    body: JSON.stringify(payload),
  });

  return redirect("/");
};
The editUserAction is very similar to the createUserAction function. The only difference is that we need to use user’s ID in the URL. When the request is successful, the user is redirected back to the users page.
The loaders and actions for editing a user are ready, so it’s time to create the EditUser component.
src/views/user/EditUser.tsx
import { useLoaderData } from "react-router-dom";
import { EditUserLoaderResponse } from "./EditUser.loader";
import UserForm from "./components/UserForm";

const EditUser = () => {
  const { user } = useLoaderData() as EditUserLoaderResponse;

  return (
    <div className="max-w-sm mx-auto">
      <UserForm user={user} action={`/user/${user.id}`} />
    </div>
  );
};

export default EditUser;
We get the fetched user data from the loader and pass it to the UserForm component. Besides that, we also render the UserForm component and pass user and action props. We don’t need to create the UserForm component, as we did it already in the previous part of this series, but here is the code as a reminder.
src/views/user/components/UserForm.tsx
import { Form } from "react-router-dom";

type UserFormProps = {
  className?: string;
  user?: {
    id: string | number;
    firstName: string;
    lastName: string;
  } | null;
  action: string;
};

const UserForm = (props: UserFormProps) => {
  const { className, user, action } = props;
  return (
    <div className={className}>
      <Form className="space-y-4" method="post" action={action}>
        <input type="hidden" name="id" defaultValue={user?.id} />
        <div className="flex flex-col items-start gap-y-2">
          <label>First Name</label>
          <input
            type="text"
            className="w-full px-4 py-2 border border-gray-300 rounded-md shadow-sm"
            name="firstName"
            defaultValue={user?.firstName || ""}
          />
        </div>
        <div className="flex flex-col items-start gap-y-2">
          <label>Last Name</label>
          <input
            type="text"
            className="w-full px-4 py-2 border border-gray-300 rounded-md shadow-sm"
            name="lastName"
            defaultValue={user?.lastName || ""}
          />
        </div>

        <div>
          <button
            type="submit"
            className="w-full px-4 py-3 mt-4 font-semibold bg-sky-600 text-sky-50"
          >
            Save
          </button>
        </div>
      </Form>
    </div>
  );
};

export default UserForm;
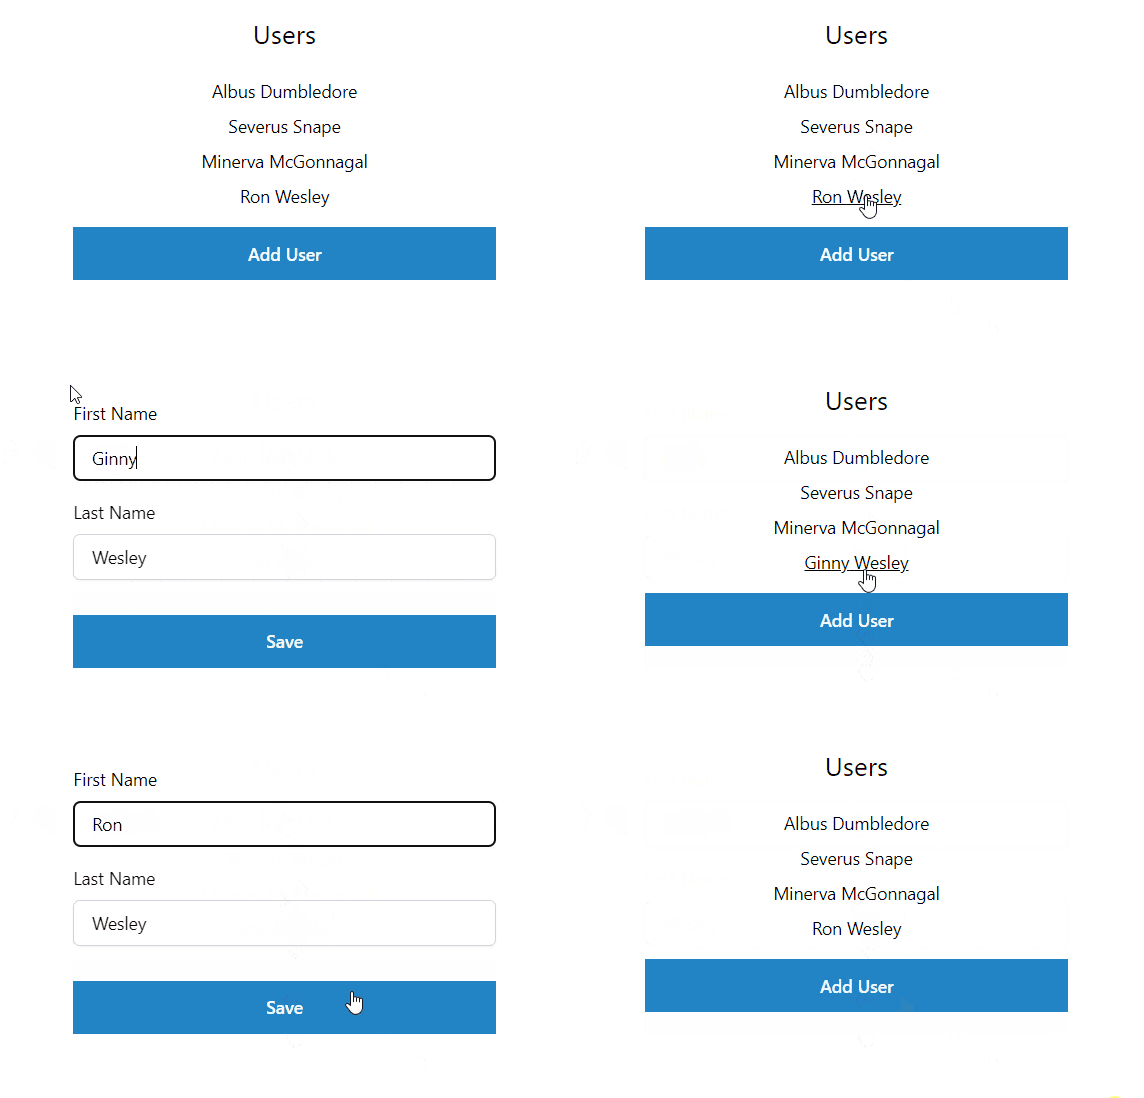
That’s all the code we need for the edit functionality. We can click on one of the users, update the name and surname and click the Save button to update the user. The GIF below shows what it looks like.

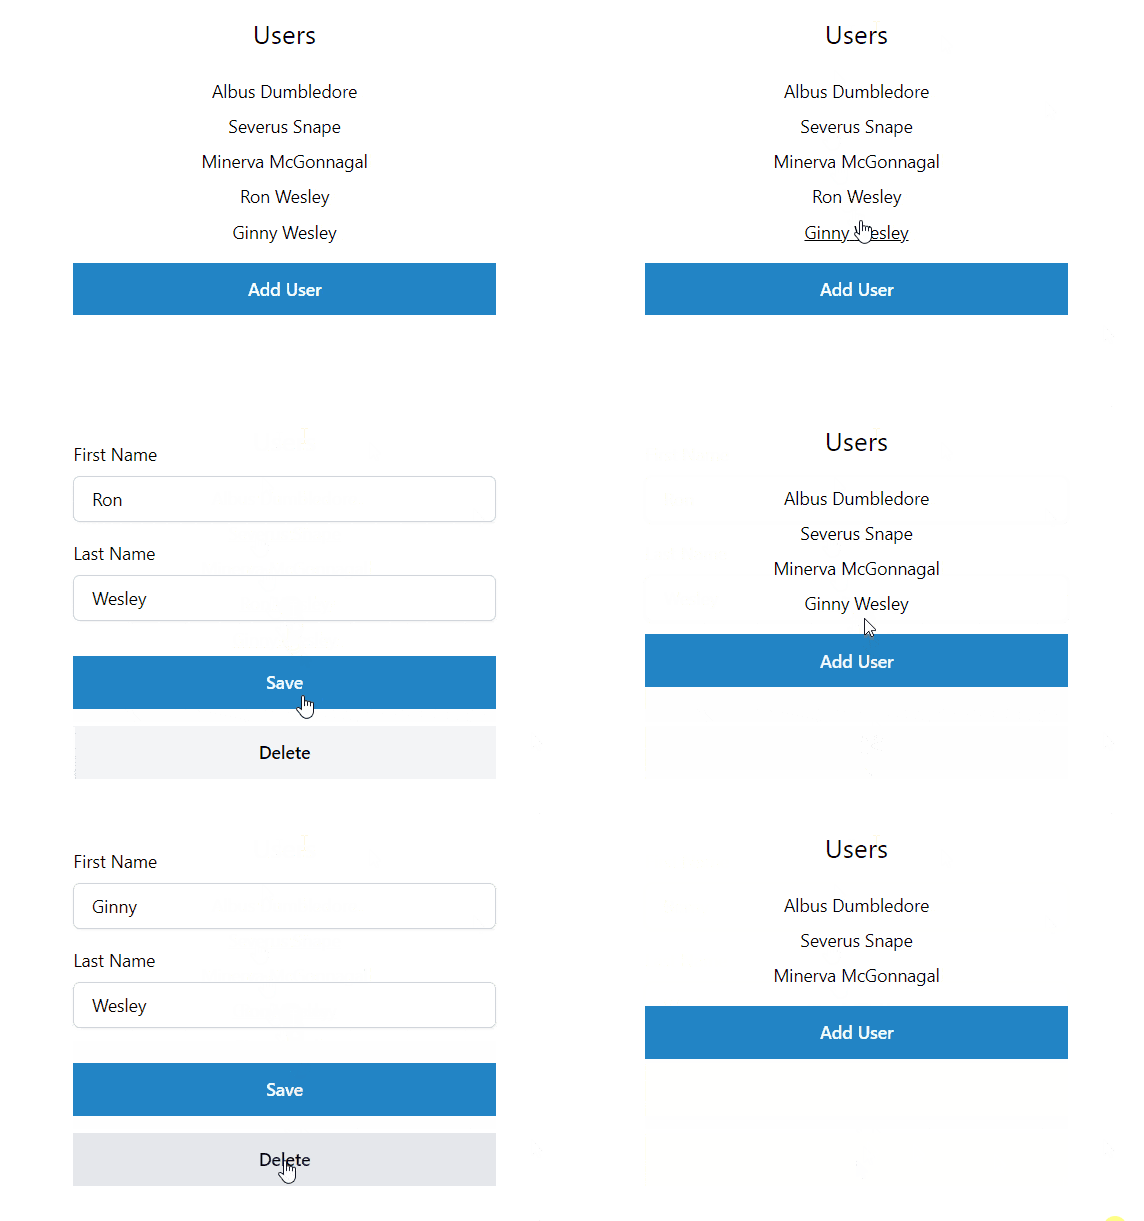
We can create, edit and display users, but we can’t delete them yet, so let’s add that functionality.
Deleting a User—How to Deal with Multiple Actions?
We will add a delete button in the UserForm component, so we can update or delete a user. However, before we do that, we need an answer to an important question: How can we have multiple actions per route? After all, we need one action for updating a user and another one for deletion. The thing is, we can’t. We can have only one action.
However, inside an action, we can figure out what should be done based on the payload. Hence, we will add a delete button and update the current save button with two attributes: name and value. Those will be used to execute either update or delete flow.
src/views/user/components/UserForm.tsx
import { Form } from "react-router-dom";

type UserFormProps = {
  className?: string;
  user?: {
    id: string | number;
    firstName: string;
    lastName: string;
  } | null;
  action: string;
};

const UserForm = (props: UserFormProps) => {
  const { className, user, action } = props;
  return (
    <div className={className}>
      <Form className="space-y-4" method="post" action={action}>
        <input type="hidden" name="id" defaultValue={user?.id} />
        <div className="flex flex-col items-start gap-y-2">
          <label>First Name</label>
          <input
            type="text"
            className="w-full px-4 py-2 border border-gray-300 rounded-md shadow-sm"
            name="firstName"
            defaultValue={user?.firstName || ""}
          />
        </div>
        <div className="flex flex-col items-start gap-y-2">
          <label>Last Name</label>
          <input
            type="text"
            className="w-full px-4 py-2 border border-gray-300 rounded-md shadow-sm"
            name="lastName"
            defaultValue={user?.lastName || ""}
          />
        </div>

        <div className="space-y-4">
          <button
            type="submit"
            name="intent"
            value="save
            className="w-full px-4 py-3 mt-4 font-semibold bg-sky-600 text-sky-50"
          >
            Save
          </button>
          {user ? (
            <button
              type="submit"
              name="intent"
              value="delete"
              className="w-full px-4 py-3 font-semibold bg-gray-100 hover:bg-gray-200"
            >
              Delete
            </button>
          ) : null}
        </div>
      </Form>
    </div>
  );
};

export default UserForm;
Next, we need to update the editUserAction method.
src/views/user/EditUser.action.ts
import { ActionFunctionArgs, redirect } from "react-router-dom";
import { User, userSchema } from "../../schema/user.schema";

const deleteUser = async (userId: string | number) => {
  return fetch(`http://localhost:4000/users/${userId}`, {
    method: "delete",
  });
};

const editUser = async (payload: User) => {
  return fetch(`http://localhost:4000/users/${payload.id}`, {
    method: "PATCH",
    headers: {
      "Content-Type": "application/json",
    },
    body: JSON.stringify(payload),
  });
};

export const editUserAction = async (args: ActionFunctionArgs) => {
  const { request } = args;
  const formData = await request.formData();
  const { intent, ...payload } = Object.fromEntries(formData.entries());
  const userData = userSchema.parse(payload);

  if (intent === "delete") {
    await deleteUser(userData.id);
  }

  if (intent === "save") {
    await editUser(userData);
  }

  return redirect("/");
};
Inside the editUserAction function, the intent value is separated from the rest of the form data. If its value is delete, the deleteUser function is called and if it’s save, then editUser is executed instead. That’s how we can handle multiple behaviors in one action.

How to Show a Pending State During Form Submission?
Sometimes it can take a while for API requests to be processed. Therefore, to improve user experience, we can show feedback that something is happening in response to user’s interaction.
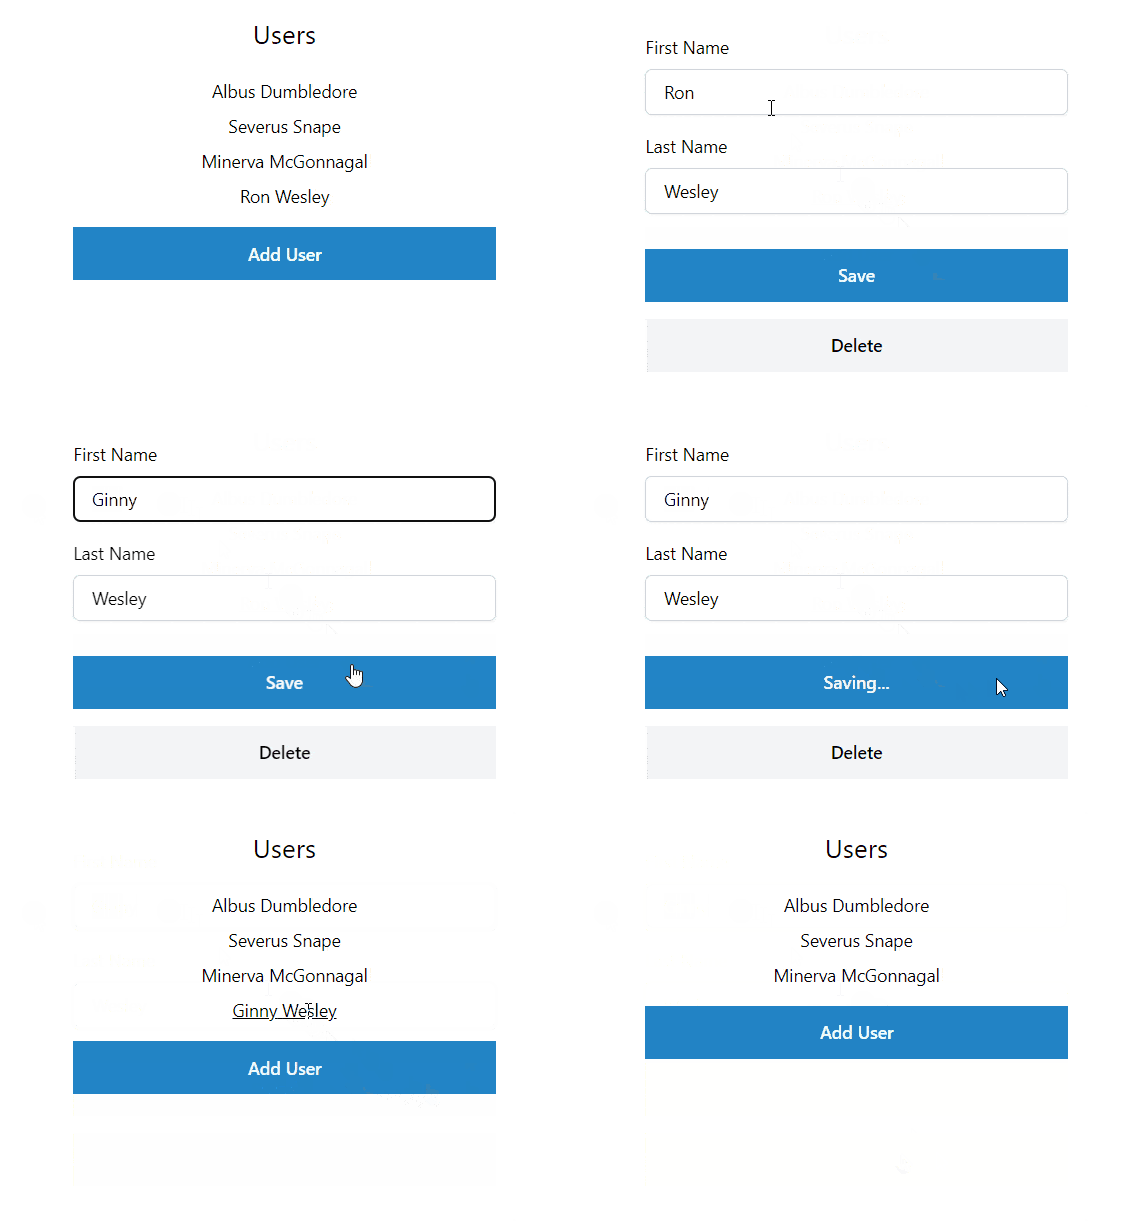
For instance, if a user clicks on the save or delete buttons, we could change the text or show a spinner. To keep things simple, we will just change texts from Save to Saving... and Delete to Deleting.... The buttons will also be disabled when the action is pending.
React Router 6 has a hook called useNavigation that provides information about page navigation. It can be used to obtain information, such as whether there is pending navigation and more. You can read more about it in detail here. We will use this hook in the UserForm component to disable form buttons and change their text.
src/views/user/components/UserForm.tsx
import { Form, useNavigation } from "react-router-dom";

type UserFormProps = {
  className?: string;
  user?: {
    id: string | number;
    firstName: string;
    lastName: string;
  } | null;
  action: string;
};

const UserForm = (props: UserFormProps) => {
  const { className, user, action } = props;
  const navigation = useNavigation();
  const isSubmitPending =
    navigation.state === "submitting" && navigation.formMethod === "post";
  const isDeletePending =
    navigation.state === "submitting" && navigation.formMethod === "delete";

  return (
    <div className={className}>
      <Form className="space-y-4" method="post" action={action}>
        <input type="hidden" name="id" defaultValue={user?.id} />
        <div className="flex flex-col items-start gap-y-2">
          <label>First Name</label>
          <input
            type="text"
            className="w-full px-4 py-2 border border-gray-300 rounded-md shadow-sm"
            name="firstName"
            defaultValue={user?.firstName || ""}
          />
        </div>
        <div className="flex flex-col items-start gap-y-2">
          <label>Last Name</label>
          <input
            type="text"
            className="w-full px-4 py-2 border border-gray-300 rounded-md shadow-sm"
            name="lastName"
            defaultValue={user?.lastName || ""}
          />
        </div>

        <div className="space-y-4">
          <button
            type="submit"
            name="intent"
            value="save"
            className="w-full px-4 py-3 mt-4 font-semibold bg-sky-600 text-sky-50"
            disabled={isSubmitPending || isDeletePending}
          >
            {isSubmitPending ? "Saving..." : "Save"}
          </button>
          {user ? (
            <button
              type="submit"
              name="intent"
              value="delete"
              formMethod="delete"
              className="w-full px-4 py-3 font-semibold bg-gray-100 hover:bg-gray-200"
              disabled={isSubmitPending || isDeletePending}
            >
              {isDeletePending ? "Deleting..." : "Delete"}
            </button>
          ) : null}
        </div>
      </Form>
    </div>
  );
};

export default UserForm;
We use navigation.state and navigation.formMethod to get isSubmitPending and isDeletePending values.
const navigation = useNavigation();
const isSubmitPending =
  navigation.state === "submitting" && navigation.formMethod === "post";
const isDeletePending =
  navigation.state === "submitting" && navigation.formMethod === "delete";
Those are then used in the save and delete buttons.
<button
  type="submit"
  name="intent"
  value="save"
  formMethod="post"
  className="w-full px-4 py-3 mt-4 font-semibold bg-sky-600 text-sky-50"
  disabled={isSubmitPending || isDeletePending}
>
  {isSubmitPending ? "Saving..." : "Save"}
</button>
{user ? (
  <button
    type="submit"
    name="intent"
    value="delete"
    formMethod="delete"
    className="w-full px-4 py-3 font-semibold bg-gray-100 hover:bg-gray-200"
    disabled={isSubmitPending || isDeletePending}
  >
    {isDeletePending ? "Deleting..." : "Delete"}
  </button>
) : null}
Note that the Delete button also has a new attribute called formMethod. When the form is submitted using the Delete button, its form method is changed from post to delete. This attribute is needed so we can distinguish between save and delete buttons and show a different text for the button that was clicked. Before we finish, let’s add a bit of an artificial delay to the editUserAction, so we can see the text update.
src/views/user/EditUser.action.ts
export const editUserAction = async (args: ActionFunctionArgs) => {
  await new Promise(resolve => setTimeout(resolve, 1000));
  /**
  	...other code...
  **/
  return redirect("/");
};
Here’s what it looks like in action.

Conclusion
Loaders and Actions are powerful features that solve common data fetching and submission challenges in React applications. They are great tools that can enhance overall functionality and user experience.
By utilizing Loaders, we overcome the waterfall issue caused by in-component data fetching and de-couple components from data fetching.
Actions, on the other hand, offer a simple approach to handling form submissions and performing needed actions before navigating.
We only covered a part of the new features introduced in React Router 6, so make sure to check out the documentation to find out more.

Thomas Findlay
Thomas Findlay is a 5-star rated mentor, full-stack developer, consultant, technical writer and the author of “React - The Road To Enterprise” and “Vue - The Road To Enterprise.” He works with many different technologies such as JavaScript, Vue, React, React Native, Node.js, Python, PHP and more. Thomas has worked with developers and teams from beginner to advanced and helped them build and scale their applications and products. Check out his Codementor page, and you can also find him on Twitter.

