
Creating a File Uploader with Nuxt and Appwrite Storage API

Summarize with AI:
Allow end users to upload files to your Nuxt.js app with Appwrite Storage API. Learn to integrate the frontend uploader with an Appwrite Storage bucket.
File upload functionality plays a crucial role in many web applications. This applies to any application we are building that requires uploading of a file, such as a content management system, image gallery or a platform that allows users to upload or share files seamlessly. With the Appwrite Storage API service, we can seamlessly create and upload files on our application.
This article will cover the steps required to build a robust file uploader with Nuxt and Appwrite Storage API. We will start from creating our Nuxt application to building our file uploader.
Prerequisites
Before going into this topic, there are a few things we need to set up or know in order to fully comprehend each stage:
- Docker installed and operational on our machine
- An Appwrite instance launched and operational (Docker must be installed on our machine before we can construct a new Appwrite instance; to create a new Appwrite instance, follow this guide: Appwrite instance)
- An Appwrite account created
Introduction to Appwrite Storage API
Appwrite’s Storage service provides us with an extensive storage API to upload, view, download and query our project files.
Appwrite Storage service uses storage buckets to manage our files. These storage buckets are similar to collections we have in our database service. The unique difference between Storage and Collection is that bucket provides us with more control over what types of files we can store in them and how big they can be, whether we want to encrypt them, scan them with antivirus software, etc.
Creating a Nuxt Project
The first step in building a Nuxt project is to install npm. Once you have npm installed on your computer, check the npm version to confirm that our project’s dependency will function with our version of npm.
To create a Nuxt project, use the command below:
npx create-nuxt-app
  or
yarn create-nuxt-app
Nuxt supports a variety of package managers, including npx and yarn. You can use these two commands to start a new Nuxt project. Whatever package manager you want to use in our project must be installed globally on your computer
before you use it to create a new project. In this example, we’d need to install npx and yarn.
Once you run the command above, you will be asked some questions:
create-nuxt-app v5.0.0
✨  Generating Nuxt.js project in file-uploader
? Project name: file-uploader
? Programming language: JavaScript
? Package manager: Npm
? UI framework: Tailwind CSS
? Template engine: HTML
? Nuxt.js modules: (Press <space> to select, <a> to toggle all, <i> to invert se
lection)
? Linting tools: (Press <space> to select, <a> to toggle all, <i> to invert sele
ction)
? Testing framework: None
? Rendering mode: Universal (SSR / SSG)
? Deployment target: Static (Static/Jamstack hosting)
? Development tools: (Press <space> to select, <a> to toggle all, <i> to invert
selection)
? What is your GitHub username? emilsone
? Version control system: Git
⠹ Installing packages with npm
After running the command, you’ll see these questions; select the options you want. All the dependencies we require will be installed once we have answered all the questions.
The next step is to cd <project-name> and run the command below:
npm run dev
Creating the File Uploader
We have completed creating a new Nuxt project. The next step is to develop our file uploader. To accomplish this, copy and paste the code below into our component folder.
<template>
    <main class="min-w-screen min-h-screen flex items-center p-5 lg:p-10 overflow-hidden relative hero-section">
      <div class="border-8 border-yellow-20 rounded-lg border-dashed  absolute top-20 bottom-20 left-20 right-20 z-0">
      </div>
      <div
        class="w-full max-w-4xl rounded-lg bg-white shadow-xl p-10 lg:p-20 mx-auto text-gray-800 relative md:text-left">
        <div class="text-center">
          <div class="text-center px-10">
            <div class="mb-10">
              <div class="w-10 h-10 inline-flex items-center justify-center rounded-full bg-indigo-100 text-black  mb-4">
                <svg xmlns="http://www.w3.org/2000/svg" class="h-6 w-6 my-6 " fill="none" viewBox="0 0 24 24"
                  stroke="currentColor" stroke-width="2">
                  <path stroke-linecap="round" stroke-linejoin="round"
                    d="M7 16a4 4 0 01-.88-7.903A5 5 0 1115.9 6L16 6a5 5 0 011 9.9M15 13l-3-3m0 0l-3 3m3-3v12" />
                </svg>
              </div>
              <h2 class="text-2xl leading-7 font-semibold">
                Drop like it's hot
              </h2>
              <p class="mt-3 text-gray-600">
                No limit</p>
              <p class="mt-4 text-gray-500 tracking-wide border-t border-dashed ">Upload or drag & drop your file SVG,
                PNG, JPG or GIF. </p>
            </div>
            <div class="flex flex-col items-center justify-center">
              <label>File
                <input type="file" id="file" />
              </label>
              <button
                class="flex mx-auto mt-16 text-white  border-0 py-2 px-8 focus:outline-none  rounded text-lg btn-style">Submit</button>
            </div>
          </div>
        </div>
      </div>
    </main>
</template>
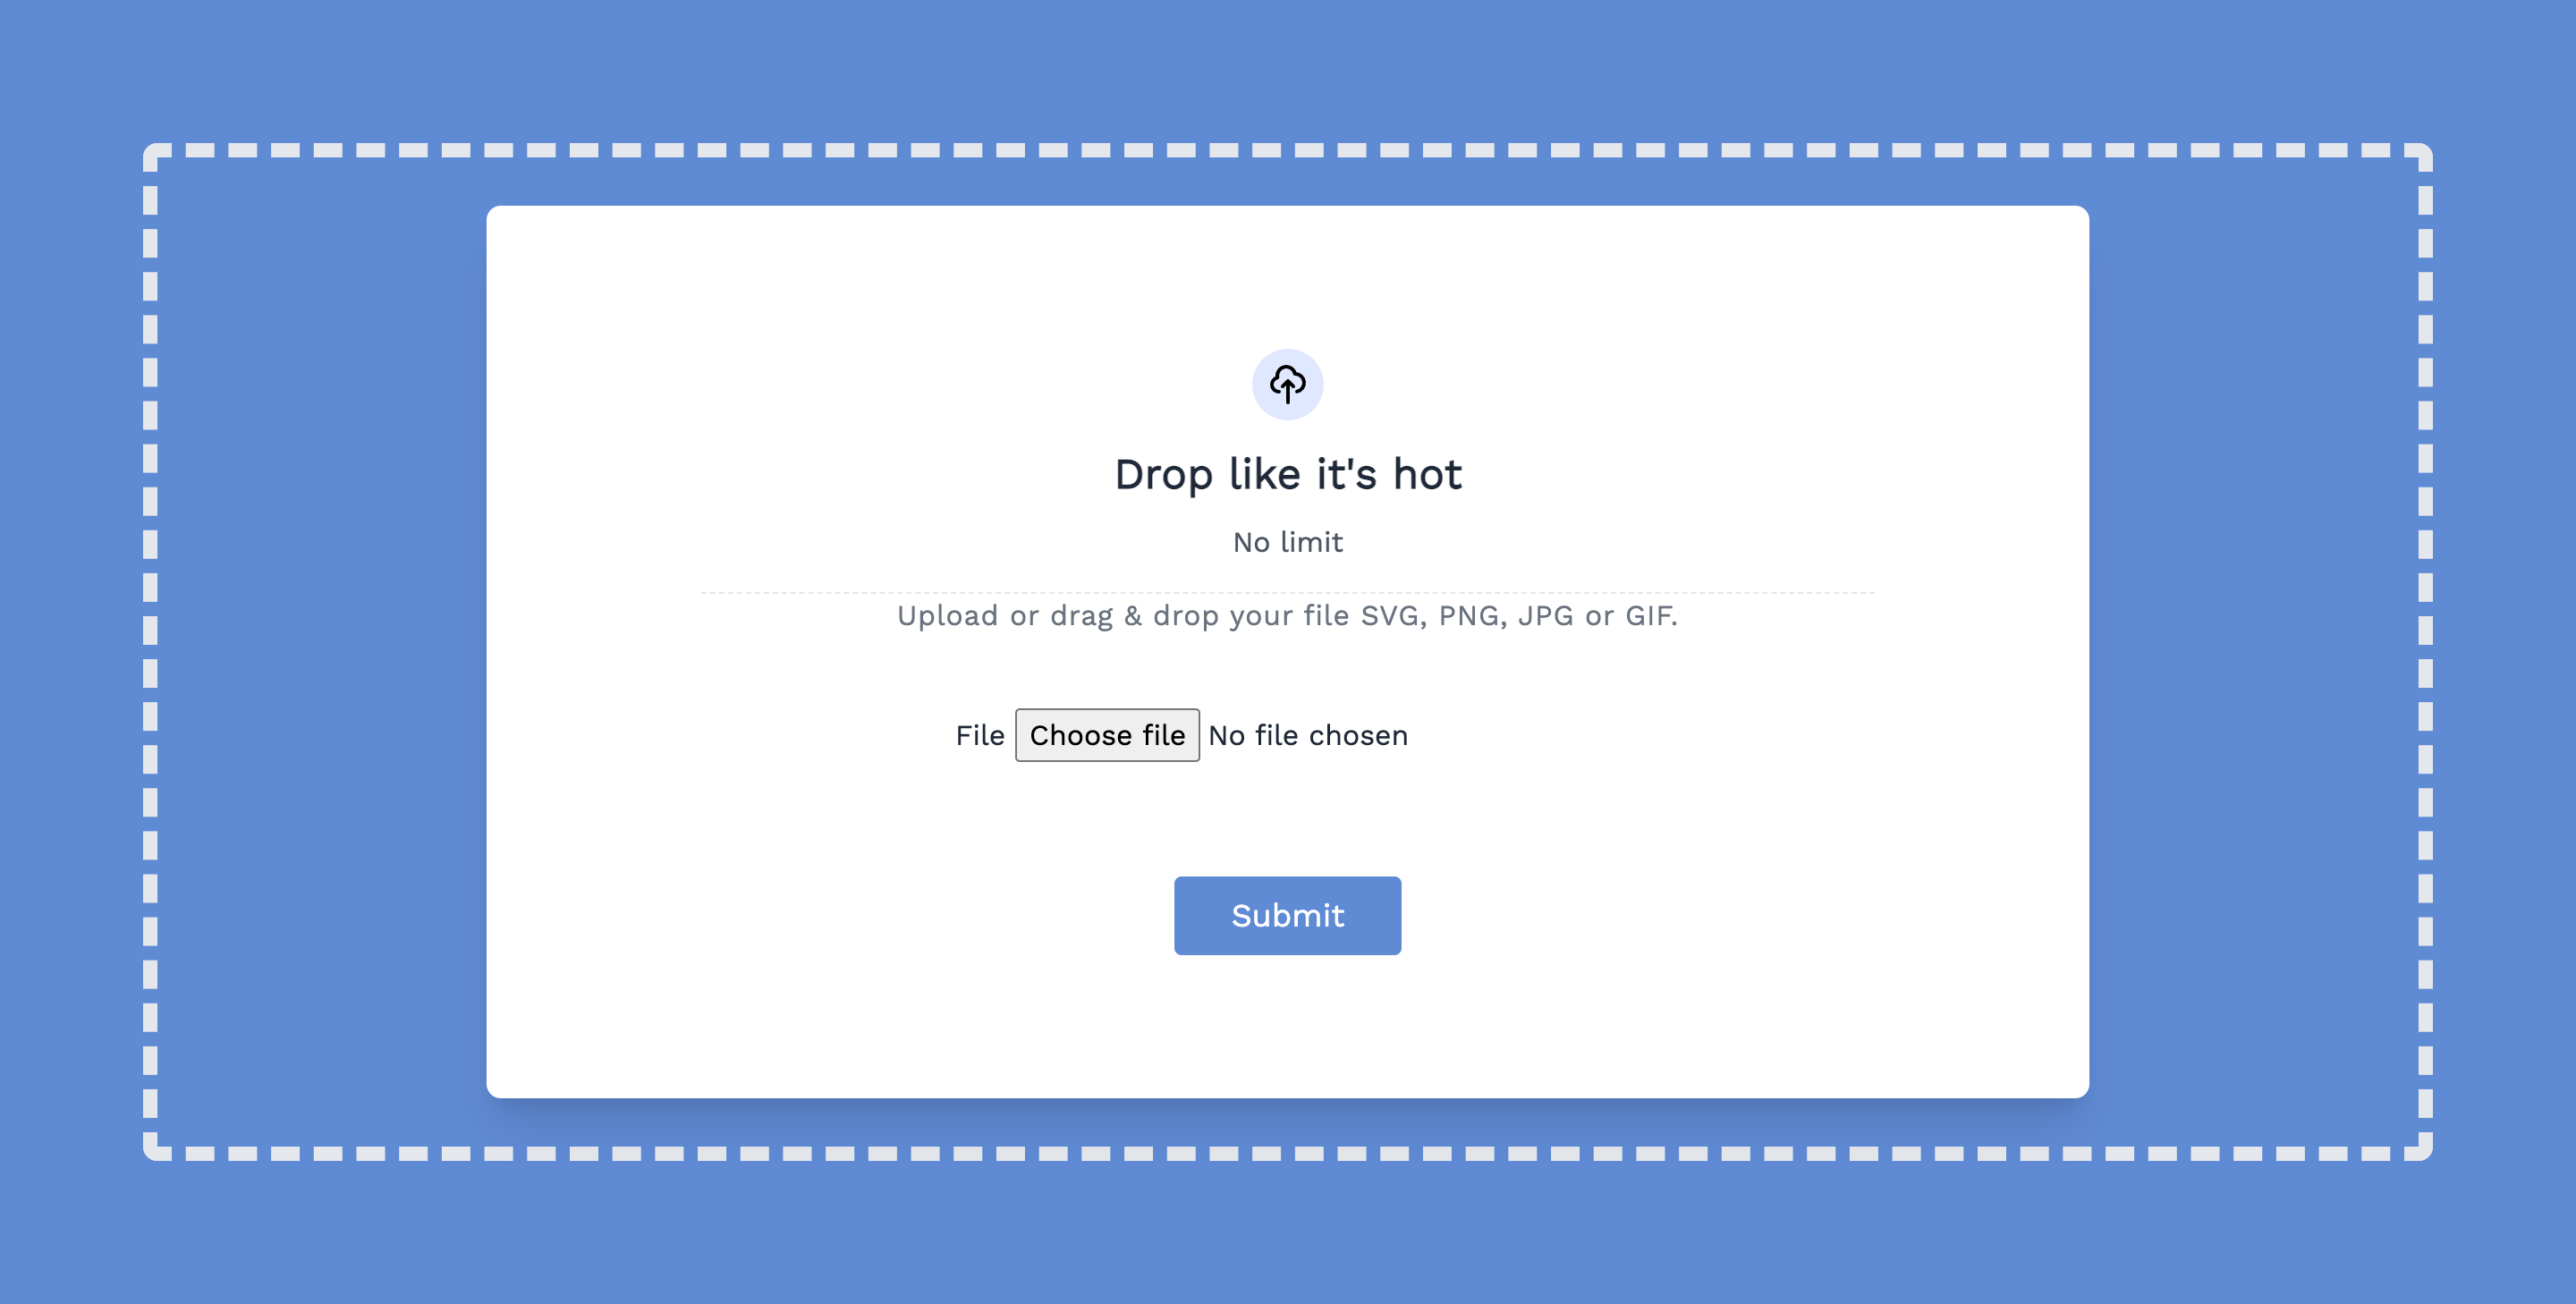
Here is what our application should look like after copying and pasting the code below
Installing Appwrite in our Nuxt Project
To add Appwrite to our Nuxt project, use the following command:
npm install appwrite
Next is to import the Appwrite module into our project:
import { Client } from 'appwrite';
Creating a New Appwrite Project
We have installed and imported our Appwrite module into our project. To use the Appwrite Storage API, we need to create a new Appwrite project. We must have created an account with Appwrite and a new Appwrite instance to follow these steps. Check the prerequisite to learn how to create a new Appwrite instance.
After that, we’ll be redirected to a local host port we specified when we built our Appwrite instance. We will be sent to the Appwrite console after pasting the localhost port into the browser, where we will create a new project. See an example below:

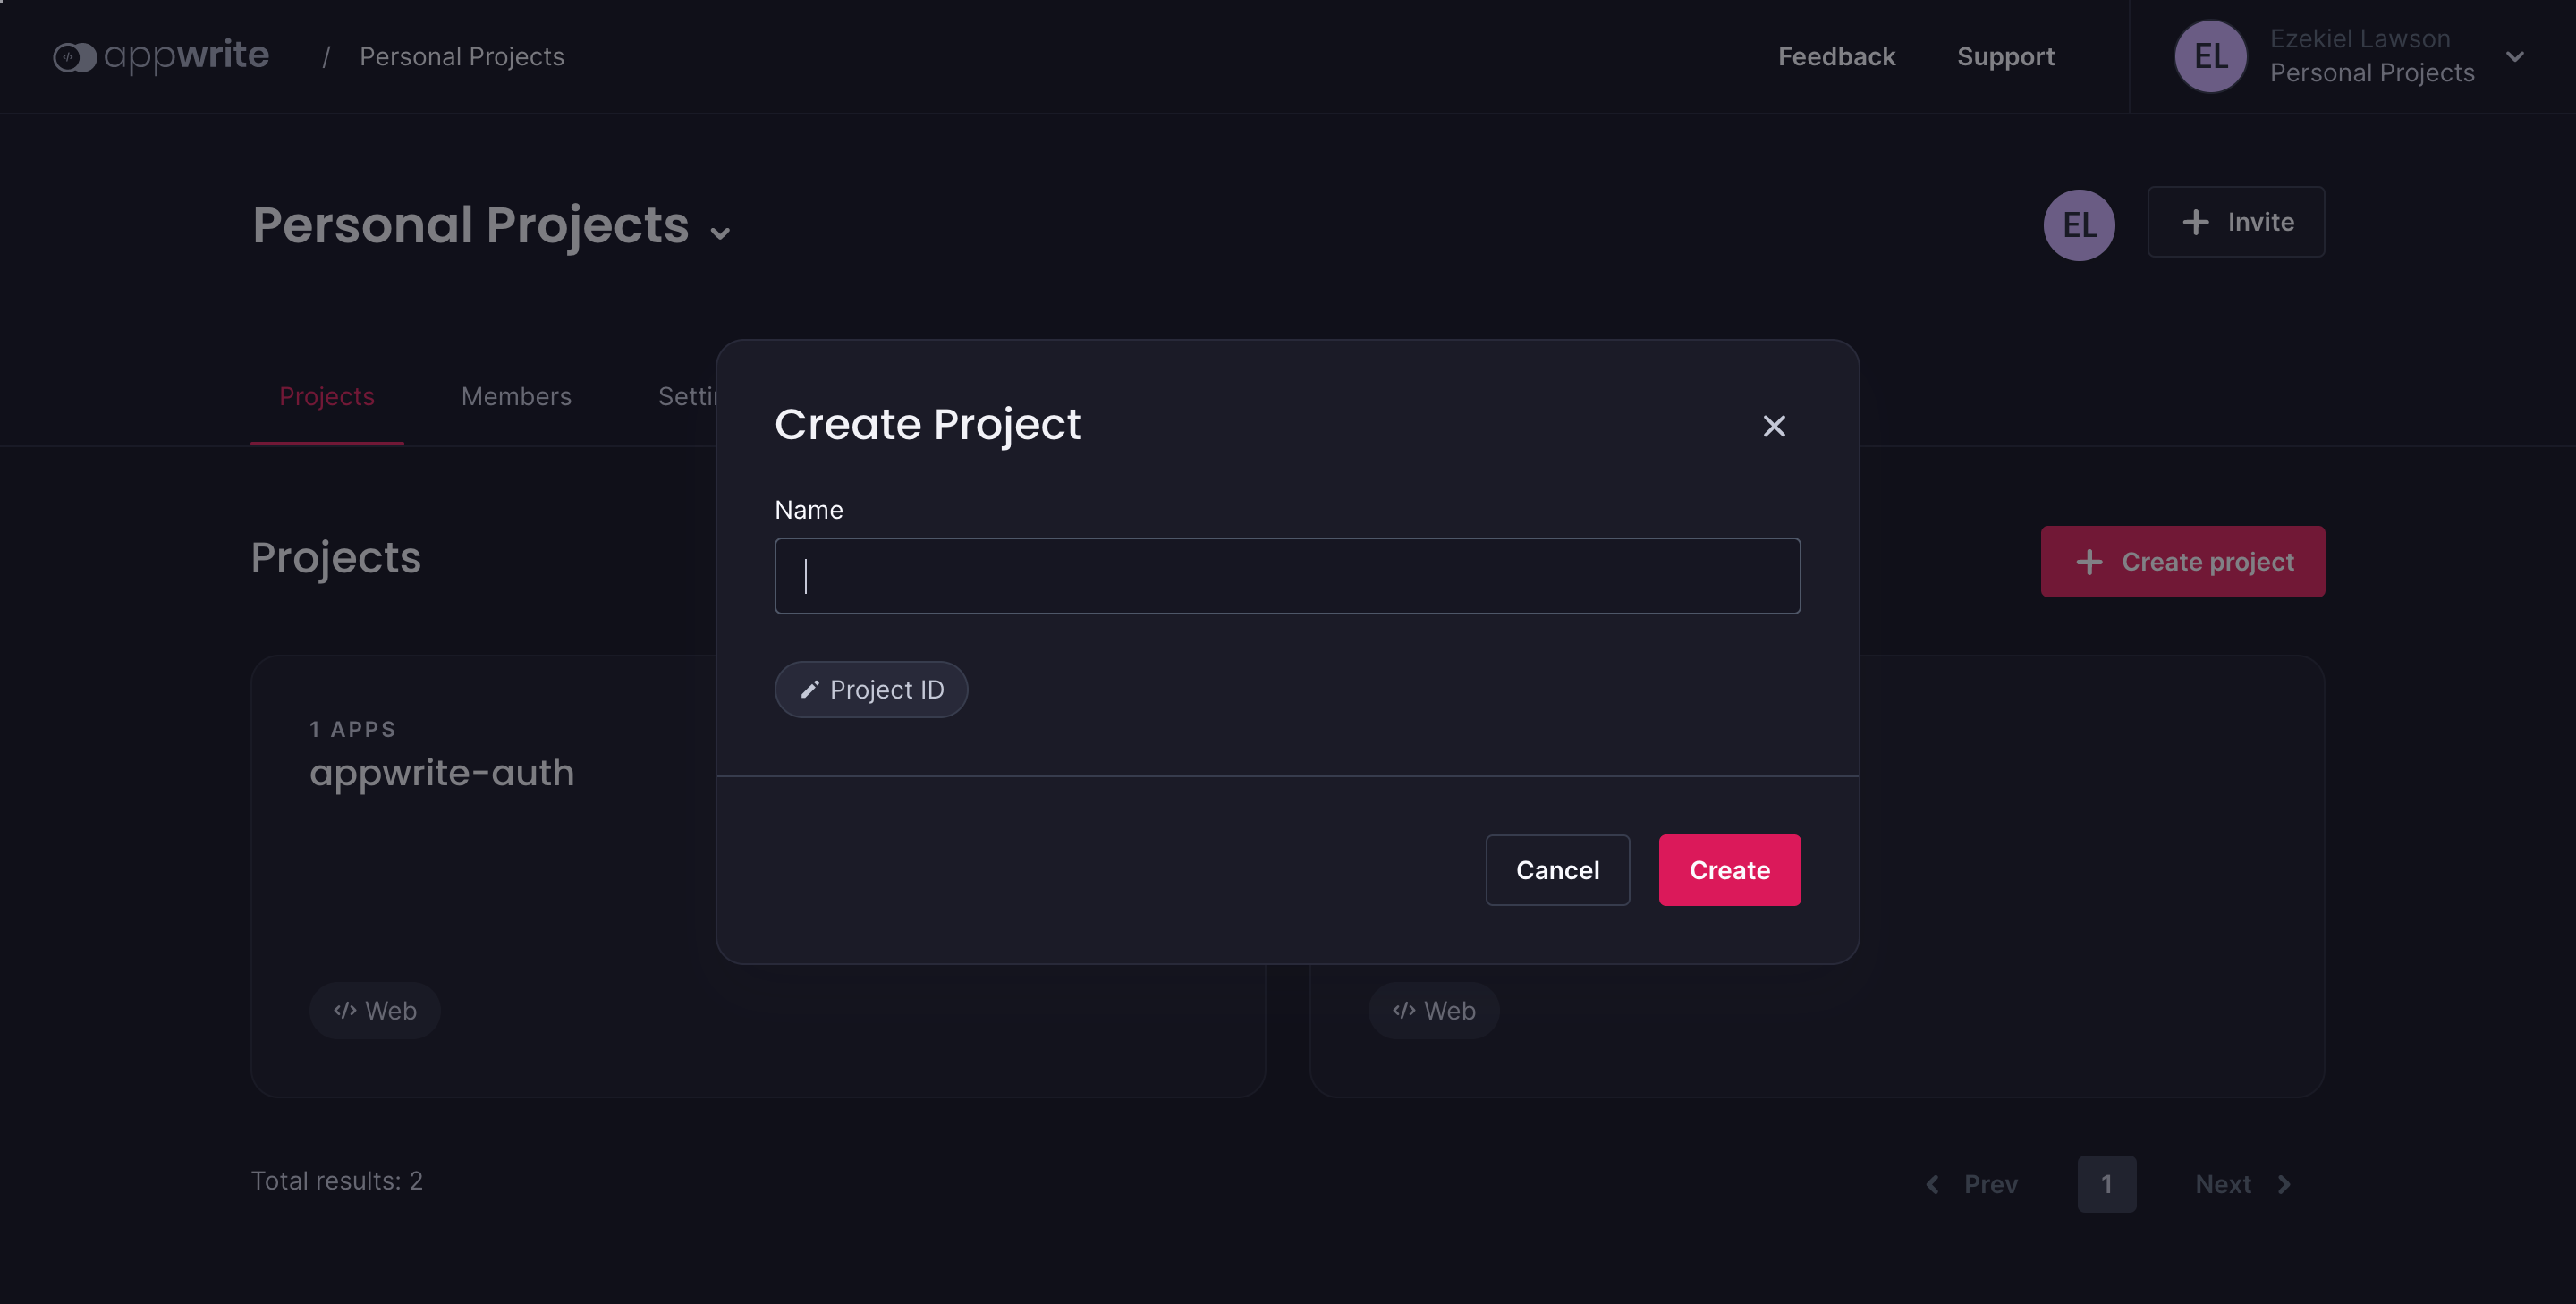
The next step is to give our project a name. In this example, we will name our project file-uploader:
We have successfully created a new project, and the next step is to add a platform. Appwrite SDK makes it very easy for us to build for any platform we want.
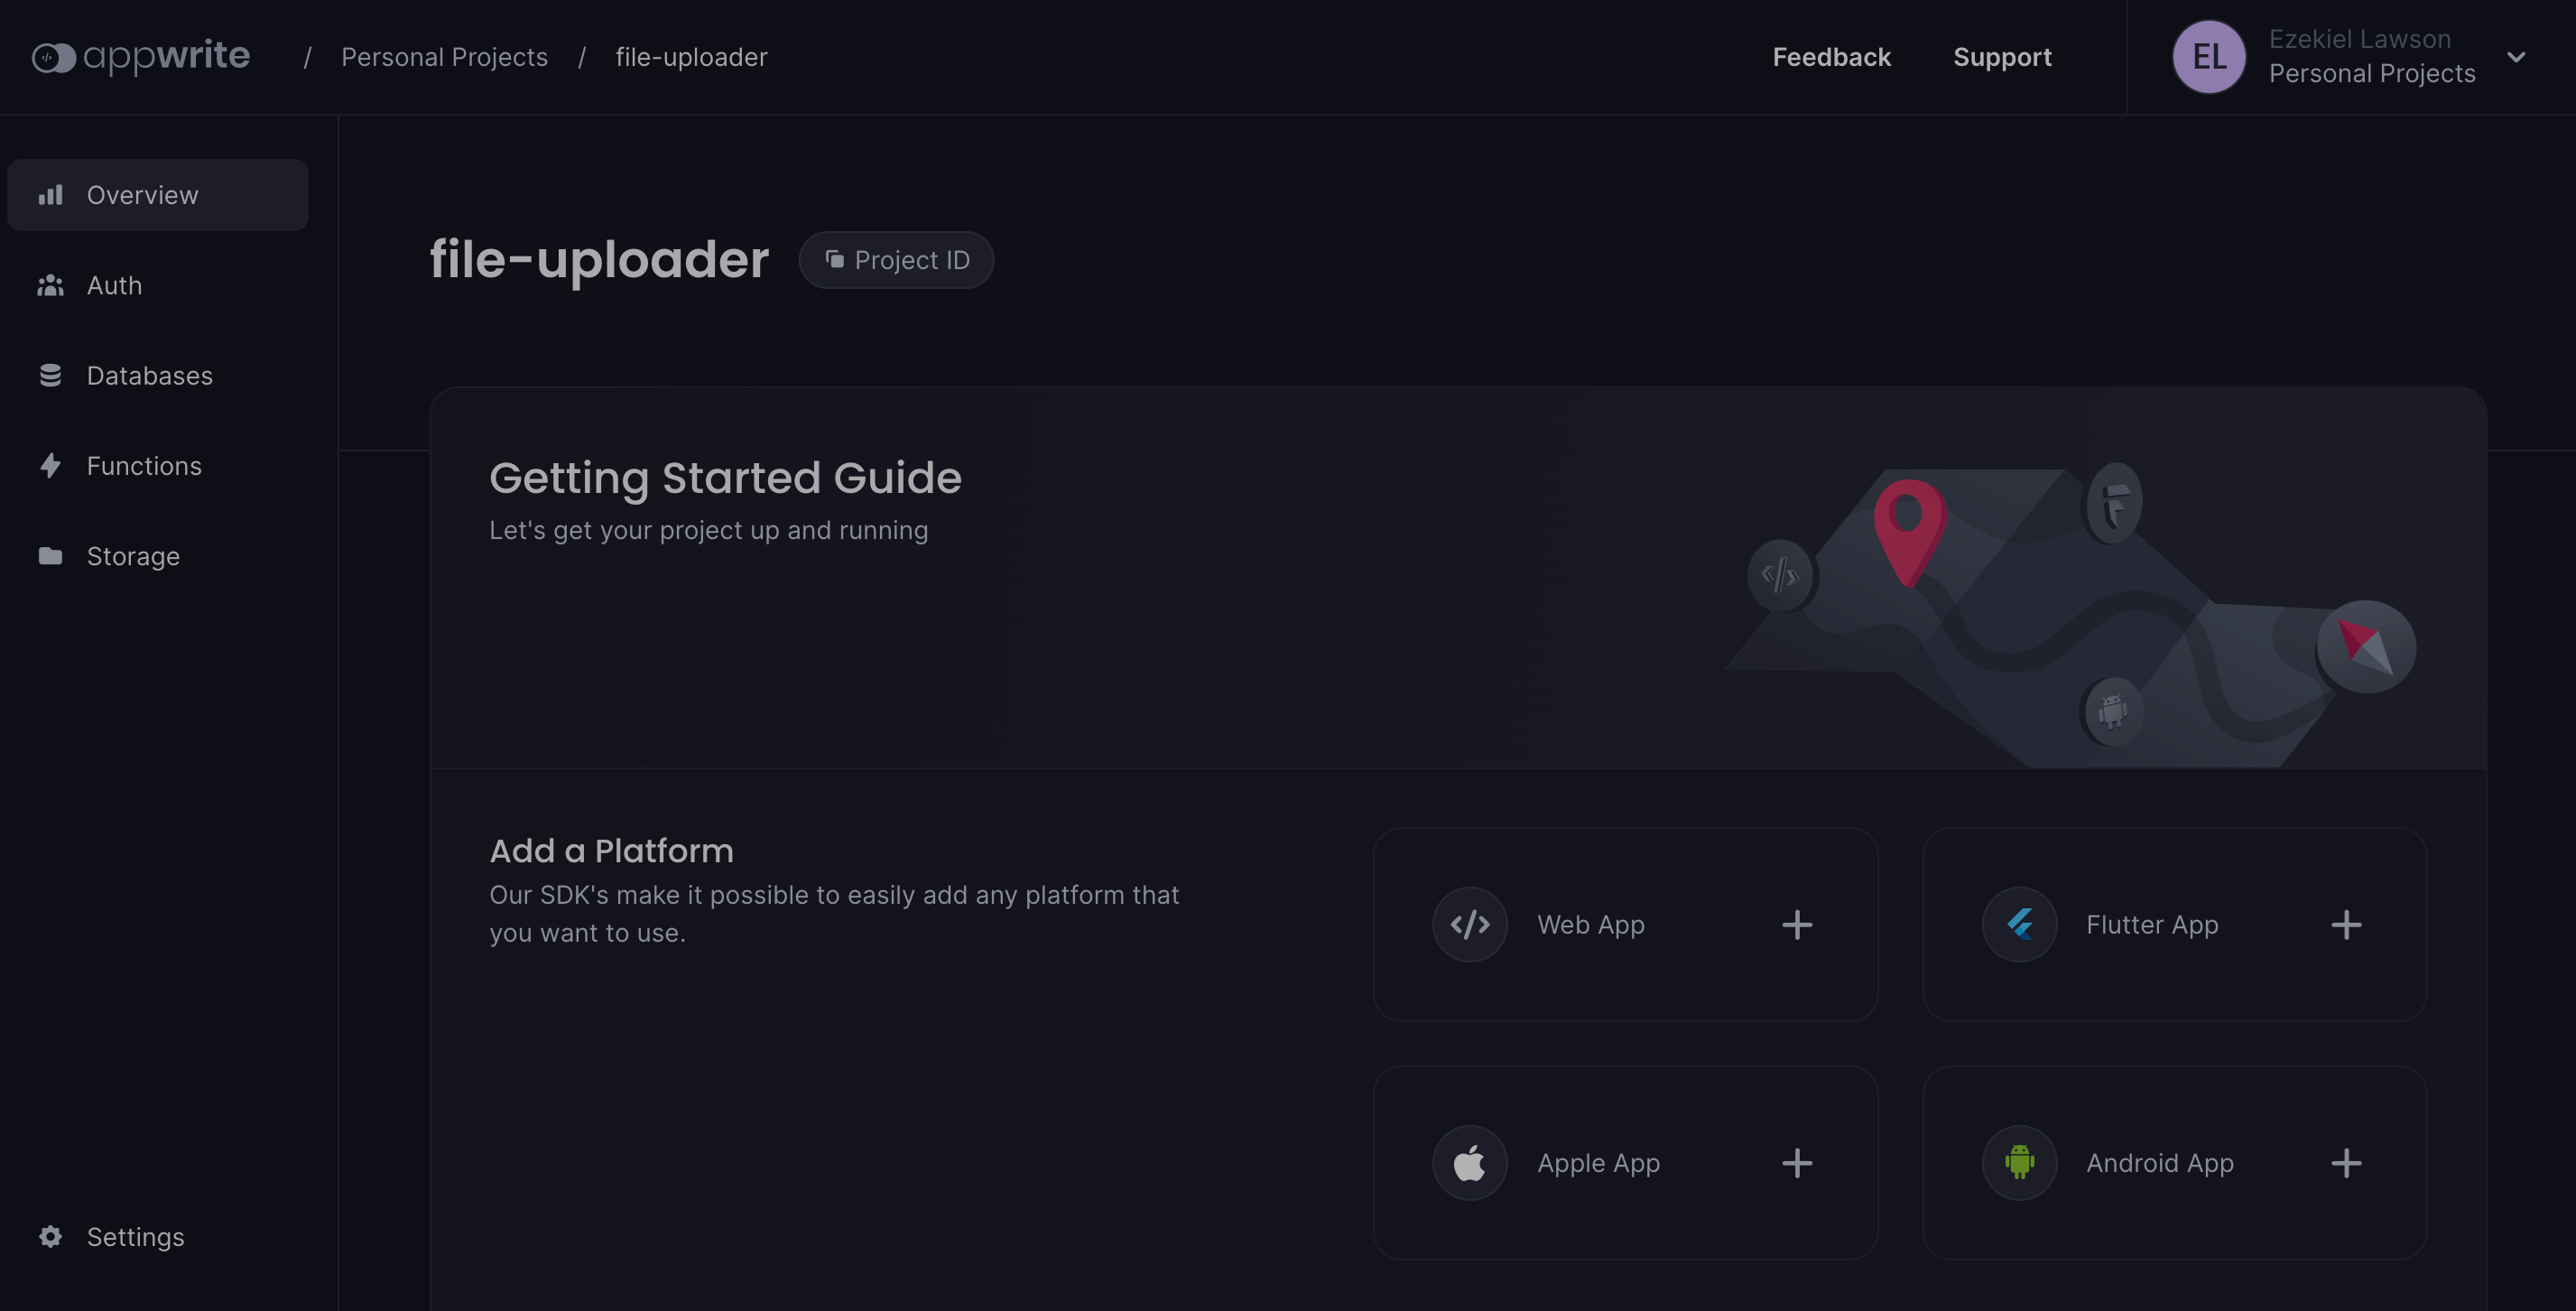
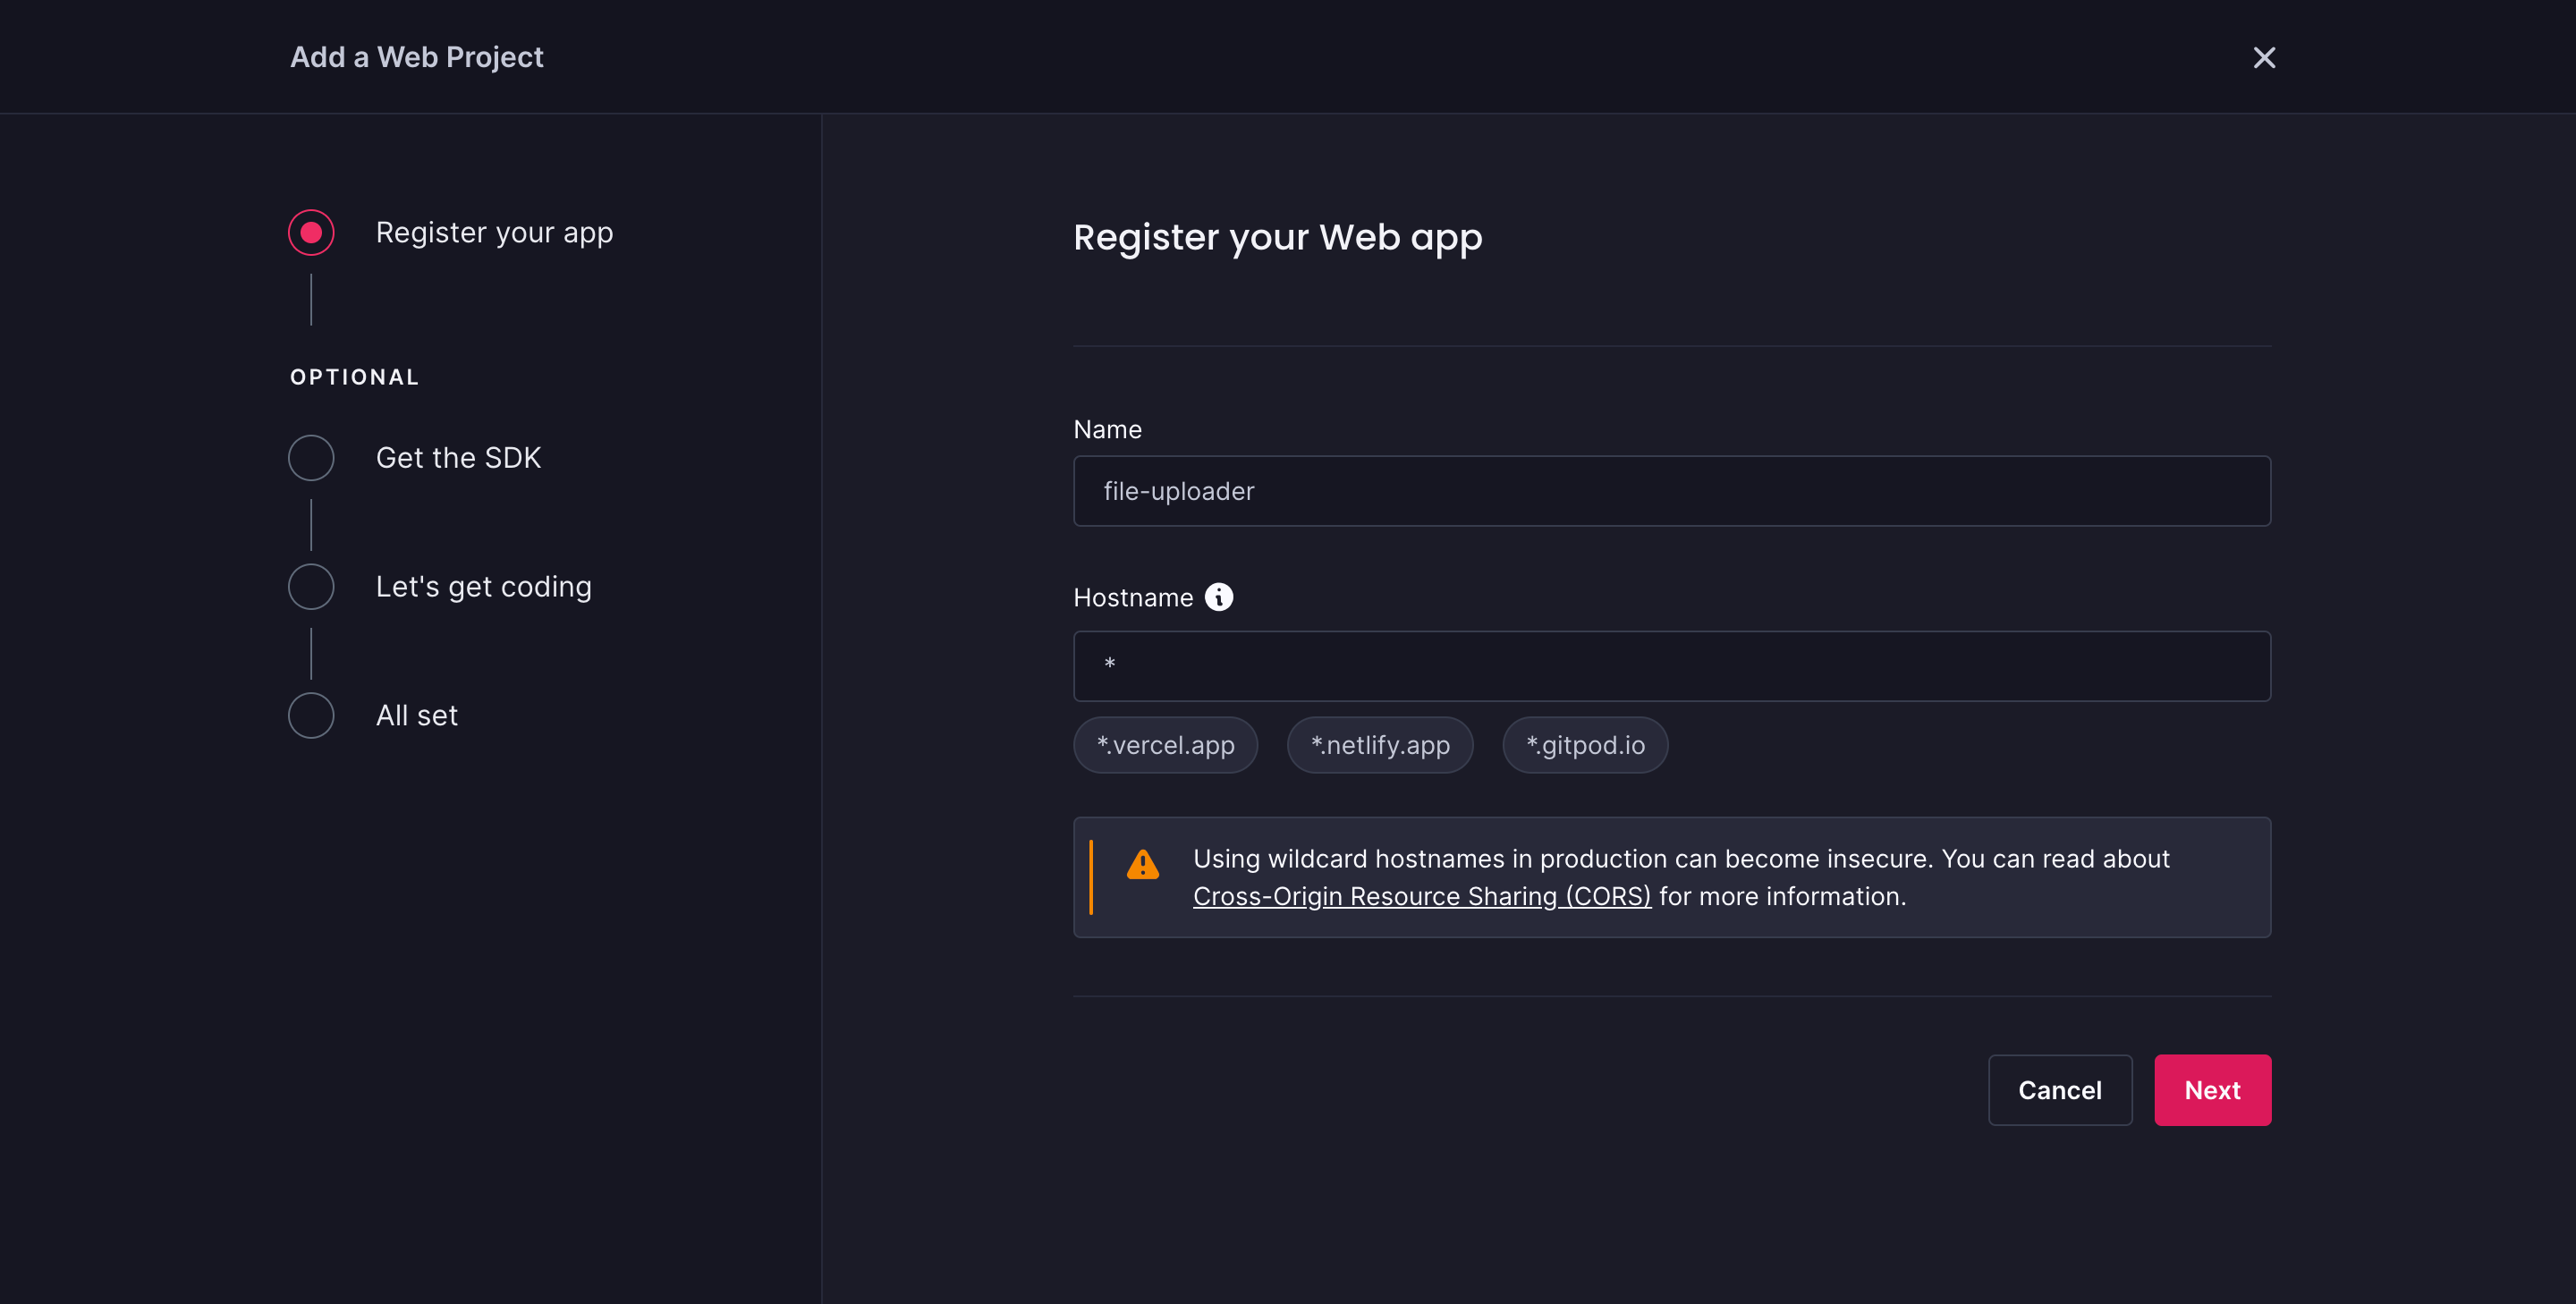
We will choose web, as that is the platform we are building for. Click on the Web App option and you will be redirected to register our web app. The first step is to create a web app and a hostname. We will create a name for only our web app and skip the hostname option:
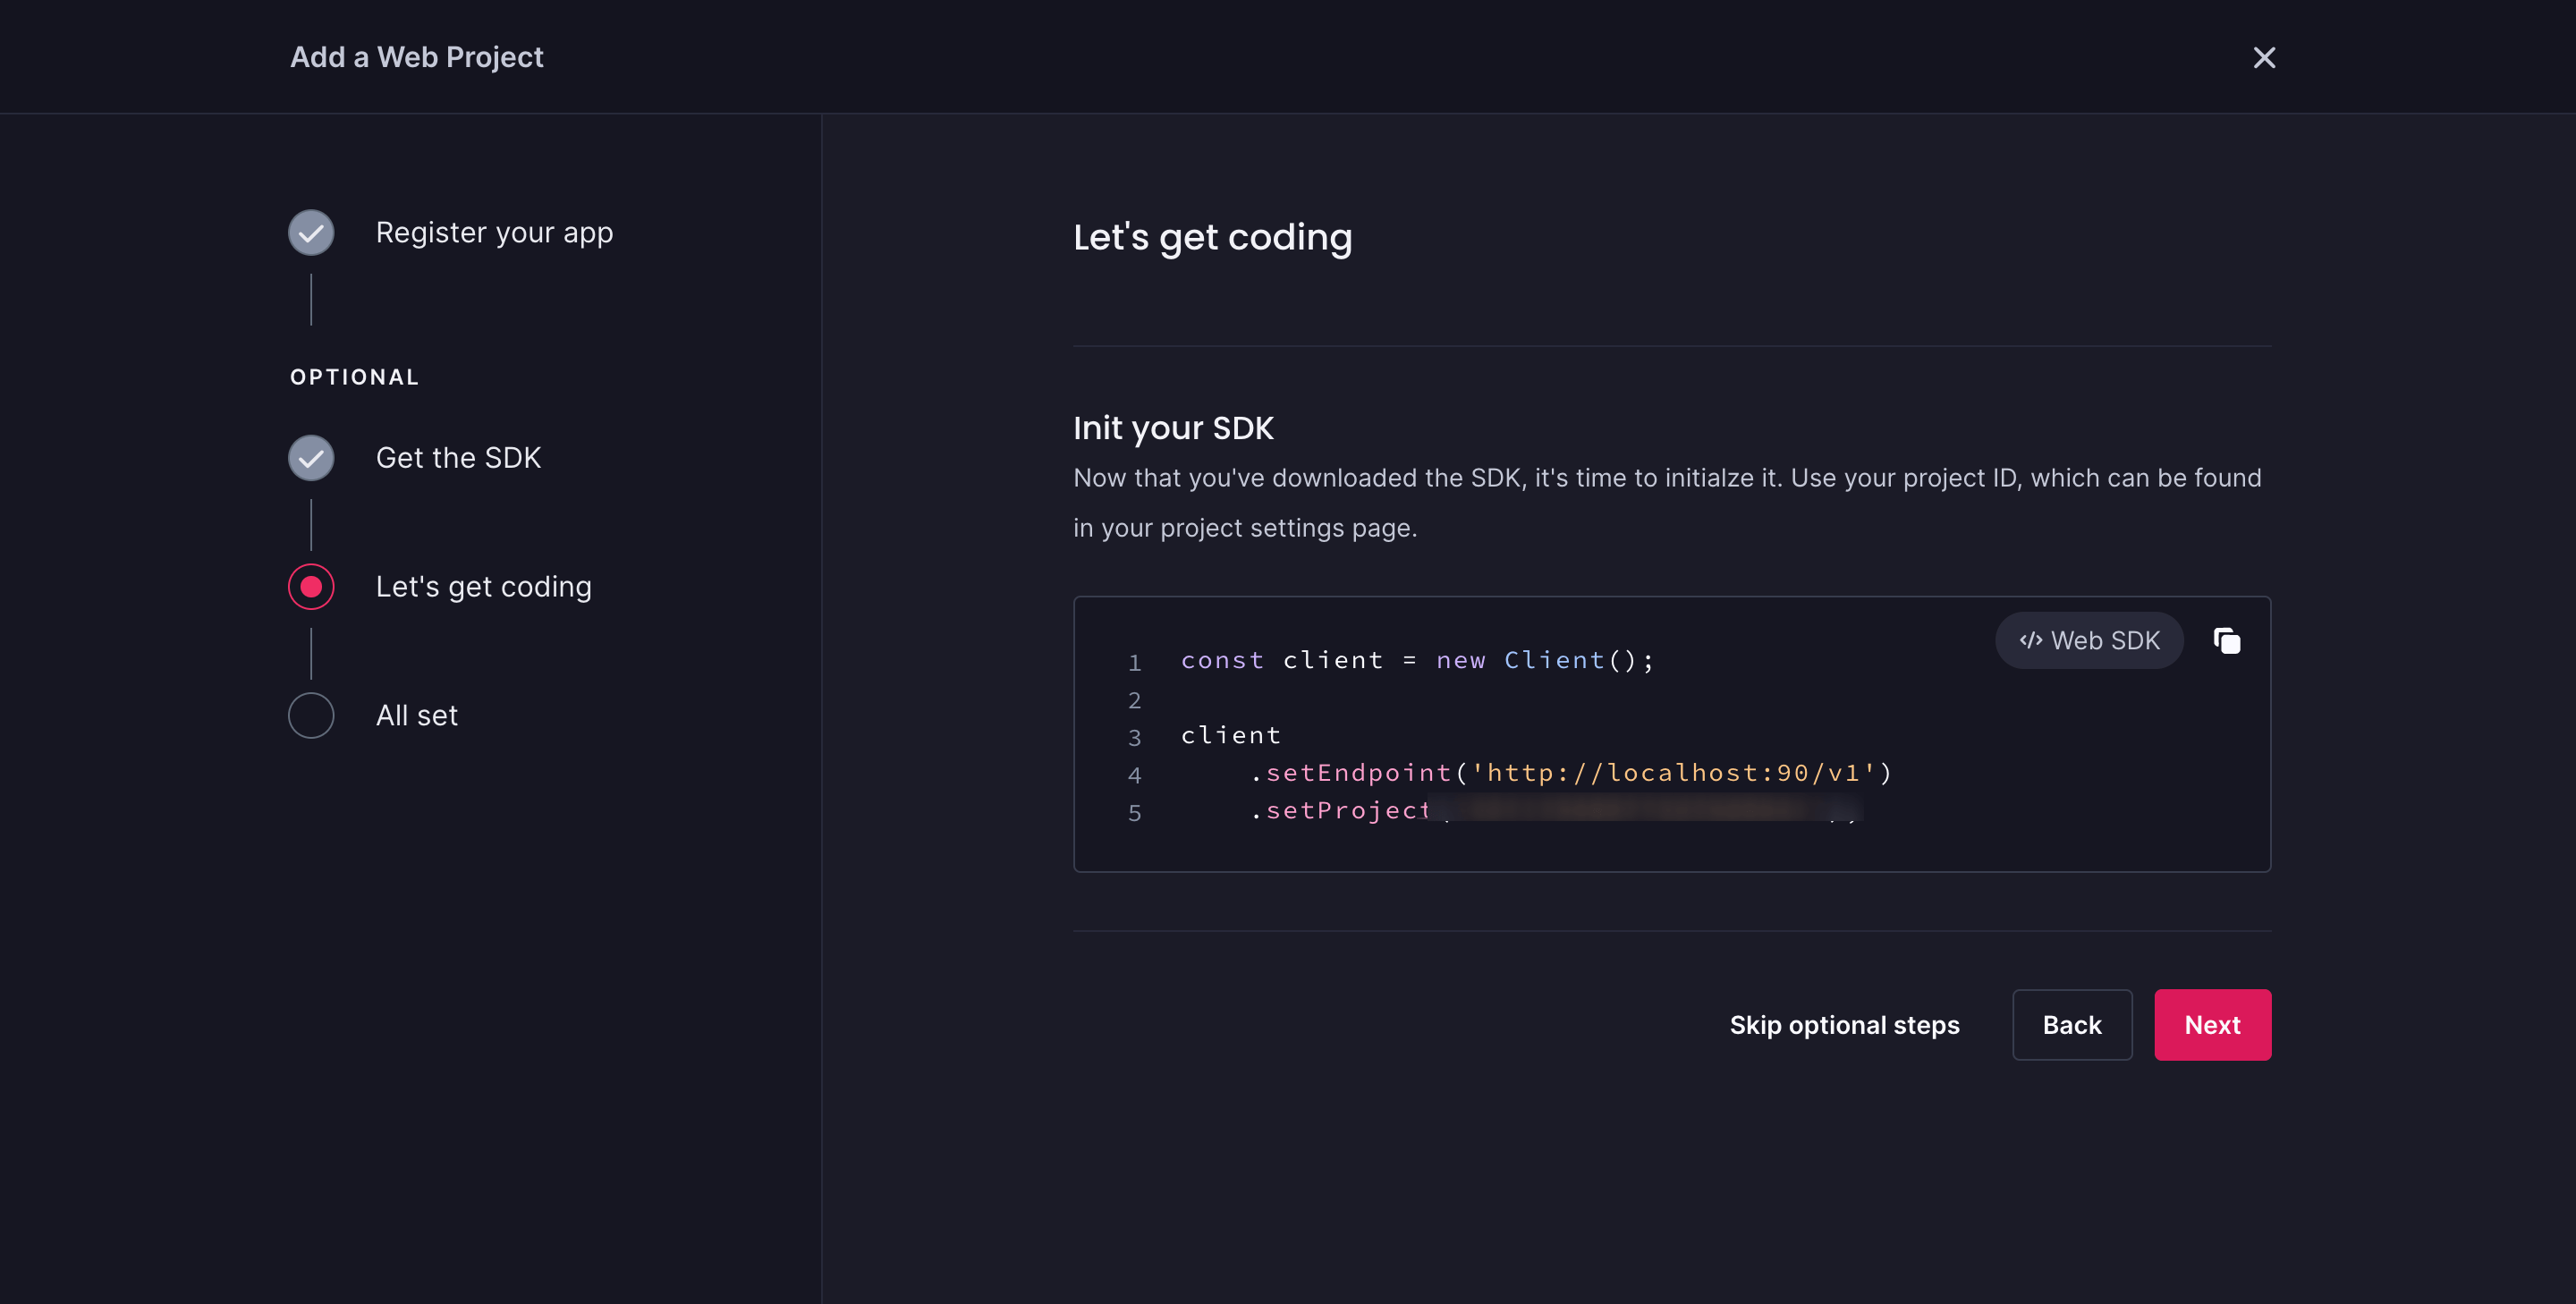
The following step is installing our SDK and importing the modules we completed in the previous part. The final stage is to launch our SDK. To accomplish this, we will use our project ID, which can be located on our project settings page.
We have successfully created a new Appwrite project and imported our SDK. The next step is to create our storage bucket.
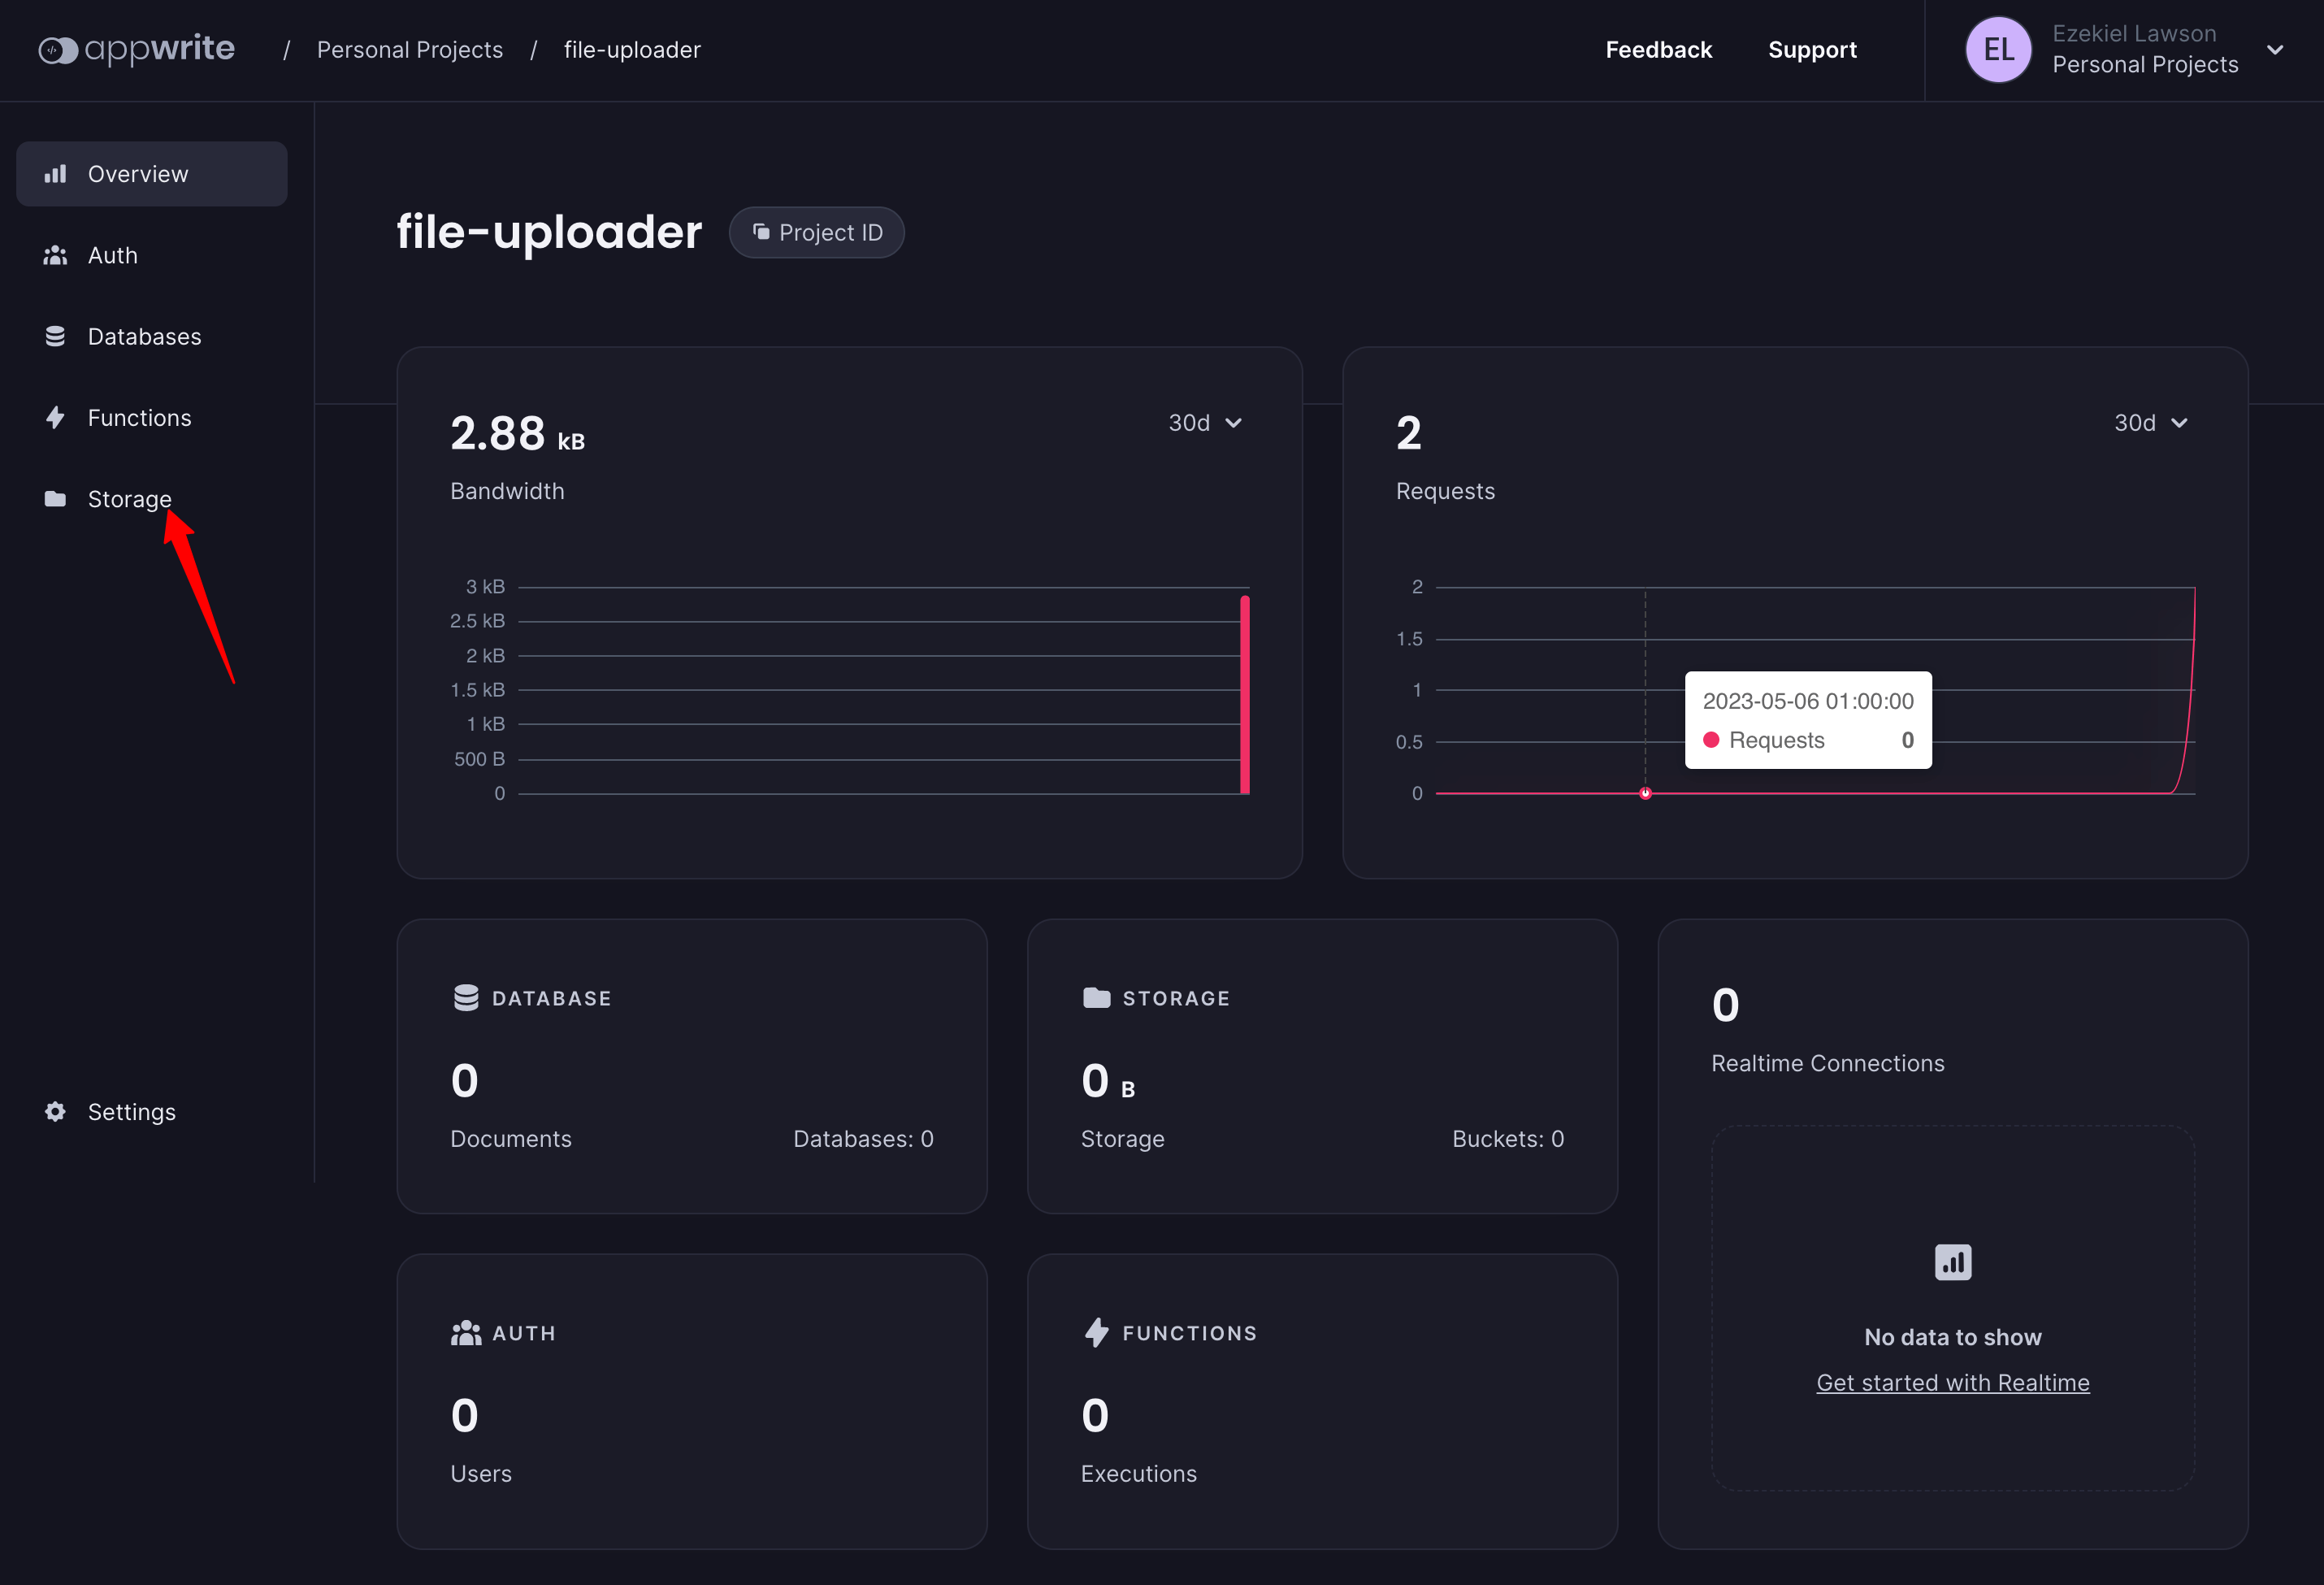
To create a storage bucket, we will navigate to our dashboard where we have our new project, click on the menu storage on the left menu bar of our dashboard.
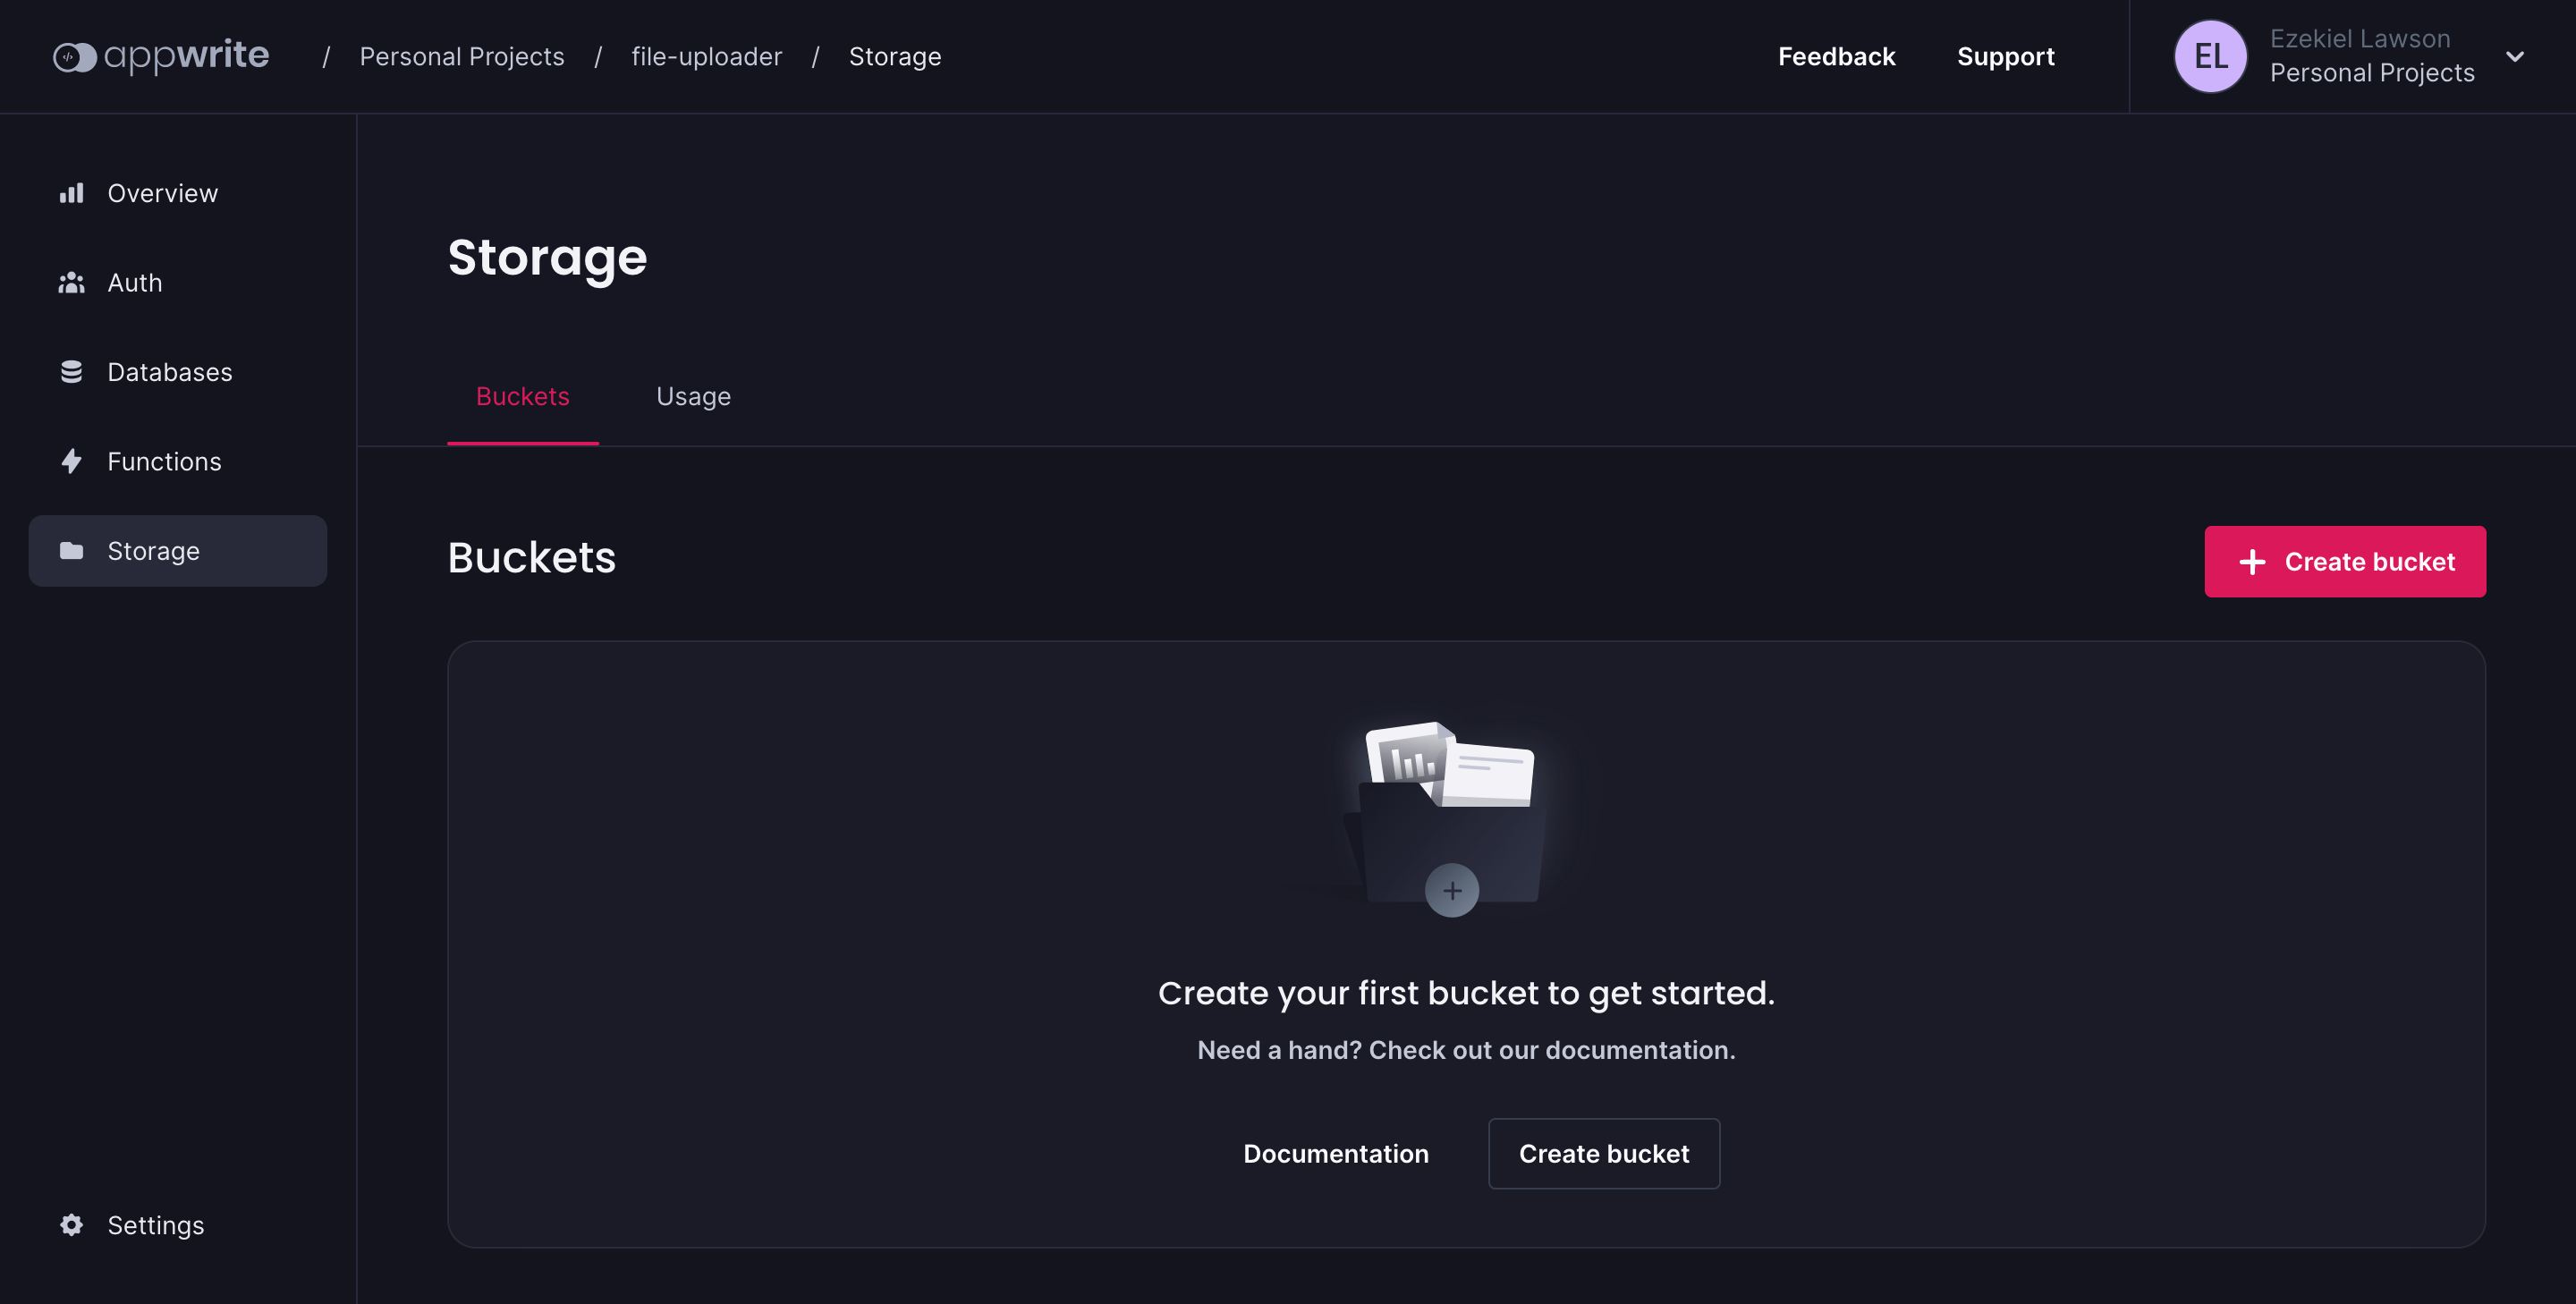
Next is to create our storage bucket. Click on create bucket and create a name for the storage bucket. We will name our storage bucket file-uploader.
After creating our storage bucket, we will be redirected to create a file. We will skip the section as we want to learn how to upload and create a file from our code, not on the dashboard.
Uploading Our Files to Appwrite Storage
We have created our bucket and project file. We’ll now look at how to upload our files to our Appwrite storage.
The first step is to add a function to our file input and upload button. See the following code example:
 <div class="flex flex-col items-center justify-center">
            <form onSubmit="window.location.reload();">
              <label>File
                <input type="file" id="file" ref="file" value="Reset" @change="handleFileUpload" />
              </label>
              <button @click="submitFile"
                class="flex mx-auto mt-16 text-white  border-0 py-2 px-8 focus:outline-none  rounded text-lg btn-style">Upload</button>
            </form>
          </div>
After importing our Appwrite functions, we create a data function that returns an object with a single property called file, and we initialize it as null, as it will be used to store the selected file for uploading.
<script>
import { Client, Storage, ID } from "appwrite";
const client = new Client();
const storage = new Storage(client);
export { client, storage, };
client
  .setEndpoint('Your API Endpoint')
  .setProject('Your project ID')
  ;
export default {
  name: 'FileUploader',
  data() {
    return {
      file: null,
    };
  },
 }
</script>
Next, we create a method function handleFileUpload. This method is called when the user selects a file. This method assigns the file the user selects to the file property using the event objects target.
The final step is to upload our file to the Appwrite storage. To do this, we will write the function submitFile, which will require three parameters: a storage identification, a unique ID and the file to be sent.
To ensure that our file was successfully uploaded, we will record our error to the console. If the file fails to upload, we will notice an error on our console; if it is successful, our file will be uploaded to our storage bucket.
<script>
 methods: {
    handleFileUpload(event) {
      this.file = event.target.files[0];
    },
    async submitFile() {
      try {
        const response = await storage.createFile('Bucket ID', ID.unique(),document.getElementById('file').files[0]);
        console.log(response); // Success
      } catch (error) {
        console.log(error); // Failure
      }
    }

  }
</script>
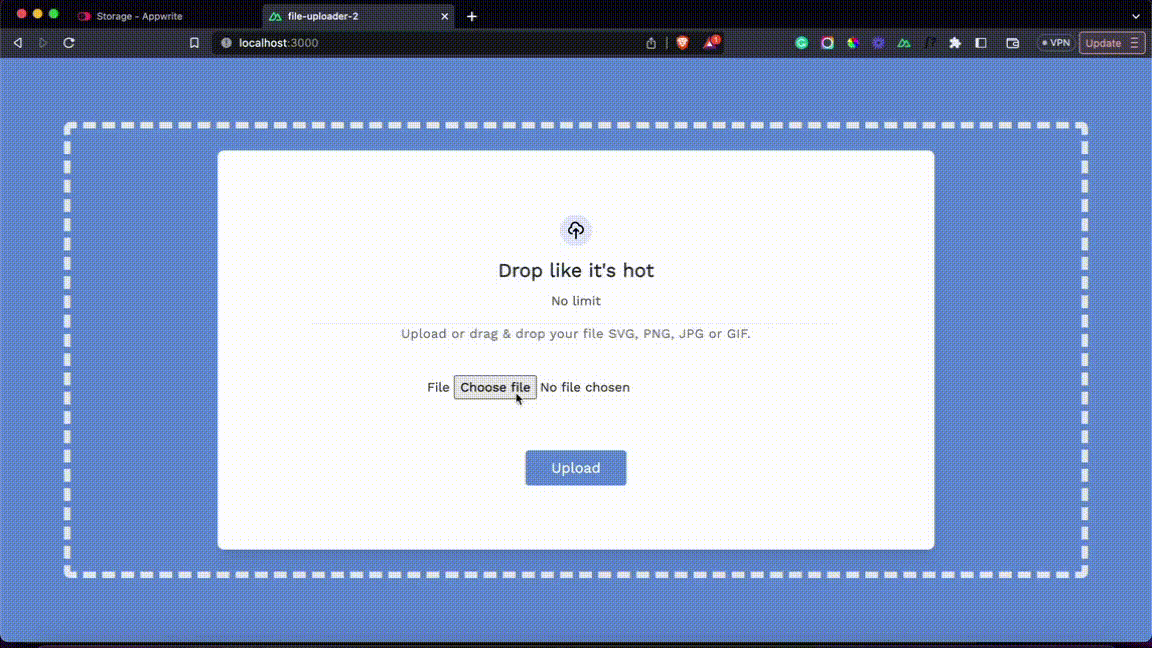
Let’s see how the code examples work, we will upload a file and submit it to the storage bucket. See the example below:
Conclusion
One distinct benefit of using Appwrite Storage API is that it has a built-in security service for our files. It gives database permissions such as read, create and write techniques, allowing users to choose whether all users, select users or a team of users can access their files. This post demonstrated how to build a file uploader website with Appwrite Storage API and Nuxt.js.

Ezekiel Lawson
Ezekiel Lawson is a technical writer and software developer. Aside from building web tools and applications, he enjoys educating people and simplifying complicated issues for their easy understanding by sharing resources that will guide developers through technical writing.
Related Posts
Comments
All articles
Topics
Web MobileMobile
Desktop
Design
Productivity
People
