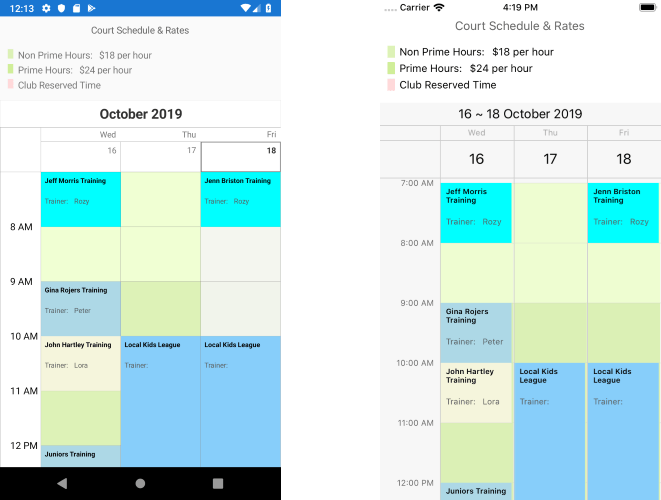
Create Beautiful Schedules with Telerik Calendar & Scheduling for Xamarin

In recent releases we’ve been enhancing our Xamarin Calendar scheduling features, so you can take advantage of a fully-customizable and easy-to-use tool for creating and managing appointments.
We've been working to improve our Calendar in Telerik UI for Xamarin in recent releases, and the R3 2019 release continues this trend. The RadCalendar now comes packed up with a few long-awaited features I am sure you’ll be delighted with. These include Appointment Templates, special and restricted time slots support as well as scrolling the view capabilities. I am going to describe them in detail one by one.

Customizable Time Slots
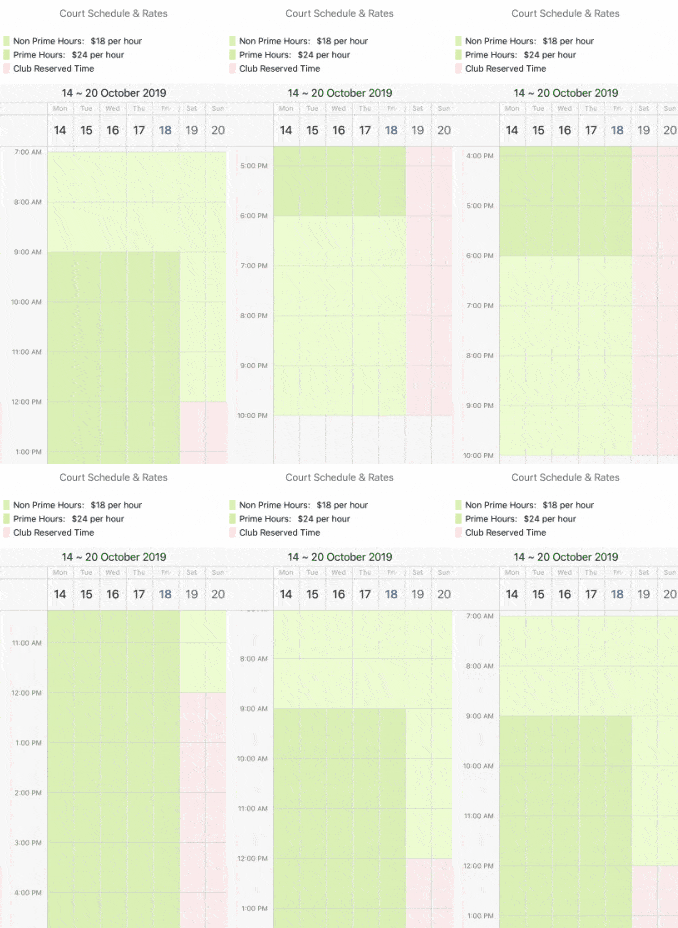
With R3 2019 the Xamarin Forms Calendar control allows you to define a collection of special time slots in order to make them noticeable across the timeline. You can modify the special slots’ appearance and template according to the design you have. In addition, some time slots can be marked as restricted, so that app users won't be able to create appointments on these slots. Let’s see the feature in action.
The example below is about a Tennis Court Schedule which displays the available and reserved time. Time slots will be styled differently according to the court rate during prime / non-prime hours. Additionally, I am going to include a restricted club reserved time when no appointments can be scheduled.
Let’s start with the first step - create a custom SpecialSlot class that will have an enum property defining whether it’s prime/non-prime or club reserved:
public enum CourtTimeSlotType
{
    Prime, Nonprime, ClubReserved
}

public class CourtTimeSlot : SpecialSlot
{
    public CourtTimeSlot(DateTime start, DateTime end): base(start, end)
    {
    }
    public CourtTimeSlotType TimeSlotType { get; set; }
}
Then, create a SpecialSlotsStyleSelector class which returns different CalendarSpecialSlotStyle according to the Slot type:
public class PrimeHoursStyleSelector : SpecialSlotStyleSelector
{
    public CalendarSpecialSlotStyle PrimeHoursStyle { get; set; }
    public CalendarSpecialSlotStyle NonPrimeHoursStyle { get; set; }
    public CalendarSpecialSlotStyle ClubReservedHoursStyle { get; set; }

    public override CalendarSpecialSlotStyle SelectStyle(object item)
    {
        var specialSlot = item as CourtTimeSlot;

        switch (specialSlot.TimeSlotType)
        {
            case CourtTimeSlotType.ClubReserved: return this.ClubReservedHoursStyle;
            case CourtTimeSlotType.Prime: return this.PrimeHoursStyle;
            default: return this.NonPrimeHoursStyle;
        }
    }
}
Define the PrimeHoursStyleSelector as a Resource in XAML:
<local:PrimeHoursStyleSelector x:Key="PrimeHoursStyleSelector">
    <local:PrimeHoursStyleSelector.ClubReservedHoursStyle>
        <telerikInput:CalendarSpecialSlotStyle BackgroundColor="#66FFD8D9"/>
    </local:PrimeHoursStyleSelector.ClubReservedHoursStyle>
    <local:PrimeHoursStyleSelector.PrimeHoursStyle>
        <telerikInput:CalendarSpecialSlotStyle BackgroundColor="#B3E9FFC1" />
    </local:PrimeHoursStyleSelector.PrimeHoursStyle>
    <local:PrimeHoursStyleSelector.NonPrimeHoursStyle>
        <telerikInput:CalendarSpecialSlotStyle BackgroundColor="#B3CFED98" />
    </local:PrimeHoursStyleSelector.NonPrimeHoursStyle>
</local:PrimeHoursStyleSelector>
Create a collection of CourtTimeSlot items that should be later bound to the SpecialSlotsSource property of the MultiDayView (or DayView):
public ObservableCollection<CourtTimeSlot> TimeSlotRates { get; set; }

private ObservableCollection<CourtTimeSlot> GetTimeSlotRates()
{
    var courtTimeSlots = new ObservableCollection<CourtTimeSlot>();

    var startDate = new DateTime(2019, 10, 1);
    var recursUntilDate = new DateTime(2019, 12, 31);

    var weekRecurrence = new RecurrencePattern {
        Frequency = RecurrenceFrequency.Weekly,
        DaysOfWeekMask = RecurrenceDays.WeekDays,
        RecursUntil = recursUntilDate
    };
    var weekEndRecurrence = new RecurrencePattern {
        Frequency = RecurrenceFrequency.Weekly,
        DaysOfWeekMask = RecurrenceDays.WeekendDays,
        RecursUntil = recursUntilDate
    };

    courtTimeSlots.Add(new CourtTimeSlot(startDate.AddHours(7), startDate.AddHours(9)){
        TimeSlotType = CourtTimeSlotType.Prime,
        RecurrencePattern = weekRecurrence
    });
    courtTimeSlots.Add(new CourtTimeSlot(startDate.AddHours(18), startDate.AddHours(22)){
        TimeSlotType = CourtTimeSlotType.Prime,
        RecurrencePattern = weekRecurrence
    });
    courtTimeSlots.Add(new CourtTimeSlot(startDate.AddHours(9), startDate.AddHours(18)){
        TimeSlotType = CourtTimeSlotType.Nonprime,
        RecurrencePattern = weekRecurrence
    });
    courtTimeSlots.Add(new CourtTimeSlot(startDate.AddHours(7), startDate.AddHours(12)){
        TimeSlotType = CourtTimeSlotType.Prime,
        RecurrencePattern = weekEndRecurrence
    });
    courtTimeSlots.Add(new CourtTimeSlot(startDate.AddHours(12), startDate.AddHours(22)){
        TimeSlotType = CourtTimeSlotType.ClubReserved,
        IsReadOnly = true,
        RecurrencePattern = weekEndRecurrence
    });
    return courtTimeSlots;
}
Lastly, add the RadCalendar control to your page with SpecialSlotsSource and SpecialSlotsStyleSelector applied:
<telerikInput:RadCalendar x:Name="calendar" ViewMode="MultiDay">
    <telerikInput:RadCalendar.MultiDayViewSettings>
        <telerikInput:MultiDayViewSettings VisibleDays="7"
                            DayStartTime="7:00:00"
                            DayEndTime="22:00:00"
                            SpecialSlotsSource="{Binding TimeSlotRates}"
                            SpecialSlotStyleSelector="{StaticResource PrimeHoursStyleSelector}" />
    </telerikInput:RadCalendar.MultiDayViewSettings>
</telerikInput:RadCalendar>
Check out the short video below to see how RadCalendar with slots styling applied will look on an iOS simulator:

Customizable Appointments
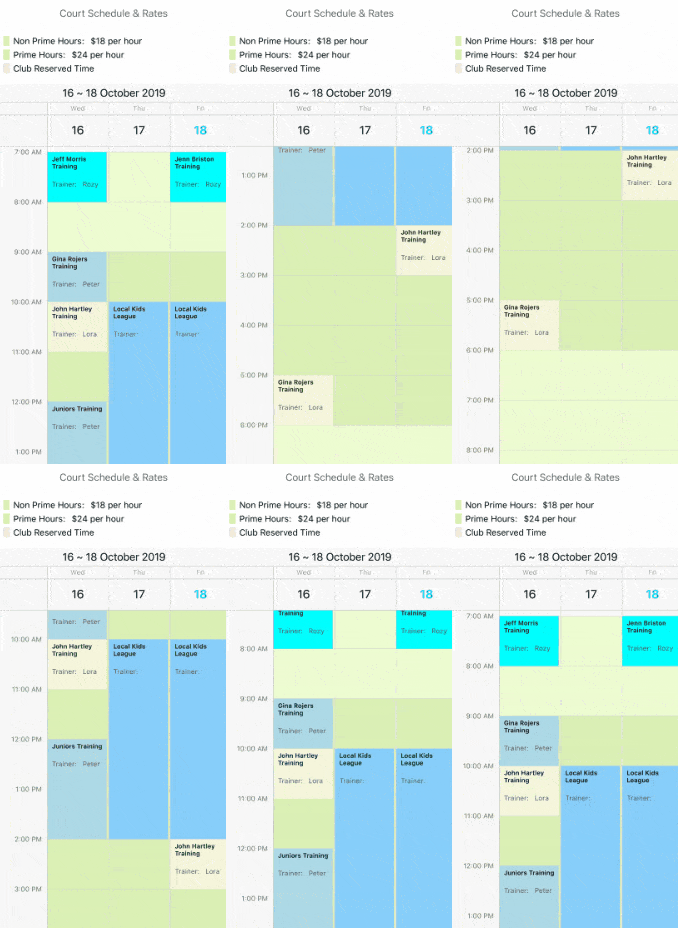
As we have configured the Xamarin Calendar timeline, now we are ready to add some appointments it. With the latest release of Telerik UI for Xamarin you have full control over the way your appointments are visualized across the timeline. The new Appointment Template feature allows you to add any text, image and styling to the Appointments shown in DayView / MultiDayView.
Let’s explore this feature with the already created Tennis Court Schedule example. Add a collection of Appointment objects to your ViewModel class:
public ObservableCollection<Appointment> Appointments { get; set; }

public ObservableCollection<Appointment> GetAppointments()
{
    var startDate = new DateTime(2019, 16, 1, 7, 0, 0);

    return new ObservableCollection<Appointment>()
    {
        new Appointment()
        {
            StartDate = startDate,
            EndDate = startDate.AddHours(1),
            Title = "Jeff Morris Training",
            Detail = "Rozy",
            Color = Color.Aqua
        },
            new Appointment()
        {
            StartDate = startDate.AddDays(2),
            EndDate = startDate.AddDays(2).AddHours(1),
            Title = "Jenn Briston Training",
            Detail = "Rozy",
            Color = Color.Aqua
        },
        new Appointment()
        {
            StartDate = startDate.AddHours(2),
            EndDate = startDate.AddHours(3),
            Title = "Gina Rojers Training",
            Detail = "Peter",
            Color = Color.LightBlue
        }
    };
}
Next we'll add a DataTemplate to the Page Resources. Here is a sample one (together with some styles):
<Style x:Key="TitleLabel" TargetType="Label">
    <Setter Property="TextColor" Value="Black" />
    <Setter Property="FontAttributes" Value="Bold" />
    <Setter Property="FontSize" Value="10" />
    <Setter Property="VerticalTextAlignment" Value="Center" />
    <Setter Property="VerticalOptions" Value="Start" />
</Style>
<Style x:Key="DetailLabel" TargetType="Label">
    <Setter Property="TextColor" Value="#5B5D5F" />
    <Setter Property="FontSize" Value="Micro" />
    <Setter Property="HeightRequest" Value="25" />
    <Setter Property="LineBreakMode" Value="WordWrap" />
    <Setter Property="HorizontalOptions" Value="Start" />
    <Setter Property="LineBreakMode" Value="TailTruncation" />
</Style>
<DataTemplate x:Key="CustomAppointmentTemplate">
    <StackLayout Padding="5" BackgroundColor="{Binding Color}">
        <Label Text="{Binding Title}" Style="{StaticResource TitleLabel}" />
        <StackLayout Orientation="Horizontal" Margin="0,10, 0, 0">
            <Label Text="Trainer: " Style="{StaticResource DetailLabel}" />
            <Label Text="{Binding Detail}" Style="{StaticResource DetailLabel}" />
        </StackLayout>
    </StackLayout>
</DataTemplate>
The last step is to apply the template to AppointmentContentTemplate property of the DayView / MultiDayView:
<telerikInput:RadCalendar x:Name="calendar" ViewMode="MultiDay" AppointmentsSource="{Binding Appointments}">
    <telerikInput:RadCalendar.MultiDayViewSettings>
        <telerikInput:MultiDayViewSettings VisibleDays="3"
                      DayStartTime="7:00:00"
                      DayEndTime="22:00:00"
                      SpecialSlotsSource="{Binding TimeSlotRates}"
                      SpecialSlotStyleSelector="{StaticResource PrimeHoursStyleSelector}"
                      AppointmentContentTemplate="{StaticResource CustomAppointmentTemplate}"/>
    </telerikInput:RadCalendar.MultiDayViewSettings>
</telerikInput:RadCalendar>
Here is the result after the latest additions:

Scrolling API
Another useful feature of RadCalendar we introduced with R3 2019 release is the ScrollTimeIntoView method. It comes in handy when you need to scroll directly to the time you want your users to focus on, rather than displaying the DayView/MultiDayView from the beginning.
As an example, let's scroll the timeline directly to the afternoon hours to check the availability there:
calendar.ScrollTimeIntoView(TimeSpan.FromHours(14));
Try it out and Share Your Feedback
As always, we would love to hear your feedback about the Calendar & Scheduling component and how we can improve it. If you have any ideas for features to add, do not hesitate to share this information with us on our Telerik UI for Xamarin Feedback portal.
Still haven't tried Telerik UI for Xamarin? The free trial is right here waiting for you to give it a try and explore all the components provided in the suite.

Yana Kerpecheva
Yana Kerpecheva is a Senior Technical Support Engineer on the Telerik UI for Xamarin team. She has been working with Telerik products since 2008, when she joined the company. Apart from work, she likes skiing and travelling to new places.
