How to Use a jQuery TreeView UI Component in Your Web App (Part 1)

Summarize with AI:
To display items in a hierarchical, tree-like structure with expandable parent and child nodes, you need a TreeView. See how you can easily create and style a custom TreeView in Kendo UI.
In a recent component spotlight, you took command of the ToolBar. Like the ToolBar, this next component is also a unique addition to your supply of tools. The TreeView is a component that displays items in a hierarchical, tree-like structure. Each parent node in the tree can be expanded and collapsed to show and hide its child nodes. Child nodes are indented to show the parent they belong to. A TreeView is useful when your content has a single root that all other items descend from. It can be used in a code editor to show a project’s file structure or in a browser to list a user’s bookmarks.
Next, you will see how to implement the Kendo UI TreeView component.
Creating a TreeView from HTML
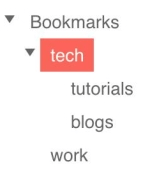
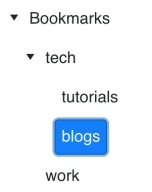
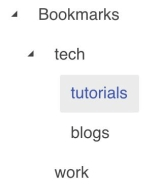
The basic implementation for a TreeView can be made from a <ul> element. The first <li> element is the root of the tree. Subtrees are added by placing a <ul> element within a <li> element. Next, you initialize the component by calling $(element).kendoTreeView(). The following are examples of a TreeView styled with different themes. The first example uses the Kendo UI theme. The second example uses the Bootstrap theme. And the third example uses the Material theme.


Here is the code to create the example. Enter the dojo to practice.
<!DOCTYPE html>
<html>
  <head>
    <title>Kendo UI Example</title>
    <link rel="stylesheet" type="text/css" href="https://kendo.cdn.telerik.com/2018.1.221/styles/kendo.common.min.css">
    <link rel="stylesheet" type="text/css" href="https://kendo.cdn.telerik.com/2018.1.221/styles/kendo.default-v2.min.css">
    <script src="https://kendo.cdn.telerik.com/2018.1.221/js/jquery.min.js"></script>
    <script src="https://kendo.cdn.telerik.com/2018.1.221/js/kendo.all.min.js"></script>
    <style>
      body { font-family: 'helvetica'; }
    </style>
  </head>
  <body>
    <ul id="tree">
      <li>
        Bookmarks
        <ul>
          <li>
            tech
            <ul>
            <li>tutorials</li>
            <li>blogs</li>
            </ul>
          </li>
          <li>work</li>
        </ul>
      </li>
    </ul>
    <script>
      $(document).ready(function() {
        $('#tree').kendoTreeView();
      });
    </script>
  </body>
</html>
Creating a TreeView from Data
Another way to initialize a TreeView is to configure the component's dataSource option. The dataSource takes an array of items. These objects represent the top-most level of the tree. Because our tree has only one node at the top, the dataSource will contain only one object. To add a subtree to a node, an items array is added to the object. The HTML is reduced to a single, empty element. This is the updated code for our TreeView:
<ul id="tree"></ul>
<script>
  $(document).ready(function() {
    $('#tree').kendoTreeView({
      dataSource: [
        { text: 'Bookmarks', items: [
          { text: 'tech', items: [
            { text: 'tutorials' },
            { text: 'blogs' }
          ]},
          { text: 'work' }
        ]}
      ]
    });
  });
</script>
Customizing a TreeView with Templates
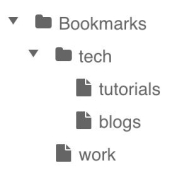
Templates allow you to customize the appearance of items in your TreeView. The template can be an HTML element or it can contain properties of the item. You define the template by adding a template field to the TreeView’s options. For our bookmark example, we want to put a folder icon next to parent nodes, and a file icon next to leaf nodes. This is what we will recreate:

If you were going to write out the HTML, the markup would look like this:
<li>
  <span class="fa fa-file"></span>work
</li>
To convert this to a template, we will need to replace the icon class name and the text of the node with variables. To use variables within our template, we will need to use a special syntax. The syntax begins with #= and ends with #. In between is the data. The syntax to get a value from one of the items is item.key where key is replaced with the name of the property. For example, to get the text of an item we use item.text.
In this example, we will add a new property to our items called icon that has the CSS class of our icon font. We will be using the Font Awesome icon fonts, but you could also use another icon font. So that our TreeView recognizes our icon proptery, we need to define the sprite field name with the dataSpriteCssClassField option. This is our updated code with the template:
$('#tree').kendoTreeView({
  template: '#= item.text #',
  dataSpriteCssClassField: 'icon',
  dataSource: [
    { text: 'Bookmarks', icon: 'fa fa-folder', items: [
      { text: 'tech', icon:' fa fa-folder', items: [
        { text: 'tutorials', icon: 'fa fa-file' },
        { text: 'blogs', icon: 'fa fa-file' }
      ]},
      { text: 'work', icon: 'fa fa-file' }
    ]}
  ]
});
Conclusion
TreeViews are best used when your content is nested as opposed to flat. Besides the configuration options we went over, the Kendo UI TreeView component has many other features. You can rearrange items in the tree by dragging and dropping them, which is certainly applicable to our bookmark example. If your TreeView represented a directory, you could make the items draggable and attach an event listener to move the location of the file. TreeView items can also have checkboxes that listen for check events. Since there is much more you can do with TreeViews, we will dive deeper into its API. In the next lesson, I will show you how to add and remove items from the TreeView.
Want to Try Kendo UI?
Want to start taking advantage of the Kendo UI TreeView, or any of the other 70+ ready-made Kendo UI components, like Grid or Scheduler? You can begin a free trial of Kendo UI today and start developing your apps faster.
Start My Kendo UI Trial
Resources

Alberta Williams
Alberta is a software developer and writer from New Orleans. Learn more about Alberta at github.com/albertaw.
