
Beyond the Basics: Exploring the Android Manifest in .NET MAUI

Summarize with AI:
See what’s stored in the Android Manifest file so you can set platform-specific configurations in your .NEW MAUI app.
.NET MAUI development enables us to create applications for multiple platforms, including iOS, MacCatalyst, Android, WPF and Tizen. Although .NET MAUI offers a shared code base, specific configurations are necessary for each platform to run the application properly. Upon creating a .NET MAUI project, files containing platform-specific configurations are generated automatically, and they can be found in the Platforms folder.
In this article, we will examine the AndroidManifest.xml file, where Android configuration information is stored, and explore some of the most frequently used elements.
To facilitate understanding, we will break the topic down into different points, beginning with:
What Is the AndroidManifest.xml?
The AndroidManifest.xml file is crucial for Android applications, whether native or cross-platform. It defines the configuration characteristics of the application before its execution, allowing us to configure various features such as:
- Permissions: Your application needs to specify all the permissions it requires. This means that when an app requests access to your location, it must first seek permission. You can configure these ones in the AndroidManifest file. ✍️ The INTERNET permission is one of the most commonly requested ones.
- General application information: This is where all the basic data for the application is configured normally to be displayed to the user. This data includes the application name, icon, theme and package name, among others.
- Compatibility and Restrictions: This part allows you to define the minimum and maximum requirements for accepted versions, ensuring app compatibility.
Where Exactly Can You Find the AndroidManifest.xml?
.NET MAUI on Android generates an AndroidManifest.xml file as part of its build process, which is stored in the Platform/Android folder. (You can locate it in the image below.)
However, there’s an additional manifest that is created by merging the XML from the Platforms\Android\AndroidManifest.xml file with any XML generated from specific features in your classes. The resulting AndroidManifest.xml file is then saved in the obj folder, specifically at obj\Debug\net7.0-android\AndroidManifest.xml for debug builds on .NET 7.
- Platform/Android folder: Go to your project ➡ Platforms ➡ Android ➡ Double-click AndroidManifest.xml
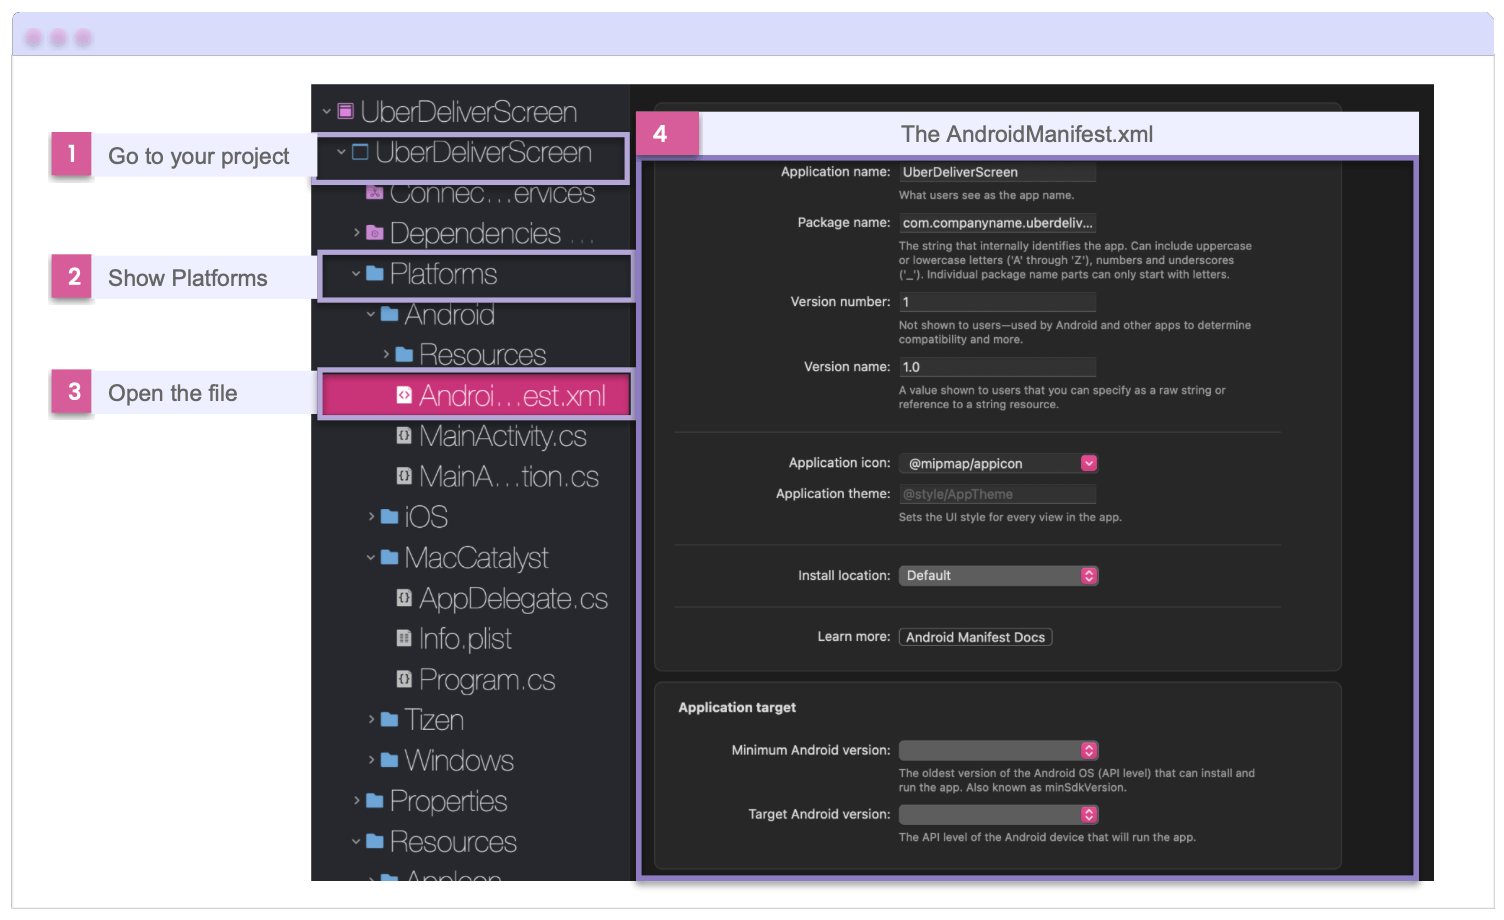
✍️ You can also open it by right-clicking on the manifest, selecting “Open With” and then choosing a source code editor.
- Autogenerated AndroidManifesrt.xml: Go to your project ➡ obj ➡ Debug ➡ net7.0-android ➡ and open your AndroidManifest.xml.
Generating the Manifest
In .NET MAUI applications, the MainActivity class derives from Activity via the MauiAppCompatActivity class and has the ActivityAttribute applied. When building the app, the system searches for any class that comes from Activity and has the ActivityAttribute attribute.
The resulting AndroidManifest.xml file is generated from these non-abstract classes that derive from Activity and that have the ActivityAttribute applied.
Your project’s MainActivity.cs should have the ActivityAttribute (like this: [Activity]) and the Activity Base should be something like the following:
using Android.App;
namespace MyMauiApp;

[Activity]
public class MainActivity : Activity
{

}
This example adds the following XML fragment to the manifest file:
<activity android:name="crc641df78fb20bf67739.MainActivity" />
Now, let’s explore configurations that contain this file.
Activity Name
The default value for the activity name is auto-generated. It is derived from the 64-bit cyclic redundancy check of the assembly-qualified name associated with the exported type. This assignment type allows you to give two separate assemblies the same name, thus avoiding any packaging errors.
But, can I change the activity name value? 🤔
If required, you can specify the activity name using the Name property. However, it’s advisable to change the name only for backward compatibility reasons, as doing so can impact type lookup speed at runtime.
One possible scenario where you may need to do this is to provide a human-readable Java name for your activity. This could be useful if another Android application needs to open yours, or if you have a script to test the startup time of your application.
Its implementation in code would look like so:
using Android.App;
namespace MyMauiApp;

[Activity (Name="companyname.foodapp.activity")]
public class MainActivity : Activity
{

}
This example adds the following XML fragment to the manifest file:
<activity android:name="companyname.MainActivity.activity" />
App Title Bar
The app bar is a top bar in the interface that can show information and actions pertaining to the current screen. In this case, it will specifically display the title. To achieve this, utilize the Label property in the following manner:
using Android.App;
namespace MyMauiApp;

 [Activity (Label="Food Ap")]
public class MainActivity : Activity
{

}
This example adds the following XML fragment to the manifest file:
<activity android:label="My Maui App" android:name="crc64bdb9c38958c20c7c.MainActivity" />
Launch from the App Chooser
In the event that your .NET MAUI application has more than one activity, it’s important to specify which activity should be launched from the application launcher. You can do this by setting the MainLauncher property to True.
using Android.App;
namespace MyMauiApp;

 [Activity (Label="Food App", MainLauncher = true)]
public class MainActivity : Activity
{

}
This example adds the following XML fragment to the manifest file:
<activity android:label="Food App" android:name="crc64bdb9c38958c20c7c.MainActivity">
  <intent-filter>
    <action android:name="android.intent.action.MAIN" />
    <category android:name="android.intent.category.LAUNCHER" />
  </intent-filter>
</activity>
Permissions
Protecting the user’s privacy is permissions’ primary duty, as they ensure that an application can access only the device information and resources required for its operation. By default, the AndroidManifest in the Platforms/Android folder configures permissions for INTERNET and ACCESS_NETWORK_STATE. Even if you remove INTERNET permission from your manifest, the permission will still be present in the generated manifest file for debug builds.
To add the necessary permissions, use the line provided below. Repeat this line for each permission that you require.
<uses-permission android:name="android.permission.INTERNET" />
Application Element
Intents and the IntentFilterAttribute are utilized to describe our app’s capabilities. The IntentFilterAttribute constructor specifies appropriate actions for your activity, while the Categories property specifies appropriate categories.
At least one activity must be provided, which is why activities are included in the constructor. Multiple [IntentFilter]s can be provided, and each instance results in a separate <intent-filter/> element within the <activity/>.
using Android.App;
using Android.Content;

namespace MyMauiApp;
[Activity(Label = "My Maui App", MainLauncher = true)]
[IntentFilter(new[] {Intent.ActionView},

Categories = new[] {Intent.CategorySampleCode, "my.custom.category"})]

public class MyActivity : Activity
{

}
This example produces the following XML fragment:
<activity android:label="My Maui App"
android:name="crc64bdb9c38958c20c7c.MainActivity">
  <intent-filter>
    <action android:name="android.intent.action.MAIN" />
    <category android:name="android.intent.category.LAUNCHER" />
  </intent-filter>
  <intent-filter>
    <action android:name="android.intent.action.VIEW" />
    <category android:name="android.intent.category.SAMPLE_CODE" />
    <category android:name="my.custom.category" />
  </intent-filter>
</activity>
Conclusion
You have learned a lot of information about AndroidManifest.xml. From now on, when you see this file, you will have more clarity about its elements. I hope this article was helpful to you! I encourage you to start implementing it in your daily life! 💚💕
See you next time! 💁♀️
References
This article was based on the official documentation.

Leomaris Reyes
Leomaris Reyes is a software engineer from the Dominican Republic specializing in mobile development. She is a 7-time Microsoft MVP and actively builds mobile applications while sharing practical knowledge through technical articles and developer-focused content.
Through her work, she explains programming concepts, developer tools and real-world development practices to help developers grow in their careers.
You can follow her on Instagram and TikTok at @leomarisreyes.dev, read her articles on AskXammy, and connect with her on LinkedIn, where she shares tutorials, insights and resources for developers.
Related Posts
Comments
All articles
Topics
Web MobileMobile
Desktop
Design
Productivity
People
