
Automated Testing of Kendo UI Made Easy

Summarize with AI:
Looking for an easy and automated way to test your apps made with Kendo UI? Learn how you can use our tools to make testing simple.
You are working with Kendo UI and you want to automate your day-to-day testing procedures. It is easier to test a custom control framework when you know it from the inside. That is the case with the .NET based Telerik Testing Framework—Test Studio's underlying automation framework technology. Let us show you how it works with Telerik Test Studio, and Telerik Test Studio Dev Edition.
Built-in Support for Kendo UI Widgets
Test Studio and Test Studio Dev Edition have out-of-the-box support for Kendo UI for Angular, Kendo UI for jQuery and the Telerik UI for ASP.NET AJAX and UI for Silverlight. Every type of component is isolated in a separate library which can be found in the \Bin\Translators folder located inside the Test Studio installation folder.
For example, if we want to test a web application which is using Kendo UI for Angular components, we should add references in our test project to the following libraries: Telerik.TestStudio.Translators.Common.dll and Telerik.TestingFramework.Controls.KendoUI.Angular.dll.
Finding and Using Kendo UI Elements
To test a component, we first need to find it. All Testing Framework and Test Studio find mechanisms are valid for this task, including the newly added CSS selector query. After finding the desired component it should be cast to the respective built-in control type. In the next example we will locate a <KendoAngularGrid> element and verify the number of currently displayed rows. Don't forget to include the required using statements!
using Telerik.TestStudio.Translators.Common;
using Telerik.TestingFramework.Controls.KendoUI.Angular;
using Telerik.TestingFramework.Controls.KendoUI.Angular.Grid;

// Navigate to Kendo UI for Angular grid demo page
ActiveBrowser.NavigateTo("https://www.telerik.com/kendo-angular-ui/components/grid/selection/", true);

// Find the first grid located in the first frame of the page
KendoAngularGrid grid = Manager.ActiveBrowser.Frames[0].Find.AllByTagName<KendoAngularGrid>("kendo-grid").FirstOrDefault();
Kendo UI Control-Specific Verifications
Additionally, to significantly facilitate the testing process, all Kendo UI components have properties exposing the current state and providing easy access to their internal structure. Therefore, now we can use the DataItems property exposed by the KendoAngularGrid class to access its rows and verify their count:
// Verify the number of rows of the grid
var expectedGridDataItemsCount = 77;
var actualGridDataItemsCount = grid.DataItems.Count;
Assert.AreEqual<int>(expectedGridDataItemsCount, actualGridDataItemsCount);
Log.Writeline("Grid rows count is: " + grid.DataItems.Count.ToString());
Following the same logic, we can select the first row of the Kendo UI grid and verify its index in the currently displayed structure:
// Selext the first row of the grid
KendoAngularGridDataItem firstRow = grid.DataItems.FirstOrDefault();

// Verify first row index
var expectedRowIndex = 0;
var actualRowIndex = firstRow.ItemIndex;
Assert.AreEqual<int>(expectedRowIndex, actualRowIndex);
Log.WriteLine("First row index is: " + firstRow.ItemIndex.ToString());
Kendo UI Control-Specific Actions
Furthermore, the built-in control types in Testing Framework and Test Studio provide methods for invoking actions specific to the respective Kendo UI component, which otherwise could be hard to trigger due to the internal event flow.
In this example we will use a <KendoAngularSwitch> element, try to toggle its state and confirm that the change was successful. Once again, do not forget to include the necessary using statements!
using Telerik.TestStudio.Translators.Common;
using Telerik.TestingFramework.Controls.KendoUI.Angular;
using Telerik.TestingFramework.Controls.KendoUI.Angular.Switch;
Initially, we navigate to the respective Kendo UI for Angular demo page and locate the element:
// Navigate to Kendo UI for Angular switch demo page
ActiveBrowser.NavigateTo("https://www.telerik.com/kendo-angular-ui/components/inputs/switch/", true);

// Find the first switch located in the first frame of the page
KendoAngularSwitch kendoSwitch = Manager.ActiveBrowser.Frames[0].Find.AllByTagName<KendoAngularSwitch>("tagname=kendo-switch").FirstOrDefault();
Afterwards, we use the built-in control property IsSwitchOn to confirm that the initial state of the Kendo UI for Angular Switch is on:
var expectedToggleState = true;
var actualToggleState = kendoSwitch.IsSwitchOn;
Assert.AreEqual<bool>(expectedToggleState, actualToggleState);
Log.WriteLine("Switch is on: " + kendoSwitch.IsSwitchOn.ToString());
Consequently, we invoke the method Toggle exposed by the component to change the state of the Kendo UI for Angular Switch to off:
// Toggle switch off
kendoSwitch.Toggle();
Log.WriteLine("Switch toggled.");
Finally, we can verify that Kendo UI for Angular Switch state really changed to the desired state by once again using the IsSwitchOn property:
// Verify switch state is off
var expectedSwitchToggleState = false;
var actualSwitchToggleState = kendoSwitch.IsSwitchOn;
Assert.AreEqual<bool>(expectedSwitchToggleState, actualSwitchToggleState);
Log.WriteLine("Switch is on: " + kendoSwitch.IsSwitchOn.ToString());
Codeless, Easy Automation Testing of Kendo UI Controls with Test Studio
Now that we've played around with the API, let's see how we can do the same things the easy way. The Test Studio stand-alone application and Test Studio Dev Edition provide access to all of the above through a friendly and intuitive user interface.
Automatic Verifications in a Dedicated and Intuitive Recorder
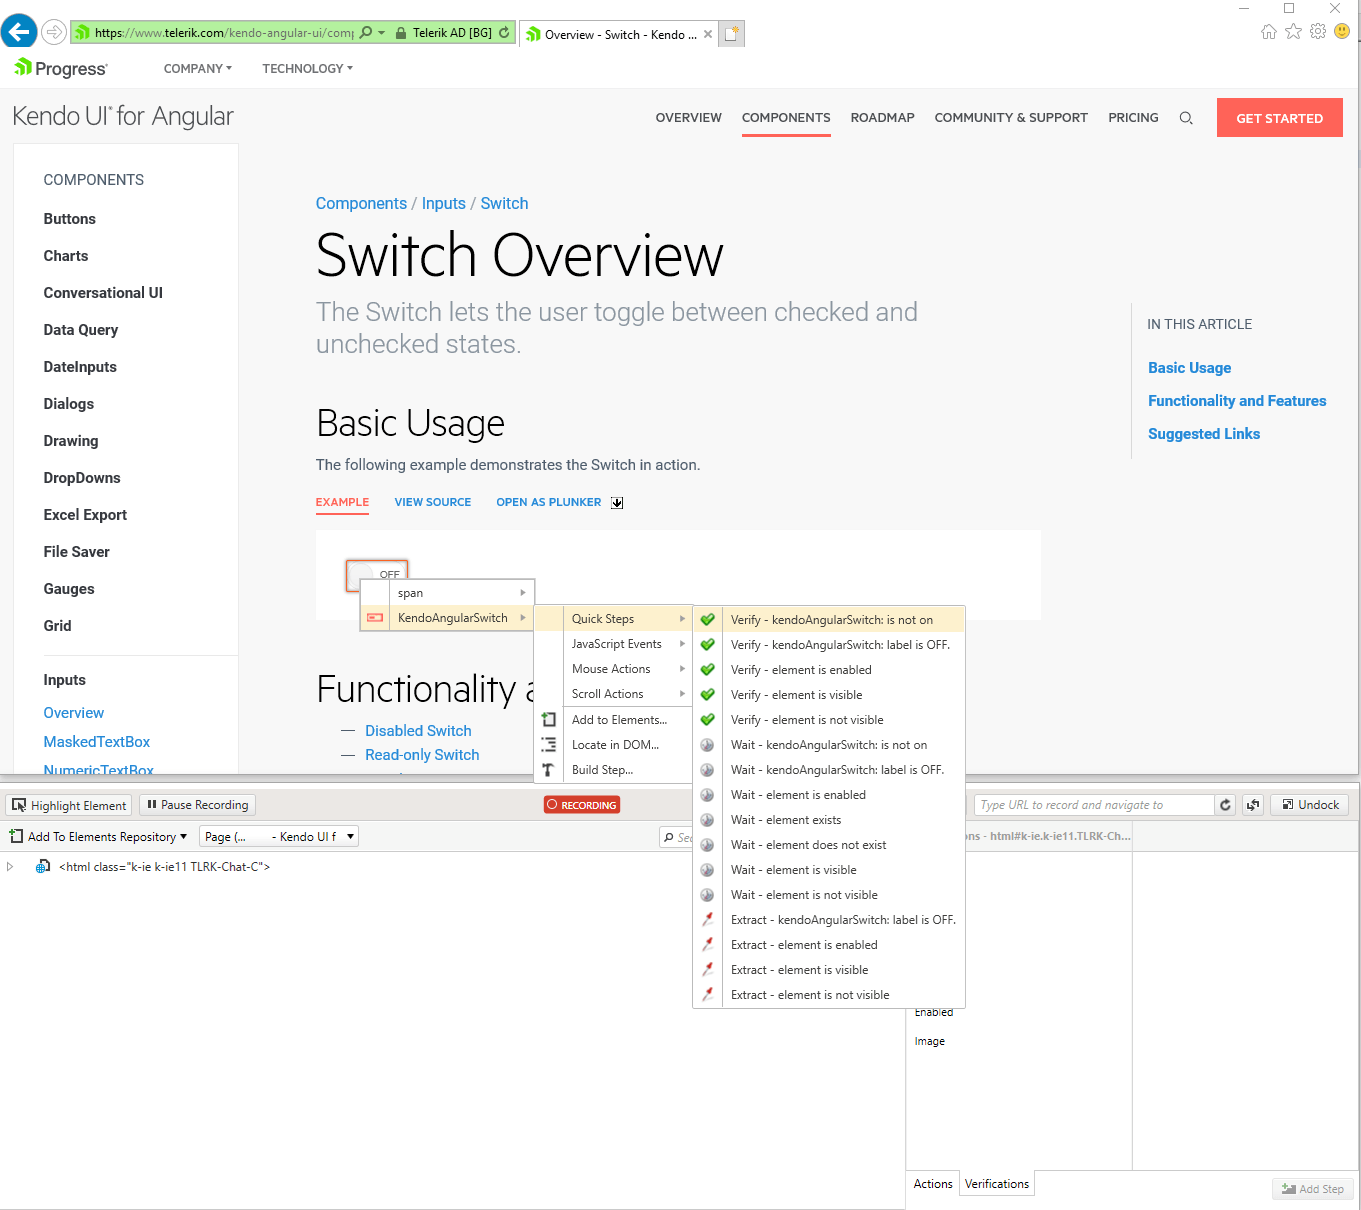
Once you start up the built-in Recorder, you get visual access to the full tree of elements of your web application. Just hit the "Highlight Element" button and you're ready to go. Test Studio performs all the heavy lifting in terms of element finding in the background for you:
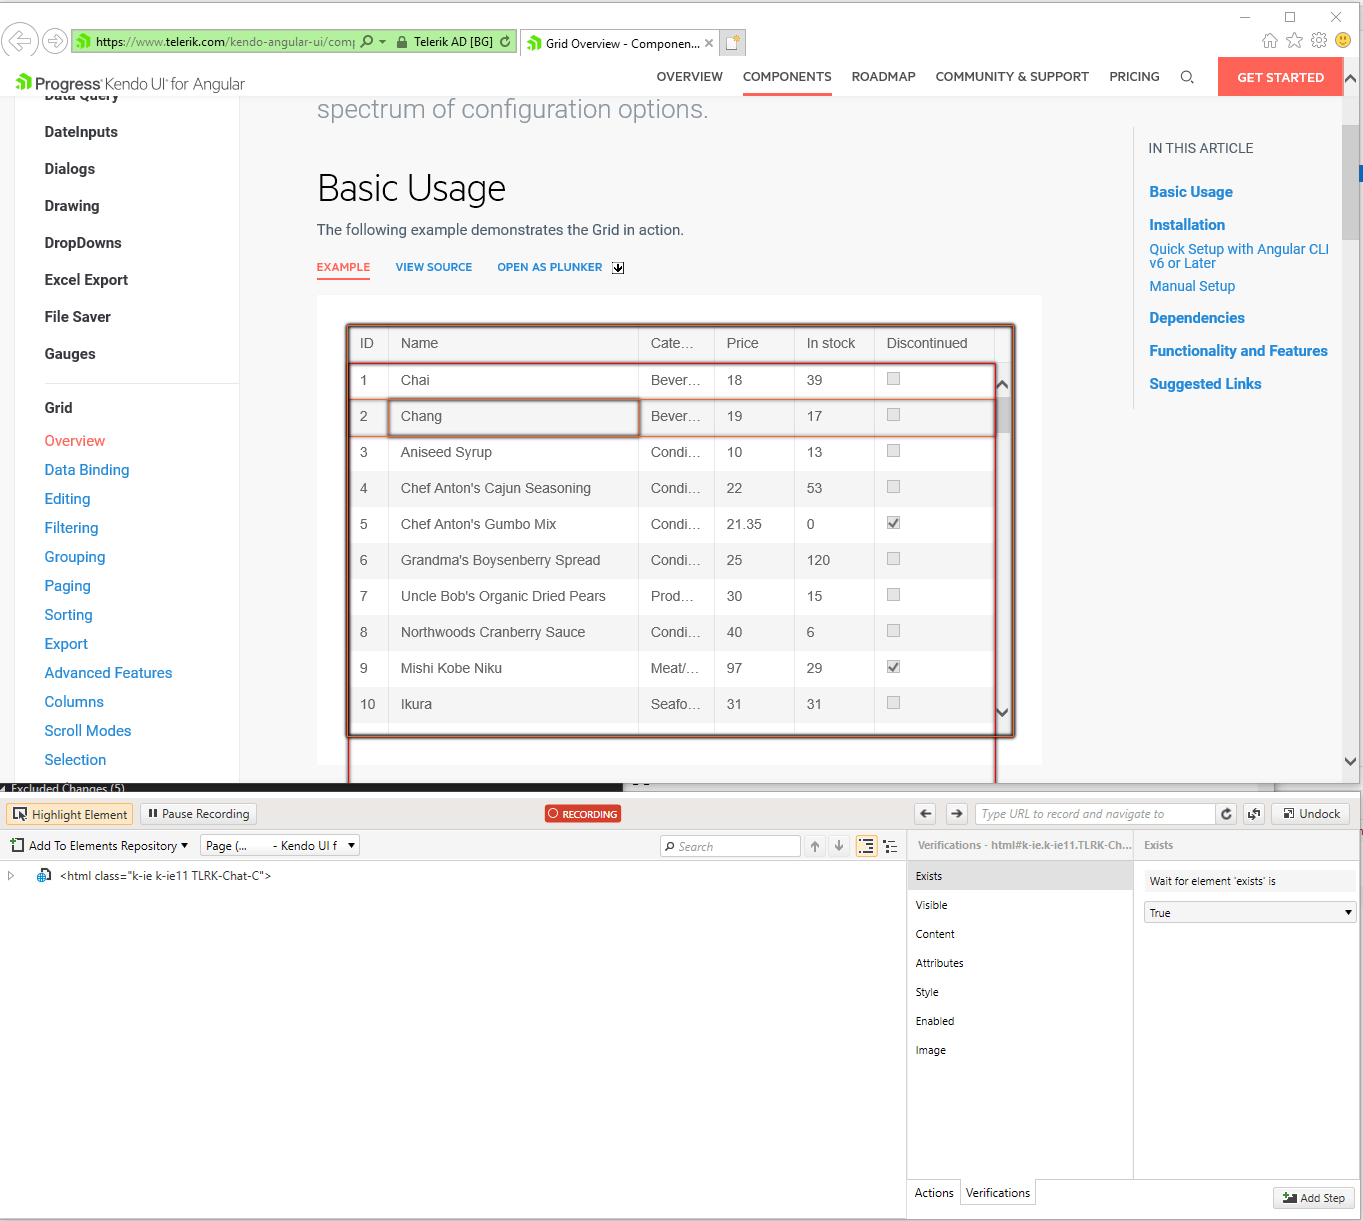
Here, when you hover the mouse over the element of your choice, you get a context-sensitive menu with translated components, together with actions and verifications available for these controls.
Let's go back to our earlier example — verifying the count of rows of your grid. We saw how it's done in code, now let's see how you can do it hassle-free. Simply point your mouse over the grid and wait for the context menu to pop up. There, when you navigate through the menu, you'll find the needed verification. Click it, and it's already a step in your test flow:
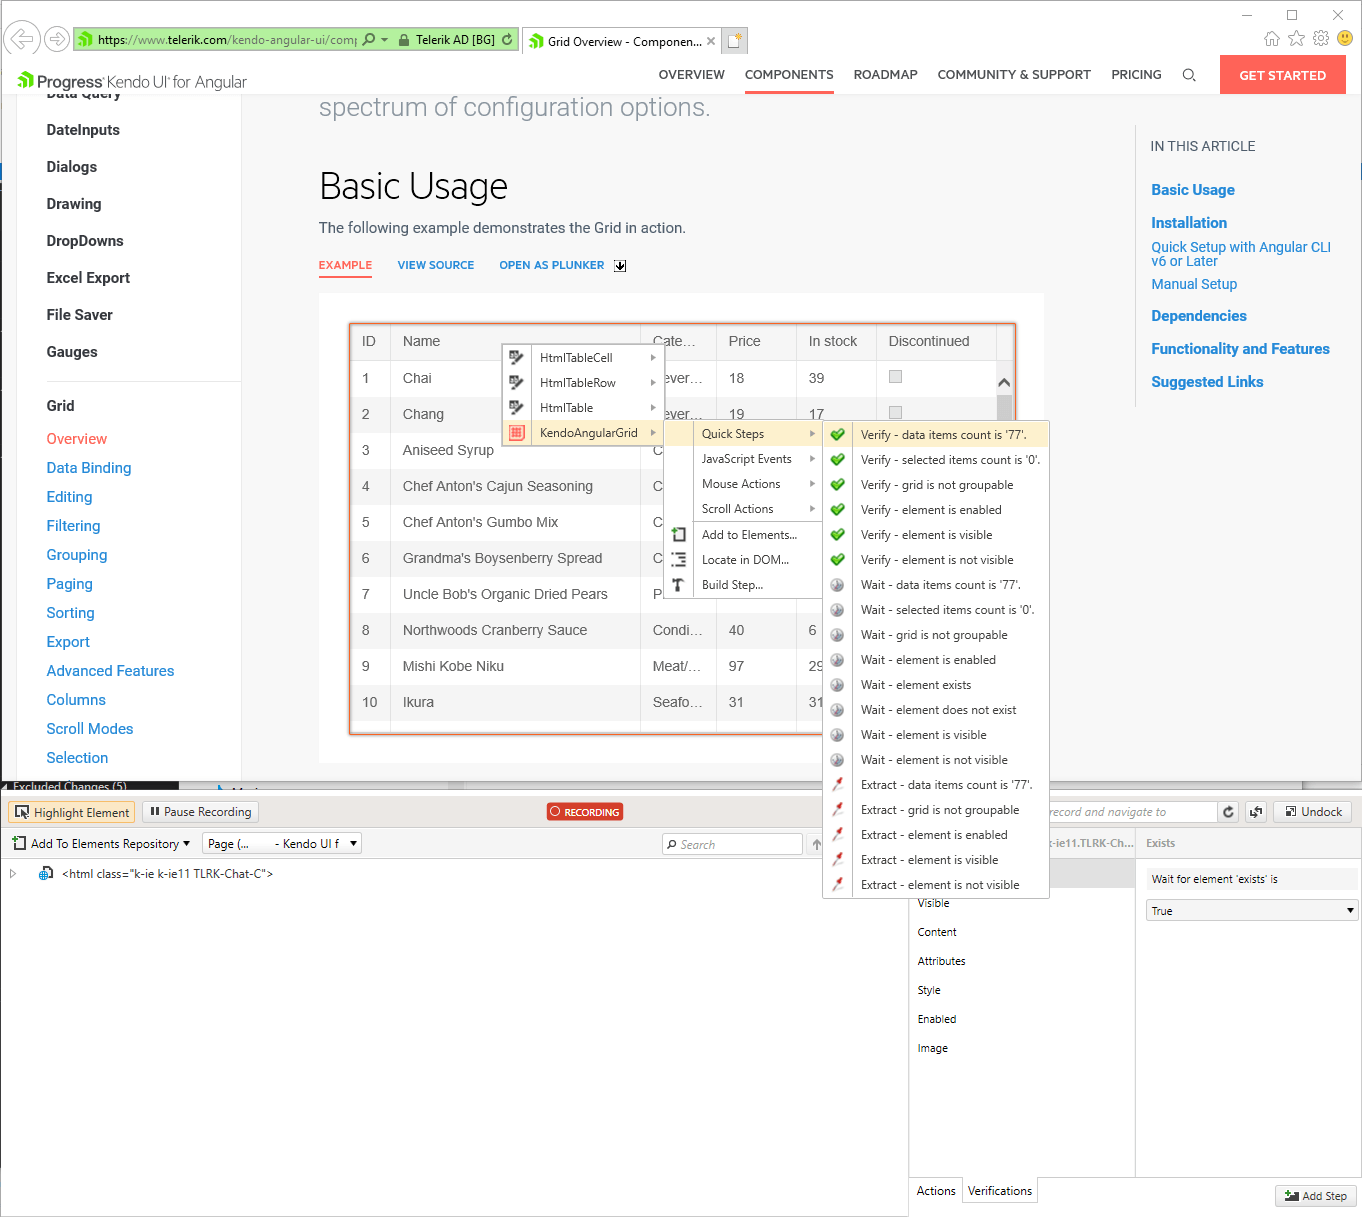
Yes, it's that easy!
Say we want next to verify that a certain cell in our grid contains some specific text. Just find the cell of interest, hover over it, navigate through the context menu and select the verification you need:
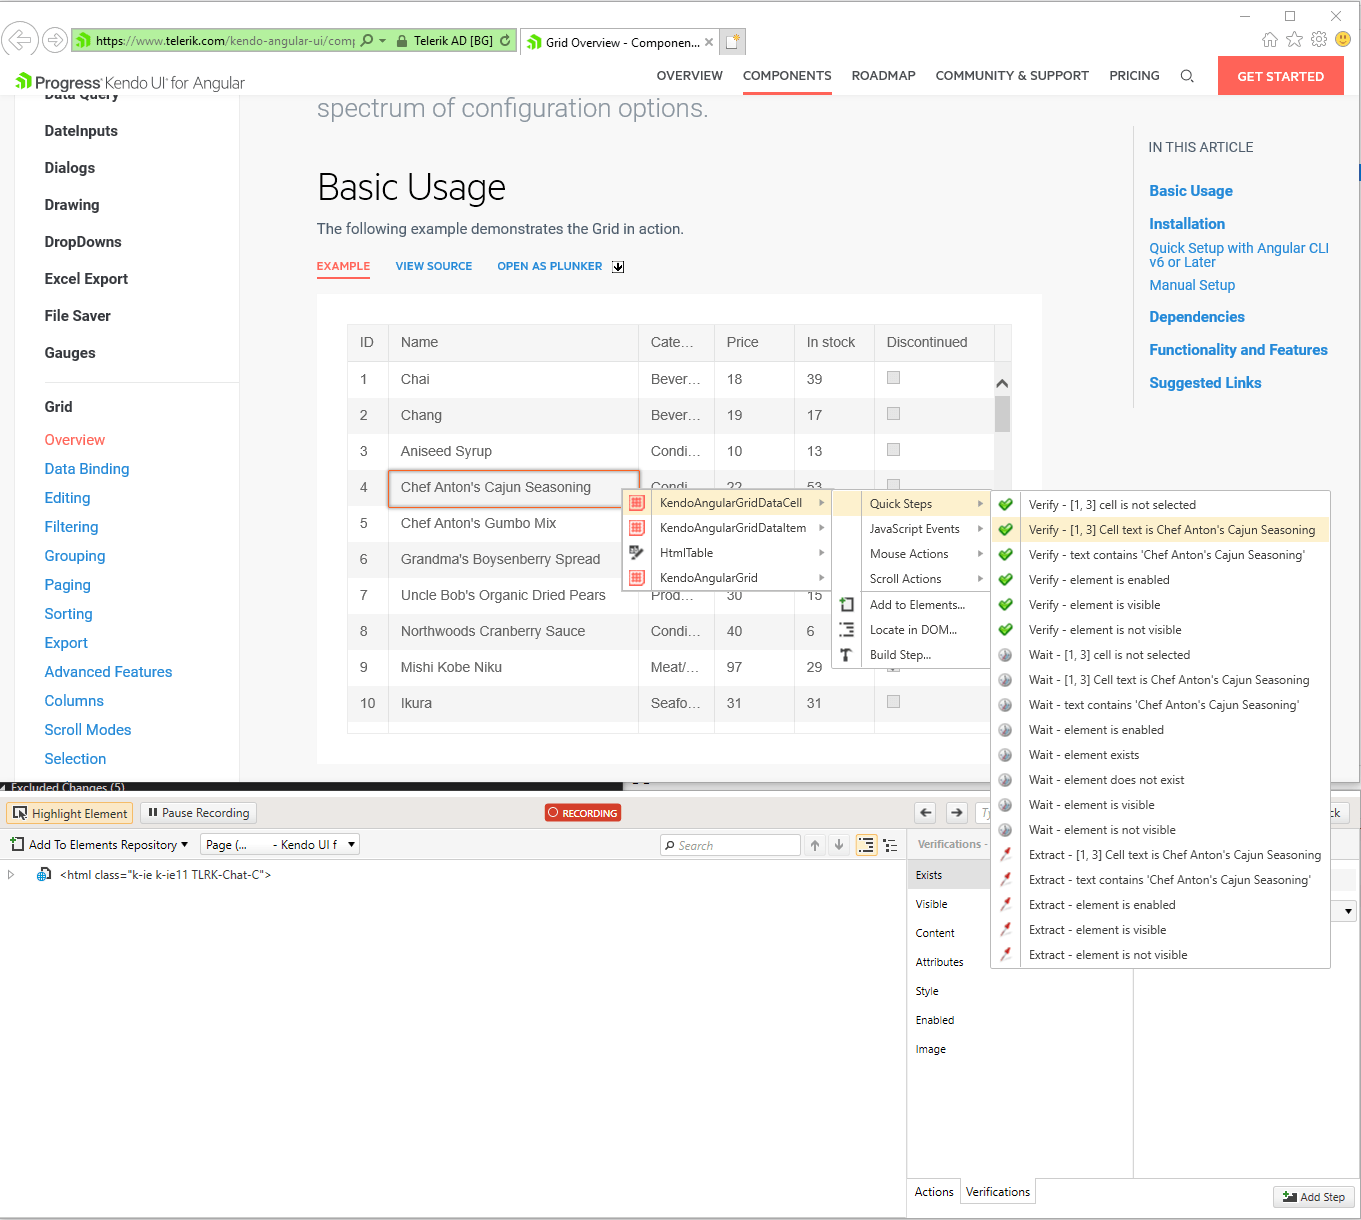
Again, it really is that easy!
Automatic Actions Translation in Recorder
There's also an easy way to record the action, specific to a given Kendo UI component. Instead of finding the element and casting it to the required type, and looking for the appropriate method to invoke, simply visually locate the desired component in your application page, point it with the mouse and perform the action you need.
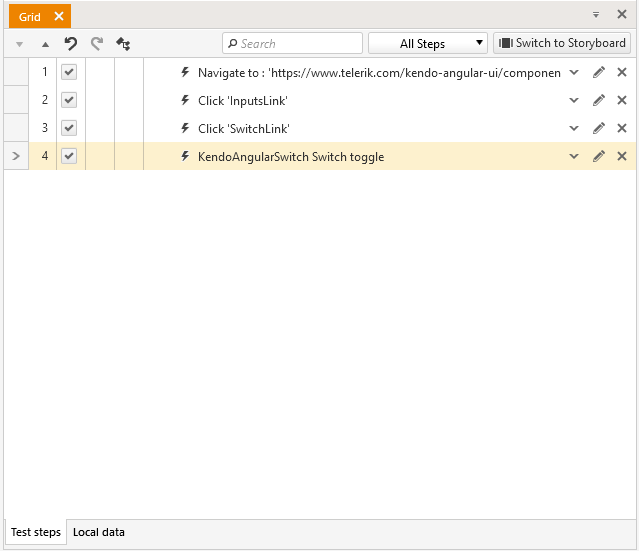
In the above case with the Kendo UI for Angular Switch control, just point at the element and toggle it. The action is readily recorded as a step in your test.
Easy, right?
You can then add verifications for the state of the Switch, the very same way we did with the Grid — hover over the Kendo UI for Angular Switch, wait for the pop-up menu, navigate to the needed verification and click:
Piece of cake!
Easily Turn Recorded Actions and Verifications into Code
Still, if you really, really love your code, don't worry. You can effortlessly convert what you've just clicked to code and it will still work, as if you just typed it in yourself.
Just select the step in question, right-click it, select "Edit in code" and you're ready to go back to coding the way you like:
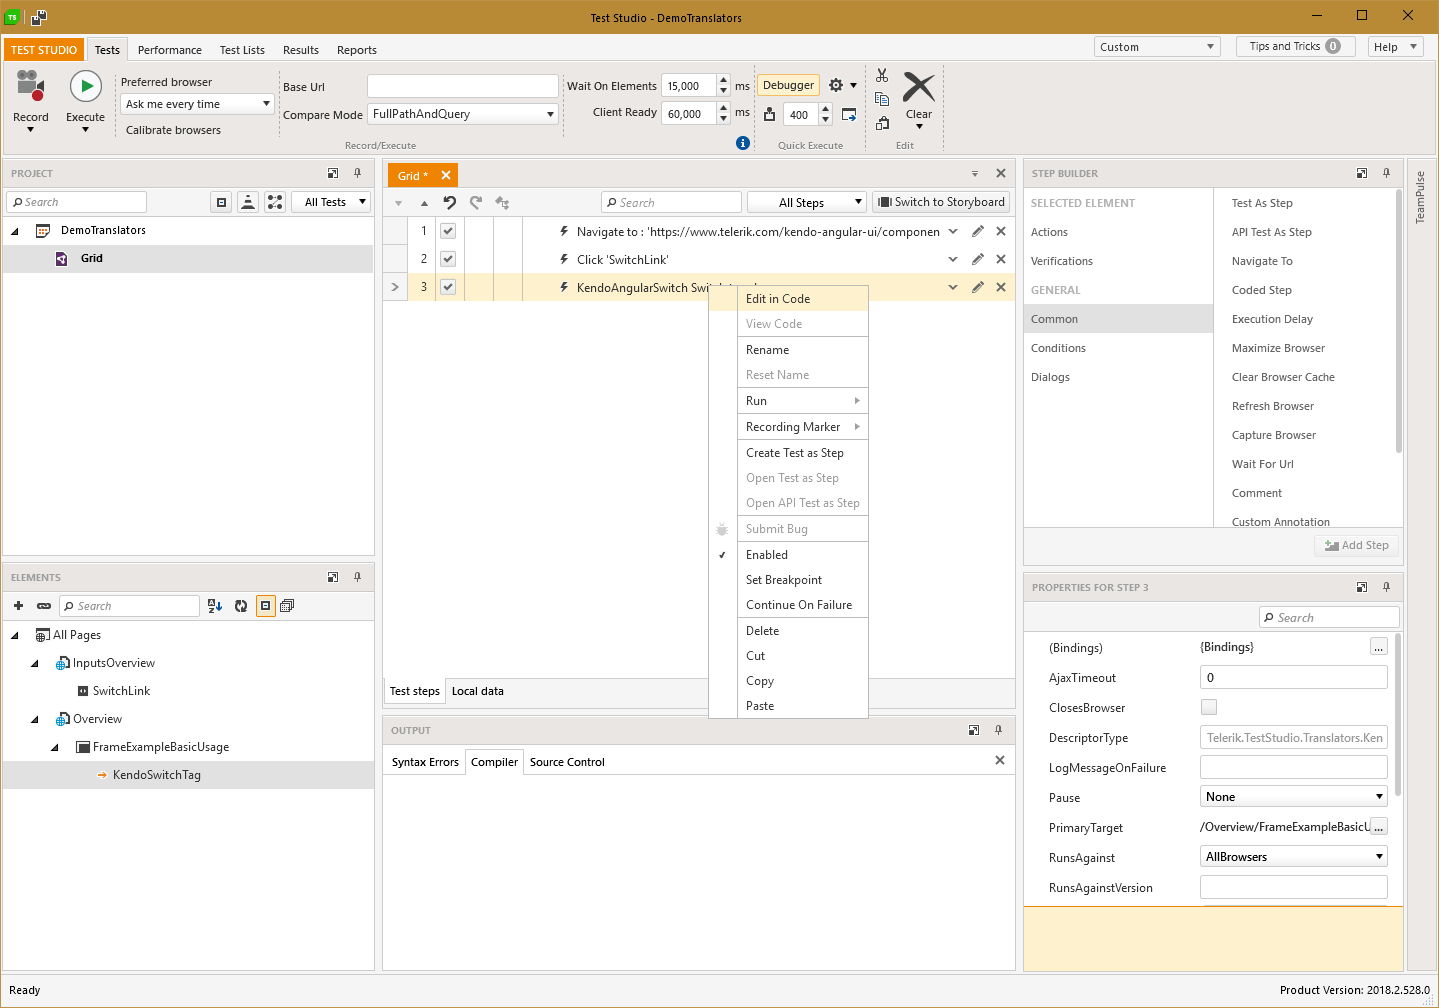
And the result is as follows:
[CodedStep(@"KendoAngularSwitch Switch toggle")]
public void Grid_CodedStep()
{
  // KendoAngularSwitch switch toggle
  Pages.Overview.FrameExampleBasicUsage.KendoSwitchTag.Toggle();
}
Side note: the generated code looks like it's missing something just because Test Studio has already silently performed the element discovery magic previously, when we clicked on the Kendo UI for Angular Switch element.
Of course, you can do the same for all available verifications.
Conclusion
All-in-all, Test Studio and Test Studio Dev Edition will indeed make your testing life much easier, and you should definitely keep it in mind when planning to automate your Kendo UI-based web application testing. Whether you like to write your own testing logic fully in code, or you would rather feel like spending more time on other automation tasks and wish to click your way through Kendo UI components testing automation, we provide you with the tooling to complete your day-to-day tasks. And, yes, it's lean and easy.
Want to try them out? Start a free trial today:
Telerik Test Studio
Telerik Test Studio Dev Edition
Happy testing!

Konstantin Adamu
Konstantin Adamu is a Software Engineer on the Progress Telerik Test Studio team. He has experience in .NET and JavaScript application development and is interested in code optimization, multithreading and modern technologies.