Installing Your License Key
Starting with the 2025 Q1 release, Progress® Telerik® UI for WPF requires activation through a license key. To activate a NuGet-based project, install the Telerik.Licensing package. Make the license key available to the account or environment that builds the application.
If either part is missing, the build can log errors and warnings. The application can also show watermarks or banners at run time.
To download a license key for Telerik UI for WPF, you must have either a developer or trial license. If you are new to Telerik UI for WPF, start with a free trial. Then follow the steps in this article.
Before You Start
Before you install the license key:
- Download your license key using Telerik CLI or from the License Keys page in your Telerik account.
- If your project uses NuGet packages, install the
Telerik.Licensingpackage. This is a required step. - If Telerik UI for WPF is referenced in a class library, install
Telerik.Licensingin the application project that consumes the class library too. - If the build runs under a service account, continuous integration (CI) agent, or another user profile, do not rely on
%appdata%\Telerikalone. Use a project-level or environment-based setup instead.
Choosing the Right Installation Approach
Depending on your development environment and preferences, you can install your license key in either of the following ways:
| Scenario | Recommended approach |
|---|---|
| Local development machine with Telerik productivity tools | Use automatic installation. |
| Local development machine without Telerik productivity tools, including older Visual Studio setups such as VS2017 | Use manual installation for NuGet projects. |
| CI server, build agent, Windows service account, or other shared environment | Use a service-oriented setup. |
| Project that uses Telerik assembly references instead of NuGet packages | Use assembly-reference installation. |
Automatic License Key Installation
Telerik provides tools that automatically provision your license key. These tools include:
- Telerik command-line interface (CLI).
- Telerik UI for WPF Visual Studio extensions.
- Progress Control Panel.
The Telerik CLI requires .NET Software Development Kit (SDK) 6.0 or later and a Telerik account with an active subscription or trial license. To install or update the license key with Telerik CLI:
-
Open any command line terminal.
-
If you don't have Telerik CLI installed, run the
dotnet tool installcommand:bashdotnet tool install -g Telerik.CLI -
Sign in to your Telerik account:
bashtelerik loginIf browser-based sign-in is blocked, use
telerik login --no-browser. Follow the Telerik CLI sign-in instructions. -
Run the
license get-keycommand:bashtelerik license get-key
The command downloads the current license key and saves it as telerik-license.txt in your operating system user's folder.
Automatic installation downloads the
telerik-license.txtfile for you, but NuGet-based projects still require theTelerik.Licensingpackage.
Installing a License Key with the VS Extensions
To install your license key by using the Telerik UI for WPF Visual Studio extensions:
- Open Visual Studio.
- Go to Extensions > Telerik > Licensing > Download Key.
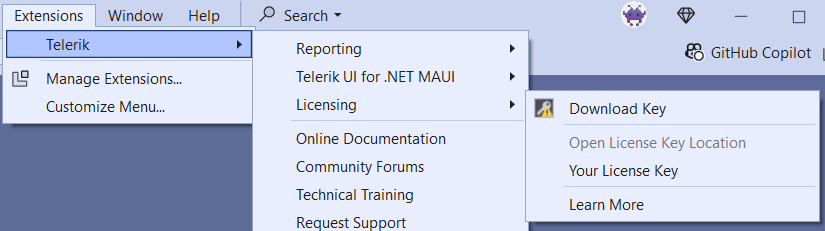
The Visual Studio extension puts the file in your home directory as %appdata%\Telerik\telerik-license.txt.
Installing a License Key with the Progress Control Panel
Start the Progress Control Panel to install your license key. It automatically downloads the telerik-license.txt file to %appdata%\Telerik.
Manual License Key Installation
Use this approach when you do not use Telerik productivity tools or when you want explicit control over the setup. This is also the recommended path for developers working in environments where automatic tooling may not be part of the workflow.
To manually download and install a license key for Telerik UI for WPF:
-
Go to the License Keys page in your Telerik account.
-
Select the Manual Setup tab in the tabstrip with the installation options.
-
Click the Set Up License Key button.
-
Check the instructions in the opened dialog and click the Download License Key button.
-
Copy the downloaded
telerik-license.txtlicense key file to one of the following locations:%appdata%\Telerik\telerik-license.txtto make it available for the current Windows user on the local machine.- The project root folder (the folder containing the project file) to make it available only to that project.
Do not commit the file to source control. This file contains your personal license key.
-
Install the
Telerik.LicensingNuGet package in the project that starts the build or application.
For a C# application using NuGet packages, add the following XML fragment inside an ItemGroup in the consuming application's .csproj file:
<PackageReference Include="Telerik.Licensing" Version="1.*" />In Visual Studio, right-click the executable or startup project and select Manage NuGet Packages. Search for Telerik.Licensing and install it.
When you build the project, the Telerik.Licensing package locates the license file and uses it to activate the product. If your project doesn’t use NuGet packages, follow the assembly-reference installation instructions instead.
When Telerik UI for WPF components are used in a class library, install
Telerik.Licensingin the consuming application project too. Installing it only in the class library is not enough.
When Copying the File to %appdata%\Telerik Does Not Work
Copying telerik-license.txt to %appdata%\Telerik works only when the application or build runs under the same Windows user profile that owns that folder.
If the license is still not found, check the following:
- The file name is exactly
telerik-license.txt. - The file is stored under the current user profile, not under a different user or administrator account.
- The project includes the
Telerik.Licensingpackage. - If the Telerik controls are referenced from a class library, the main application project also includes
Telerik.Licensing. - For CI, Windows services, or shared accounts, provide the key through a project-level location or an environment variable, not a personal profile folder.
- If
TELERIK_LICENSEis set, its value takes precedence over the license file. Unset it to force use of the file, as described in the license key precedence FAQ. - If the project uses assembly references instead of NuGet packages, use a script key. Copying
telerik-license.txtalone does not activate assembly-reference projects.
If %appdata%\Telerik is not suitable for your setup, place the file in the project root. Alternatively, use the CI and shared-environment setup.
Rebuild and run the application after correcting the setup. Check for licensing build errors or warnings and for runtime watermarks or banners. If these remain, see License Activation Errors and Warnings. For class-library and add-in/plug-in special cases, see No License Found - Troubleshooting.
Using a Service-Oriented Setup for CI and Shared Environments
For build servers, CI pipelines, service accounts, and other shared environments, use an environment-based setup instead of a personal profile folder.
For CI pipelines, use a deployment key as described in Adding the License Key to CI Services. Deployment keys are tied to an application and cannot be used for application development.
Provide the key to the build account through one of these options:
- Set the
TELERIK_LICENSEenvironment variable to the key value stored in a secure secret. - Set
TELERIK_LICENSE_PATHto the location of a securetelerik-license.txtfile. This option requiresTelerik.Licensing1.4.10 or later.
This approach is better suited for non-interactive environments because it does not depend on a specific user profile such as %appdata%\Telerik.
Store license keys in secure secrets or secure files. Do not put plaintext keys in source files or pipeline definitions, or print them in build logs.
On local development machines, each developer should use the key associated with their own account.
Adding a License to Projects Using Telerik Assembly References (no NuGet packages)
Telerik strongly recommends the use of NuGet packages whenever possible. Only include the license key as a code snippet when NuGet packages are not an option.
Assembly-reference projects require a script key. Copying telerik-license.txt alone does not activate them. The project must also reference Telerik.Licensing.Runtime.dll. For a missing-assembly error, see Resolving a Missing Licensing Runtime Assembly.
To add the script key to a project that references Telerik assemblies:
-
Go to the License Keys page in your Telerik account.
-
Click the View Script Keys button.
-
In the dropdown menu, select Progress® Telerik® UI for WPF.
-
Copy the C# code snippet into a new file, for example,
TelerikLicense.cs. The code snippet contains an assembly attribute calledEvidenceAttributethat holds information about the license key. -
Add the
TelerikLicense.csfile to your project. For a class library, add this file to the consuming application project too.
The following example shows the assembly attribute in TelerikLicense.cs. Replace your-wpf-script-key-here with the WPF script key from your account:
[assembly: global::Telerik.Licensing.EvidenceAttribute("your-wpf-script-key-here")]If you use multiple Telerik products in the same application, add the script keys for all products. Examples include WPF, WinForms, and Reporting.
The following example shows TelerikLicense.cs with multiple script keys. Replace each placeholder with the script key for the corresponding product:
[assembly: global::Telerik.Licensing.EvidenceAttribute("your-WPF-script-key-here")]
[assembly: global::Telerik.Licensing.EvidenceAttribute("your-WINFORMS-script-key-here")]
[assembly: global::Telerik.Licensing.EvidenceAttribute("your-REPORTING-script-key-here")]
Do not publish the license key code snippet in publicly accessible repositories. This is your personal license key.
Updating Your License Key
Whenever you purchase or renew a Telerik UI for WPF license, download and install a new license key. Use the automatic installation or manual installation approach. The new license key includes information about all previous license purchases. This process is referred to as a license key update.