Getting Started with WinForms DropDownList
Use RadDropDownList to display a compact list of choices in a WinForms application. This getting-started guide shows how to add the control, populate it with text and images, and react when the selected item changes.
What You Will Build
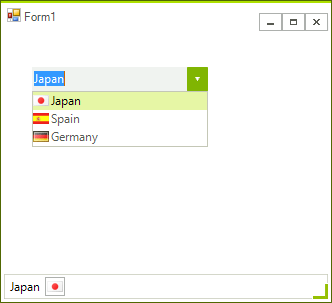
In this example, users select a country from RadDropDownList, and the selected text and image are displayed in RadStatusStrip.
Completed example with a country selector and status strip.
Watch the Video Tutorial
If you prefer a guided walkthrough, watch Getting Started with RadDropDownList. The video demonstrates the same basic setup and data-binding workflow.
Video tutorial preview for the RadDropDownList getting-started walkthrough.
Install the Required Assemblies
Choose the setup approach that matches your project.
Install with NuGet
To use RadDropDownList with NuGet packages, install Telerik.UI.for.WinForms.AllControls. If your project targets a specific framework, review the available Telerik UI for WinForms NuGet packages before you install.
For the full NuGet workflow, see Install Telerik UI for WinForms by using NuGet packages.
Starting with the 2025 Q1 release, Telerik UI for WinForms uses a new licensing mechanism. For details, see Set up your Telerik license key.
Add Assembly References Manually
When you drag a control from the Visual Studio Toolbox to the Form Designer, Visual Studio adds the required references automatically. If you create RadDropDownList in code, add these assemblies manually:
Telerik.Licensing.RuntimeTelerik.WinControlsTelerik.WinControls.UITelerikCommon
If you still need to install the assemblies locally, review the available Telerik UI for WinForms installation approaches.
Create the DropDownList Example
Follow these steps to build the sample form:
- Add a
RadDropDownListand aRadStatusStripto the form. - Add a few images to the project resources. In this example, each image represents one country in the list.
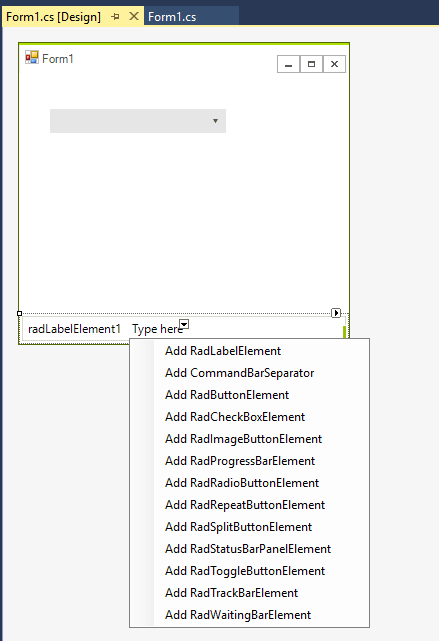
- Open the
RadStatusStripsmart tag, add aRadLabelElementand aRadButtonElement, and set theDisplayStyleproperty of theRadButtonElementtoImage.
Status strip configured with label and button elements.
- Select
RadDropDownList, find theItemsproperty in the Properties Window, and click the ellipsis button to open the RadItem Collection Editor. - Click Add three times to create three items.
- Set the item text to
Japan,Spain, andGermany. - Assign the matching resource image to each item's
Imageproperty. - Set
TextImageRelationtoImageBeforeTextfor each item so the image appears before the text. - Click OK to close the RadItem Collection Editor.
- In the Properties Window, select the Events button.
- Locate the
SelectedIndexChangedevent forRadDropDownListand double-click it to generate an event handler.
Handle Selection Changes
Add the following event handler code to update the status strip whenever the selected item changes:
Handle the SelectedIndexChanged Event
void radDropDownList1_SelectedIndexChanged(object sender, Telerik.WinControls.UI.Data.PositionChangedEventArgs e)
{
    if (this.radDropDownList1.SelectedIndex > -1)
    {
        this.radLabelElement1.Text = this.radDropDownList1.SelectedItem.Text;
        this.radImageButtonElement1.Image = this.radDropDownList1.SelectedItem.Image;
    }
}
This code reads the selected RadListDataItem and assigns its text and image to the RadStatusStrip elements. When users choose a different country, the status strip updates immediately.
Result
After you complete these steps, RadDropDownList displays the country list with images, and RadStatusStrip reflects the current selection. This pattern is useful when the selected value needs to update other parts of the UI without opening another dialog.
Telerik UI for WinForms Learning Resources
Continue with these related resources:
- Telerik UI for WinForms DropDownList component
- Getting started with Telerik UI for WinForms components
- Telerik UI for WinForms setup
- Telerik UI for WinForms Converter
- Telerik UI for WinForms Visual Studio templates
- Deploy Telerik UI for WinForms applications
- Telerik UI for WinForms virtual classroom training courses for registered users
- Telerik UI for WinForms license agreement