New to Telerik UI for .NET MAUI? Start a free 30-day trial
.NET MAUI Scheduler Agenda Styling
Updated on Nov 6, 2025
Use the following properties of the AgendaViewDefinition to customize the appearance of the agenda view:
MonthTemplate(DataTemplate)—Specifies the template used to display month headers in the agenda view.WeekTemplate(DataTemplate)—Specifies the template used to display week headers in the agenda view.DayTemplate(DataTemplate)—Specifies the template used to display day headers in the agenda view.AppointmentDurationTemplate(DataTemplate)—Specifies the template used to display appointment duration in the agenda view.InitializationBusyIndicatorStyle(Stylewith target typeRadBusyIndicator)—Specifies the style for the busy indicator shown during initial data loading. This indicator appears centered on screen while the agenda items are being loaded and until scroll is performed to the current item.LoadingProgressIndicatorStyle(Stylewith target typeRadLinearProgressBar)—Specifies the style applied to the progress bar displayed when loading appointments for the visible range.
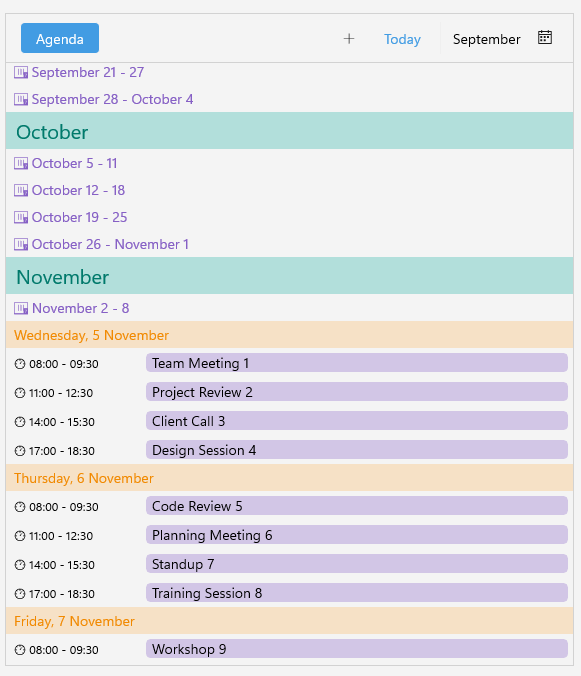
Here is an example of how to define custom templates in the Agenda View:
- Define the Agenda View in XAML:
XAML
<telerik:RadScheduler x:Name="scheduler"
					  AppointmentsSource="{Binding Appointments}"
					  AppointmentTemplate="{StaticResource CustomAppointmentDataTemplate}">
	<telerik:RadScheduler.ViewDefinitions>
		<telerik:AgendaViewDefinition MonthTemplate="{StaticResource CustomMonthTemplate}"
									  WeekTemplate="{StaticResource CustomWeekTemplate}"
									  DayTemplate="{StaticResource CustomDayTemplate}"
									  AppointmentDurationTemplate="{StaticResource CustomDurationTemplate}" />
	</telerik:RadScheduler.ViewDefinitions>
</telerik:RadScheduler>- Add the templates to the page's resources:
XAML
<DataTemplate x:Key="CustomAppointmentDataTemplate">
<telerik:RadBorder CornerRadius="4"
Margin="5"
IsClippedToBounds="True"
BackgroundColor="#D2C6E6">
<Grid>
<BoxView WidthRequest="4"
BackgroundColor="#8660C5"
HorizontalOptions="Start"
VerticalOptions="Center" />
<Label Text="{Binding Occurrence.Appointment.Subject}"
TextColor="Black"
VerticalTextAlignment="Center"
Margin="6, 0, 4, 0" />
</Grid>
</telerik:RadBorder>
</DataTemplate>
<DataTemplate x:Key="CustomMonthTemplate">
<Grid BackgroundColor="#B2DFDB"
Padding="10,5">
<Label Text="{Binding FormattedMonth}"
FontSize="20"
TextColor="#00796B" />
</Grid>
</DataTemplate>
<DataTemplate x:Key="CustomWeekTemplate">
<Grid Padding="8,4">
<Label TextColor="#8660C5">
<Label.FormattedText>
<FormattedString>
<Span Text=" "
FontFamily="TelerikFontExamples" />
<Span Text="{Binding FormattedWeek}" />
</FormattedString>
</Label.FormattedText>
</Label>
</Grid>
</DataTemplate>
<DataTemplate x:Key="CustomDayTemplate">
<Grid BackgroundColor="#40FFAC3E"
Padding="8,4">
<Label Grid.Column="0"
Text="{Binding FormattedDay}"
FontSize="14"
TextColor="#F18900"
Margin="0,0,8,0" />
</Grid>
</DataTemplate>
<DataTemplate x:Key="CustomDurationTemplate">
<Label TextColor="Black"
FontSize="12"
Padding="8,0" VerticalTextAlignment="Center"
WidthRequest="135">
<Label.FormattedText>
<FormattedString>
<Span Text=" "
FontFamily="TelerikFontExamples" />
<Span Text="{Binding FormattedStartTime}" />
<Span Text=" - " />
<Span Text="{Binding FormattedEndTime}" />
</FormattedString>
</Label.FormattedText>
</Label>
</DataTemplate>- Add the
teleriknamespace:
XAML
xmlns:telerik="http://schemas.telerik.com/2022/xaml/maui"- Add a
ViewModelfor theAppointmentSource:
C#
public class ViewModel
{
    public ViewModel()
    {
        this.Appointments = new ObservableCollection<Appointment>();
        this.GenerateAppointments();
    }

    public ObservableCollection<Appointment> Appointments { get; set; }

    private void GenerateAppointments()
    {
        var startDate = DateTime.Today;
        var random = new Random();

        var subjects = new[]
        {
            "Team Meeting",
            "Project Review",
            "Client Call",
            "Design Session",
            "Code Review",
            "Planning Meeting",
            "Standup",
            "Training Session",
            "Workshop",
            "Performance Review"
        };

        for (int i = 0; i < 40; i++)
        {
            var dayOffset = i / 4; // Spread across days (4 appointments per day)
            var hourOffset = 8 + (i % 4) * 3; // Start at 8 AM, add 3 hours for each appointment

            var start = startDate.AddDays(dayOffset).AddHours(hourOffset);
            var end = start.AddHours(1.5);

            this.Appointments.Add(new Appointment
            {
                Subject = $"{subjects[i % subjects.Length]} {i + 1}",
                Start = start,
                End = end,
                IsAllDay = false
            });
        }
    }
}
This is the result on WinUI: