.NET MAUI Scheduler Built-In Dialogs
The Telerik .NET MAUI Scheduler exposes built-in dialogs for the creation and modification of appointments, so you can provide users with the ability to directly schedule their meetings.
Check below the available dialogs for managing appointments.
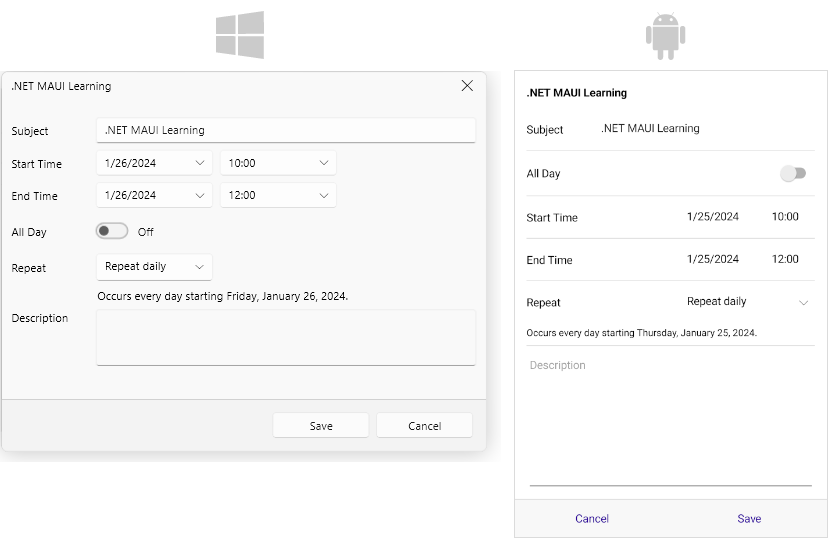
Create and Edit Appointment
EditAppointmentDialog is the dialog that allows the end user to create a new appointment or edit an existing one.
- On desktop, the
EditAppointmentDialogappears when the end user double-clicks an empty slot or an appointment. - On mobile, the behavior of the
EditAppointmentDialogdepends on the selected calendar slot:- If the end user taps an empty slot, the Edit Appointment dialog appears to let them create a new appointment.
- If the end user taps an existing appointment and then taps Edit in the Preview Appointment dialog, the Edit Appointment dialog appears to let them modify the appointment.
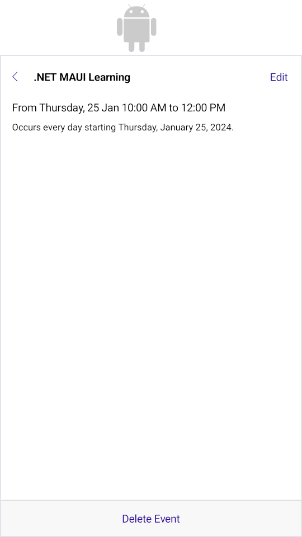
Preview Appointment
(Android- and iOS-only) When the end user taps an existing appointment, the PreviewAppointmentDialog lets them preview the appointment details, or edit or delete the appointment.
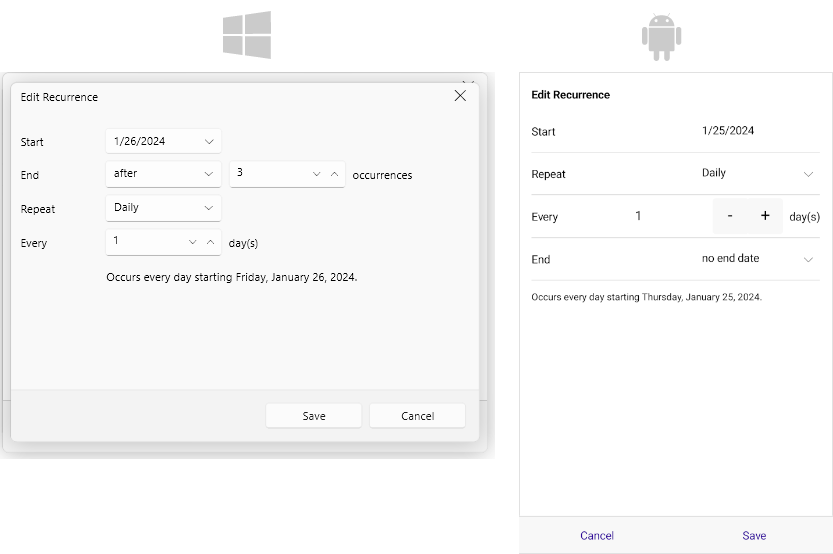
Edit Recurrence
The EditRecurrenceDialog lets the end user configure the recurrence settings of an appointment.
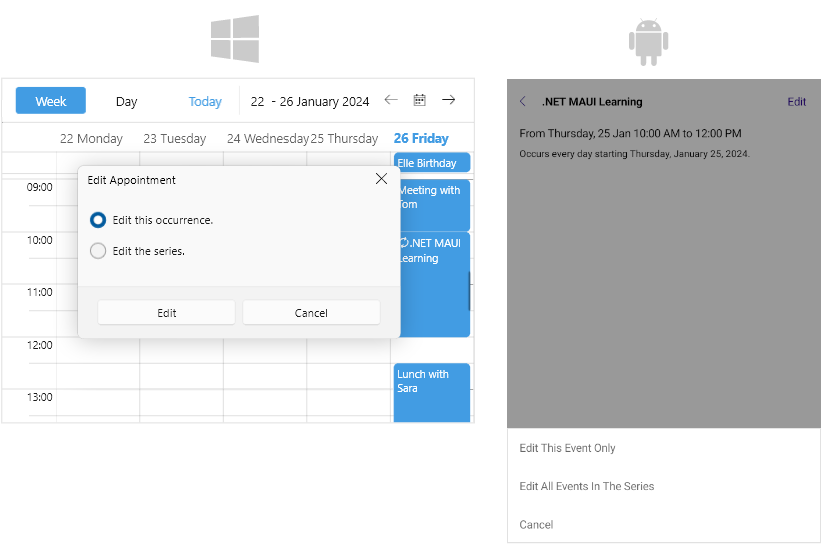
Edit Recurrence Choice
When the end user interacts with a recurring appointment, the EditRecurrenceChoiceDialog lets them choose if they want to edit a single occurrence or the entire series.
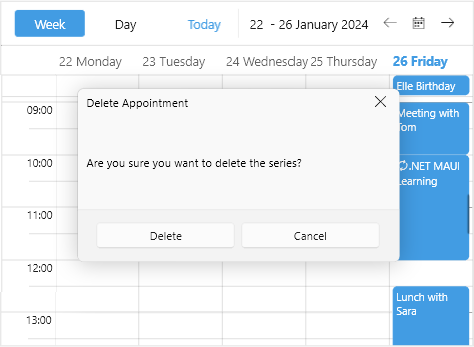
Delete Recurrence Choice
When the end user interacts with a recurring appointment, the DeleteRecurrenceChoiceDialog lets them choose if they want to delete a single occurrence or the entire series.
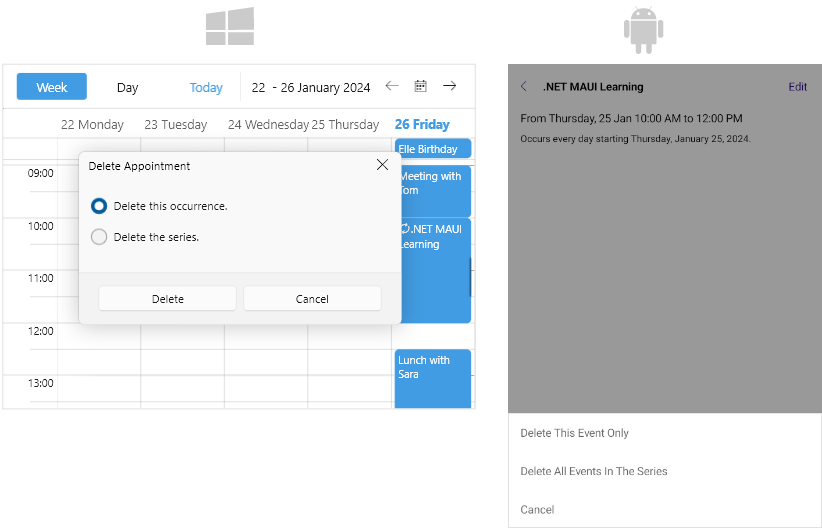
Delete Appointment Choice
(Desktop-only) When the end user attempts to delete an appointment, the DeleteAppointmentChoiceDialog asks for confirmation.
Methods
Use the following methods to show the built-in dialogs of the Scheduler:
CreateAppointmentWithDialog(DataRange range)—Opens a dialog for creating an appointment.EditAppointmentWithDialog(Occurrence occurrence)—Opens a dialog for editing an exsisting appointment.DeleteAppointmentWithDialog(Occurrence occurrence)—Opens a dialog for deleting an existing appointment.
The following example demonstrates how to use the methods for managing the built-in dialogs:
1. Create a sample view with a RadScheduler instance and a few buttons:
<Grid RowDefinitions="Auto, *"
      RowSpacing="10">
    <StackLayout Orientation="{OnIdiom Vertical, Desktop=Horizontal}"
                 Spacing="5">
        <Button Text="Add Appointment"
                Clicked="AddAppointmentClicked" />
        <Button Text="Edit First Appointment"
                Clicked="EditAppointmentClicked" />
        <Button Text="Delete First Appointment"
                Clicked="DeleteAppointmentClicked" />
    </StackLayout>
    <telerik:RadScheduler x:Name="scheduler"
                          AppointmentsSource="{Binding Appointments}"
                          Grid.Row="1">
        <telerik:RadScheduler.ViewDefinitions>
            <telerik:WeekViewDefinition />
            <telerik:DayViewDefinition />
            <telerik:MonthViewDefinition />
            <telerik:AgendaViewDefinition />
        </telerik:RadScheduler.ViewDefinitions>
    </telerik:RadScheduler>
</Grid>
2. Add the buttons' clicked event handlers in the code-behind:
private void AddAppointmentClicked(object sender, EventArgs e)
{
    this.scheduler.CreateAppointmentWithDialog(new DateRange(DateTime.Now, DateTime.Now.AddHours(1)));
}

private void EditAppointmentClicked(object sender, EventArgs e)
{
    var app = this.scheduler.AppointmentsSource?.FirstOrDefault();
    if (app != null)
    {
        if (app.RecurrenceRule != null)
        {
            this.scheduler.EditAppointmentWithDialog(Occurrence.CreateOccurrence(app, app.Start, app.End));
        }
        else
        {
            this.scheduler.EditAppointmentWithDialog(Occurrence.CreateMaster(app));
        }
    }
}

private void DeleteAppointmentClicked(object sender, EventArgs e)
{
    var app = this.scheduler.AppointmentsSource?.FirstOrDefault();
    if (app != null)
    {
        if (app.RecurrenceRule != null)
        {
            this.scheduler.DeleteAppointmentWithDialog(Occurrence.CreateOccurrence(app, app.Start, app.End));
        }
        else
        {
            this.scheduler.DeleteAppointmentWithDialog(Occurrence.CreateMaster(app));
        }
    }
}
Events
The Scheduler exposes the following events for its built-in dialogs:
DialogOpening—Raised when a dialog is about to be opened. TheDialogOpeningevent handler receives two parameters:- The sender argument, which is of type
object, but can be cast to theRadSchedulertype. - A
SchedulerDialogOpeningEventArgsobject with the following properties:DialogType—Provides the dialog type.Cancel—IfTrue, cancels the dialog opening.
- The sender argument, which is of type
DialogClosing—Raised when a dialog is about to be closed. TheDialogClosingevent handler receives two parameters:- The sender argument, which is of type
object, but can be cast to theRadSchedulertype. - A
SchedulerDialogClosingEventArgsobject with the following properties:DialogType—Provides the dialog type.Cancel—IfTrue, cancels the dialog closing.DialogResult (bool?)—Indicates how the dialog was closed.nullwhen closed with the Close button.Falsewhen closed with the Cancel button.Truein all other cases.
- The sender argument, which is of type
Check a quick example on how to use the DialogOpening and DialogClosing events:
1. Add the RadScheduler definition:
<telerik:RadScheduler x:Name="scheduler"
                      AppointmentsSource="{Binding Appointments}"
                      DialogOpening="OnDialogOpening"
                      DialogClosing="OnDialogClosing">
    <telerik:RadScheduler.ViewDefinitions>
        <telerik:WeekViewDefinition />
        <telerik:DayViewDefinition />
        <telerik:MonthViewDefinition />
        <telerik:AgendaViewDefinition />
    </telerik:RadScheduler.ViewDefinitions>
</telerik:RadScheduler>
2. Add the event handlers:
private void OnDialogOpening(object sender, Telerik.Maui.Controls.Scheduler.SchedulerDialogOpeningEventArgs e)
{
    if(e.DialogType == Telerik.Maui.Controls.Scheduler.SchedulerDialogType.DeleteRecurrenceChoiceDialog)
    {
        e.Cancel = true;
        logLabel.Text = "Cannot delete the recurrent appointment.";
    }
    else
    {
        logLabel.Text = "Opening ..." + e.DialogType;
    }
}

private void OnDialogClosing(object sender, Telerik.Maui.Controls.Scheduler.SchedulerDialogClosingEventArgs e)
{
    if (!e.DialogResult.HasValue || e.DialogResult.Value == false)
    {
        logLabel.Text = "Closing ..." + e.DialogType;
    }
}
Styling
You can style the visual appearance of each dialog by creating the corresponding Style with TargetType set to SchedulerDialog. Here is a list of the available Style properties:
EditAppointmentDialogStyle—Defines theStylethat will be applied on the Edit Appointment dialog.EditRecurrenceDialogStyle—Defines theStylethat will be applied on the Edit Recurrence dialog.EditRecurrenceChoiceDialogStyle—Defines theStylethat will be applied on the Edit Recurrence Choice dialog.DeleteAppointmentChoiceDialogStyle—(Desktop-only)Defines theStylethat will be applied on the Delete Appointment Choice dialog.DeleteRecurrenceChoiceDialogStyle—Defines theStylethat will be applied on the Delete Recurrence Choice dialog.PreviewAppointmentDialogStyle—(Android- and iOS-only)Defines theStylefor the Preview Appointment dialog.
The following example demonstrates how to style the Edit Appointment dialog.
1. Define the Scheduler with the EditAppointmentDialogStyle in XAML:
 <telerik:RadScheduler x:Name="scheduler"
                       EditAppointmentDialogStyle="{StaticResource CustomSchedulerEditAppointmentDialog_Style}"/>
2. Define the style in the resources of the page:
<Style x:Key="CustomSchedulerEditAppointmentDialog_Style" TargetType="telerik:SchedulerDialog">
    <Setter Property="ControlTemplate" Value="{StaticResource CustomSchedulerEditAppointmentDialog_ControlTemplate}" />
    <Setter Property="HeightRequest" Value="{OnPlatform Default=450, WinUI=530}" />
</Style>
Review the ControlTemplate definition in the Resources folder of the Controls Samples application.
For a runnable example demonstrating the Scheduler built-in edit appointment dialog customization, see the Controls Samples Application and go to Scheduler > Customization.