Adding Deployment Keys to CI/CD Services
This article describes how to activate your Kendo UI for Angular license in popular CI/CD services. Use Deployment Keys for build pipelines and provide the key through an environment variable or a secure file.
Deployment keys are dedicated license keys for build pipelines. Each deployment key is tied to one application and its selected products. You cannot use deployment keys for application development.
Developer license keys remain valid for CI/CD deployments, so existing pipelines do not need to be updated. For new pipelines, we recommend using deployment keys. For more information, see the differences between developer license keys and deployment keys.
To activate your license in a CI/CD environment:
- Go to the Deployment Keys page.
- Click Add Application. In the form that opens:
- Add the application name.
- Select the type of application—public or private.
- Select the set of products used in the application.
- Copy the deployment key and store it securely.
- Create an environment variable named
TELERIK_LICENSE, and set it to the deployment key value. Alternatively, store the key in atelerik-license.txtfile, for example, through the Azure Secure Files approach.
The following general requirements apply to all CI/CD environments:
- Regardless of the CI/CD tool you use, the step that installs the project dependencies must be executed before the step that activates the license.
- The license activation step requires the
@progress/kendo-licensingpackage to be downloaded and set up in your local environment or CI/CD pipeline. - Store the deployment key securely in an environment variable, a secret, or a secure file. Never hardcode a key in the build script.
- The CI pipeline configurations are not executable. They merely outline the specific sequence of steps.
For a runnable demo with setup pipelines for all CI services mentioned on this page, refer to the DevOps - Pipeline and Workflow GitHub repository.
Creating an Environment Variable
Set TELERIK_LICENSE to your deployment key. Each platform has a different process for setting environment variables. The following examples cover popular CI/CD services.
Starting with the 2025 Q1 release, the name of the environment variable changes from
KENDO_UI_LICENSEtoTELERIK_LICENSEand the downloaded file changes fromkendo-ui-license.txttotelerik-license.txt. This change is required as all Telerik UI and Kendo UI products now use the same licensing mechanism with a common license key. See the Handling License Key File Name and Environment Variable Name Changes in the 2025 Q1 Release knowledge base article for more details.
GitHub Actions
- Create a new Repository Secret or an Organization Secret. Set the secret name to
TELERIK_LICENSEand paste the deployment key as its value. - After running
npm installoryarn, add a build step to activate the license.
steps:
    # ... Install modules before activating the license.
    - name: Install NPM modules
      run: |
        npm install -g @angular/cli
        npm install

    - name: Activate Kendo UI License
      run: npx kendo-ui-license activate
      # Set a working directory if the application is not in the repository root folder:
      # working-directory: 'ClientApp'
      env:
        TELERIK_LICENSE: ${{ secrets.TELERIK_LICENSE }}

    # ... Run an application build after the activation of the license.
    - name: Build Application
      run: npm run build --configuration production
GitLab CI/CD Pipelines
- Go to Settings > CI/CD > Variables in your GitLab project.
- Add a new
TELERIK_LICENSEvariable and paste the deployment key as its value. - After running
npm installoryarn, add a build step to activate the license.
yaml# .gitlab-ci.yml file
variables:
  NODE_ENV: production

setup_dependencies:
  stage: setup
  script:
    - echo "Installing dependencies..."
    - npm install
  # ...

activate_license:
  stage: activate
  script:
    - echo "Activating Kendo UI license..."
    - npx kendo-ui-license activate
  environment:
    name: production
  variables:
    TELERIK_LICENSE: $TELERIK_LICENSE
  # ...
Azure Pipelines (YAML)
- Create a new Secret Variable named
TELERIK_LICENSE. - Paste the deployment key as its value.
- Install project dependencies with
npm installoryarn. - Add a build step to activate the license using
npx kendo-ui-license activateoryarn run kendo-ui-license activatecommands.
The following example provides the syntax for Windows and Linux build agents.
pool:
  vmImage: 'windows-latest'
steps:
# ... Install modules before activating the license.
- script: call npm install
  displayName: 'Install NPM modules'
- script: call npx kendo-ui-license activate
  displayName: 'Activate Kendo UI License'
  # Set a working directory if the application is not in the repository root folder:
  # workingDirectory: 'ClientApp'
  env:
    TELERIK_LICENSE: $(TELERIK_LICENSE)
# ... Run an application build after the activation of the license.
- script: call npm run build --configuration production
displayName: 'Build Application'Azure Pipelines (Classic)
-
Create a new Secret Variable named
TELERIK_LICENSE. -
Paste the deployment key as its value.
-
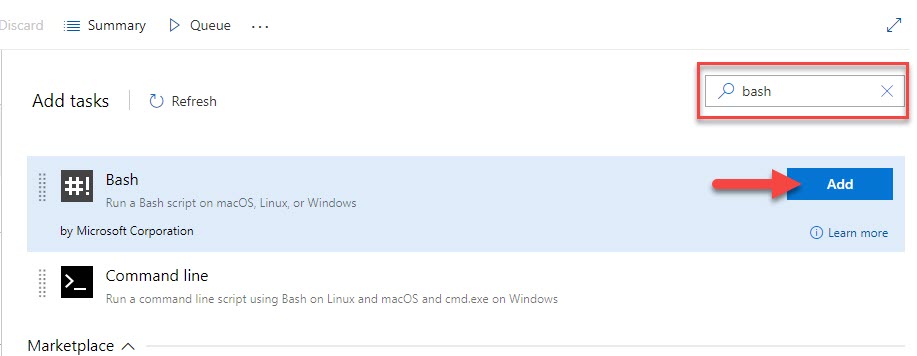
Before the NPM build task, add a new Bash task to the Agent job.
-
Change the step to inline and use the following command:
bash# Activate the license npx kendo-ui-license activate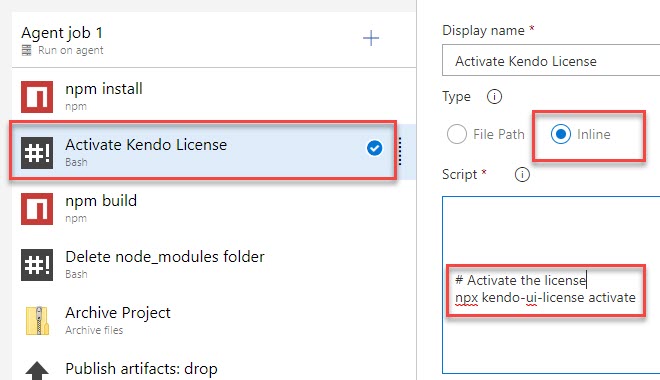
Using Secure Files on Azure DevOps
Secure files are an alternative approach for sharing the license key file in Azure Pipelines that does not have the size limitations of environment variables.
You have two options for a file-based approach:
- Set the
TELERIK_LICENSE_PATHvariable. - Add a file named
telerik-license.txtto the project directory or a parent directory.
Make sure you reference
@progress/kendo-licensingv1.5.0 or later.
With a YAML pipeline, you can use the DownloadSecureFile@1 task, then use $(name.secureFilePath) to reference it.
# ... Install modules before activating the license.
- script: call npm install
  displayName: 'Install NPM modules'

- task: DownloadSecureFile@1
  name: DownloadTelerikLicenseFile # defining the 'name' is important
  displayName: 'Download Telerik License Key File'
  inputs:
    secureFile: 'telerik-license.txt'

- script: call npx kendo-ui-license activate
  displayName: 'Activate Kendo UI License'
  # Set a working directory if the application is not in the repository root folder:
  # workingDirectory: 'ClientApp'
  env:
    # use the name.secureFilePath value to set TELERIK_LICENSE_PATH
    TELERIK_LICENSE_PATH: $(DownloadTelerikLicenseFile.secureFilePath)
With a classic pipeline, use the “Download secure file” task and a PowerShell script to set TELERIK_LICENSE_PATH to the secure file path.
-
Add a “Download secure file” task and set the output variable's name to
telerikLicense.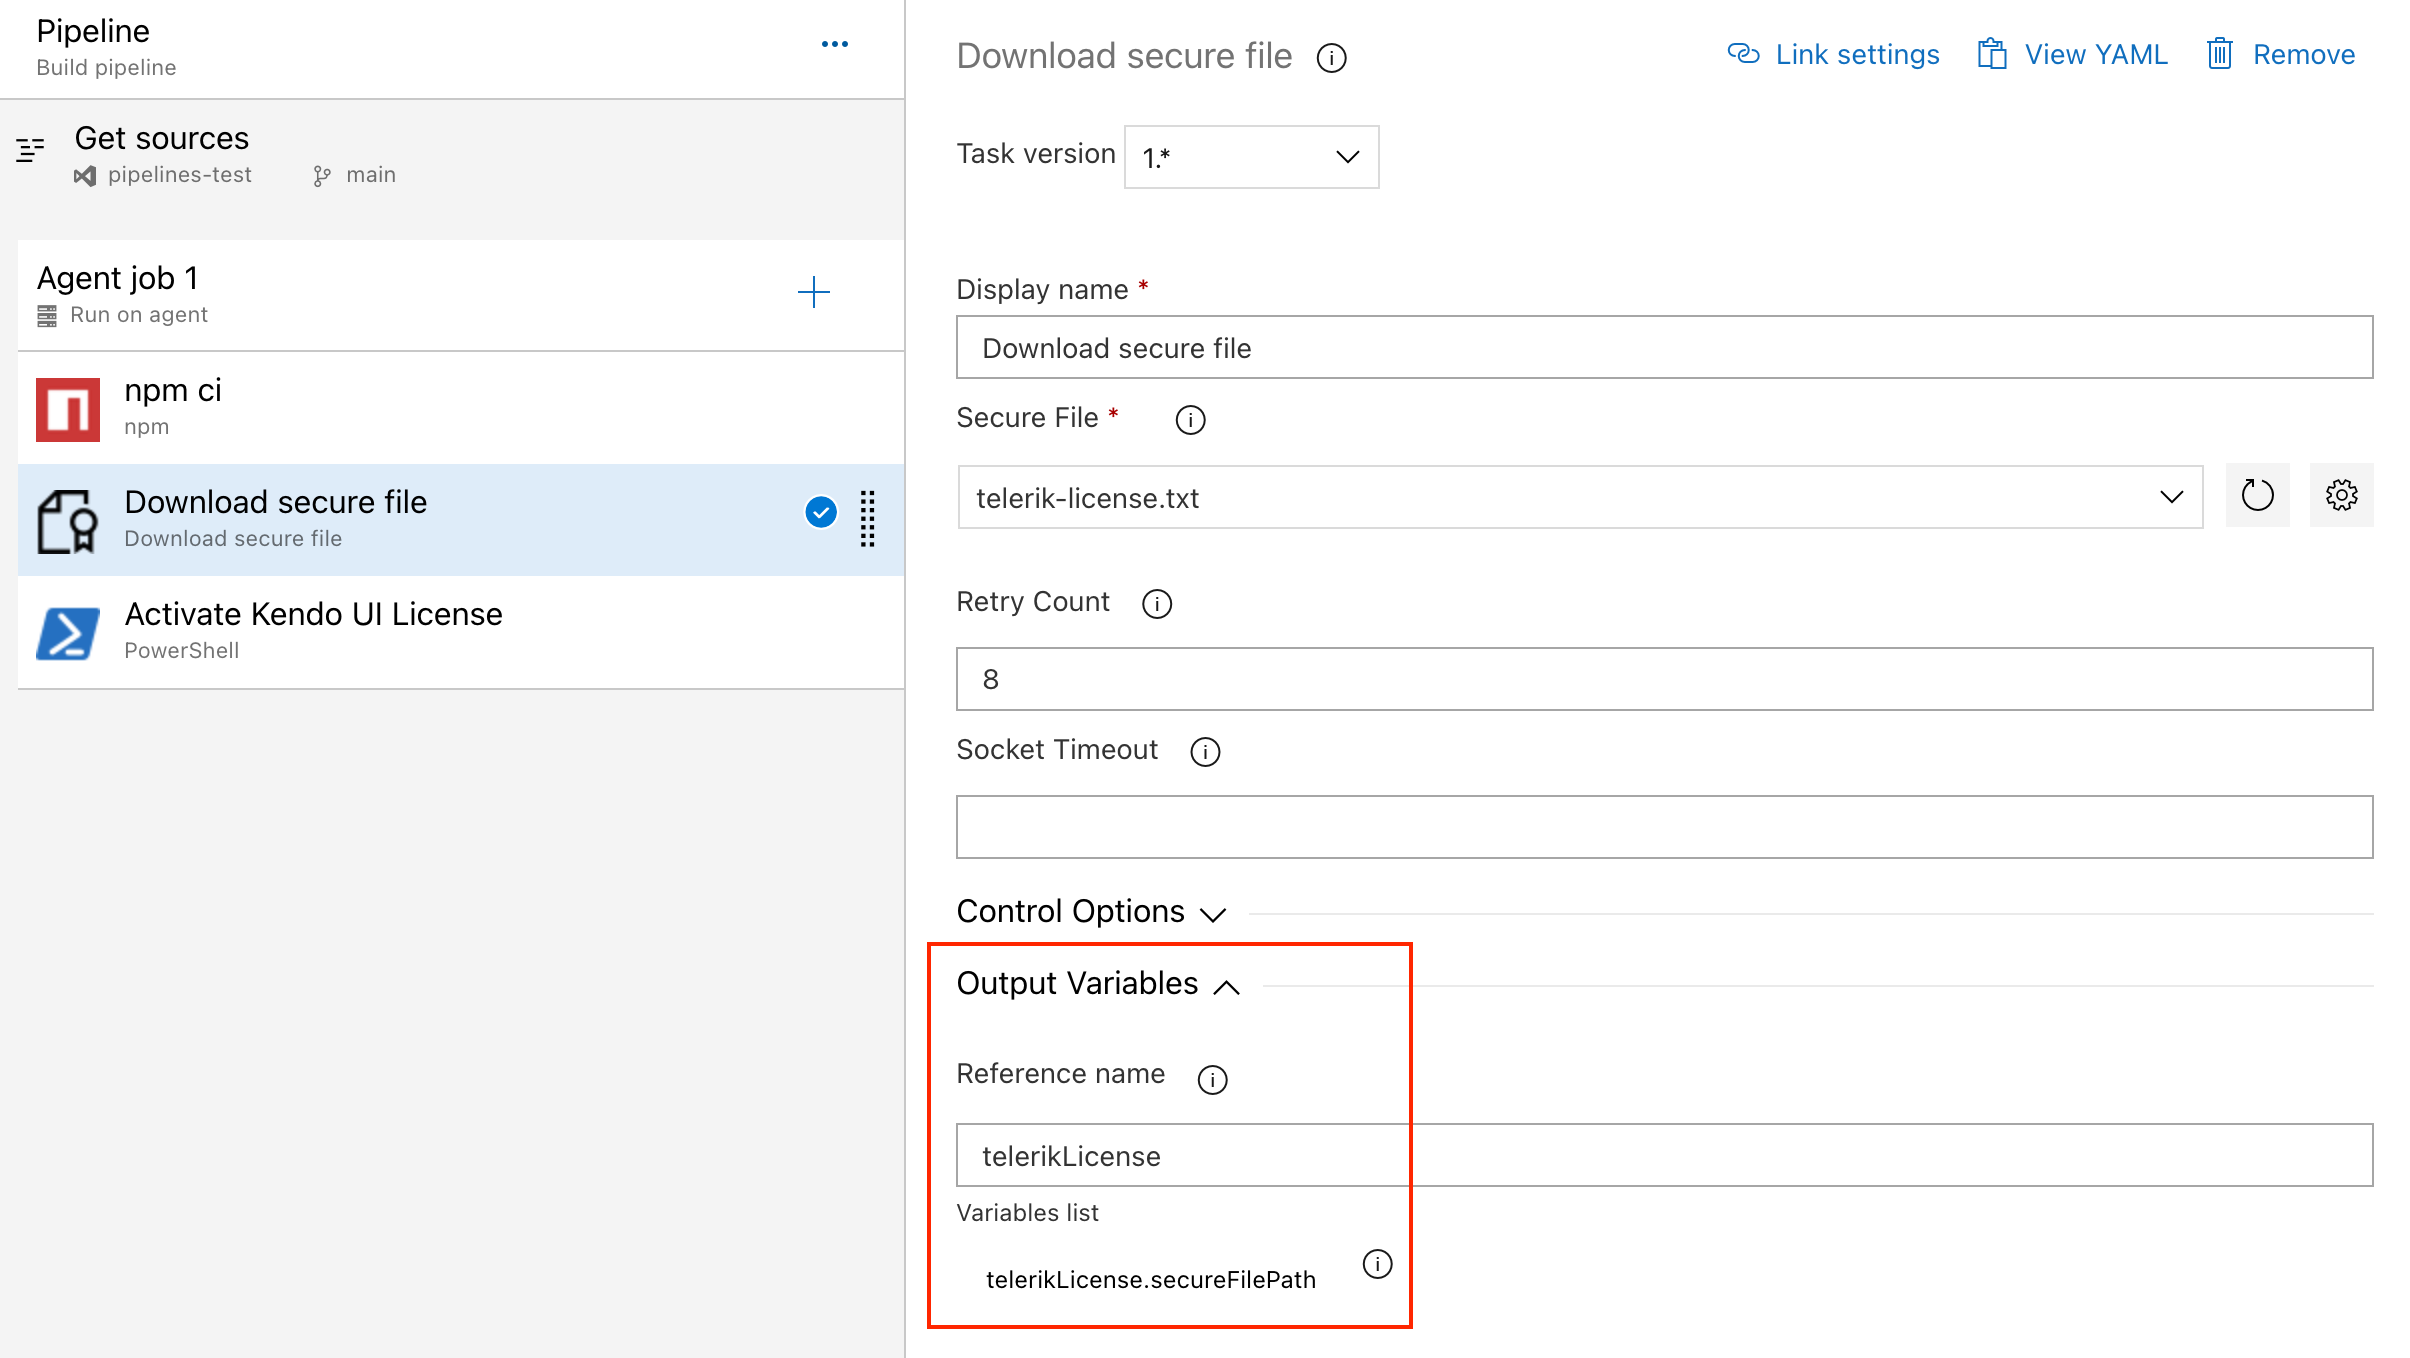
-
Add a PowerShell task that sets the
TELERIK_LICENSE_PATHvariable and activates the license.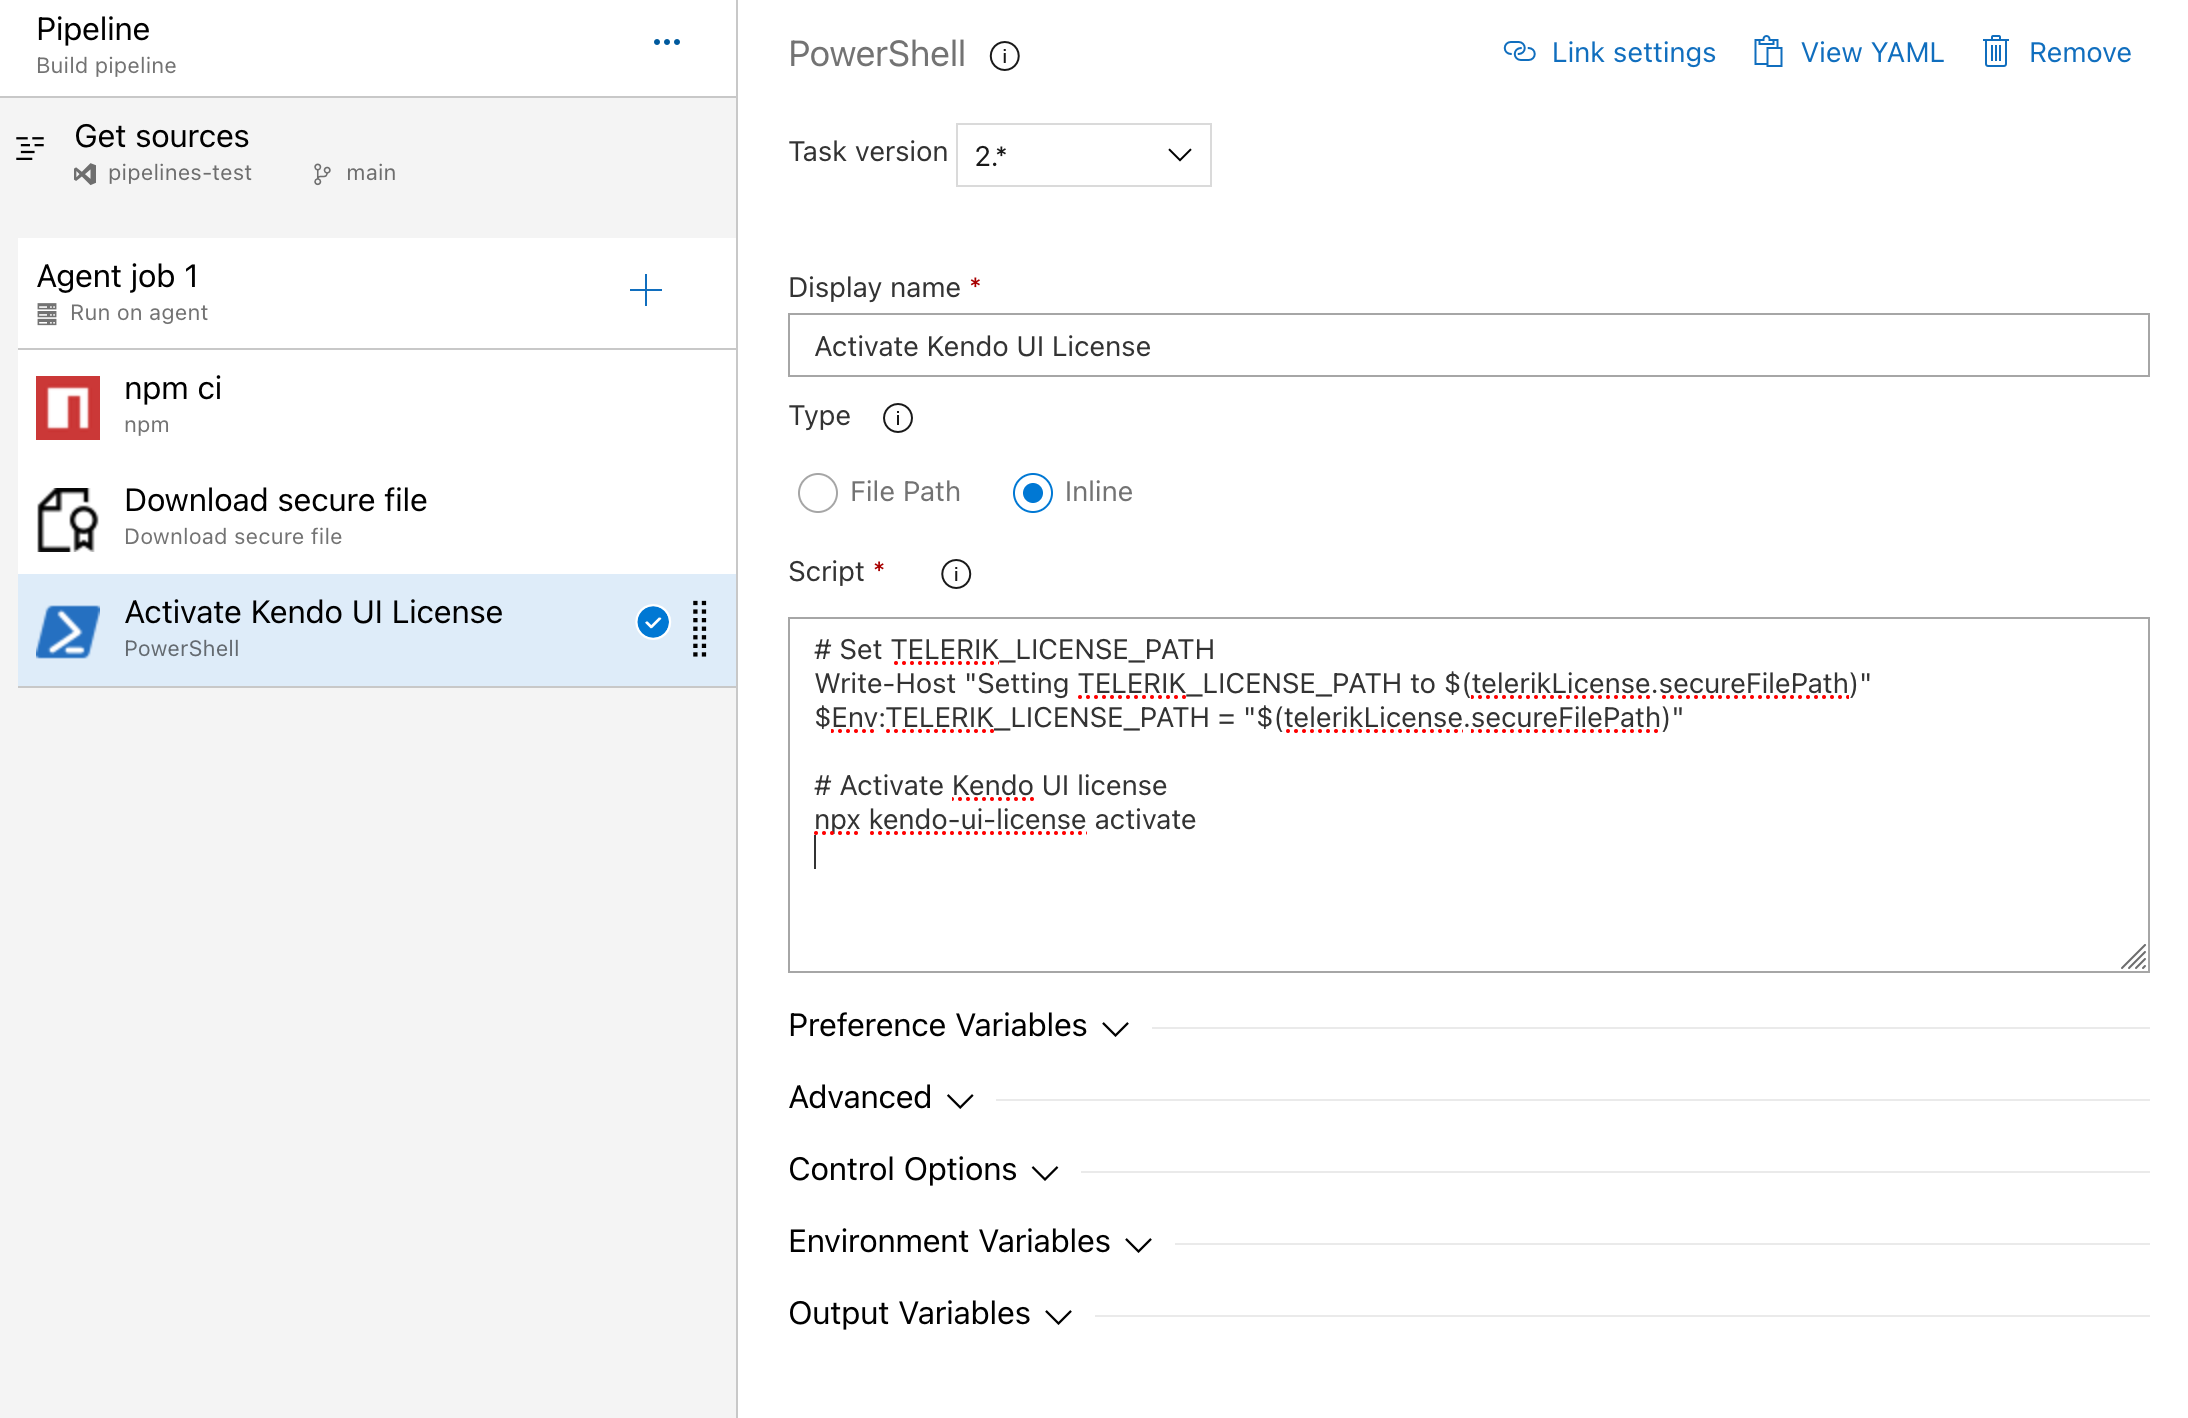
To set the environment variable and activate the license run the following script:
# Set TELERIK_LICENSE_PATH
Write-Host "Setting TELERIK_LICENSE_PATH to $(telerikLicense.secureFilePath)"
$Env:TELERIK_LICENSE_PATH = "$(telerikLicense.secureFilePath)"

# Activate Kendo UI license
npx kendo-ui-license activate
Alternatively, copy the telerik-license.txt file into the repository directory:
# Copy telerik-license.txt from secure file
echo "Copying $(telerikLicense.secureFilePath) to $(Build.Repository.LocalPath)/telerik-license.txt"
Copy-Item -Path $(telerikLicense.secureFilePath) -Destination "$(Build.Repository.LocalPath)/telerik-license.txt" -Force

# Activate Kendo UI license
npx kendo-ui-license activate
If using Task Groups, change the file name from
$(telerikLicense.secureFilePath)to$(Agent.TempDirectory)\telerik-license.txtas output variables are not supported.