Yes i could work backwards thro the css files decrypting all those negative positions markers
Indeed i just started doing this for menu but i am sure a whole load of people are having to do the self same thing so telerik map out those sprite files please
kmv
29 Answers, 1 is accepted

You are totally right! We should have thought of this earlier - only today there are three tickets related to the lack of styling documentation. We've started developing an idea about the best visual way to show the regions of the sprite; I'll update this thread when there is some progress on the topic.
We've got the sprite PSDs available for some of the controls - you can find them attached to this post. I hope that they will be sufficient until we create something better.
Greetings,
Alex
the Telerik team
Check out Telerik Trainer , the state of the art learning tool for Telerik products.

I assume one can not simply add a layer to the PSD file and have it show up in the skin selector. The prior method of skinning was much more user-friendly, configurable, and portable.
I already modified the PNG sprite file for the RadMenu, but it does not act as expected.
Indeed, the new skinning approach is not as convenient as the old one. We're aware of that, and this is why we want to build the Visual Style Builder, and other tools that will make the process easier than before. Until then, please explain what you are trying to achieve (as far as I understand, you wish to make a skin bigger - but which?) - we will provide you with the desired CSS and images.
The reasoning behind using the sprite images is that they reduce the number of HTTP requests to the server, and therefore - make the controls perform much faster. A detailed overview of this technique can be found at A List Apart.
Greetings,
Alex
the Telerik team
Check out Telerik Trainer , the state of the art learning tool for Telerik products.
I love the sprite approach, and have adopted it in my work close to 100%, meaning I'm designing sites based on sprites as well. If the site uses just a couple of RadControls I try to put the skin within the site sprite as well.
But for some reason some controls haven't been totally "spritified" yet. The Treeview is a good example, all the lines are still in separate images. I'm sure there is a good reason for it, so I haven't bothered moving them all into a sprite image when skinning the treeview.
I second Kevins idea, it could be a great timesaver. For example, I've yet to see half of the bars in the window skins sprites displayed anywhere, and I have no idea where - if anywhere - they are used.
Regards,
-DJ-
You said:
"...Until then, please explain what you are trying to achieve (as far as I understand, you wish to make a skin bigger - but which?) - we will provide you with the desired CSS and images."
In response to that, I don't see how me sending you our design and requirements solves this problem. We have several sites that need custom skins. I wish to understand it, by reading documentation or going through examples, rather than have someone else do the work.
If it isn't one thing, it's got to be another.

superXRAY it isn't the graphics that set the size of the menu at all , thee sprites are used as backgrounds so just fill the size of the item, the size comes from the css and the size of the items inside the menu
telerik altough i like the sprite approach have you done any metrics on what performance difference it actually makes
and finally i look forward to the design tools, sprite map and css comments :-)
kevin
I know, but they do play a part in what size you can make the menu. It's just very frustrating when projects should take days, but instead take weeks when one has to factor in all the 'other' stuff that has to be done. I actually stripped out all the sprite usage, because I just simply need a flat menu. However, I have redone one sprite file for another project 75%.
We scheduled a review of the skinning documentation for this week. I'm going to update you with the results so that you can share your feedback.
@DJ: The line images have not been "spritified", true (in fact, the TreeView performs several hundred ms faster when there are no line images). I guess the reasoning behind this is getting old, so we're going to review that, too.
@kevin: The performance implications depend on the responsiveness of the server, but even if it's the most performant in the world, the number of requests is minimized significantly. I have no numbers that I can give you, but if you insist, we could do a peformance test (e.g. with the scheduler Q2.2008 release vs Q1.2009, oh, that will be fun).
Best wishes,
Alex
the Telerik team
Check out Telerik Trainer , the state of the art learning tool for Telerik products.
Posting the PSD Sprite files is rather useless and...demeaning, to the original problems. Everyone that has the RadControls for ASP.NET AJAX Q1 2009 installed already has the PNG files. Stating that the menu performs much faster than not using sprites...I changed one of my menus over to separate files for each part of the menu, preloaded the images with JavaScript, and it is much faster than the Sunset-skinned RadMenu using a sprite.
Excuse my venting, but I get faster response times on the forums than I do for my paid subscription support.
Again, simple documentation would suffice.
I am sorry for offending you through not answering.
> Speaking specifically of the RadMenu, is it pixel-based or does it look for the transition from colored pixels to transparency for the separation of the different parts of the sprite image?
The menu is pixel-based.
> In other words, how does one change the size of the RadMenu, since the sprite image is not vector based?
By specifying exact background-position in your custom skin; the base stylesheet provides background positioning that is convenient for the new lines of skins; if you decide not to stick with their dimensions, you can override them in any way you want.
> Sprites
The pre-loading with Javascript simply moves the loading delay of the images to another event. If you pre-load the sprite, the pre-loading process will be shorter. And comparing a skin with cached images to one without gives no accurate information. I'm attaching a test of the Sunset skin, with and without sprites, from localhost (request size shows 300% improvement). The request delays raise quite a but when accessing a remote server.
> Documentation
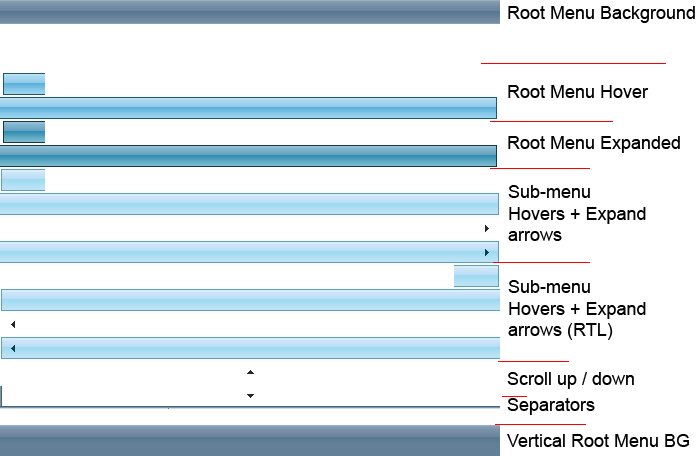
The psd files have named layers, each of which contain the specific parts of the skin. I've extrated these to an image, which you can find attached.
Best wishes,
Alex
the Telerik team
Check out Telerik Trainer , the state of the art learning tool for Telerik products.
There is so much speed difference using sprites vs separate images that you can see it without even measuring it.
I think having menu-sprite-dissection.png like images available in each skin folder for each control wouldn't be a bad idea. This way you can get a clear and quick overview, and it should shorten the skinning time.
Regards,
-DJ-
And thank you :-) I guess we can create something a tad more professional for the documentation - this was hacked for about 5 minutes, just as an illustration. Surely, something like this will be one kind of documentation - do you guys need something else?
All the best,
Alex
the Telerik team
Check out Telerik Trainer , the state of the art learning tool for Telerik products.
The dissection image is exactly what I, not to speak for anyone else, was looking for. It is what I meant when I said "simple documentation". I'm sorry that something so simple seems to become such a big deal.
Thank you for posting the image. If it were up to me, I would immediately replace all the documentation for the RadMenu skinning with that image. :)

Thanks for sharing your opinion. Apart from dissection images, as my colleague said, we could also provide PSD files with the raw sprite images, which contain separator lines and labels describing the different images included (attached simple example for RadInput Forest)
What will be more useful for you - dissection images or PSDs with labelled layers ?
Kind regards,
Dimo
the Telerik team
Check out Telerik Trainer , the state of the art learning tool for Telerik products.

There can only really be one answer to that; and the answer is BOTH! :-)
--
Stuart
The simplest way for all parties would be to include these dissection images in each controls image folder, just like you now include a screenshot of the control.
Speaking for myself, I don't really prefer creating new skins based on the psd files rather than just the sprite gif or png files.
Regards,
-DJ-
What would help even more now is visually showing us how the CSS file ties to the sprite. I've pretty much figured that out for now, but I have bigger things to worry about and need to pass this type of work off to someone else, who doesn't understand it...and I don't have time to pay them to figure it out.
The PSDs are very helpful if yo want to modify the sprite. If you want to create new skins, actually neither PSDs, nor dissected images are of any use - you simply have to understand the concept of sprites.
Regards,
Dimo
the Telerik team
Check out Telerik Trainer , the state of the art learning tool for Telerik products.
I don't see any reason why anyone would make a "new" skin in the meaning of starting with an empty css file and an empty sprite. Unless this person had something to prove?
I haven't made a new skin for any of the Q1 2009 controls that needs to have different dimensions than the original ones, that might be the only occasion that starting with an empty sprite could prove beneficial. Still don't think I would go that way.
However, it depends on the nature of the psd files how useful they are. If the layers are more or less merged with their effects embedded, you could just as well start with a png or a gif. The flat sprites do suffice for any decent designer I would think.
If however you have highlights and semi transparent gradients in separate layers it would obviously speed up the skinning for someone who just wanted to change the base colours etc.
So we always end up with the fact that the dissection images would prove helpful when you are first skinning a control, but in most cases you learn what goes where rather quickly.
Regards,
-DJ-
You are right, but there are different developers with different requirements, so starting a new skin from scratch is also possible.
Concerning our PSD's, their effects are generally not flattened (rasterized).
Sincerely yours,
Dimo
the Telerik team
Check out Telerik Trainer , the state of the art learning tool for Telerik products.
Dimo said:
---------------------------------
"The PSDs are very helpful if yo want to modify the sprite. If you want to create new skins, actually neither PSDs, nor dissected images are of any use - you simply have to understand the concept of sprites.
Regards,
Dimo
the Telerik team "
---------------------------------
My point exactly except that I should have been more specific. I created a vector-based PNG for this, resizing it to whatever I need to make it. The PNG posted describing the parts of the PNG does help, as it helps those to decode the CSS. I think much of what has been said is out of context of, at least, for what I was/am after; documentation that explains to someone that doesn't work on the Telerik Development Team how to modify the CSS and Sprites in combination to achieve their goal. It is nearly a mute point at this time.
Please make some kind of posting when there is documentation released.
We surely will.
Best wishes,
Dimo
the Telerik team
Check out Telerik Trainer , the state of the art learning tool for Telerik products.
Thank you,
Kim
I am not sure what you mean by "skin downloads". We intend to upload the sprite PSDs at telerik.com/skins once they are ready for all controls. Adding them to the RadControls installers will increase too much the installers' size.
Please find attached the RadGrid PSDs for the Q1 2009 skins.
Best wishes,
Dimo
the Telerik team
Instantly find answers to your questions on the new Telerik Support Portal.
Check out the tips for optimizing your support resource searches.
I now have a new issue. I am customizing the treeview skin. I am using your office2007 skin and changing the images. I would like to use a bigger (taller and wider) plus and minus image. I changed the sprite but I cannot for the life of me figure out how to change the css so that the larger image displays. Currently my plus and minus images are getting chopped off on the right and bottom. No where in the style sheet is there way to change the height or width or the sprite location. In the previous version of the skins you could change the location of the image in the sprite and also the heigth and width.
My Pre 2009 Q1 Style Sheet looked like this...
.RadTreeView_Telerik .rtPlus,
.RadTreeView_Telerik .rtMinus
{
margin:4px 4px 0pt -21px;
width:18px;
height:18px;
}
.RadTreeView_Telerik .rtPlus
{
background: transparent url(TreeView/PlusMinus.gif) no-repeat 0 0;
}
.RadTreeView_Telerik .rtMinus
{
background: transparent url(TreeView/PlusMinus.gif) no-repeat 0 -18px;
}
Now all there is this:
.RadTreeView_Telerik
.rtPlus,
.RadTreeView_Telerik
.rtMinus
{
background-image: url('TreeView/PlusMinus.png');
}
I have tried adding a height and width to this style but it doesn't work.
i also noticed that there are several other images being referenced in all of treeview css files under the Node Lines section. These images are not in the 2009 Q1 Release anywhere.
All of the images referenced below are missing:
.RadTreeView_Telerik
.rtLines .rtLI,
.RadTreeView_Telerik
.rtLines .rtFirst .rtUL { background-image: url('TreeView/NodeSpan.png'); }
.RadTreeView_Telerik_rtl
.rtLines .rtLI,
.RadTreeView_Telerik_rtl
.rtLines .rtFirst .rtUL { background-image:url('TreeView/NodeSpan_rtl.png'); }
.RadTreeView_Telerik
.rtLines .rtFirst,
.RadTreeView_Telerik
.rtLines .rtFirst .rtUL { background-image: url('TreeView/FirstNodeSpan.png'); }
.RadTreeView_Telerik_rtl
.rtLines .rtFirst,
.RadTreeView_Telerik_rtl
.rtLines .rtFirst .rtUL { background-image: url('TreeView/FirstNodeSpan_rtl.png'); }
.RadTreeView_Telerik
.rtLines .rtLast,
.RadTreeView_Telerik
.rtLines .rtLast .rtUL { background-image: none; }
.RadTreeView_Telerik
.rtLines .rtTop { background-image:url('TreeView/TopLine.png'); }
.RadTreeView_Telerik_rtl
.rtLines .rtTop { background-image:url('TreeView/TopLine_rtl.png'); }
.RadTreeView_Telerik
.rtLines .rtMid { background-image:url('TreeView/MiddleLine.png'); }
.RadTreeView_Telerik_rtl
.rtLines .rtMid { background-image:url('TreeView/MiddleLine_rtl.png'); }
.RadTreeView_Telerik
.rtLines .rtBot { background-image:url('TreeView/BottomLine.png'); }
.RadTreeView_Telerik_rtl
.rtLines .rtBot { background-image: url('TreeView/BottomLine_rtl.png'); }
.RadTreeView_Telerik
.rtLines .rtLast .rtTop { background-image:url('TreeView/SingleLine.png'); }
.RadTreeView_Telerik_rtl
.rtLines .rtLast .rtTop { background-image:url('TreeView/SingleLine_rtl.png'); }
Thank you,
Kim
Regarding the first issue, I'm attaching a custom skin that shows which properties have to be edited.
Regarding the second issue - it was caused by our build scripts and is fixed already. The reason of the missing images is that they are now located in the ../Common/ folder (common for all skins) rather than in the /TreeView folder.
Regards,
Alex
the Telerik team
Instantly find answers to your questions on the new Telerik Support Portal.
Check out the tips for optimizing your support resource searches.
The code example you sent doesn't work. I had already tried that. The height and width does not get applied. The position works but the right side and bottom of my plus and minus are getting chopped off.
.RadTreeView_Telerik
.rtPlus,
.RadTreeView_Telerik
.rtMinus
{
background-image: url('TreeView/PlusMinus.png');
}
div.RadTreeView_Telerik
.rtPlus,
div.RadTreeView_Telerik
.rtPlus:hover
{
width: 18px;
height: 18px;
background-position: 0 0;
}
div.RadTreeView_Telerik
.rtMinus,
div.RadTreeView_Telerik
.rtMinus:hover
{
width: 18px;
height: 18px;
background-position: 0 -18px;
}
Dosen't make sense to me since CSS is supposed to cascade. But it works now.