Configure a Project Using Forge Desktop App
Use the Forge Desktop App project configuration wizard to connect a local repository to Forge. The wizard checks the repository environment, configures source control, selects a coding agent and model profile, configures an issue tracker, captures project metadata, and lets you review the setup before adding the project.
The wizard centralizes settings that would otherwise be configured through project, agent, and toolchain configuration files. The files and integration behavior depend on the choices you make during setup.
Prerequisites
Before launching the wizard, make sure that:
- The Forge Desktop App is installed. See Getting Started with Desktop App.
- The project repository is cloned locally.
- The repository is accessible with your current user account.
- Git is installed and the folder is a valid Git repository.
- At least one supported coding agent is installed if you want to run workflows immediately.
- The selected coding agent is authenticated.
- Your issue tracker account and credentials are available if you plan to connect an external tracker.
- You can provide accurate project metadata, including the primary language, frameworks, testing framework, and package manager.
Run the Forge Desktop App in an isolated development environment when using autonomous coding agents. Review generated changes before accepting, committing, or publishing them.
Launch the Project Configuration Wizard
-
Start the Forge Desktop App and sign in with your Telerik account.
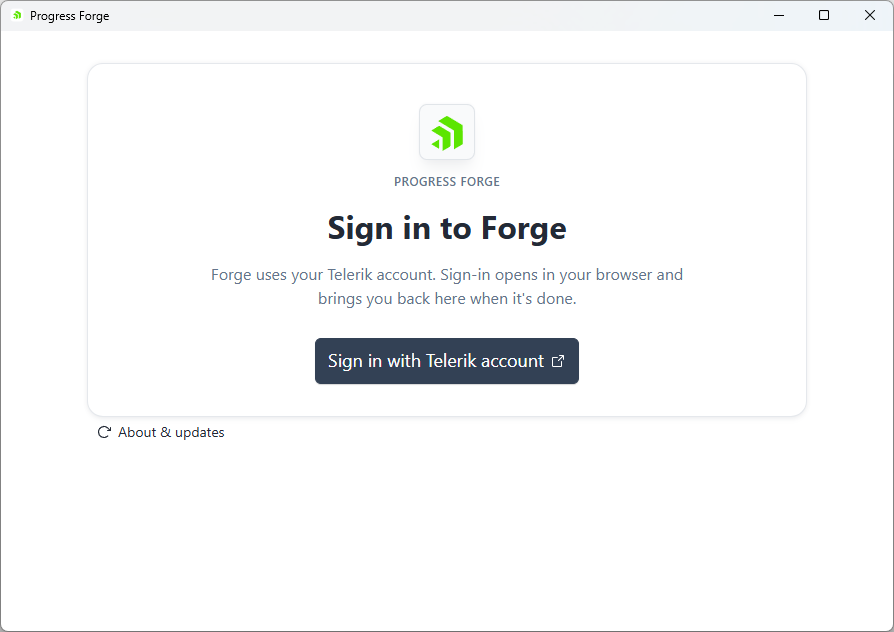
If you don't have a valid Telerik license, you can start a trial or purchase a license.
-
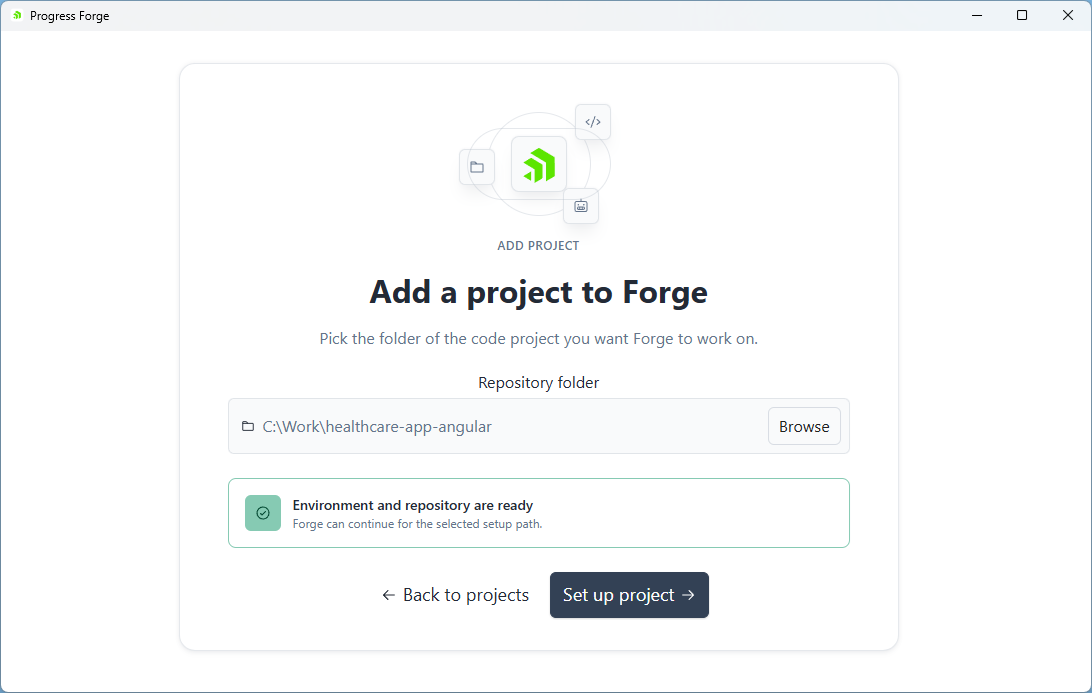
Select Browse beside Repository folder.
-
Select the local folder containing the repository you want to configure.
-
Wait until the readiness panel says Environment and repository are ready.
-
Select Set up project.
The wizard uses the selected folder for repository detection, project metadata suggestions, and the configuration it creates. Select the repository root rather than a nested source directory.
Step 1: Select and Verify the Repository
This step identifies the local repository and confirms that the environment can support project setup.
Step 2: Configure Source Control
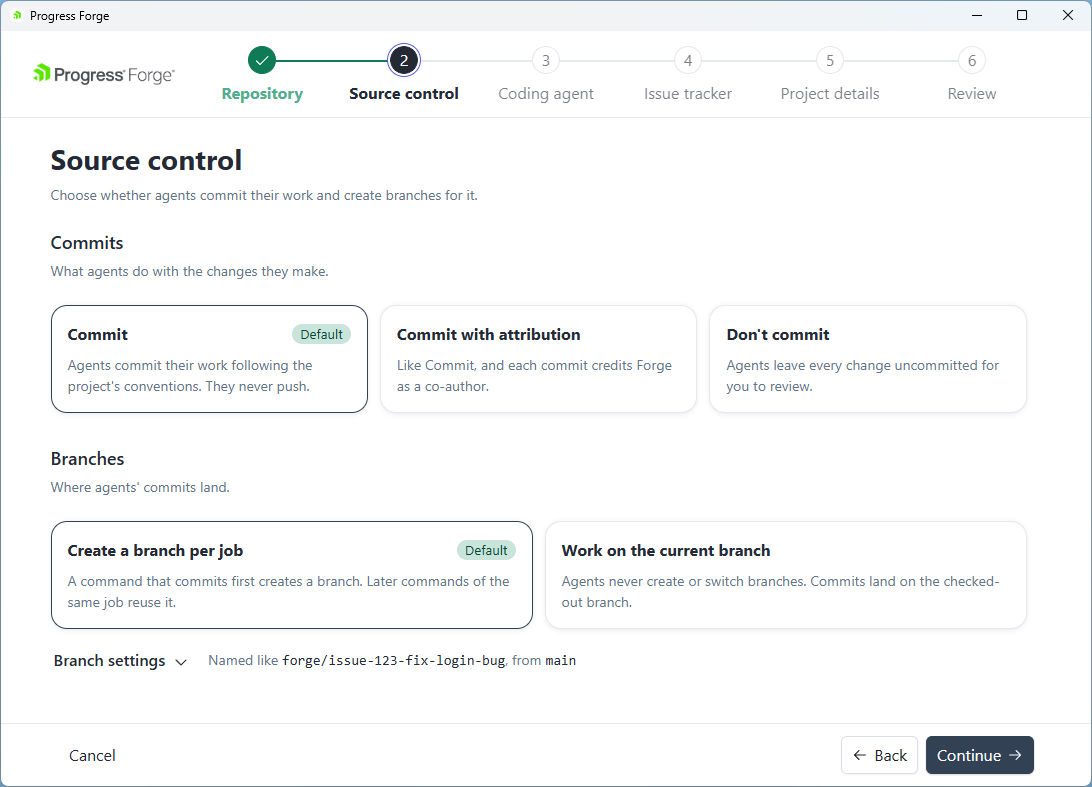
The Source control step lets you choose whether agents commit their work and create branches for it.
Configuration Options
Under Commits, choose what agents do with the changes they make:
- Commit: Agents commit their work following the project's conventions. This is the default; agents never push.
- Commit with attribution: Like Commit, and each commit credits Forge as a co-author.
- Don't commit: Agents leave every change uncommitted for you to review.
Under Branches, choose where agents' commits land:
- Create a branch per job: The first command that commits creates a branch. Later commands in the same job reuse it. This is the default.
- Work on the current branch: Agents never create or switch branches. Commits land on the checked-out branch.
Recommended Settings
Keep Commit and Create a branch per job selected for the default workflow: agents commit changes without pushing and keep each job's commits on its own branch. Choose Don't commit if you want to inspect or edit all changes before committing them.
Procedure
- Select whether agents should commit, commit with Forge attribution, or leave changes uncommitted.
- Select whether agents should create a branch per job or work on the current branch.
- Review the Branch settings summary.
- Select Continue.
Notes
Source control settings determine how local changes are committed and branched; agents do not push changes to a remote repository.
Step 3: Select a Coding Agent
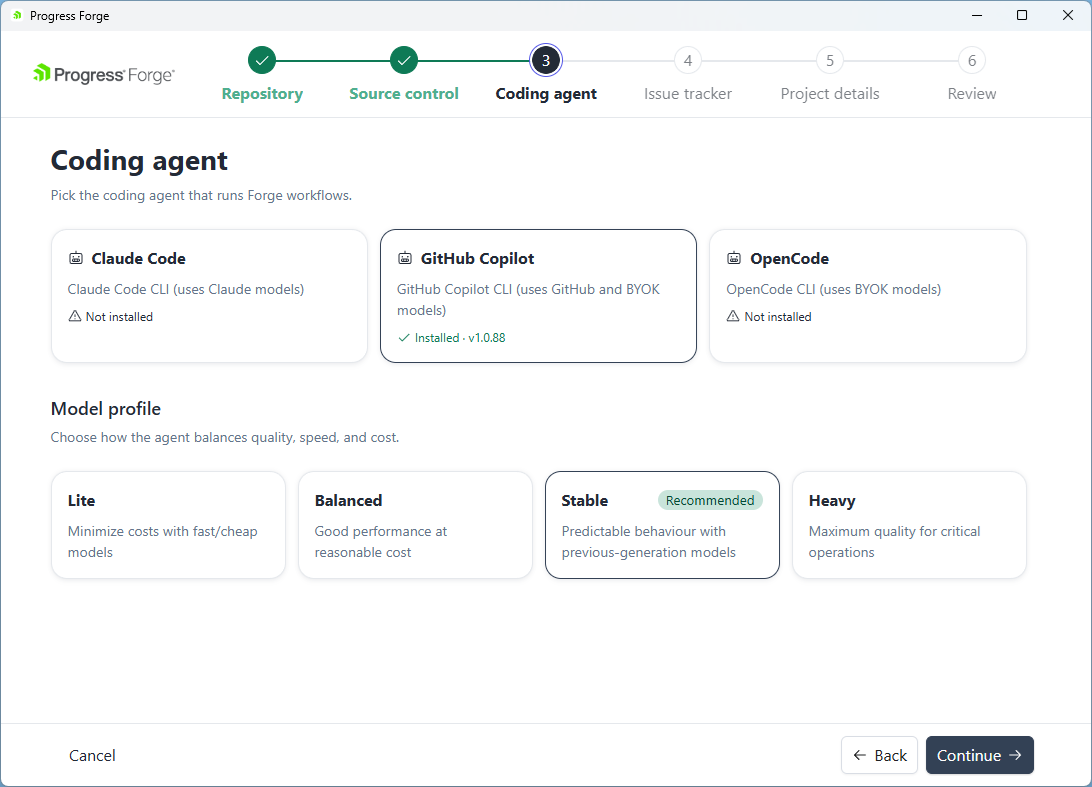
The Coding agent step selects the external AI coding application Forge uses for workflow execution and a model profile that balances capability, speed, and cost.
Configuration Options
The wizard presents these agent choices:
- Claude Code: Claude Code CLI (uses Claude models).
- GitHub Copilot: GitHub Copilot CLI (uses GitHub and BYOK models).
- OpenCode: OpenCode CLI (uses BYOK models).
Each card shows whether the CLI is installed. An installed CLI also shows its version. For example, the screenshot shows GitHub Copilot as Installed · v1.0.88, while Claude Code and OpenCode are Not installed.
Under Model profile, choose one of four profiles:
- Stable: The default profile with predictable behavior for day-to-day workflows. It is marked Recommended.
- Balanced: A flexible profile for broader workflow experimentation with a balance of capability and usage.
- Lite: A lower-cost profile for fast, lightweight behavior and early exploration.
- Heavy: A maximum-quality profile for critical operations where capability matters more than speed or cost.
Other profiles may be available in the product or agent configuration. The profile maps to provider-specific models; it is not itself a model name.
Recommended Settings
Select an agent that is both Installed and Authenticated. Choose Stable for a first project setup unless your team has a documented reason to optimize for lower cost with Lite or broader experimentation with Balanced.
Procedure
- Select the coding agent your team uses.
- Confirm that the selected card reports Installed and Authenticated.
- If authentication is required, authenticate with the provider and return to the wizard.
- Select Heavy, Stable, Balanced, or Lite under Model profile.
- Continue to the Issue tracker step.
Notes
The selected agent becomes the project preference used by Forge. Model availability, provider access, subscriptions, and provider-specific credentials remain the responsibility of the agent provider. You can change the agent or model profile later in project configuration.
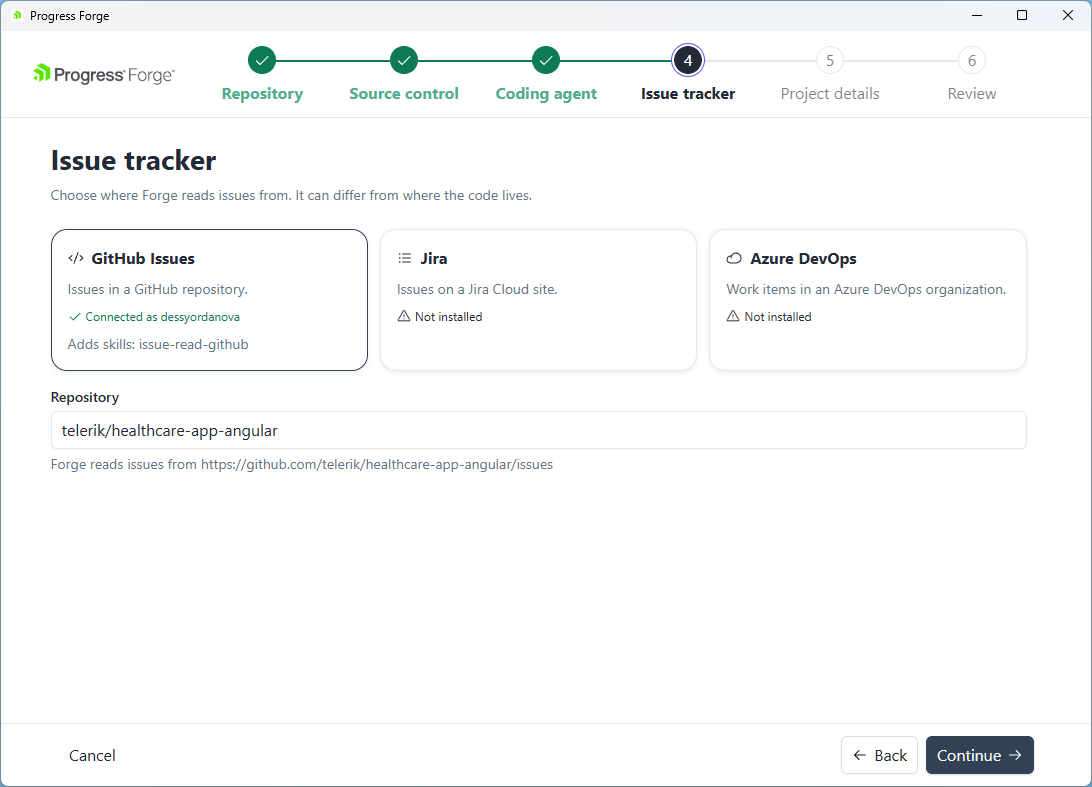
Step 4: Connect an Issue Tracker
The Issue tracker step determines where Forge reads issues and work items. The selected tracker affects the toolchain configuration and the context available to the coding agent.
Configuration Options
The wizard offers these tracker choices:
- GitHub Issues: Issues in a GitHub repository.
- Jira: Issues on a Jira Cloud site.
- Azure DevOps: Work items in an Azure DevOps organization.
The cards show connection or installation status. In the screenshot, GitHub Issues is connected and adds the issue-read-github skill, while Jira and Azure DevOps show Not installed. When GitHub Issues is selected, the Repository field shows the repository Forge reads from, and the hint displays its issues URL.
Recommended Settings
Select the tracker that owns the work items your team intends to process. Use GitHub Issues when the repository already manages work in GitHub. Select Jira or Azure DevOps when the project’s issue source is managed there instead of in GitHub.
Procedure
- Select GitHub Issues, Jira, or Azure DevOps.
- Review the selected tracker's status. For GitHub Issues, check or edit the Repository value and confirm the issues URL in the hint.
- Select Continue to go to Project details.
Notes
Selecting a tracker does not create credentials or install the tracker CLI. Authenticate the required provider separately.
Step 5: Enter Project Details
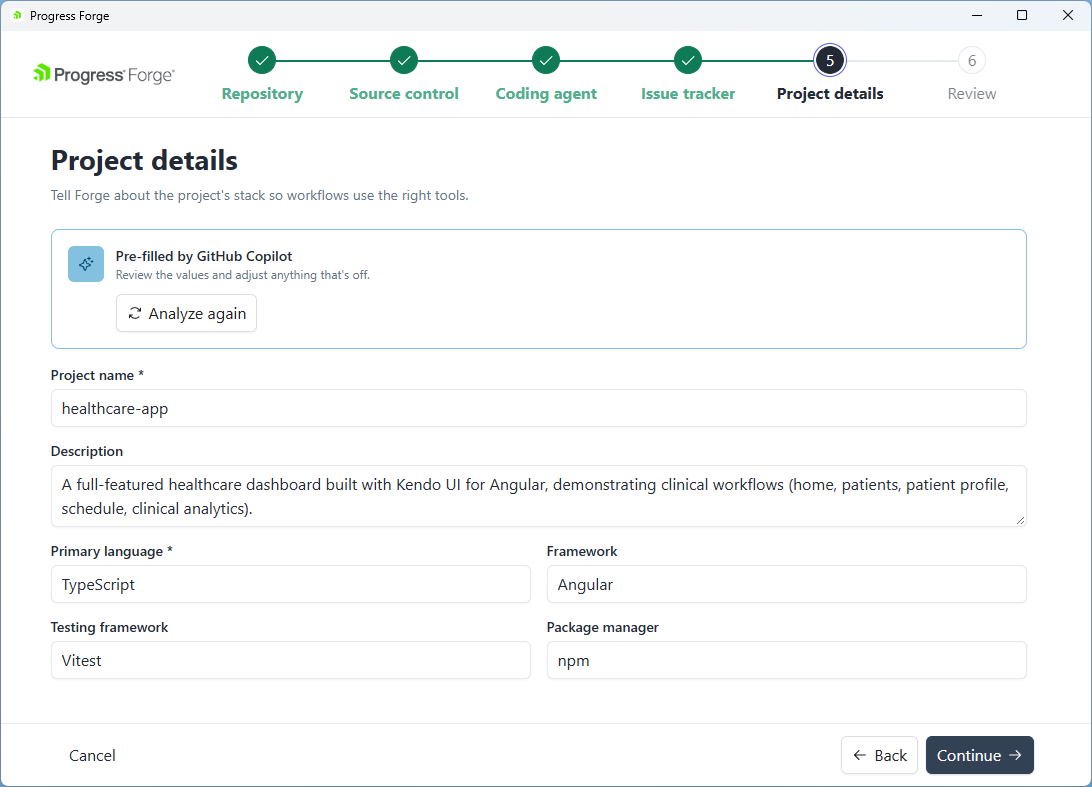
The Project details step records the project's stack so workflows use the right tools. The screen can pre-fill values using the selected coding agent. Review them and adjust anything that is incorrect.
Configuration Options
- Project name: The project or repository name. This field is required.
- Description: A concise explanation of what the project does.
- Primary language: The main programming language. This field is required.
- Framework: The framework used by the project.
- Testing framework: The test framework or test command.
- Package manager: The dependency or package manager.
Example of pre-filled sample values:
- Project name:
healthcare-app - Description:
A full-featured healthcare dashboard built with Kendo UI for Angular, demonstrating clinical workflows (home, patients, patient profile, schedule, clinical analytics). - Primary language:
TypeScript - Framework:
Angular - Testing framework:
Vitest - Package manager:
npm
Recommended Settings
Review the pre-filled values and correct anything that does not describe the project. Do not place credentials, tokens, or secrets in project details.
Procedure
- Review the Pre-filled by GitHub Copilot notice and its values.
- If needed, select Analyze again to rerun the analysis.
- Edit Project name, Description, Primary language, Framework, Testing framework, or Package manager as needed.
- Select Continue to go to Review.
Notes
Project details guide prompt composition. They do not install a framework, package manager, or testing tool. For a monorepo, select or configure service-specific metadata after the initial project setup.
Step 6: Review Setup
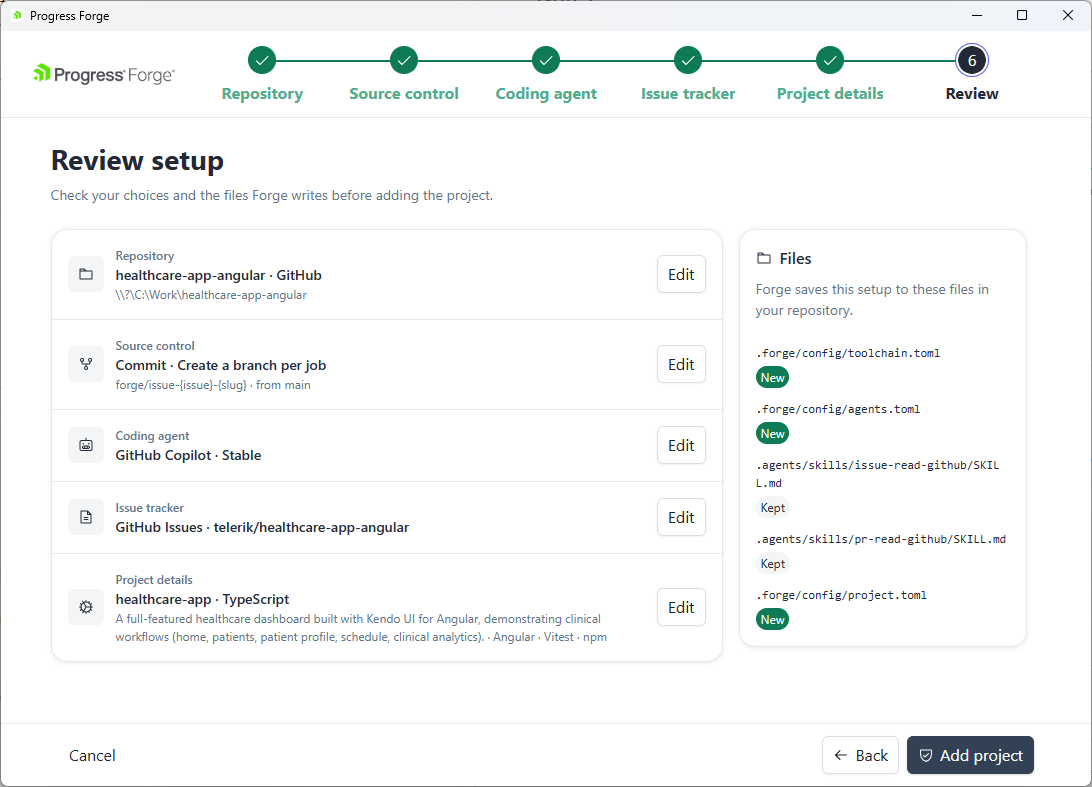
The Review setup page asks you to check your choices and the files Forge writes before adding the project. Use it to review each setup area and return to a step with Edit if you need to change a choice.
Configuration Summary
The review page shows these summaries:
- Repository: Shows the repository name, code host, and local path.
- Source control: Shows the commit choice, branch choice, and branch naming/base-branch summary.
- Coding agent: Shows the selected agent and model profile.
- Issue tracker: Shows the selected integration and repository, when applicable.
- Project details: Shows the project name and language, followed by the description and stack details.
The Files panel lists the files Forge saves in the repository. Entries are marked New or Kept.
Each summary row has an Edit button. Use it to return to the corresponding wizard step without restarting the setup.
Procedure
- Review the Repository, Source control, Coding agent, Issue tracker, and Project details summaries.
- Review the file list and its New and Kept statuses.
- Use Edit beside a summary to return to that setup step if needed.
- Select Add project to add the project to the Forge Desktop App.
Expected Outcome
Forge adds the repository as a configured project and makes it available for project settings, workflow execution, progress monitoring, approval actions, and artifact review. The generated configuration should reflect the selections summarized on this page.
Complete the Configuration
After the project is added:
- Open the project from the Forge Desktop App project list.
- Confirm that the repository path is correct.
- Confirm that the selected coding agent is installed.
- Confirm that the issue tracker reports a connected or available state.
- Review the project metadata and configuration files generated for the project.
- Start with a low-risk workflow and review its output before accepting changes.
The wizard is a configuration workflow. It does not replace provider authentication, create external credentials, or guarantee that every configured agent model and tracker operation is available.
Best Practices
- Select the repository root, not a nested source folder.
- Review commit and branch behavior on Source control before continuing.
- Choose an installed coding agent before continuing from Coding agent.
- Choose Stable for predictable first runs unless your team has another approved profile.
- Test the issue-tracker connection before running issue-based workflows.
- Replace repository suggestions with accurate project metadata.
- Keep credentials and tokens out of project details and configuration files.
- Review every summary row before the final confirmation.
- Run the first workflow in an isolated development environment and inspect generated artifacts.
- Use the Edit action on the review page rather than restarting setup when one value is incorrect.
Troubleshooting
Use these checks to resolve common setup issues before continuing or running your first workflow.
Set up project is unavailable
Confirm that a folder is selected and that the readiness panel reports a valid repository. Select the repository root and wait for environment detection to finish.
The repository is not valid
Confirm that the selected folder contains a Git repository and that the current user can read it. Select the folder containing the repository’s .git directory.
The coding agent is not installed
Install the selected agent, ensure its executable is available in PATH, and authenticate it with the provider. Return to the wizard and review the agent status again.
Authentication is required or the tracker connection fails
Authenticate the selected provider outside the wizard. Verify the repository, site, project, or account details before continuing.
Suggested project details are inaccurate
Edit every affected field on Project details. The suggestions are editable and do not replace verification against the repository’s actual language, framework, tests, and package manager.
The setup summary is incorrect
Select the Edit button on the affected summary row, correct the wizard step, and return to Review setup. Confirm the updated values before finishing.