Run Your First Workflow
Once your project is configured, use the Forge Desktop App to start a workflow for an issue and monitor its progress. This guide explains how to enter an issue, select an automatic or built-in workflow, review the run, respond to an approval request, handle a validation failure, and find the run in Tasks.
The example uses the healthcare-app-angular project and issue #61. Replace these values with the project and issue assigned to your work.
Prerequisites
Before you start, make sure that:
- The Forge Desktop App is installed. See Installing Desktop App.
- A project is configured and available in the project selector.
- You have an issue in the connected issue tracker.
- You know the issue URL, issue number, or tracker identifier.
- The selected project has a configured and authenticated coding agent.
- You can review workflow outputs and make approval or retry decisions.
Starting a Workflow
- Select the project from the project selector in the upper-left corner of the Forge Desktop App.
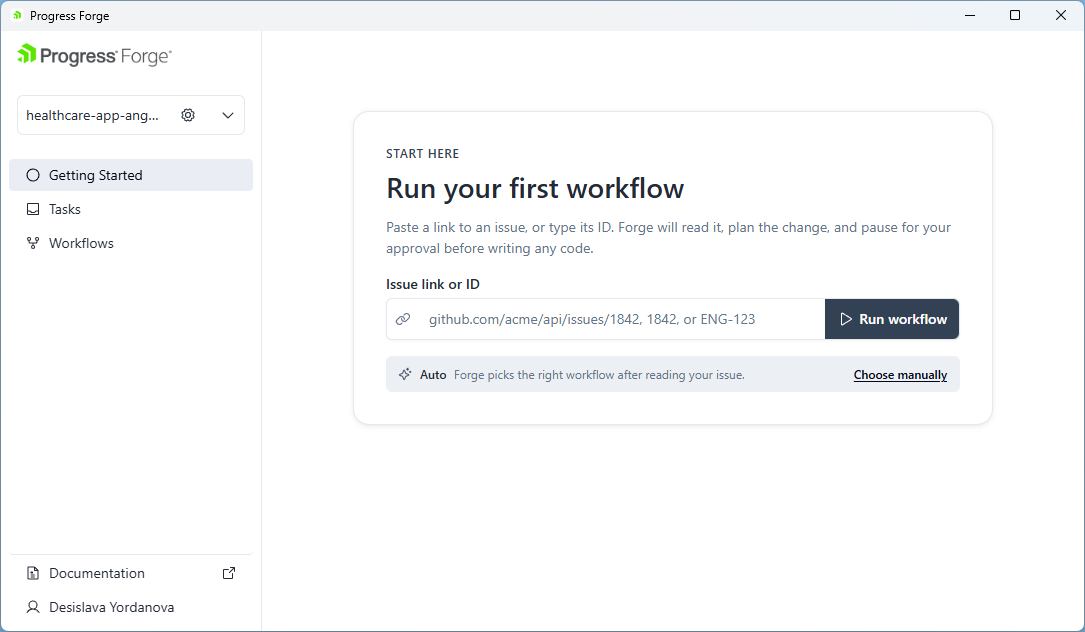
- Select Getting Started in the left navigation to open the Run your first workflow page. The left navigation also provides Tasks and Workflows.
- Enter an issue URL or identifier in Issue link or ID. The field accepts formats such as
github.com/acme/api/issues/1842,1842, orENG-123. - Choose a workflow:
- Keep Auto selected to let Forge suggest a workflow after reading the issue.
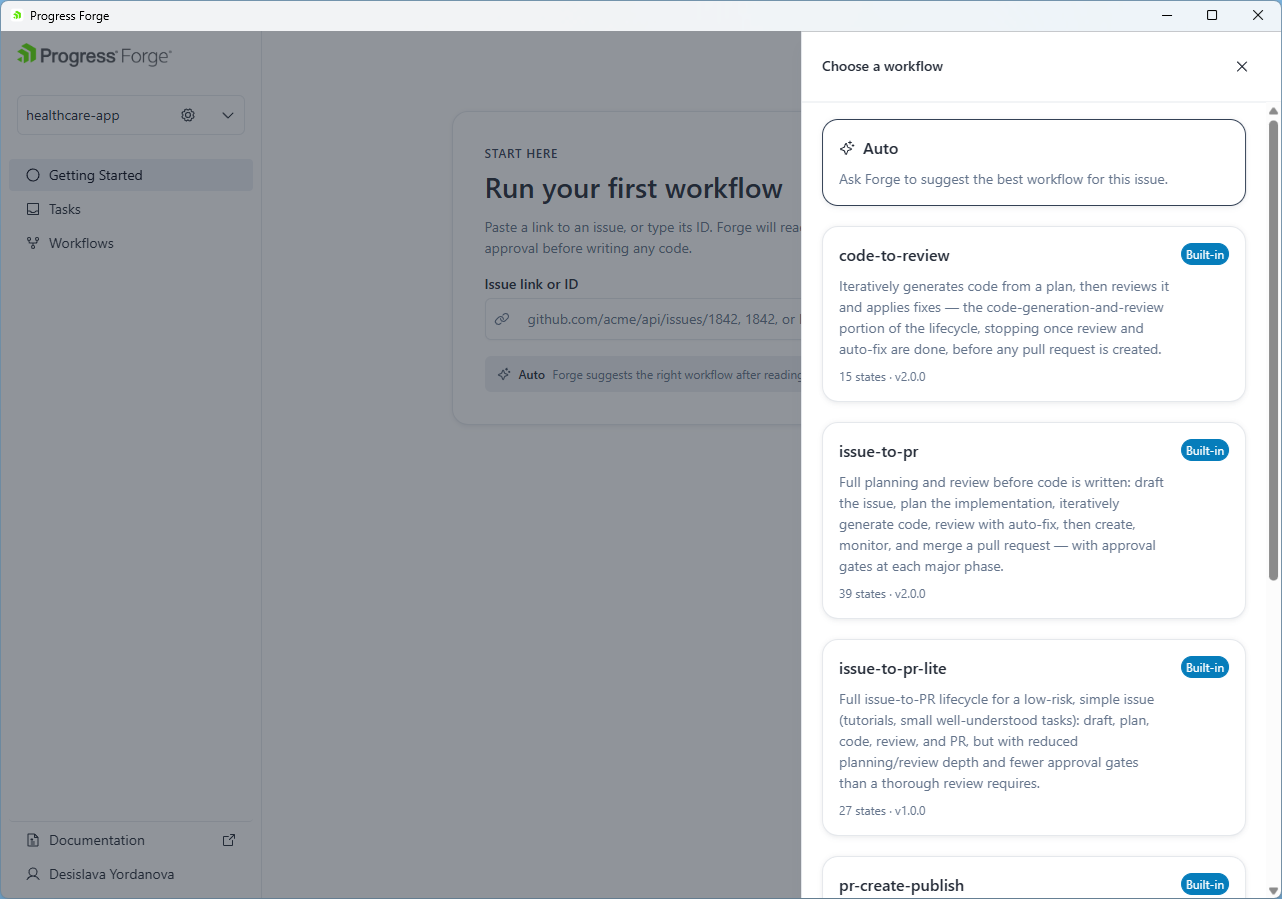
- Select Choose manually to open the Choose a workflow panel and choose a listed workflow.
- Select Run workflow beside the issue field.
The Choose a workflow panel includes Auto and workflow cards. Built-in workflows are marked Built-in and show a description, number of states, and version.
For details about automatic workflow selection, see Auto workflow routing.
Running a Workflow
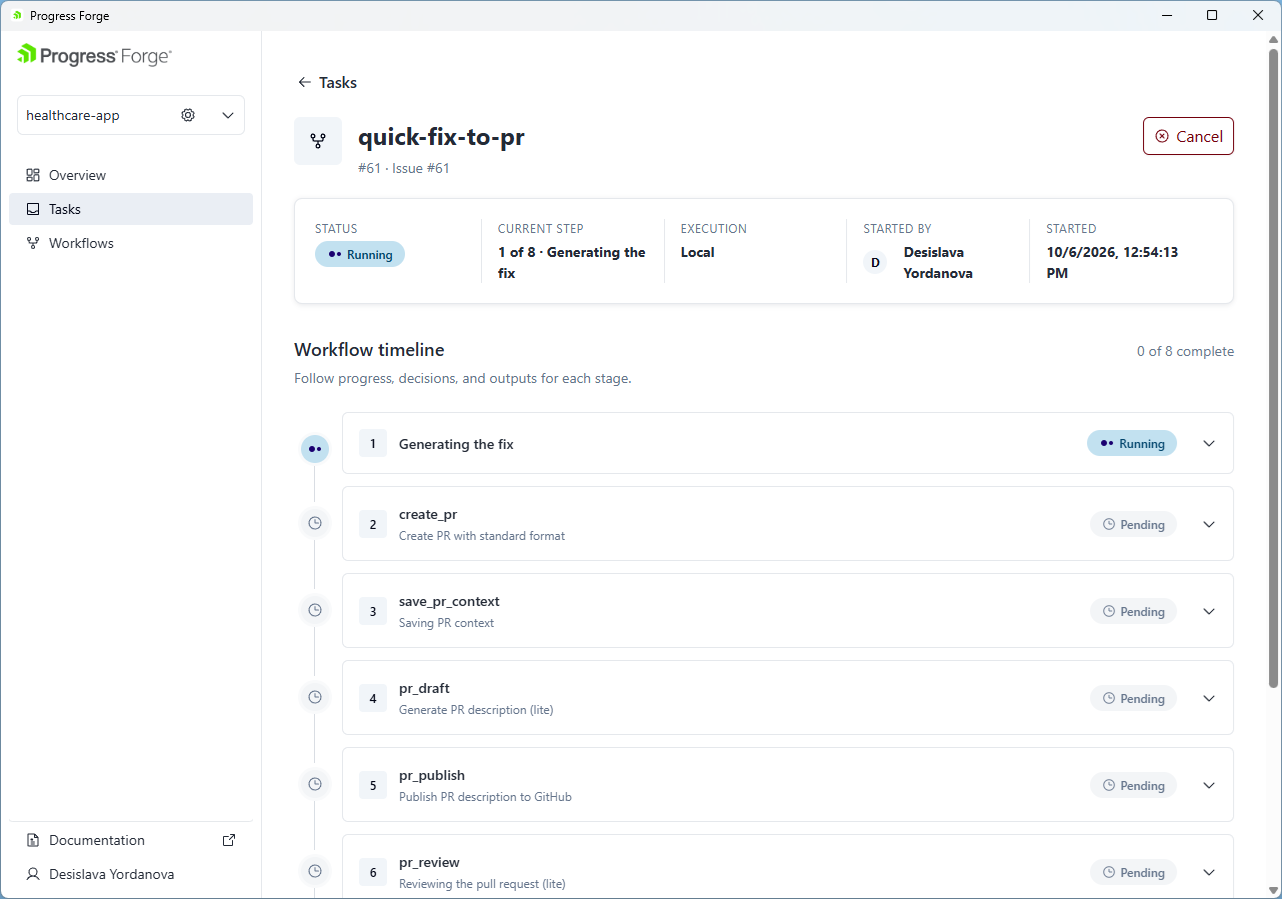
After you select Run workflow, Forge creates a task and opens its run view in Tasks. The run header identifies the workflow and issue. The summary shows the overall Status, Current step, Execution, Started by, and Started values. In the example, the execution context is Local.
Monitor the Workflow Timeline
The run view includes a Tasks link to return to the task list and a Workflow timeline that shows each stage in order. The timeline displays a completion count, stage description, status, and expandable details. Examples of the displayed statuses include Running, Pending, Completed, Needs input, and Failed. The run header can provide Pause and Cancel while a run is in progress. The available controls depend on the run's current state.
Expand a stage to review its details or artifacts. If a stage requires a decision, the details panel displays the relevant fields and actions.
Respond to an Approval Request
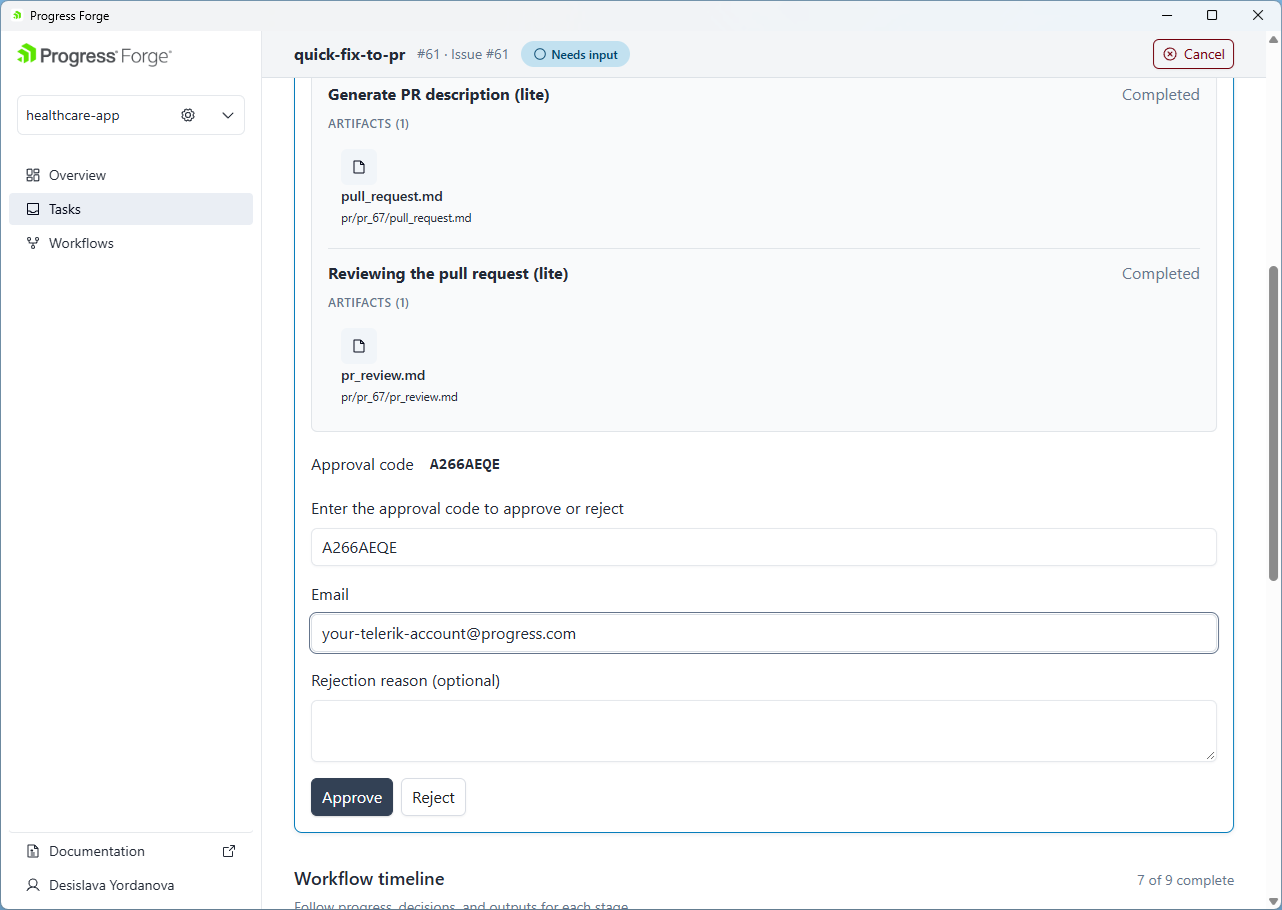
When the overall status is Needs input, review the active stage and complete the fields shown in its panel. In the approval example, the panel lists artifacts produced by earlier stages, then displays an Approval code, an Email field, and an optional Rejection reason field. Enter the approval code shown by the interface and your email address. Select Approve to approve the request, or enter a reason and select Reject to reject it.
Handle Validation Failures
During execution, a stage can fail instead of completing. Expand the failed stage to view its failure panel. Inspect the failed checks. Select Retry step to run validation again.
The timeline may continue to show later stages. The provided failure view does not establish that these later stages have executed successfully. Use each stage’s status and expanded details as the source of truth.
Review Tasks and Results
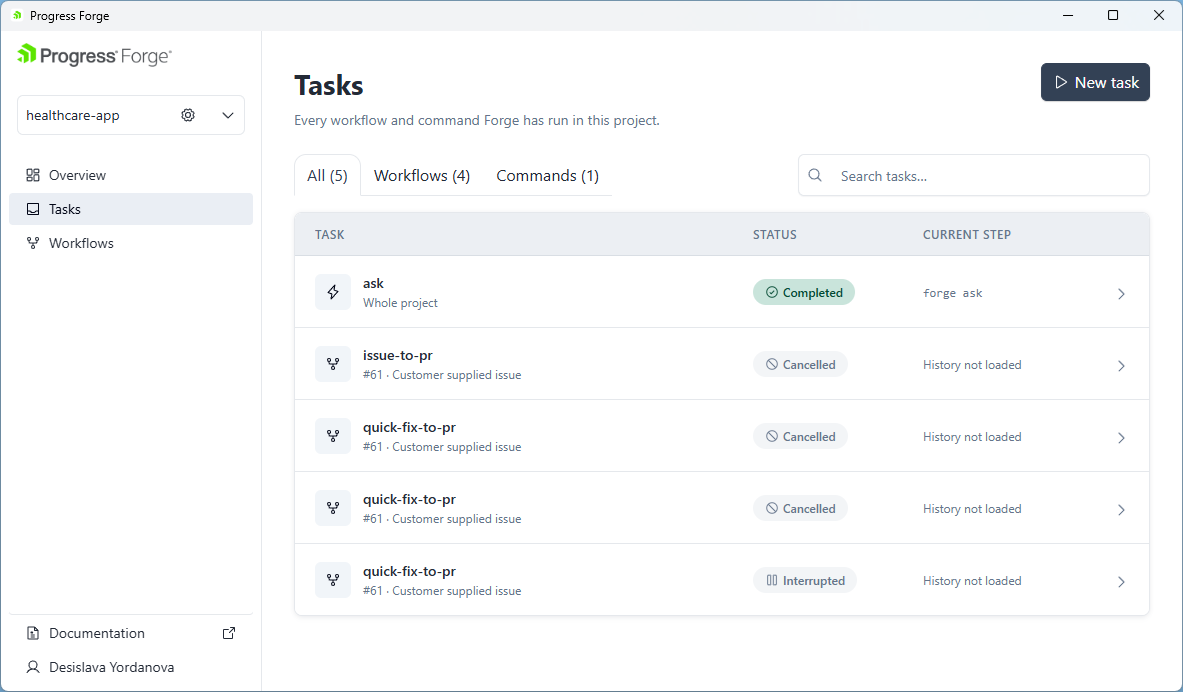
To find a run, select Tasks in the left navigation. The Tasks page lists workflow and command activity for the project and provides these controls:
- New task: Starts a new task.
- All, Workflows, and Commands tabs: Filter the task list by task type and show the number of entries in each tab.
- Search tasks...: Searches the task list.
- The task table shows Task, Started By, Status, and Current Step. Select a task row or its chevron to open the run details.
Expected Results
For a successful run, the workflow timeline reaches its final stage and the task list shows Completed. Expand completed stages to inspect their artifacts, and use Tasks to reopen the run later.
The screenshots also show how to respond to an approval request, inspect validation failure details, retry a failed step, and pause or cancel a run when those controls are available.
Troubleshooting
The issue cannot be loaded
Verify that you entered the exact issue URL, numeric ID, or tracker identifier. Confirm that the selected project is connected to the tracker containing the issue.
No suitable workflow is selected in Auto mode
Select Choose manually and choose a workflow from the list.
The workflow is waiting for input
Review the Current step and its expanded panel. Open the listed artifact, then select Approve plan or enter a revision in Request changes. Use Cancel in the workflow header to stop the run.
A validation stage fails
Select View failure details, review the failing checks, correct the underlying issue when required, and select Retry step. Cancel the workflow when you need to investigate outside the current run.
Next Steps
- Continue monitoring the workflow from its timeline and review each generated artifact.
- Complete any required approval or retry action shown by the current stage.
- Return to Set Up Project Configuration to change the repository, agent, tracker, or project metadata.
- Review Workflows Overview to compare workflow purposes and approval gates.