Welcome the New Telerik UI for Unity XR

Summarize with AI:
Say hello to Telerik UI for Unity XR—the newest UI component suite from Progress Telerik to enable AR/VR developer success.
The natural choice for .NET developers who want to create AR/VR applications is Unity game engine. Unity allows you to use your C# knowledge and create native applications that can be easily build and deployed to various platforms and devices.
While the Unity team keeps improving the built-in packages and the core features needed for every AR/VR application, developer productivity demands more tools to shorten the learning path and to minimize the confusion between different devices and the related frameworks coming with each XR device. We at Progress Telerik have already experienced these needs while developing several business applications in the past few years. That is why we have decided to combine our knowledge and expertise, and we are now happy to announce the first release of Telerik UI for Unity XR.
This latest product is now part of our rich portfolio and provides what you may expect—easy-to-use assets that are purposed to become the solid foundation of quality-looking AR/VR applications. Let’s unpack and see what is included in this first release and what our plans are for the future.
What Is Included
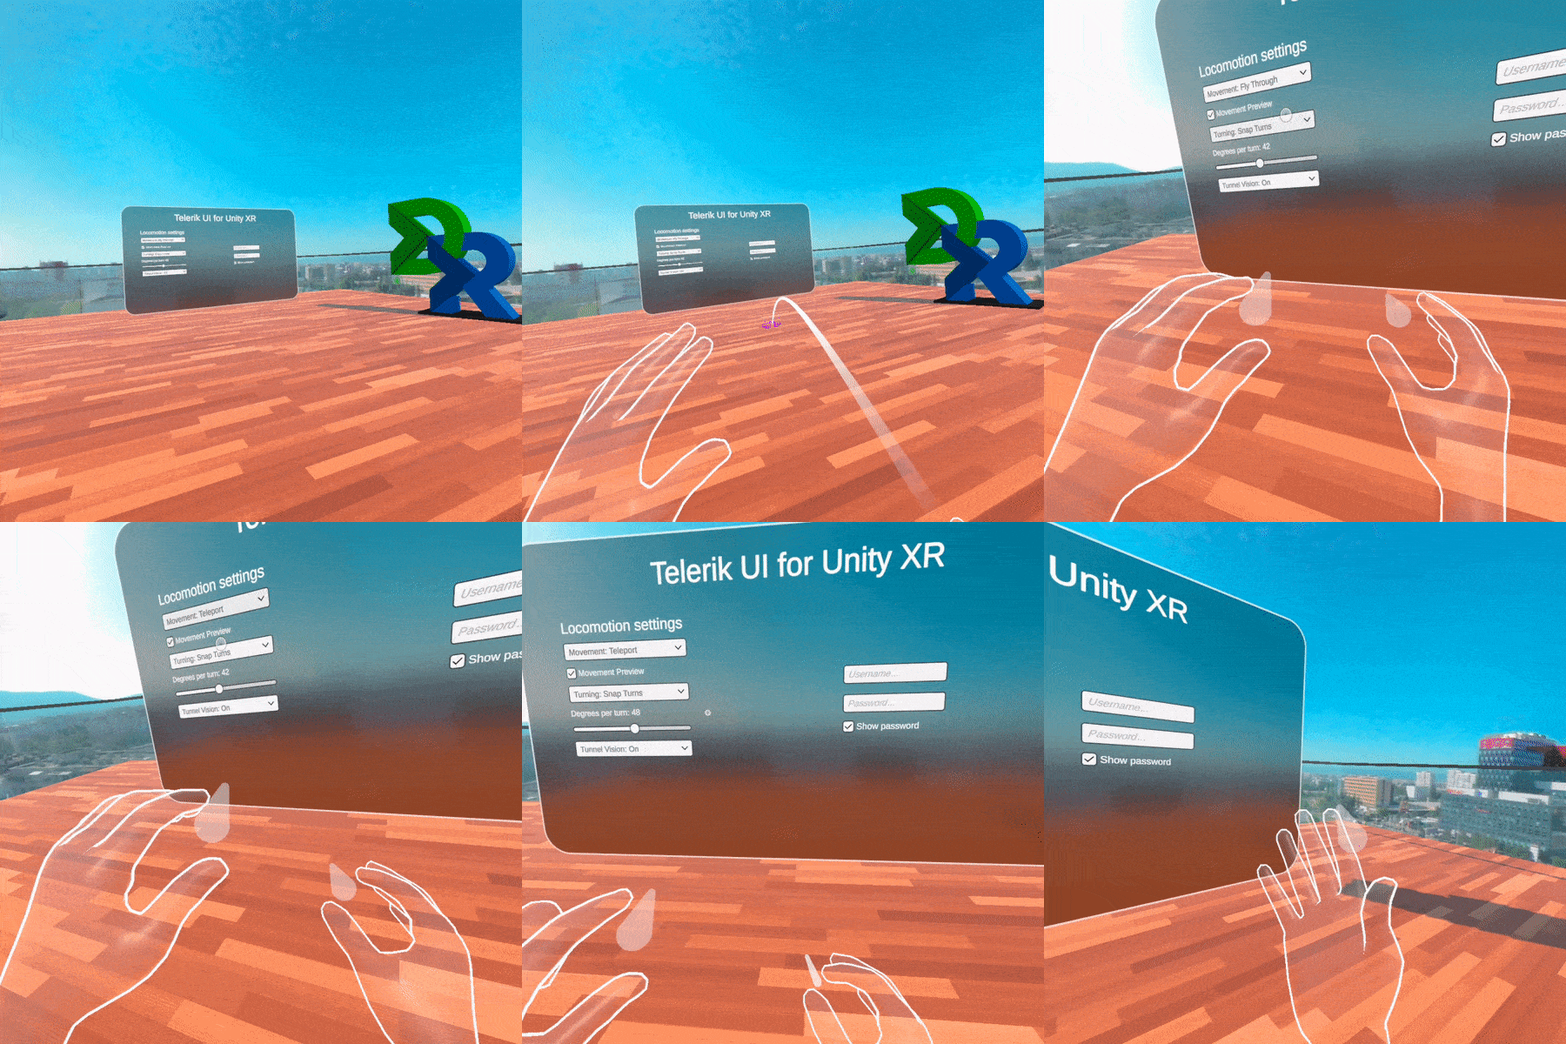
For our first release, we provide several Unity packages organized in five main folders. These folders are separated by XR features sets targeting the following functionalities—core features for cross-platform XR development, interactions with the objects in the virtual space, different motions with their related effects when moving in the 3D world, sharp-looking UI controls specially designed for building AR/VR user interfaces, and integration assets with demos showing how to use all Telerik functionalities together.
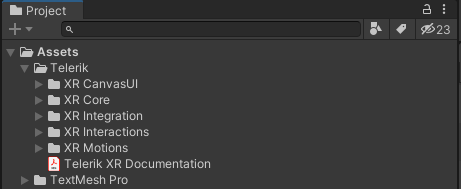
You can get all the features and demos by downloading the Telerik XR Complete package from Unity Asset Store. If your project requires only a subset of the features, you may consider downloading some of the smaller packages—Telerik XR Motions, Telerik XR Interactions or Telerik XR CanvasUI.
Now let’s take a closer look at each of the Telerik subfolders and see more details of the contained functionalities.
Telerik XR Core
The XR Core Telerik subfolder contains the core features for building cross-platform XR applications. In the following image, you may notice some of the important files in the folder—including the XR Rig prefab, the Demos subfolder and the package file which allows you not only to import the content in you project Assets but also to reference it via the Unity Package Manager.
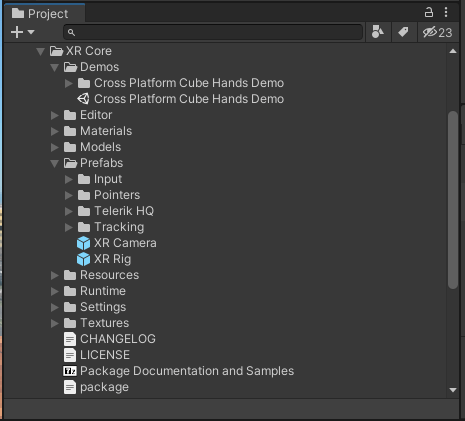
XR Core is an important part of our component suite, and all other Telerik packages depend on it. This dependency ensures that all XR features are built on top of the cross-platform XR Rig structure, and it is easier to add support to a new XR device without having to rewrite existing code. Let’s take a closer look at the sample scene from the Demos folder to get a better understanding of the cross-platform matter of the XR Rig hierarchy.
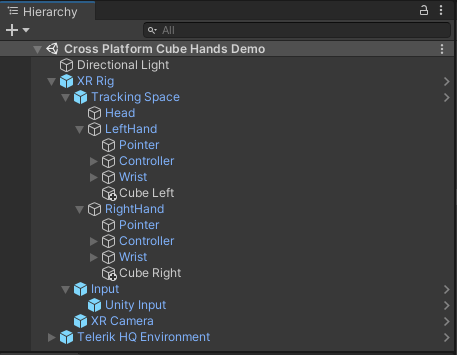
As you may notice in the screenshot above, the XR Rig’s tracking space provides abstract structure for each of the common XR nodes—head, left hand and right hand. In this demo scene there is one cube object added to each hand. The scene can be deployed to every XR device supported by Unity XR Plug-in Management, and as a result when you move your hands you will see cubes attached to your virtual hands. The correct position of the virtual head and hands is ensured by the Unity Input prefab which may be seen in the image above and which uses the Unity cross-platform input API to update the XR Rig hierarchy transform values.
The structure of the rig also provides abstract hierarchy for the hand wrist with its finger objects as well as for hand controllers with common button and joystick definitions. The base logic provided by the Telerik XR Core package does not update the fingers and controllers as the current version of Unity Input API does not provide this information. However, other Telerik packages are adding device specific prefabs which may be located under the Input node hierarchy and are responsible for updating the XR Rig’s fingers and controllers for the concrete device. This way, if you make your hand gestures implementation dependent on the XR Rig abstract hierarchy, you may easily add support for a new device by simply dragging and dropping the new input prefab.
Now let’s see the other packages and features that are included in the first release of Telerik UI for Unity XR.
Telerik XR Interactions
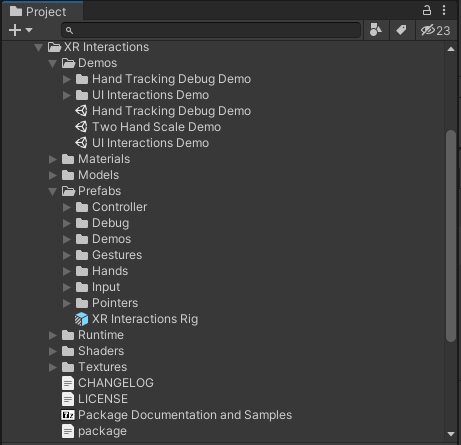
The XR Interactions Telerik subfolder contains functionalities that allow you to implement interactions with the objects in the virtual space. This includes distant laser interactions with controllers, distant pointer interactions with hand pinch gesture, close finger interactions and more. Using the abstract structure of the XR Rig hierarchy, you can easily implement your own gestures either with hands or controllers.
In the following image, you can see some of the important parts in the XR Interactions folder—including the XR Interactions Rig which is a prefab variant of the already discussed XR Rig from Telerik XR Core, the Demos folder which includes several sample scenes, and the package file which allows you not only to import the content in you project Assets but also to reference it via the Unity Package Manager.
To get better understanding of the features that XR Interactions add on top for the XR Rig, you may look at the following hierarchy in UI Interactions Demo scene.
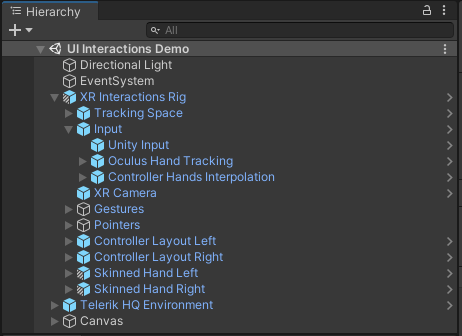
This scene shows how the laser pointers may be used to interact with the default Unity UI—buttons, sliders, dropdowns, etc. The setup works both with hands and with controllers. The Oculus Hand Tracking prefab under the Input node is responsible for updating the fingers state of the XR Rig, allowing you to run the demos with Oculus Quest device and use hand tracking for the interactions. This way, the hand and finger pointer will be able to read the finger states from the rig and recognize pinch or close finger UI interactions. You may also notice the Skinned Hand Left and Skinned Hand Right prefabs, which also read the finger positions from the XR Rig and are responsible for rendering the virtual hands.
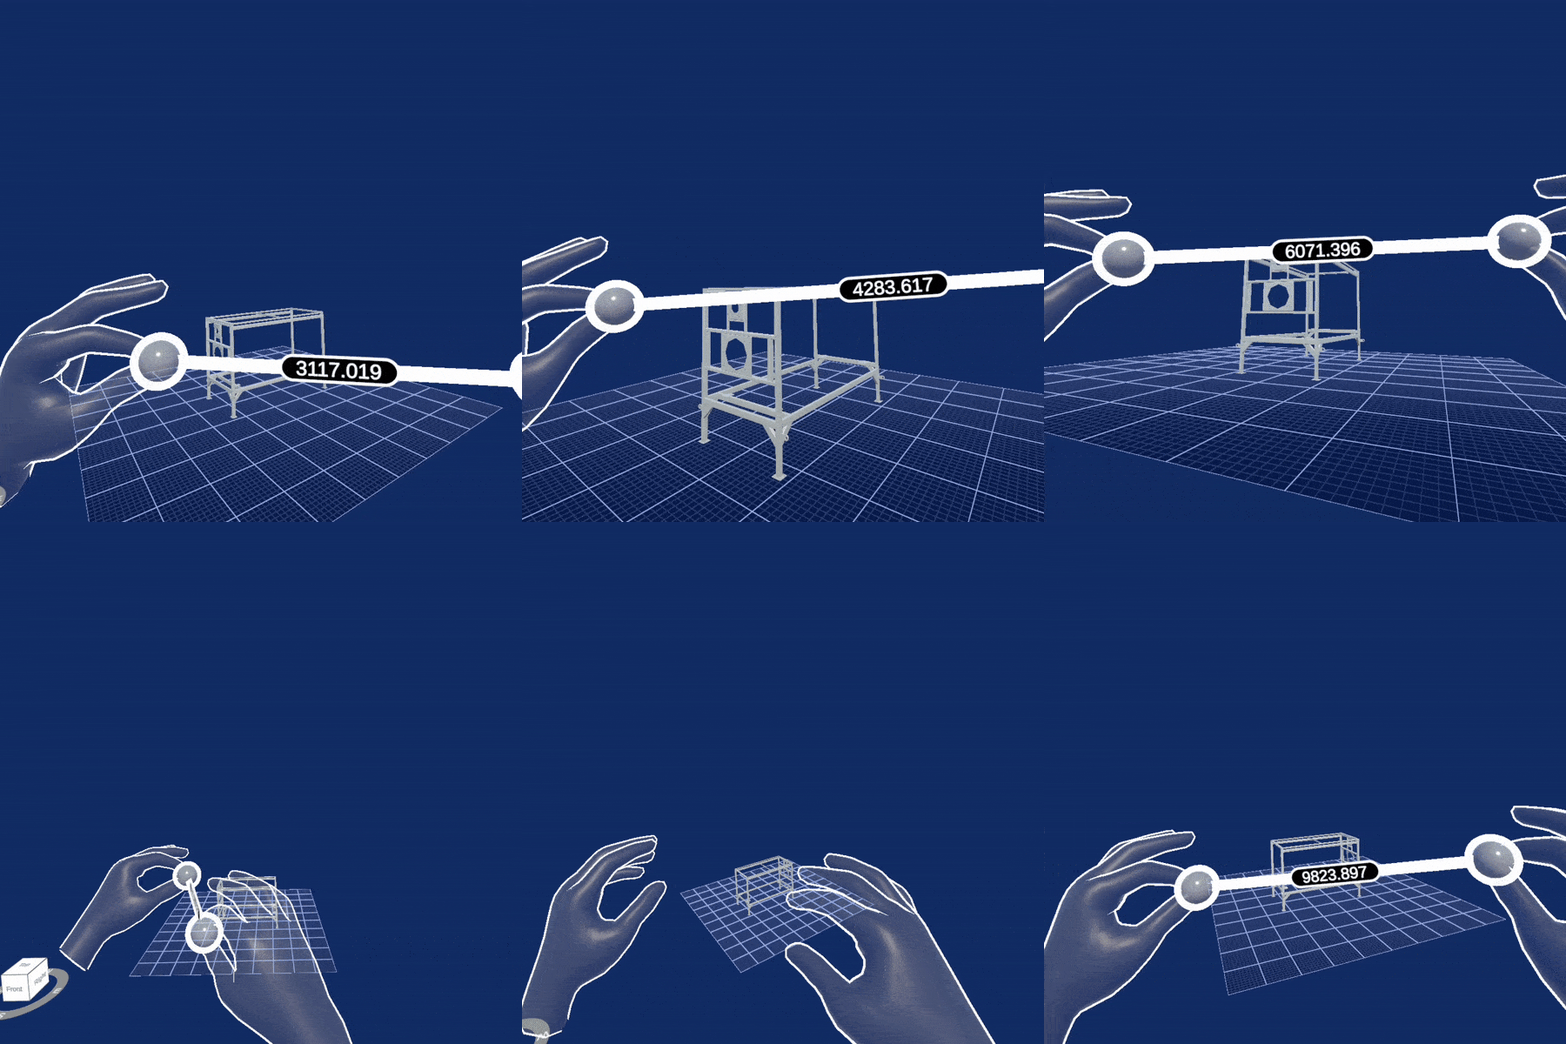
Another example showcasing custom interaction type is the Two Hand Scale Demo scene. It uses the initial XR Rig prefab from XR Core because the concrete scenario does not need all the interactions which otherwise come with the XR Interactions Rig. Instead, it uses a TwoHandScaleGesture component, which recognizes simultaneous pinches with both hands and allows to you change the position, rotation and scaling of a scene object. This demo also uses the skinned hand models to visualize the virtual hands as shown in the animation below:
Telerik XR Motions
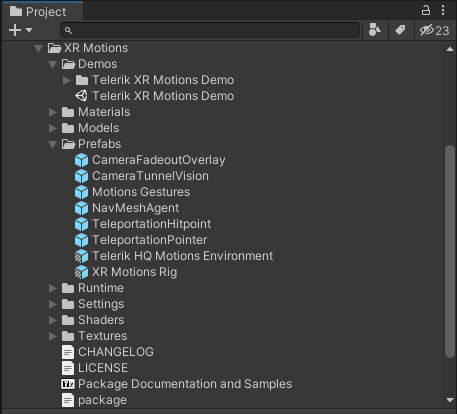
The XR Motions Telerik subfolder contains functionalities that allow you to easily implement different scene movements. In the following image, you can see some of the important files in this folder—including a XR Motions Rig prefab variant, XR Motions Demo scene, and the package file which allows you not only to import the content in you project Assets but also to reference it via the Unity Package Manager.
Having a closer look at the sample scene you may see the features added by the motions package on top of the already described XR Core functionalities.
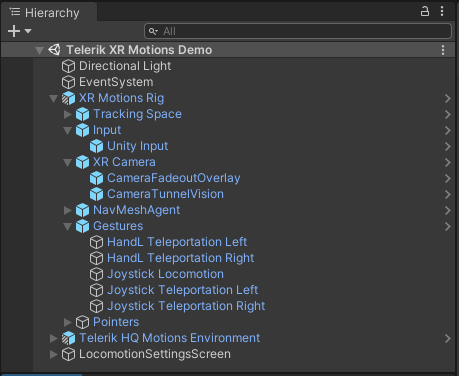
Under the Gestures node, you will see several gestures for using either teleportation curve with hands and controller, or smooth locomotion movement with the joystick. You can easily create your custom gesture by following a similar implementation pattern. Other noticeable additions to the rig are the camera effects, which are represented as children of the XR Camera node. These effects are meant to reduce the risk of motion sickness that some users may otherwise experience when moving in the virtual world.
In the following animation, you can see the Teleportation curve in action. The first time it is used to teleport to some predefined teleportation spot. The LocomotionDestination component is attached to the chair spot in the scene and is specifying the concrete positions and view direction when teleporting to the chair. The second usage of the teleportation curve is achieved with the Joystick gesture which allows you to choose the view direction before the movement is executed.
Telerik XR CanvasUI
The XR CanvasUI Telerik subfolder contains several UI components that are specially designed to be rendered with sharp-looking edges no matter how close you are looking at them in the virtual world. This effect ensures better rendering of the application UI compared to the default Unity Canvas components, which become blurry on closer distance.
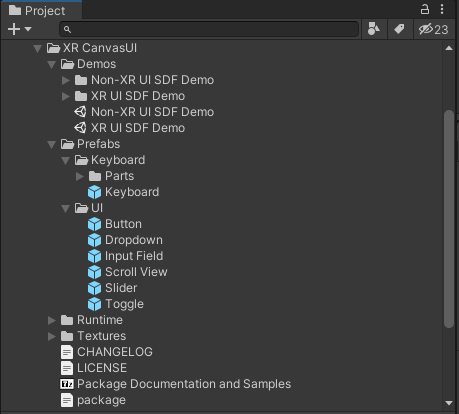
In the following image, you can see the most important parts of XR Canvas folder—including its Demos subfolder with sample scenes, several prefabs defining the different components, and the package file which allows you not only to import the content in you project Assets but also to reference it via the Unity Package Manager.
In the following animation, you can see some of these components in action—including the Keyboard and its auto-positioning feature based on the currently selected input field.
Telerik XR Integration
The XR Integration Telerik subfolder contains prefabs and demos that show the integration between the rest of the Telerik packages. This folder is distributed only if you purchase the full Telerik XR Complete from Unity Asset Store. The following image shows the structure of XR Integration folder including its Demos subfolder, XR Rig Complete prefab variant, and the package file which allows you not only to import the content in your project Assets but also to reference it via the Unity Package Manager.
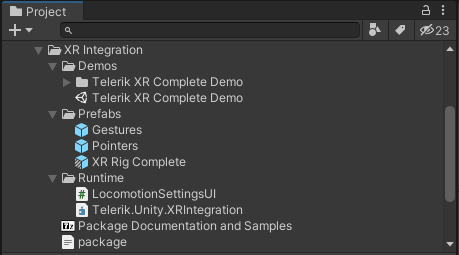
The XR Rig Complete prefab is combining most of the features available in all Telerik packages. This allows you to easily create a new scene with a lot of predefined functionalities with a single drag-and-drop operation of this prefab.
The following animation showcases the integration between Oculus Hand Tracking component from XR Interactions and the Hand L Teleportation Gesture from XR Motions. The first one initializes the fingers input from the Oculus Quest device. Later on, the gesture recognizes the specific hand pose in order to execute the movement action. This behavior can be easily tested by building and deploying the Telerik XR Complete Demo scene to Oculus Quest device.
Learn More
Although the Telerik components can be used with the simple drag and drop of prefabs, they also allow you a rich variety of customizations. You may find more detailed information in our online documentation. If you are specifically looking on how to build your first AR/VR scene you may take a look at our getting started articles.
What’s Next
In the next versions of Telerik UI for Unity XR, we plan to add both new features and support for different device-specific functionalities. We would be happy to hear your feedback on the existing release, the new features you will need and also the devices you will be targeting for your application. Improving development productivity and making our customers happy are always our top priorities. That is why we will be building our roadmap based on your feedback.

Deyan Yosifov
Deyan is an architect, principal software developer and mathematics enthusiast. He joined the Telerik team in 2013 and has since participated in the development of several different projects—Document Processing Libraries, RadPdfViewer and RadSpreadProcessing WPF controls, and most recently in Telerik AR/VR. He is passionate about 3D technologies and loves solving challenging problems.
