Using The AutoComplete With PHP
Summarize with AI:
One of my absolute favorite features about Google search is the auto suggesting that it does as I type in the search box. It’s a really nice feature. I liked it so much, I wrote a plugin for Kendo UI that ties into the Google Suggest API to return YouTube results. Shameless plug.
When I built that plugin, I used the Kendo UI AutoComplete. The AutoComplete is a really neat control and provides an excellent experience for your users. I wanted to take a close look at it today and how to use it in the context of a PHP application. We’ll look at how to configure the control, how to suggest client side and then we’ll push everything to the server in case you have an extremely large dataset like Google does in the Suggest data.
Origins
The history of the AutoComplete UX is rather interesting. It originated as a technology for helping people with physical disabilities increase their typing speed. However it became immediately clear that it was very useful for everyone. It’s particularly advantageous in a few scenarios…
- There are a limited number of options that are rather easy to guess.
- The user is writing text in a highly structured language, such as code.
There are many implementations of AutoComplete, including Visual Studio Intellisense, Google Suggest, Word Processors, and in the last few years it’s become quite ubiquitous on mobile devices.
I personally find it extremely helpful on my iPhone when I’m typing and iOS fixes words for me, or suggests the rest. I actually prefer the Android implementation of the AutoCompletion, but I digress lest I provoke the mobile device debates here. Of course, this is all well and good until you trust the software too much to finish your sentences for you and hilarity ensues. This has become known as AutoCorrect which is an enhanced version of the AutoComplete UX.
Setup Database Access
Let’s set up a quick PHP file to return our results from the database. My Northwind implementation has a USStates table in it that I will be using for this demo. You will see me include connections.php file. That file just contains my database connection information. I extract it into it’s own file so I don’t have to write that code over and over each time I create a different PHP file or page.
I’m using PDO again here as we are eventually going to want to pass some parameters to this file and we will want PDO to protect us from SQL Injection. For now, I’m just going to return a list of all the states.
Return A List Of States
<?php
    include("connection.php");

    $arr = array();

    foreach($db->query("SELECT StateID, StateName FROM USStates") as $row) {
        $arr[] = $row;
    }

    // add the header line to specify that the content type is JSON
    header("Content-type: application/json");

    echo "{\"data\":" .json_encode($arr). "}";
?>
That’s a very simple select that’s returning a list of states from the database. We know their are only 50 states, so our result set is small.
Kendo UI AutoComplete
The Kendo UI AutoComplete is easy to setup. The first thing that you will need is an empty input. Of course you are going to need the Kendo UI CSS and JavaScript files as well. Your HTML code should look something like this…
Start With An Input
<!DOCTYPE HTML>
<html lang="en-US">
    <head>
        <meta charset="UTF-8">
        <title></title>
        <link href="http://cdn.kendostatic.com/2012.2.913/styles/kendo.common.min.css" rel="stylesheet">
        <link href="http://cdn.kendostatic.com/2012.2.913/styles/kendo.blueopal.min.css" rel="stylesheet">
    </head>
    <body>

        <input id="autocomplete" />

        <script src="http://code.jquery.com/jquery-1.7.1.min.js"></script>
        <script src="http://cdn.kendostatic.com/2012.2.913/js/kendo.all.min.js"></script>

        <script>

            // magic happens here!

        </script>
    </body>
</html>
I’m using the Kendo UI CDN references above. Please check your license before you use the Kendo UI CDN.
Now that we have an input along with the correct script and CSS references, we are ready to use some JavaScript to turn this into an AutoComplete.
To do that, I’m going to create a Self-Invoking Anonymous Function. If you aren’t familiar with those, give my last PHP article a glance. It’s simply a function without a name that executes as soon as the page loads. It protects us from accidentally cluttering up the global namespace in JavaScript.
Use Strict
I’m also using the ‘use strict’ declaration. This is another subject in and of itself, but what it basically does is tell the browser not to let you do something stupid. This is very important because older browsers are not going to be as tolerant of your mistakes.
For instance, if you declare a variable without var, what happens? Well in modern browsers it simply attaches this variable to the global namespace. This is ultra bad. Do not put your variables on the window object. Create one variable that becomes your personal scope. I usually use something like MYAPP. Modern browsers will make concessions for this grave error, but IE 8 and 7 will not. They will instead throw an error telling you that the “object doesn’t support this property or method”. That’s an EXTREMELY unhelpful error that you can spend a lot of time trying to track down. I spent 3 hours earlier this week that could have been saved by just adding “use strict” to the top of the JavaScript. Then what happens is that the browser immediately throws an error telling you that the variable is undefined. That’s a whole lot easier than trying to translate an obscure IE error into “You’re missing the word ‘var’”.
Moving On
Your anonymous function might look something like this…
Anonymous Function
<script>

    'use strict';

    (function($, kendo) {

        // magic happens here!

    })(jQuery, kendo);

</script>
Now you need to select your input and turn it into an AutoComplete with a jQuery Selector. You have a few configuration options that you need to specify right away.
- dataSource: The DataSource For The AutoComplete
- dataTextField: The field in the DataSource that has the text you want to display and filter on
- placeholder: The text that you want to display as the watermark in the autocomplete
Create The AutoComplete
'use strict';

(function($, kendo) {

   // select the input and create an AutoComplete
   $("#autocomplete").kendoAutoComplete({
       dataSource: new kendo.data.DataSource({
           transport: {
               read: "data/states.php"
           },
           schema: {
               data: "data"
           }
       }),
       dataTextField: "StateName",
       placeholder: "Please Select A State"
   });

})(jQuery, kendo);
I additionally specified that my repeating list of states is contained in the data element in the JSON that will be coming back from the server. I usually don’t have my list of data as the top level object just in case I need to add some additional information to the response later on.
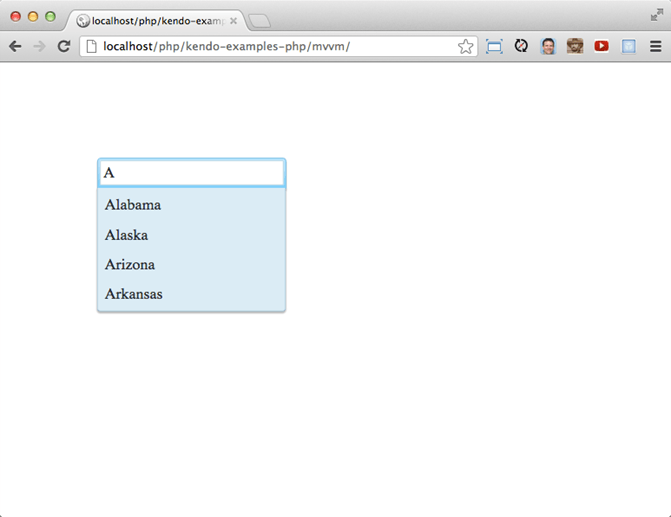
This will give you a nice AutoComplete and it works great! It will make an initial call to the database and return all of the states. These states are then filtered as you type.
BIG Data
This is really nice, but what if your dataset is massive? You do NOT want to return all of the data and then stick it in the DOM. That will be a terrible experience for the user if it doesn’t crash their browser first. What you really need the AutoComplete to do is to send instructions to the server so that the server can send back only what you need to display. To do this, simply toggle serverFiltering: true on the DataSource of the AutoComplete.
Send Filtering To The Server
'use strict';

(function($, kendo) {

   // select the input and create an AutoComplete
   $("#automplete").kendoAutoComplete({
       dataSource: new kendo.data.DataSource({
           transport: {
               read: "data/states.php"
           },
           schema: {
               data: "data"
           },
           // this will cause the datasource to filter
           // on the server instead of the client
           serverFiltering: true
       }),
       dataTextField: "StateName",
       placeholder: "Please Select A State"
   });

})(jQuery, kendo);
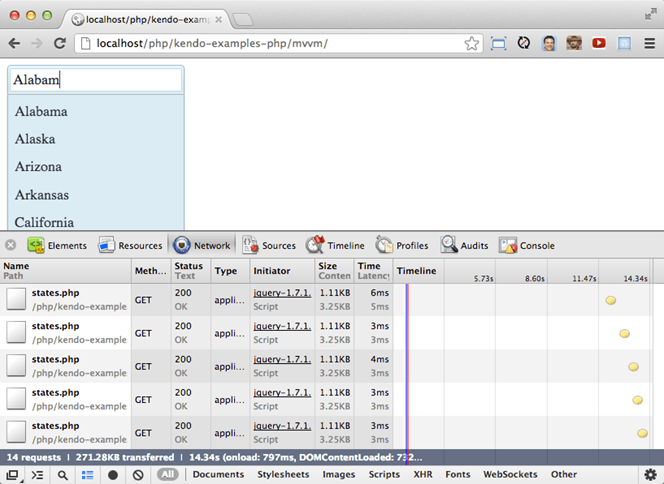
Now when you start typing, you will see requests go across in the Network Tab of your Developer Tools in the browser.
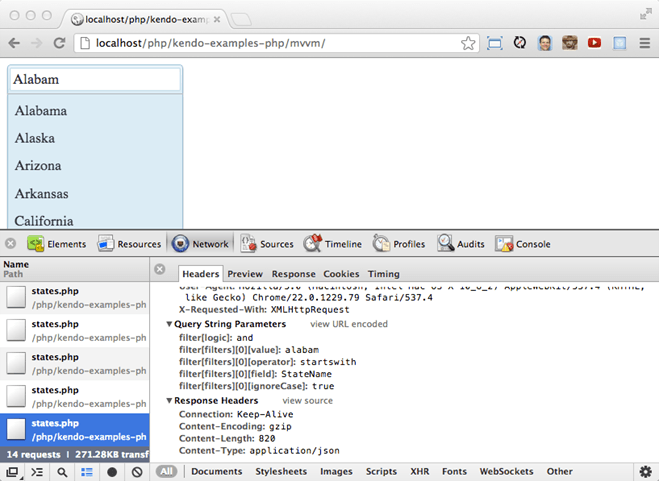
You will also see that the AutoComplete has stopped filtering the results. This is because it’s now sending a filter object to the server and expecting the server to filter the results. You can inspect one of the network requests to see this.
We need to get that object over to the server so the server can handle the filtering. Transactional databases are great at filtering data. The filter object is giving us quite a bit of information. Filter is an array of filters for other widgets and operations like the grid where you may be filtering on multiple conditions.
- logic: and - This is the default. If we were filtering multiple conditions, we might be doing and or or.
- value: The value the user has typed into the input so far.
- operator: By default, this is startsWith. However, you should modify the filter for such values as Equal To, Not Equal To and much more. Refer to the filter documentation to see all the available options.
- field: The field you want the server to filter on
- ingnoreCase: Whether or not you have configured the AutoComplete to ignore case. The default is true.
We only need really one of these. That is the value. We already know we are filtering on what the field starts with and we know what field we are filtering on. To get this data out of the filter object and into a format we can easily digest on the PHP side, add a method to the DataSouce which will map this value to a simple StartsWith parameter that we can easily read off the _GET PHP container.
The parameterMap function takes in two variables. The options being passed with the current request, and the operation. The options will contain the parameters being passed to the server. The operation just tells us which of the DataSource transport operations are currently being executed (create, read, update or destroy). We just need to return our StartsWith parameter back out and this is what will be sent along to the states.php file.
Modify The Parameter Map
(function($, kendo) {

   // select the input and create an AutoComplete
   $("#automplete").kendoAutoComplete({
       dataSource: new kendo.data.DataSource({
           transport: {
               read: "data/states.php",
               // modify the parameter map so that we can
               // send a custom variable to the states.php file
               parameterMap: function(options, operation) {
                   return {
                       StartsWith: options.filter.filters[0].value
                   }
               }
           },
           schema: {
               data: "data"
           },
           // this will cause the datasource to filter
           // on the server instead of the client
           serverFiltering: true
       }),
       dataTextField: "StateName",
       placeholder: "Please Select A State"
   });

})(jQuery, kendo);
Now we need to modify the states.php file to do a SQL LIKE statement. We are going to need to do a wildcard as well. This will select anything that starts with the value passed to the LIKE statement. We do this by appending a “%” at the end. This means our actual SQL Statement ends up being “SELECT StateID, StateName FROM States WHERE StateName LIKE ‘ala%’” if we entered “ala” in the AutoComplete. Using PDO, the PHP file now looks like this…
Query The DataBase With LIKE
<?php
    include("connection.php");

    $arr = array();

    $stmt = $db->prepare("SELECT StateID, StateName FROM USStates WHERE StateName LIKE ?");

    // get the StartsWith value and append a % wildcard on the end
    if ($stmt->execute(array($_GET["StartsWith"]. "%"))) {
        while ($row = $stmt->fetch()) {
            $arr[] = $row;
        }
    }

    // add the header line to specify that the content type is JSON
    header("Content-type: application/json");

    echo "{\"data\":" .json_encode($arr). "}";
?>
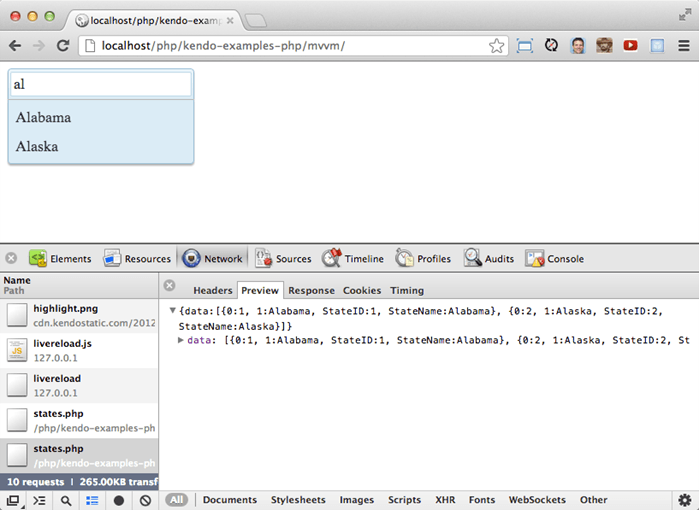
Now filtering will be done on the server. The AutoComplete will filter the data based on the characters typed in, but the filtering is all happening remotely. If you examine a request, you will see that each request is returning ONLY the options that match the filter values.
MVVM To Make It Better
We can actually implement a little bit of the MVVM pattern here to reduce the amount of JavaScript code that was written. The MVVM pattern is going to let us have a JavaScript object called the “ViewModel” that will contain all the data, and the bind that object to the HTML. We are going to do three important things here.
- Change widget initialization to be done with declarative initialization instead of imperative initialization
- Add a view model which will contain the DataSource
- Bind the HTML To The ViewModel
About Declarative Initialization
I’ve written on this topic before and I would highly suggest you check it out in the docs article based on that post. Declarative Initialization in incredibly powerful and makes your code quite a bit more elegant.
The main idea here is that we are going to define the configuration of the AutoComplete with markup. Each of the configuration options is actually going to be a data- attribute in the HTML element. We need to set a few options.
- data-role Tells Kendo UI what kind of widget this element should be transformed into.
- data-text-field The dataTextField for the AutoComplete. Notice that camelCased configiuration values in Kendo UI become - separated when using Declarative Initialization.
- data-placeholder The placeholder text.
The HTML for the AutoComplete now defines it’s configuration for Kendo UI
Declarative Initialization
<input data-role="autocomplete" data-text-field="StateName" placeholder="Select A State" />
You may have noticed that we have lost our DataSource configuration. Let’s create a ViewModel to put that back.
ViewModel With DataSource
var viewModel = kendo.observable({
    states: new kendo.data.DataSource({
        transport: {
            read: "data/states.php",
            parameterMap: function(options, operation) {
                return {
                    StartsWith: options.filter.filters[0].value
                }
            }
        },
        schema: {
            data: "data"
        },
        serverFiltering: true
    })
});
Now bind the source of the AutoComplete to the state property on the view model by setting the data-bind attribute.
Set the Data-Bind Attribute
<input data-role="autocomplete" data-bind="source: states" data-text-field="StateName" placeholder="Select A State" />
The very last step is to tell Kendo UI to bind the document to the ViewModel. This will create the widget and bind it’s DataSource to the states property of the ViewModel. Here is all the code for the page.
Full Page Code
<!DOCTYPE HTML>
<html lang="en-US">
<head>
    <meta charset="UTF-8">
    <title></title>
    <link href="http://cdn.kendostatic.com/2012.2.913/styles/kendo.common.min.css" rel="stylesheet">
    <link href="http://cdn.kendostatic.com/2012.2.913/styles/kendo.blueopal.min.css" rel="stylesheet">
</head>
<body>
    <input data-role="autocomplete" data-bind="source: states" data-text-field="StateName" placeholder="Select A State" />

    <script src="http://code.jquery.com/jquery-1.7.1.min.js"></script>
    <script src="http://cdn.kendostatic.com/2012.2.913/js/kendo.all.min.js"></script>

    <script>

        'use strict';

        (function($, kendo) {

            var viewModel = kendo.observable({
                states: new kendo.data.DataSource({
                    transport: {
                        read: "data/states.php",
                        parameterMap: function(options, operation) {
                            return {
                                StartsWith: options.filter.filters[0].value
                            }
                        }
                    },
                    schema: {
                        data: "data"
                    },
                    serverFiltering: true
                })
            })

            kendo.bind(document.body, viewModel);

        })(jQuery, kendo);

    </script>

</body>
</html>
Wrap Up
The AutoComplete is a really nice way to help out your users and reduce the time it takes for them to make a selection. Kendo UI allows you to push the filtering work to the server so that your UI stays fast and responsive when working with large datasets.
Grab the code from today’s tutorial over at our GitHub PHP Examples Repo.
As always, make sure to download Kendo UI and start creating a better HTML5 user experience.

Burke Holland
Burke Holland is a web developer living in Nashville, TN and was the Director of Developer Relations at Progress. He enjoys working with and meeting developers who are building mobile apps with jQuery / HTML5 and loves to hack on social API's. Burke worked for Progress as a Developer Advocate focusing on Kendo UI.


