React Basics: Interactivity and State

Summarize with AI:
State is React’s built-in way of storing data that changes over time. When that data changes, React automatically rerenders the component to reflect the new values.
One of the main reasons React has become so popular is its ability to build highly interactive user interfaces. Modern users expect instant feedback—whether they’re clicking a button, typing in a form or toggling a menu. At the heart of this interactivity lies state.
In this post, we’ll explore what state is, how it works, and how it makes your React components come alive—using a hands-on demo of the classic todo app. Since this article is part of our React Basics series, we’ll simplify the concept as much as possible. Think of it as the foundation for your React learning journey.
Interactivity with State
Interactivity simply means that your app responds when users take an action. A static page only displays information, but an interactive app reacts. For example:
- A button that counts how many times it’s been clicked
- A form that shows what you type in real-time
- A todo app that lets you add and check off tasks
React makes this kind of dynamic behavior straightforward by letting components manage their own data through state.
State is React’s built-in way of storing data that changes over time. When that data changes, React automatically re-renders the component to reflect the new values.
It’s important to understand the difference between props and state:
- Props: External data passed into a component (read-only)
- State: Internal data a component manages itself (can change)
If props are like arguments you pass to a function, state is like the function’s own local variables.
Introducing useState
React provides the useState hook to add state to your components.
For example:
import { useState } from "react";
function Counter() {
     const [count, setCount] = useState(0);
     return (
          <div>
               <p>You clicked {count} times</p>
               <button onClick={() => setCount(count + 1)}>Click Me</button>
          </div>
    );
}
Here’s what’s happening:
countis the current state value.setCountis the function used to update it.
Each time the button is clicked, setCount increases the value and React rerenders the component.
A few key things to remember:
- State updates may be asynchronous.
- Never modify state directly (avoid doing
count++). - Use the updater function when the new value depends on the previous one:
setCount(prev => prev + 1).
When state changes, React doesn’t mutate it directly—it creates a new value and rerenders, keeping UI updates predictable.
Real-World Example: Building a Todo App
Some parts of a UI need to change in response to the user’s actions. For example, when a user switches between active and completed todos in a to-do app, the interface should update accordingly.
In React, this type of dynamic data is managed with state. You can add a state to any component and update it whenever needed. In this section, we’ll explore how to build components that handle user interactions, manage their state and render different outputs as that state evolves.
Everything you’ll learn in this section forms the foundation of nearly every React component or app you’ll ever build.
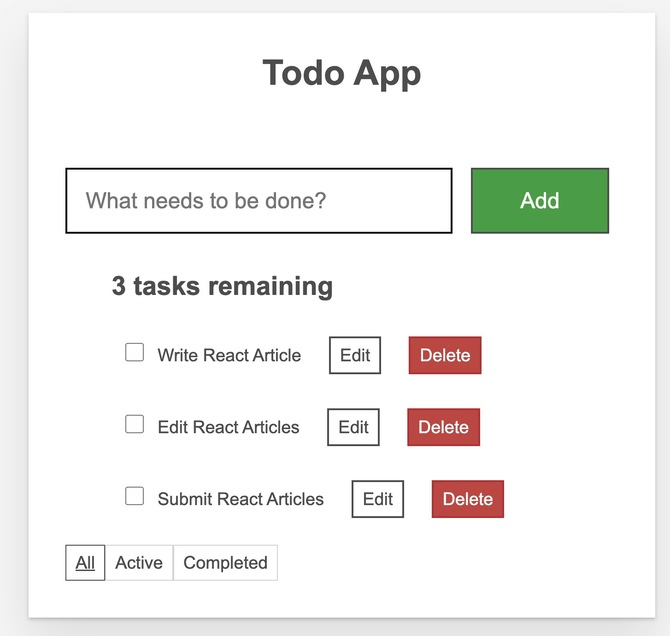
Here’s a quick mockup of what we’ll be building:

And here is the link to entire code demo: https://codesandbox.io/p/sandbox/todo-app-in-react-q9qxm5.
To follow along, have Node.js installed. If you’re new to React, feel free to check out React Basics: Getting Started with React and Visual Studio Code. Alternatively, you can fork this React CodeSandbox boilerplate, which I’ll be using throughout the tutorial.
Cool? Let’s dive in.
State as a Component’s Memory
Components often need to update what’s shown on the screen after a user interacts with them. For example, typing in a form should update the input field, clicking the edit button in a todo app should edit the tdo, and clicking Buy should add a product to the shopping cart. To make this possible, components need a way to “remember” things like the current input value, the edited todo or the items in the cart. In React, this built-in memory is called state.
You can add a state to a component using the useState hook. Hooks are special functions that let components use React features, and useState is the one that manages state. When you call it, you give it an initial value and it returns two things: the current state value and a function to update that value.
So let’s start by building our todo app components and making them interactive with state. However, before that, make sure to copy the styles.css file from the code demo file into your own project.
Open your App.js and add the following code:
import "./styles.css";
import { useState } from "react";
import TodoForm from "./components/TodoForm";
import Todo from "./components/Todo";

let nextId = 3;
const initialTodos = [
  { id: 0, title: "Write React Write", done: true },
  { id: 1, title: "Edit React Articles", done: false },
  { id: 2, title: "Submit React Articles", done: false },
];

export default function App() {
  const [todos, setTodos] = useState(initialTodos);
  function handleAddTodo(title) {
    setTodos([
      ...todos,
      {
        id: nextId++,
        title: title,
        done: false,
      },
    ]);
  }

  function handleChangeTodo(nextTodo) {
    setTodos(
      todos.map((t) => {
        if (t.id === nextTodo.id) {
          return nextTodo;
        } else {
          return t;
        }
      })
    );
  }

 function handleDeleteTodo(todoId) {
    setTodos(todos.filter((t) => t.id !== todoId));
  }
`
  const todoList = todos.map((todo) => (
    <li className="todo stack-small">
      <Todo
        id={todo.id}
        todo={todo}
        name={todo.title}
        key={todo.id}
        onChangeTodo={handleChangeTodo}
        onDeleteTodo={handleDeleteTodo}
      />
    </li>
  ));
  return (
    <div className="todoapp stack-large">
      <h1 className="header">Todo App</h1>
      <TodoForm onAddTodo={handleAddTodo} />
      <h2 id="list-heading">{todos.length} tasks remaining</h2>
      <ul
        aria-labelledby="list-heading"
        className="todo-list stack-large stack-exception"
        role="list"
      >
        {todoList}
      </ul>
    </div>
  );
}
In the code demo above, we created our todo app parent component, which is the parent component that houses every other component and subcomponents in our application. Then we created a mockup of initialTodos data. After that, we set up our first piece of state, which is the state of todos:
const [todos, setTodos] = useState(initialTodos);
After that, we added a few functions to handle user interactions—handleAddTodo, handleChangeTodo and handleDeleteTodo. Each one updates the todos state using setTodos, which automatically triggers a rerender so the UI always reflects the latest data.
Next, we created a todoList variable that maps over the todos array and returns a list of individual Todo components. Finally, we rendered the app so users can interact with it in real time.
With this example, you can see how we utilize useState for our todos state and how we update the state of Todos with all the functionalities when user interaction happens with setTodos.
Responding to Events
In React, you attach event handlers directly to JSX. Event handlers are simply functions that run when a user interacts with events—clicking a button, typing in an input or focusing a form field.
Built-in elements like <button> work with standard browser events such as onClick. But when you create your own components, you can define custom event props with whatever names make sense for your app.
Next, let’s create the remaining components, starting with the TodoForm.js components, which accepts new todo input from the user and adds it to the todo list.
export default function TodoForm({ onAddTodo }) {
  const [title, setTitle] = useState("");
  const handleSubmit = (e) => {
    e.preventDefault(); // prevent page refresh
    if (!title.trim()) return; // optional: avoid empty todos
    onAddTodo(title);
    setTitle("");
  };
  return (
    <form onSubmit={handleSubmit}>
      <input
        type="text"
        id="new-todo-input"
        placeholder="What needs to be done?"
        className="input input__lg"
        name="text"
        autoComplete="off"
        value={title}
        onChange={(e) => setTitle(e.target.value)}
      />
      <button type="submit" className="btn btn__primary btn__lg">
        Add
      </button>
    </form>
  );
}
In TodoForm.js, we use useState again to set the state of the new todo being added by the user:
const [title, setTitle] = useState("");
Here, we use useState to manage the input value. When the user submits the form, handleSubmit prevents the default page reload, adds the new todo via onAddTodo, and clears the input field.
This simple pattern—state + events—is the backbone of interactivity in React.
Next, we’ll apply the same approach to make other components interactive. Let’s start by creating the Todo component used in our App component.
Add the following code:
import { useState } from "react";
export default function Todo({ id, name, todo, onChangeTodo, onDeleteTodo }) {

  const [isEditing, setEditing] = useState(false);

  let todoTemplate;

  if (isEditing) {
    todoTemplate = (
      <>
        <input
          id={id}
          value={todo.title}
          onChange={(e) => {
            onChangeTodo({
              ...todo,
              title: e.target.value,
            });
          }}
        />
        <button type="button" className="btn" onClick={() => setEditing(false)}>
          Save
        </button>
      </>
    );
  } else {
    todoTemplate = (
      <>
        {todo.title}
        <button type="button" className="btn" onClick={() => setEditing(true)}>
          Edit
        </button>
      </>
    );
  }
  return (
    <>
      <div>
        <label>
          <input
            type="checkbox"
            className="check"
            checked={todo.done}
            onChange={(e) => {
              onChangeTodo({
                ...todo,
                done: e.target.checked,
              });
            }}
          />
          {todoTemplate}
          <button
            type="button"
            className="btn btn__danger"
            onClick={() => onDeleteTodo(todo.id)}
          >
            Delete
          </button>
        </label>
      </div>
    </>
  );
}
In the Todo component, we use the isEditing state to toggle between view and edit mode.
const [isEditing, setEditing] = useState(false);
We also respond to user interactions using event handlers passed down from the parent component—onChangeTodo and onDeleteTodo.
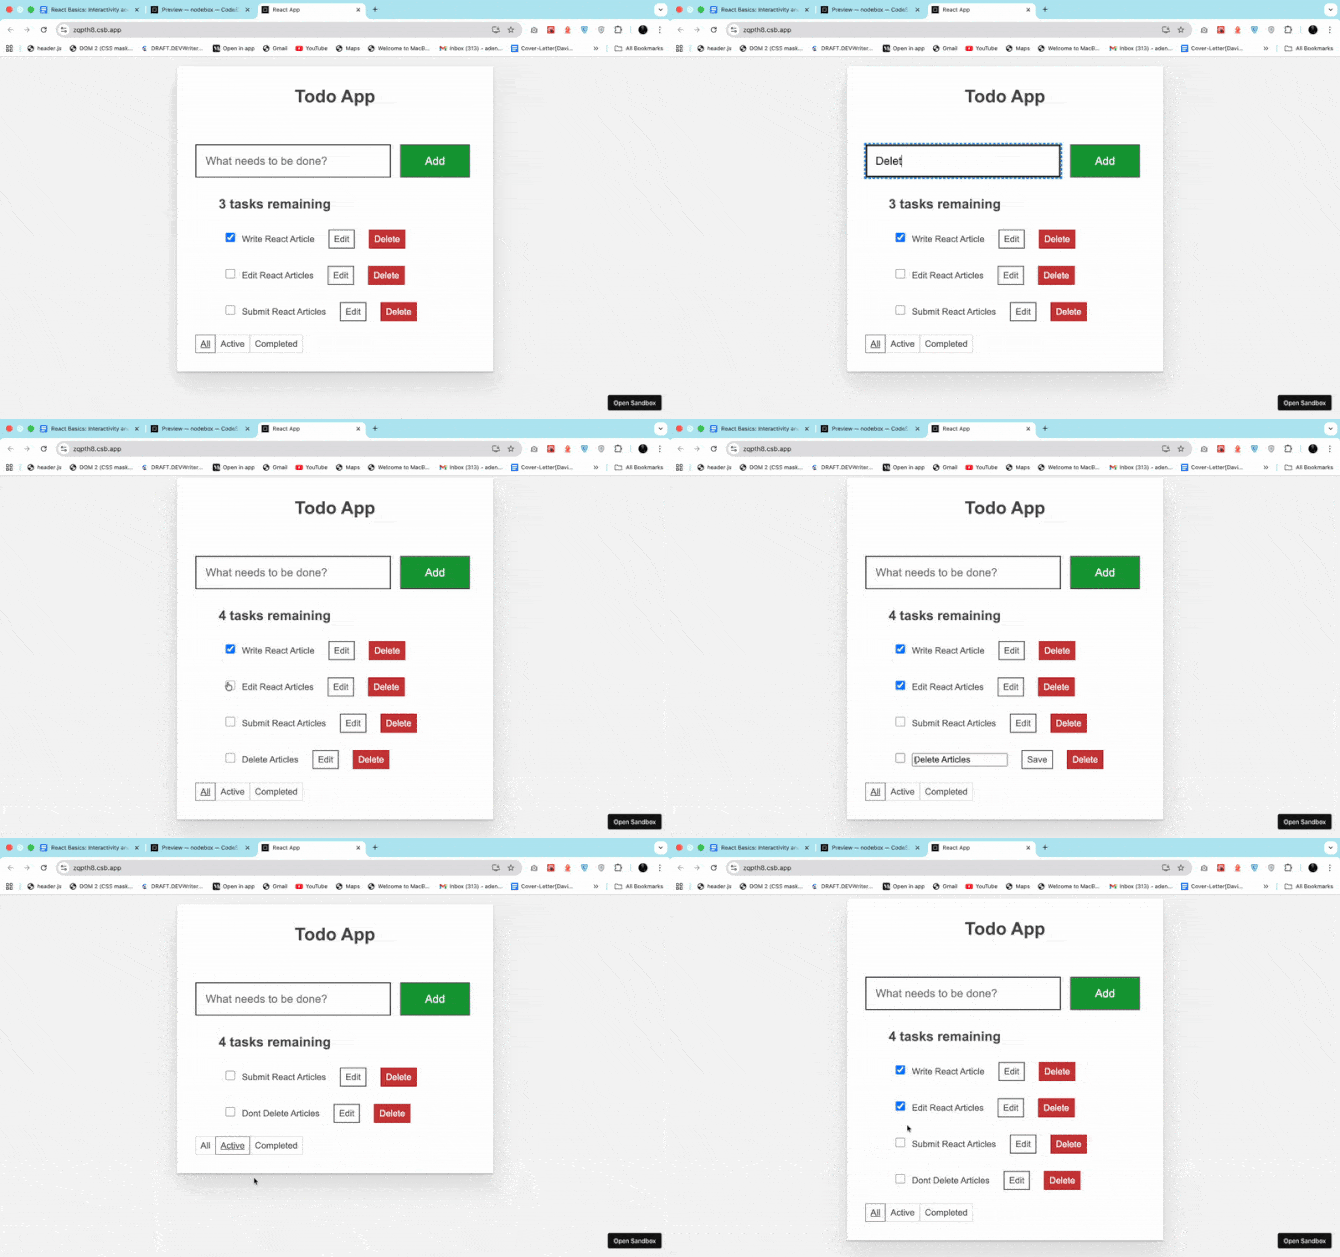
Now, our todo application is working perfectly. A user can easily add a todo, check a todo, edit a todo, and also delete a todo. As a challenge, try adding a filter feature (e.g., show “All”, “Active” or “Completed” todos). The solution is already in the demo source code on CodeSandbox, but I recommend that you implement it yourself first to reinforce everything you’ve learned.

Wrapping Up
State is one of the most fundamental concepts in React. It’s what gives your components life, allowing them to react, update and reflect user actions in real time.
In this tutorial, you’ve learned how to:
- Understand the difference between props and state.
- Use the
useStatehook to add state to components. - Respond to user interactions through event handlers.
- Manage dynamic data and updates in a real-world todo app example.
Every time a user adds, edits or deletes a todo, React rerenders the UI based on the latest state—and that’s the magic behind React’s interactivity.
You now have a solid foundation for understanding how state drives React applications. Next, you can explore more advanced concepts such as derived state, lifting state up, and managing global state with tools like Context API, MobX or Redux.
We’ve covered most of these topics in detail on the blog, and you’ll find them listed below in the Further Reading section to continue your React learning journey.
Further Reading

David Adeneye Abiodun
David Adeneye is a software developer and a technical writer passionate about making the web accessible for everyone. When he is not writing code or creating technical content, he spends time researching about how to design and develop good software products.

