Prototyping ASP.NET Core Data Grids

Summarize with AI:
Save time when you create ASP.NET Core data grids by building prototypes first. Learn to do this quickly in this tutorial.
Building prototypes is a process used to quickly introduce a working model of a product or feature. The benefit of prototyping is that there is little time or resources invested to create examples that can be used to collect feedback and iterate upon. Using this process, errors can be spotted early, user experience can be evaluated quickly, and less waste is created as a result.
In this article, we'll focus on rapidly building data grids; a popular user interface (UI) element used in many modern software applications. To reduce development time, we'll utilize GenFu. This is a tool that’s used to generate prototype data and wire-frames. We’ll also use Telerik UI for ASP.NET Core, which is a complete set of UI components that includes a fully-featured ASP.NET Core grid.
Getting Started
Let's start with an idea of what's needed from our application's data grid and a blank canvas. Our goal is to create a page that contains a data grid that displays a list of people and their details. At this point, the exact properties of the data don't matter since we're simply trying to determine the layout of the page.
We'll begin with an empty Razor view and add a simple layout for where our data grid will be displayed. In this example, we'll use Bootstrap to mark up the layout. Bootstrap is provided by default with ASP.NET Core and has an excellent layout system.
<div class="row">
    <div class="col-sm-12">
            <!-- data grid -->
    </div>
</div>
To begin, we would like to display a data grid on the page so that we can determine if adjustments to the Bootstrap layout are needed. One option would be to copy a static data grid consisting of an HTML table. However, this approach would leave our page’s markup bloated with unnecessary filler. Instead, focus on the layout elements of the HTML by using GenFu to inject placeholder content at run-time.
GenFu consists of a core prototype data generation library and an optional set of wire-framing tools. To add this tooling, use NuGet to install GenFu.HtmlHelpers.Wireframes. This package includes the data generation library and optional wire-framing tools. Next, add the following references to the _ViewImports.cshtml file.
@*For prototyping*@
@using GenFu;
@using GenFu.HtmlHelpers.WireframeHelper
@using GenFu.Services;
Wire-frames
Once GenFu is installed, we have access to HTML helpers which will easily create placeholder content for our application. This content is defined by the HTML Helper @Html.GenFu() followed by the type of HTML we would like to generate, such as headings (H#), paragraphs (P), lists (UL/OL), tables (Table) and more. The methods can be chained, thus creating a fully-marked up page with a single line of code.
@Html.GenFu().H1().P().H2().Ul().P()
<!-- this example creates a fully marked up page of Heading, Paragraph, Heading 2, Unordered list, and Paragraph -->
Focusing on the task at hand, we'll create a placeholder for a table within our layout. We'll using the HTML Helper's Table() method. By default, the method will generate a table with 5 items.
<div class="row">
    <div class="col-sm-12">
            @Html.GenFu().Table()
    </div>
</div>

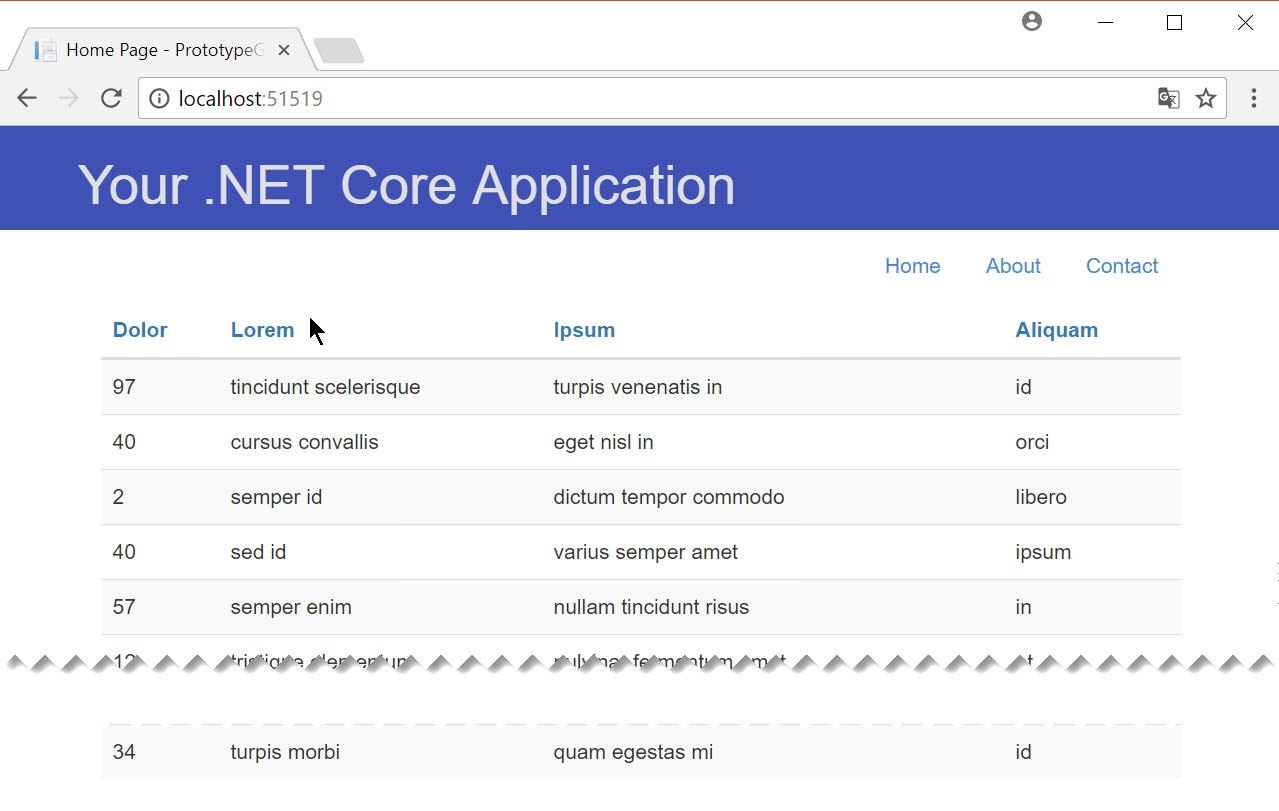
The Table() method isn’t very useful on its own. However, it is flexible and can be configured with a few parameters. For example, we can specify the number of rows to generate. Let’s set this to 25. The HTML attributes for the table can also be set. For this example, we'll create a visual style by leveraging Bootstrap's CSS classes. Setting the tableAttributes parameter to new { @class = "table table-striped table-responsive" } will give us a better representation of how our table should look in the final application.
@Html.GenFu().Table(rows: 25, tableAttributes: new { @class = "table table-striped table-responsive" })

With these changes, our table starts to take shape on the page. This is a great opportunity to adjust the layout of the page and align other UI elements that may be part of the view such as menus, charts, or forms. We might want to show this view to an end-user, stakeholder, or designer at this point. Unfortunately, the Lorem Ipsum placeholder text might be a bit abstract for some people. Let's iterate on our table and display something more realistic.
Let's assume we have a preliminary specification for the data that will be displayed in the view. Without investing heavily in things like creating a database, controllers, and actions, we'll display something meaningful on the page. We'll start with a simple object and add just the properties displayed in the view.
public class Person
{
    public string FirstName { get; set; }

    public string LastName { get; set; }

    public string Address { get; set; }

    public string PhoneNumber { get; set; }
}
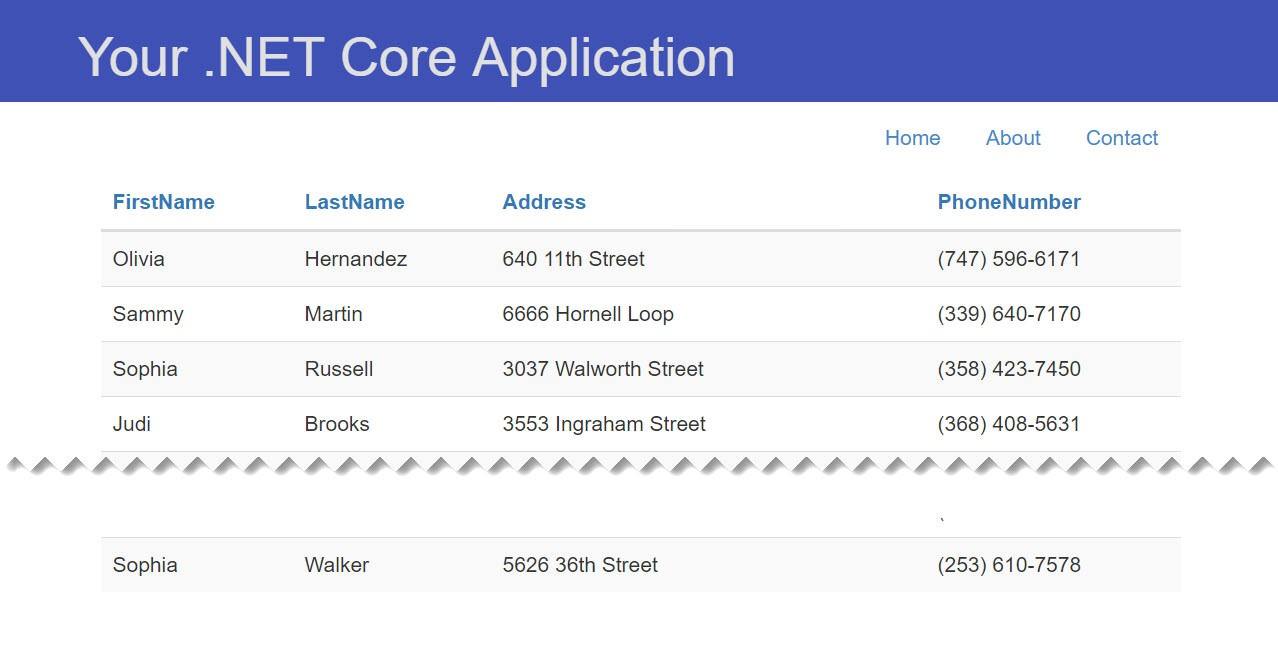
With the object created, we can instruct GenFu to fill the table using the object as a guide to generate data. By adding the Person type to the Table() method, we'll get an placeholder with realistic test data based on the property names of the object. GenFu understands different topics, such as "contact details" or "blog posts," and uses that understanding to populate commonly named properties using reflection.
@(Html.GenFu().Table<Person>(rows: 25, tableAttributes: new { @class = "table table-striped table-responsive" }))

Outstanding UI
So far we've built a pretty impressive looking table without touching any underlying code. While this is a reasonable prototype of what our intentions are for the view, it doesn’t resemble our final product. Let's iterate again, by transforming our table into a robust data grid. This next step will allow us to present the view to users and collect feedback on how users would like to interact with the data grid.
To transition to a data grid, we'll need a data grid component that we can configure quickly and with minimal effort. We would also like to have the ability to quickly add features users typically expect from a data grid such as sorting, paging, filtering, accessibility, keyboard navigation, and inline CRUD operations. Telerik UI for ASP.NET Core has the Kendo UI data grid for all of this and more. Telerik UI for ASP.NET Core can be added to an existing project, or included from start via File > New Project > Telerik ASP.NET Core MVC Application templates. A 30-day free trial will give us enough time to build prototypes and test out features of the grid.
When using the Kendo UI data grid, we'll transition away from the GenFu wireframe helpers and utilize GenFu's core generation utilities. GenFu will allow us to continue building without creating additional databases, controllers, or actions. To generate data using GenFu, we'll use the A.ListOf<T> method. This method generates random data based on the type specified; the result as a List<T>.
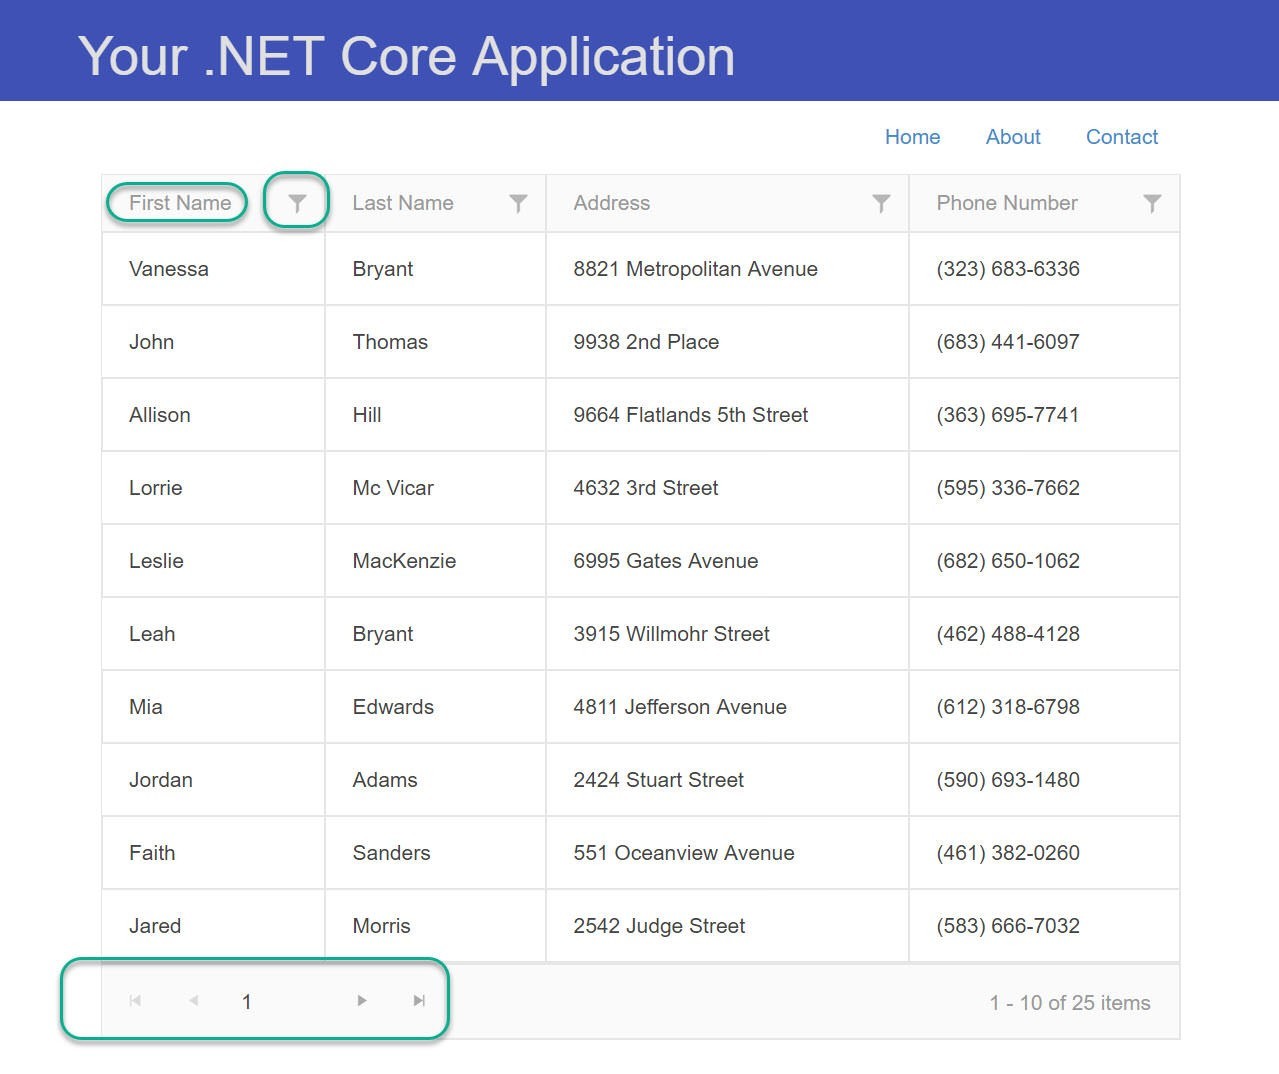
Let's replace our wire-frame table with the Kendo UI data grid. Using the Kendo() HTML helper we'll add features using a fluent API chain. In this case we'll add the features: Pageable, Filterable, and Sortable. Finally, we'll specify the grid's data in the BindTo() method, which is used to bind the grid to an inline data source. In the BindTo() method, we'll generate our data using GenFu.
@(Html.Kendo().Grid<Person>().Name("myGrid")
            .Pageable()
            .Filterable()
            .Sortable()
            .BindTo(A.ListOf<Person>(25))
    )

Our data grid is starting to take shape. We've enabled sorting, filtering, and paging so that the data can manipulated with ease. Let's assume that when this iteration of the prototype is presented to users, they request that a photo of the person be listed beside the information on the grid. Let's update our grid to include a photo. Again, we'll simulate this data using GenFu.
Since we're using Telerik UI for ASP.NET Core's Kendo UI grid, we can easily add custom templates to the grid. In this case, we'll be utilizing the column template to add an avatar column to display a photo for each person.
We'll need to define our columns in the grid using the Columns() method. This method defines a Template column which accepts a string representing the template. For its value, we'll add an image element and set the source to an image generated by GenFu's Services.PlaceholditUrlBuilder.UrlFor() method.
columns.Template("<img class='avatar' src='" + PlaceholditUrlBuilder.UrlFor(50, 50) + "'/>").Title("Avatar").Width(80);.
@(Html.Kendo().Grid<Person>().Name("myGrid")
.Pageable()
.Filterable()
.Sortable()
.Columns(columns =>
{
columns.Template("<img class='avatar' src='" + PlaceholditUrlBuilder.UrlFor(50, 50) + "'/>").Title("Avatar").Width(80);
columns.Bound(c => c.FirstName);
columns.Bound(c => c.LastName);
columns.Bound(c => c.PhoneNumber);
columns.Bound(c => c.Address);
})
.BindTo(A.ListOf<Person>())
)
![]()
The final result is a prototype grid that includes an avatar that represents each person.
Wrapping Up
Using a prototyping process enables us to build using rapid iteration with little investment. Since we're focused on a prototype of the user interface of the application, we can quickly make decisions, test ideas, and move to the next phase of development without wasted time building unused business logic. In this article, we focused on building a robust data grid prototype. We built iterations using GenFu wire-frames, and transitioned to Telerik UI for ASP.NET Core's grid populated with data from GenFu. These iterative steps assist in fine tuning layout, user experience (UX), and features. The prototyping process can be applied to other scenarios that include forms, dashboards, and much more.

Ed Charbeneau
Ed
