Meet the RadPopUp Control for Xamarin Forms

Summarize with AI:
Let's take a look at the Telerik RadPopUp control for Xamarin Forms.
Sometimes we have to present certain important information on our application in order to be able to alert the user in a fast, precise, concise way of demanding all their attention, with a goal of a quick reaction and effective understanding of the information.
This information can be presented if the user performs a specific action. Let’s look at an sample scenario!
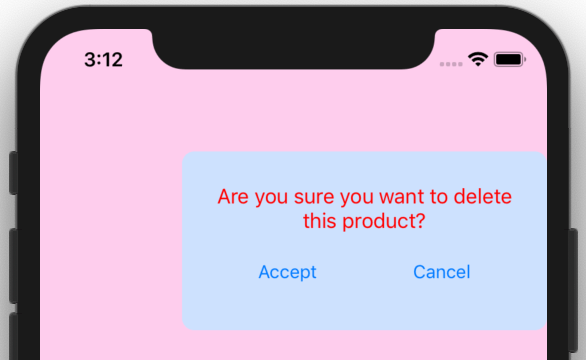
Imagine that we have a supermarket shopping list application and we need to add a product but it turns out that we selected the wrong one and we want to delete it. This would be a good scenario to ask the user: Are you sure you want to delete this product? With this simple Alert message, we make sure the user does not delete the wrong product by mistake. 💁♀
For these kinds of scenarios, we can use RadPopUp. In this article, we will detail the topic covering the following points:
✔ Adding namespaces
✔ Learning the structure of RadPopup and knowing its properties
✔ Bringing life to our RadPopup
First of All… What Do I Need?
-
Install Telerik UI for Xamarin in your Visual Studio.
For Mac
For Windows -
Add Telerik NuGetPackage (See the instructions here).
⚠ Important: Telerik has a free trial that allows us to explore all the great components they offer for us to use in our Apps.
Let’s Start!!!
Add the Following Namespaces
The first things you must add are the namespaces that contain the RadPopup:
➖Telerik.XamarinForms.Primitives:
xmlns:telerikPrimitives="clr-namespace:Telerik.XamarinForms.Primitives;assembly=Telerik.XamarinForms.Primitives"
➖Telerik.XamarinForms.Input:
xmlns:telerikInput="clr-namespace:Telerik.XamarinForms.Input;assembly=Telerik.XamarinForms.Input"
👩🏫 Learning the Structure of the RadPopup and its Properties
First of all, let’s understand the structure of this control!
- We need to add a control that works as a bridge to show the message when we click. In this case, we will add a Button.
<Button HorizontalOptions="Center"
            VerticalOptions="CenterAndExpand"
            HeightRequest="60"
            WidthRequest="150"
            Text="Delete article"
      Clicked="DisplayPopup">
</Button>
- Within the control declared above, we add the following lines:
<telerikPrimitives:RadPopup.Popup>
     </telerikPrimitives:RadPopup.Popup>
- Within the labels declared in the previous step, let’s do this!
<telerikPrimitives:RadPopup x:Name="PopUpSample"
             OutsideBackgroundColor="#FECDED"
             IsModal="False">
</telerikPrimitives:RadPopup>
As you have noticed, we have two interesting properties added in the previous step:
➖ IsModal: Accepts a Bool value. Indicates how PopUp will behave. Let’s see:
▪ If the value is True, when clicking outside the PopUp, this control remains on the screen.
▪ If the value is False, when you click outside the PopUp, that control will disappear from the screen.
➖ OutsideBackgroundColor: Indicates the color of the Background that the rest of the screen will take when the PopUp is displayed.
- Now, we add the features of the PopUp border.
<telerikPrimitives:RadBorder CornerRadius="10"
            BackgroundColor="#CDE1FE">
</telerikPrimitives:RadBorder>
Done! Now you just have to add the design you want the PopUp to contain. In this case, we will add the confirmation message to delete the selected product in our example supermarket shopping list. We will put the buttons of: “Accept” and “Cancel”.

Let’s see the complete example, according to the steps indicated:
XAML
<StackLayout Margin="0,40,0,0">
       <Button HorizontalOptions="Center"
               VerticalOptions="Start"
               HeightRequest="60"
               WidthRequest="150"
       Text="Click here to rate"
       Clicked="ShowPopup">
               <telerikPrimitives:RadPopup.Popup>
                   <telerikPrimitives:RadPopup x:Name="PopUpSample"
                                               OutsideBackgroundColor="#FECDED"
                                               IsModal="False">
                       <telerikPrimitives:RadBorder CornerRadius="10"
                                                    BackgroundColor="#CDE1FE">
                                <Grid Padding="25">
                               <Grid.RowDefinitions>
                                   <RowDefinition Height="*"/>
                                   <RowDefinition Height="*"/>
                               </Grid.RowDefinitions>
                               <Grid.ColumnDefinitions>
                                   <ColumnDefinition Width="120"/>
                                   <ColumnDefinition Width="120"/>
                               </Grid.ColumnDefinitions>
                                    <Label Grid.Column="0"  Grid.Row="0" Grid.ColumnSpan="2" TextColor="Red" HorizontalTextAlignment="Center" Text="¿Está seguro de que desea eliminar este producto?" />
                               <Button Grid.Column="0" Grid.Row="1" Text="Aceptar"/>
                               <Button Grid.Column="1" Grid.Row="1" Text="Cancelar" Clicked="ClosePopup"/>
                           </Grid>
                       </telerikPrimitives:RadBorder>
                   </telerikPrimitives:RadPopup>
               </telerikPrimitives:RadPopup.Popup>
       </Button>
</StackLayout>
For this example, we add in our CodeBehind the events of opening and closing the RadPopup.
For the cancel button we add the event ClosePopUp:
private void ClosePopup(object sender, EventArgs e)
       {
           PopUpSample.IsOpen = false;
       }
For our main button, which is the one that opens the RadPopUp, we add the event ShowPopUp:
private void ShowPopup(object sender, EventArgs e)
{
    PopUpSample.IsOpen = true;
}
And voilaaa!!! Our RadPopup is implemented! 😍
Thanks for reading my article! 💚💕
References:

Leomaris Reyes
Leomaris Reyes is a Software Engineer from the Dominican Republic, with more than 5 years of experience. A Xamarin Certified Mobile Developer, she is also the founder of Stemelle, an entity that works with software developers, training and mentoring with a main goal of including women in Tech. Leomaris really loves learning new things! 💚💕 You can follow her: Twitter, LinkedIn , AskXammy and Medium.
