
Hello, Create React App 2.0!

Create React App 2.0 is now available. In this blog post, Eric Bishard will walk you through what's changed and how you can use it in your development environment.
Table of Contents
- A Requirement for Using Create React App v2.0
- Are You New to Create React App?
- Starting From Scratch
- What's Changed and Why Should I Care?
- Breaking Changes to be Aware Of
- Resources for Create React App v2.0
Create React App provides an environment for learning React with zero configuration, developed by the React team at Facebook Open Source to help you jump-start your application. As the go to CLI tool for React developers (since it's V1 release in 2016), Create React App (CRA) has had opinions on what to use for your tests and test runner, what production minifier and bundler to use and how to set up a modular JavaScript codebase. These are decisions that you won't have to make to get your app up and running quickly, relieving you from a good deal of JavaScript fatigue when all you want to do is get straight to building your app and components.
Don't worry, you will still be able to make plenty of decisions on your own around state management, data retrieval, etc. CRA does not go as far as to make decisions like those for you. What it does do is create an out of the box front-end build pipeline that you can use with any back-end API or data retrieval options that you want.
A Requirement for Using Create React App v2.0
CRA 2.0 no longer works with Node 6. You must have Node 7 or greater installed in order to work with the latest bits. Before you get started you will need to ensure that Node is updated. You can check easily by running the following command:
node -vI have updated my Node as of the first day of the CRA 2 release and I have the following version of Node installed and everything is working just fine:
$ node -v
v8.12.0
Are You New to Create React App?
If not, skip to the section, What's Changed and Why Should I Care?. If you are, I would like to go over in detail how to use the CRA with a very basic Hello World walkthrough.
The first time I used the tool, I was confused about why I was not seeing Webpack, Babel and Jest in my package.json, but it turns out that's because CRA has a dependency called react-scripts that hides these and other dependencies and configurations from you. It's OK, though. Once you get moving and are comfortable with your application you can always eject from the CRA exposing those dependencies and their configurations.
Starting From Scratch?
If you want to try CRA 2.0, here are the basic commands - and just like the 1.x version, there are just a few very simple scripts to become familiar with.
Create React App is a CLI, however it is not as feature rich as other CLIs like Angular CLI. For instance, it does not generate components or add features to your app, but this is OK and it does make working with React a lot easier.
When you run the following command, CRA will use the 2.0 template by default:
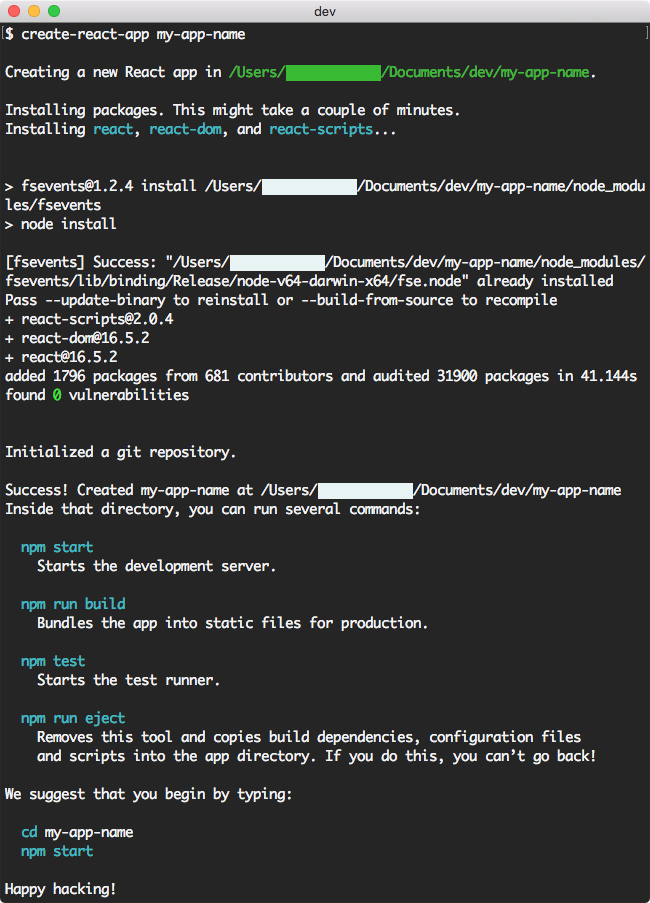
If you had installed CRA before October 1, 2018 and you have not used it in a while, you do not need to reinstall globally as the CRA will by default use the latest template. This does not mean you cannot use the old 1.x template. If you want to do that, you can add the argument, --scripts-version as follows:
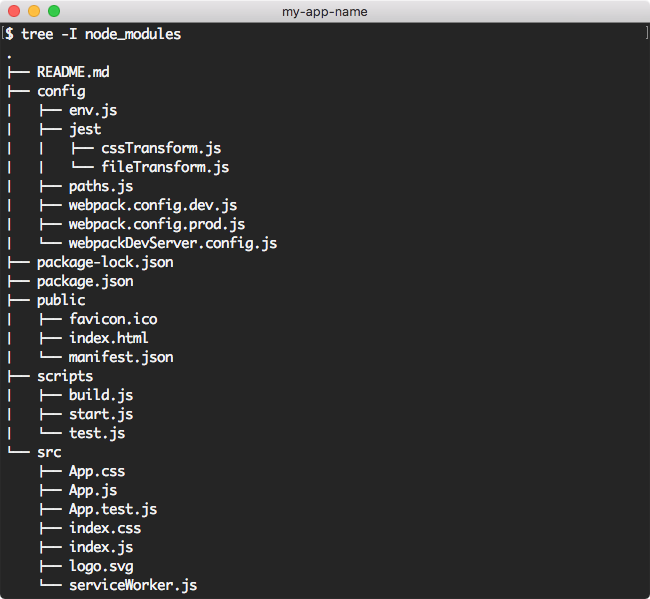
$ create-react-app my-app-name --scripts-version=react-scripts@1.xAfter CRA finishes generating your application, you will have a directory with the following structure:
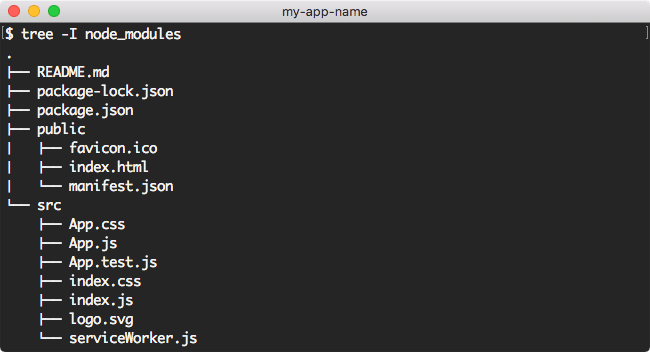
Here, I have expanded the important folders and files that you should be aware of, mainly the public and src directories are where you will be making changes and adding your first components and test files. As you can see, CRA has a few components and tests already setup for you.
Note: It is possible to use thecreate-react-app commandin a current directory using:
$ create-react-app .This command, followed by a dot indicates to the CLI that we want to setup CRA in the current working directory. However, you should ensure there are no conflicting files present, like
package.json. As this will keep the initialization from running.
After running the create-react-app command, change directories and run npm start or yarn start to build and run the app:
$ cd my-app-name
$ npm start
This will use the Webpack Dev Server on localhost:3000. Navigating to this page in your browser will bring you to the home page with the React logo:

CRA doesn't support Hot Module Replacement because it "hides" Webpack from you. For example, if a change is made to App.js, the entire app is reloaded in the browser.
Note: If you wish to use Hot Module Replacement when using Create React App, please refer to Brian Han's (excellent) article entitled, Hot reloading with create-react-app without ejecting... and without react-app-rewired.
Let's terminate our current dev server and try running our tests using the npm test or yarn test command:
$ npm testThe following options will be displayed:
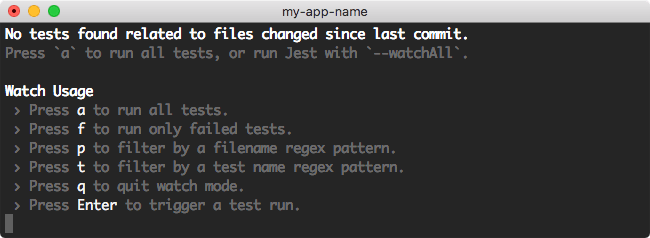
Let's run all tests by pressing a:
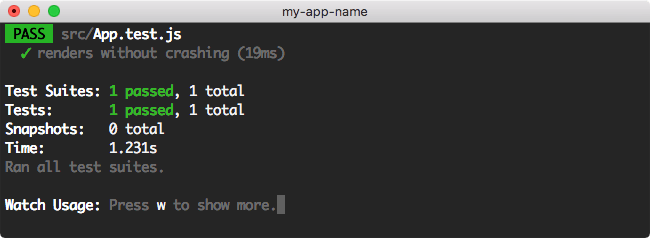
As you can see, the tests listed in src/App.test.js passed.
If we wish to ship this beautiful spinning React logo app as it sits, we can execute the npm run build or yarn build, which will create a directory inside the project called build:
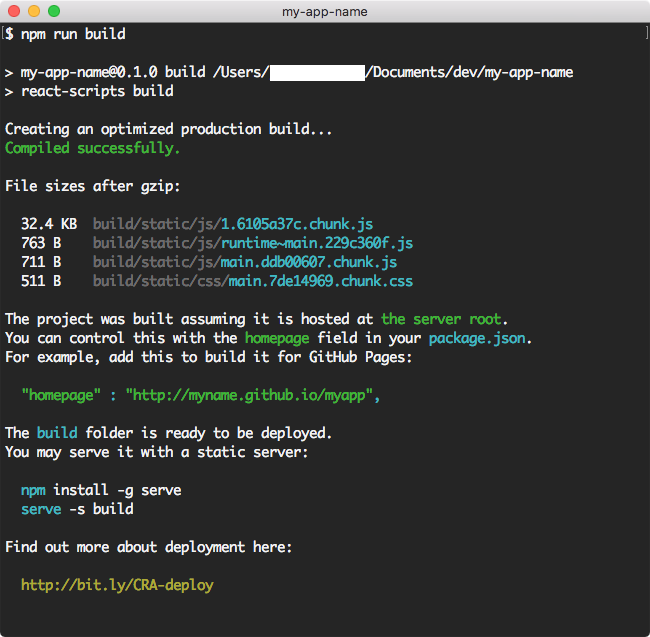
Here, an optimized production build has been created. Once the operation has completed, the build script details exactly what happened and how you can deploy the generated output. To find out more about deployment, you can go here.
Finally, as part of this test drive, we will eject our application from our CRA. I would encourage doing this with a test application so that you understand what the command does and how it is irreversible.
Before we begin, let's examine package.json:
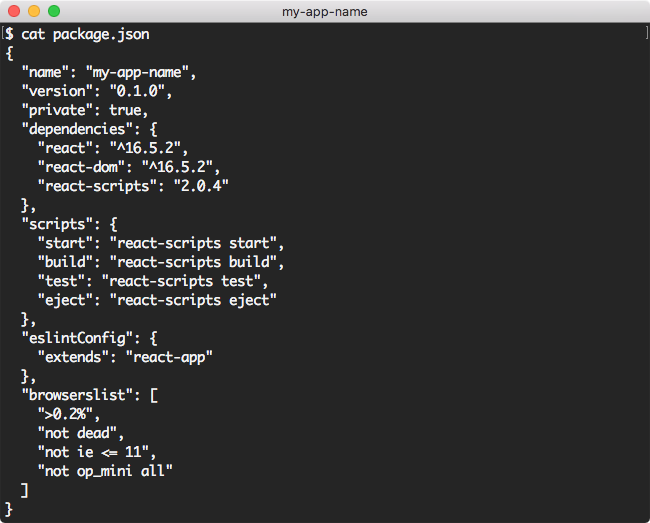
The only dependencies listed are react, react-dom, and react-scripts. react-scripts are where all the hidden dependencies live when using CRA.
Also, let's note the structure of the application directory:

Let's now eject our application:
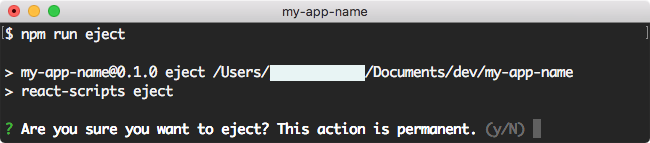
Please take note of the warning before performing the eject operation on your app.

Committing this operation will modify project.json and the directory structure of the app:
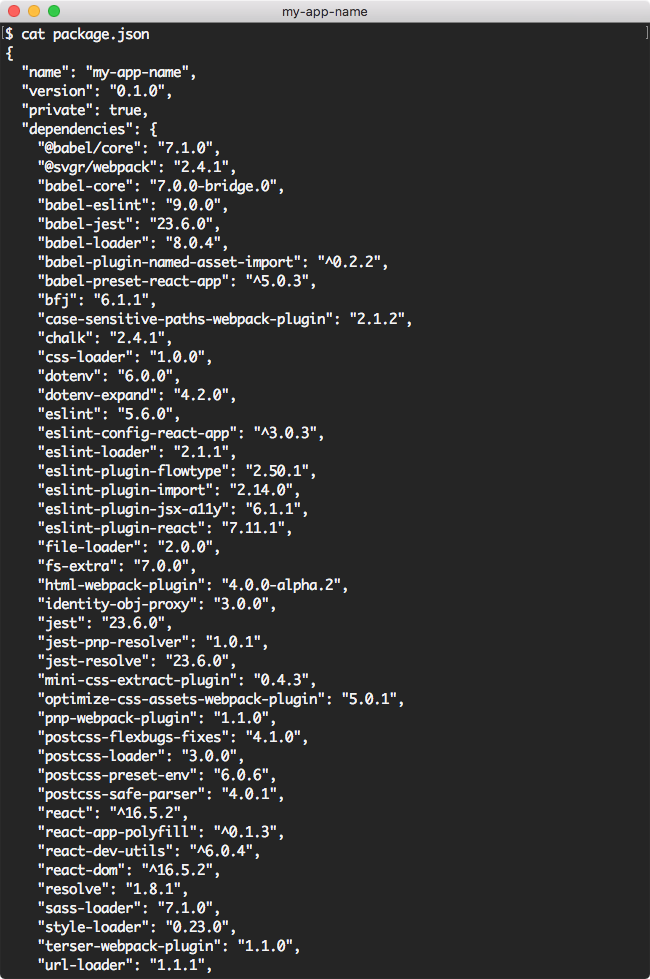
You now have control over all of the previously hidden dependencies, we now also have a scripts and config directory. At this point we are no longer using the CRA, however; you can still run all of the same commands as before: start, test and build. Obviously, the eject script no longer exists. The new directory structure looks something like this:
One last thing I wish to mention is that it does not matter if you use npm or yarn in any of these steps. Both will provide the exact same output in each case. I do find that using yarn does on average take less time that npm to perform each command, but also requires that you have yarn installed.
What's Changed and Why Should I Care?
Some reasons for updating include taking advantage of the updates to the major dependencies like Babel 7, Webpack 4, and Jest 23, which have gone through major changes this year.
Aside from some of the freebies we get from having Babel, Webpack and Jest updated to their latest versions, and as someone who is fairly new to React and the more advanced concepts, I wanted to cover some of the basics that are going to make my life better as a React developer. Here are what I believe are some of the most important changes that are also easy to understand from a beginner or intermediate standpoint.
Sass/CSS Modules Out of the Box
This is one of my favorite features. Previously I had several starter projects on my GitHub which I would clone in order to get to a good starting point with different CSS configurations as CRA 1.x didn't provide the greatest CSS options right out of the box. It also was not trivial for me to set this stuff up, hence the modified starter projects I had to create in order to make working with CSS easy from the start of my project.
SVG as a Component in JSX
We have support for working with SVGs, enabling us to import them as a React component in our JSX.
Smaller CSS Bundles
We can now take advantage of better CSS bundling by simply targeting modern browsers.
Better Syntax for React Fragments
As someone who has run into the issue of Babel not supporting the shorthand for React Fragments, it's nice to know that with the Babel update, Create React App now supports this abbreviated tag syntax right out of the box.
Opt-In for Using Service Workers and Supporting Old Browsers
Offline-first Progressive Apps are faster and more reliable than traditional ones, and they provide an engaging mobile experience as well. But, they can make debugging deployments more challenging, and for this reason, in Create React App 2 service workers are opt-in.
What Has Changed in the App Files and Their Structure?
After getting up and running with the new template, you will notice that the home page for the CRA is slightly different from before. I actually like the new design as a starting point much better. If you are unsure which version you are running this change makes it simple to know which version you are on. Below we see the old 1.x version to the left and the newer 2.x version to the right.
The file structure in CRA 2.x is nearly identical to that of the structure in 1.x, but one of the first things you will notice when opening up your project is that the old registerServiceWorker.js has been renamed to serviceWorker.js. If you go into that file, the only change is the addition of a config object that can be passed to the registerValidSW() function enabling onOffline and onError callbacks to the Service Worker. This is useful to display user messages when in offline mode and to log errors on serviceWorker if registration fails. More info can be found here if you want to explore this change.
If you go into your index.js file, you will notice why registerServiceWorker.js has been renamed to serviceWorker.js. It's because by default we are not registering the service worker anymore. By simply changing the line in index.js that reads: serviceWorker.unregister(); to serviceWorker.register(); you will then be able to take advantage of offline caching (opting in). I think the name change for this file makes sense because of the opt-in change. To learn more about Progressive Web Apps in CRA, go here.
NPM Scripts Remain the Same
We still have the four (4) basic commands used to start, build, test and eject the application:
npm startoryarn startwill host the app locally with Webpack Dev Servernpm testoryarn testwill execute the test runner using Jest tests (more info)npm run buildoryarn buildwill package a production build for deployment (more info)npm run ejectoryarn ejectwill remove thereact-scriptsfrom your dependencies and copy all config files and transitive dependencies into your project as well as update yourpackage.json
If you would like to compare the two package.json files for each version of the ejected apps (1.x vs 2.x), I have put them up on a diff checker here.
Below is a snapshot taken from both a 1.x app and a 2.x app that have been ejected. As you can see we have a lot more transitive dependencies in the new version of CRA 2 and only a few packages that were removed from the old version.
Breaking Changes to be Aware Of
- As I mentioned, Node 6 is no longer supported, you must be running Node 7 or greater
- Older browsers (such as IE9 to IE11) support is opt-in and this could break your app
- Code-splitting with
import()now behaves closer to specification - Jest environment includes
jsdomout of the box - Support for specifying an object as
proxysetting replaced with support for a custom proxy module - Support for
.mjsextension removed - PropTypes definitions now get stripped out of the production builds
The 2.0.3 release notes do go into further detail about breaking changes, so I would check that document out if you need more clarity.
Resources for Create React App v2.0
I have compiled a list of all of the content that I have found around the topic of Create React App 2. This should get you up to speed and started using some of the new features, which I assume even those of you that have React figured out will enjoy learning. For instance, Kent C Dodds created a YouTube video showing how to use the custom Babel macros, which is now supported in version 2. He will get you up to speed on using and creating your own macros in a short period of time.
You can check out the Github Repo, and for additional information not covered here, the React team has also done a blog post on the release and breaking changes.
- Create React App 2.0: Babel 7, Sass, and More
- Create React App on Github
- Create React App Issues
- Create React App Docs
- Adding a Sass Stylesheet
- Egghead.io: Add Sass Support to Create React App 2
- Adding a CSS Module Stylesheet
- Egghead.io: Use CSS Modules with Create React App 2
- Adding SVGs
- Egghead.io: Add SVG as React Component in Create React App 2
- React Fragments
- Egghead.io: Use React Fragment Syntax in Create React App 2
- Google Workbox (Offline Support/PWA)
- Release Notes & Migration Notes for 1.x to 2.03
- CSS Modules arrive to Create React App (CRA) in version 2.0
- Babel Plugin Macros
- Polyfill for old Browsers
- Kent C. Dodds - Using and writing custom babel macros with create-react-app v2
- Babel macros on NPM
- Telerik Blog: All Things React

Eric Bishard
Eric Bishard is a Developer Advocate and former member of the KendoReact team at Progress. A software engineer with experience building web based applications with a focus on components for user interfaces in Angular and React, Eric works with @Couchbase, tweets @httpJunkie and blogs at ReactStateofMind.com.
Related Posts
Comments
All articles
Topics
Web Mobile DesktopDesktop
Design
Productivity
People
Latest Stories
in Your Inbox
Subscribe to be the first to get our expert-written articles and tutorials for developers!
All fields are required