Exploring the New Grid Structure in Xamarin Forms

Summarize with AI:
Learn more about how to use the new simplified Grid Structure in Xamarin Forms.
Howdy!!! 🙋♀ It’s a pleasure to have you here always learning great new things! I hope that you are still safe in your homes in this pandemic time. 😔
In this post, I will be giving you amazing news about the Grid! Personally, it is one of my favorite layouts. 😍 It helps me to build wonderful designs on my UI apps. Remember that a Grid is a layout that allows us to locate controls in our design through rows and columns.
So now we’ll learn about the new Grid Structure in Xamarin Forms available from the Xamarin.Forms 4.7-pre1 version.
If you are reading this article you have probably found yourself in one of the following scenarios:
-
You are just starting to learn and you don’t know how to use the Grid. If you are in this group, welcome to the new structure! 📣 If you want to know in more details about the general Grid structure, you can read this article.
-
Or… You know how to use the Grid but sometimes you may think something like "The Grid is amazing but why can’t it be implemented with fewer lines?" 🤔
So, Let’s Start! 😎
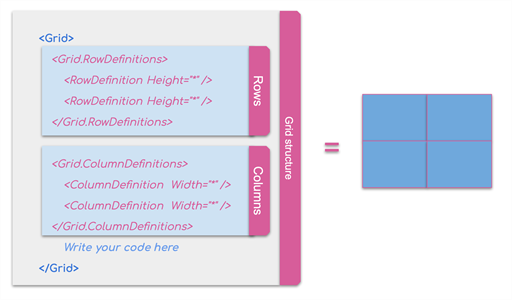
First of all, let’s see the unique Grid structure before this update:
In the image below we are creating two columns and two rows. To create each one, we need to add something like <Grid.ColumnDefinitions> or <Grid.RowDefinitions> (depending on what you need). And inside this, you have to add line by line all the rows or columns that you will be using. In this example, I have 10 lines just for building the Grid structure.
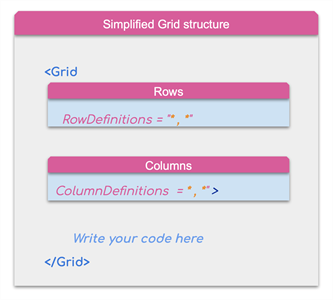
But you know what? From the Xamarin.Forms 4.7-pre1, we have the same structure previously shown but simplified. 🤩 This simplification will be just for the structure. The functionality will not have any changes!
So, now let’s simplify the 10 lines used above!
Code Example
    <Grid RowDefinitions = "*,*"ColumnDefinitions = *,*" >

        Write your code here

    </Grid>
🚀 As you can see, with just two lines you can create the same Grid structure, helping you save lines and time!
How did I do it?
Let’s go step by step. First thing you must do is add the <Grid tag, but before closing it, add Rows and Columns:
-
Starting with the row, you just have to add
RowDefinitionsand inside it add as many rows as you need with their respective height, but this time you don’t have to add the Height property. -
Continuing with the Columns add
ColumnDefinitionswith the same description as previously explained for the rows, but this time don’t add the Width property and close the tag line.
⚠ You can add the row or column in the order that you want—it doesn’t need a specific order.
Then write all the code that you need in the layout, and, finally, end by closing the </Grid> tag.
And done. Our Grid is completely simplified! I hope that this article will be very helpful for you! 💚
🏡 Stay safe and see you next time!
References: https://docs.microsoft.com/en-us/xamarin/essentials/text-to-speech

Leomaris Reyes
Leomaris Reyes is a Software Engineer from the Dominican Republic, with more than 5 years of experience. A Xamarin Certified Mobile Developer, she is also the founder of Stemelle, an entity that works with software developers, training and mentoring with a main goal of including women in Tech. Leomaris really loves learning new things! 💚💕 You can follow her: Twitter, LinkedIn , AskXammy and Medium.


