Dynamic variable item height with auto layout and TKListView for iOS
Summarize with AI:
One component which causes troubles to most iOS developers is UICollectionView. This is a quite flexible and powerful component, but sometimes it consumes a lot of time and efforts to tweak to your needs. Some things that should be easy become a nightmare and in some cases you should write a lot of code. That is why we created TKListView as an easy to use and feature rich replacement. TKListView wraps UICollectionView and adds new features such as pull to refresh, load on demand, cell swipe, item reordering and much more. In a series of blogs posts we will tell you about some of the most interesting features in TKListView and how fun and easy is to use TKListView and Telerik UI for iOS.

One specific problem faced by our customers is creating a collection view with items of different size, where the size is dynamic and depends on the item content. The obvious solution when using UICollectionView is creating a custom layout and implementing the sizeForItemAtIndexPath method. In this method we should get the item related data to calculate its size. But what if we use auto layout? Well, with auto layout we can position the content, but if we want define the size of the cell using auto layout, we would have to do a lot of extra work. The first thing that comes in mind is to dequeue an item and obtain the calculated size. However, this is not possible with UICollectionView, because you can't dequeue an item outside of the collectionView:cellForItemAtIndexPath: method. This will raise an exception.
All this is easy with TKListView. In this tutorial we will learn how to define a cell with dynamic size in the Interface Builder and to set up TKListView with such cells. Let's start:
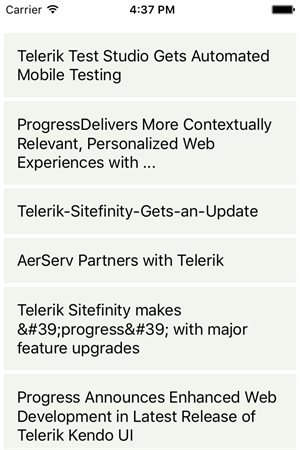
Here is the result:

Nice, huh? :)
As usual, the code for this example is available in our public GitHub repo.
Stay tuned for our next article about TKListView.

One specific problem faced by our customers is creating a collection view with items of different size, where the size is dynamic and depends on the item content. The obvious solution when using UICollectionView is creating a custom layout and implementing the sizeForItemAtIndexPath method. In this method we should get the item related data to calculate its size. But what if we use auto layout? Well, with auto layout we can position the content, but if we want define the size of the cell using auto layout, we would have to do a lot of extra work. The first thing that comes in mind is to dequeue an item and obtain the calculated size. However, this is not possible with UICollectionView, because you can't dequeue an item outside of the collectionView:cellForItemAtIndexPath: method. This will raise an exception.
All this is easy with TKListView. In this tutorial we will learn how to define a cell with dynamic size in the Interface Builder and to set up TKListView with such cells. Let's start:
-
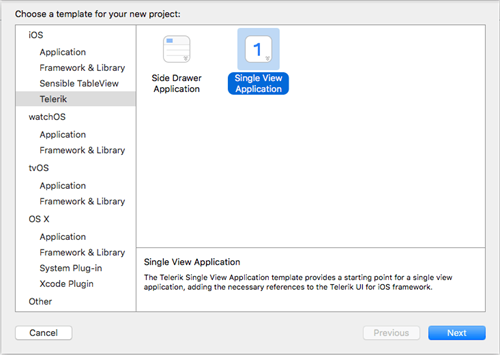
The first step is to create a new project. This can be done by using the new Single View Application template that can be chosen from the Telerik section in File > New > Project dialog. The project template will initialize everything that is necessary in order to build a project with Telerik UI for iOS. Let's choose Swift for this tutorial.

- Now add a new cell by selecting File > New > File and then choosing the User Interface section and the Empty template. Let's call the file MyCell.xib.
- Open the nib file and choose UICollectionViewCell from the Object library. Drag the UICollectionViewCell in the Interface Builder.
-
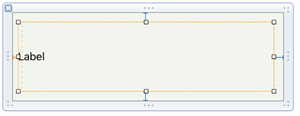
Add a UILabel and drop it inside the UICollectionViewCell. Position the label so that it covers the whole cell and leave small spacing on all sides:

-
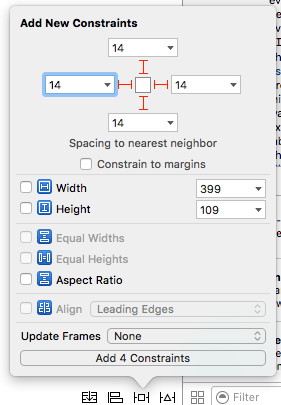
Add four constraints to bind the label size with the cell size:

- Set the Lines property for the label to 0. This will allow text wrapping and multiple lines in the label.
- Set the cell identifier to myCell.
- Choose File > New > File and add a new class that inherits from TKListViewCell. It should be called MyCell.swift.
- Now get back to the Interface Builder and change the cell class to MyCell.
- Open the Assistant Editor and create a new property in MyCell class to hold the UILabel. Let's call it myLabel.
-
Open the ViewController class and add this code:
let listView =TKListView(frame:self.view.frame)listView.autoresizingMask= [.FlexibleWidth,.FlexibleHeight]self.view.addSubview(listView) -
By default, TKListView uses TKListViewLinearLayout. We should set its dynamicItemSize property to true in order to enable dynamic item sizing:
let layout = listView.layoutas! TKListViewLinearLayoutlayout.dynamicItemSize=true -
We should also register our custom cell in TKListView:
listView.registerNib(UINib(nibName:"MyCell",bundle:nil),forCellReuseIdentifier:"myCell")
let dataSource = TKDataSource()dataSource.settings.listView.defaultCellID = "myCell"dataSource.settings.listView.initCell { (listView:TKListView, indexPath:NSIndexPath, cell:TKListViewCell, item:AnyObject) -> Void in let myCell = cell as! MyCell let dict = item as! NSDictionary myCell.myLabel.text = dict["titleNoFormatting"] as? String}dataSource.loadDataFromURL("https://ajax.googleapis.com/ajax/services/search/news?v=1.0&rsz=8&q=Telerik", dataFormat: TKDataSourceDataFormat.JSON, rootItemKeyPath: "responseData.results") { (err:NSError?) -> Void in listView.dataSource = self.dataSource listView.reloadData()}Here is the result:

Nice, huh? :)
As usual, the code for this example is available in our public GitHub repo.
Stay tuned for our next article about TKListView.

About the Author
Tsvetan Raikov
Tsvetan is the Team Leader of the UI for iOS team. He has been part of Telerik since 2006, when he joined the company as regular developer in the WinForms team. Tsvetan made his way through all developer postions over the past few years. His addiction to the cutting edge technologies, together with the passion to develop outstanding products are what drive him forward. In his spare time Tsvetan loves biking, hiking and snowboarding. You can find Tsvetan on Twitter @tzraikov, and LinkedIn.
Comments
Comments are disabled in preview mode.
