
Discovering the Power of the Expander Control for Xamarin Forms

Summarize with AI:
Learn how to use this handy control to save time when you're developing your next Xamarin app.
As developers, it’s normal for us to find applications that require more complex controls than the more common ones. In these moments we have to choose between building them from scratch or looking for whether the controls we need already exist. If we choose to build them ourselves, we can penalize the development time of the project. 😓 So in this post, making use of Telerik UI for Xamarin, in a few steps we will learn how to use one of those uncommon but very, very useful controls for our applications: the Expander. 💓
But 🤔… What is the Expander?
The Expander, also called the RadExpander, is a control that allows us to group a set of information (graphic controls), allowing it to collapse and expand, so we can have all the information we need on the screen but save space on the screen design.

First of All… What Do I Need?
- Install Telerik in your Visual Studio.
- Add Telerik NuGetPackage (See the instructions here)
⚠ Important: Telerik UI for Xamarin has a free trial that allows us to explore all the great components they offer for use in our apps.
Let’s Start!
1. Add the following namespace to your app
xmlns:telerikPrimitives="clr-namespace:Telerik.XamarinForms.Primitives;assembly=Telerik.XamarinForms.Primitives"
2. Learning RadExpander Structure
To add this control, you must use the following structure:
    <telerikPrimitives:RadExpander HeaderText="Settings">
                 <telerikPrimitives:RadExpander.Content>

                        <!-- Here you can add whatever layout that you need-->
                 </telerikPrimitives:RadExpander.Content>
    </telerikPrimitives:RadExpander>
As we saw above, we need to enclose our code between these two tags and then just close it. It’s important to know that inside the tags, we can add whatever layout that we need, such as: StackLayout, GridLayout, among others. These are some of my favorite properties. 💓
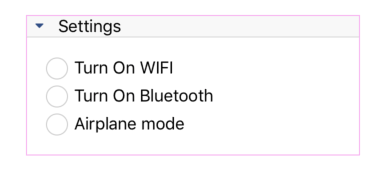
- HeaderText: (Obligatory field) This is the name that will be displayed in the header of the expander.

- HeaderLocation: Allows us to set the location that will get the header bar. Values accepted are:
- Top (Default value)
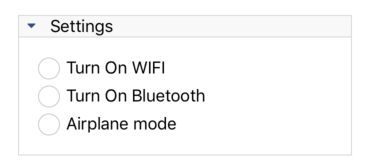
- Bottom
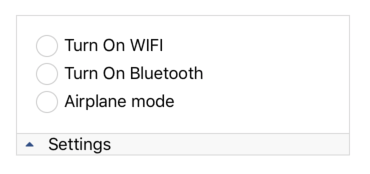
- BorderColor: This is the color that the border of the entire RadExpander will have, including the header bar.
Now, Let’s See an Example!
    <telerikPrimitives:RadExpander x:Name="SettingExpander" HeaderText="Settings" HeaderLocation="Top" BorderColor="#F7AEF0">
                 <telerikPrimitives:RadExpander.Content>
                    <Grid Margin="20">
                        <Grid.RowDefinitions>
                            <RowDefinition Height="Auto"/>
                            <RowDefinition Height="Auto"/>
                            <RowDefinition Height="Auto"/>
                        </Grid.RowDefinitions>
                        <Grid.ColumnDefinitions>
                            <ColumnDefinition Width="Auto"/>
                            <ColumnDefinition Width="Auto"/>
                        </Grid.ColumnDefinitions>

                        <telerikPrimitives:RadCheckBox Grid.Row="0" Grid.Column="0" />
                        <Label Grid.Row="0" Grid.Column="1" Text="Turn On WIFI" />

                        <telerikPrimitives:RadCheckBox Grid.Row="1" Grid.Column="0" />
                        <Label Grid.Row="1" Grid.Column="1" Text="Turn On Bluetooth" />

                        <telerikPrimitives:RadCheckBox Grid.Row="2" Grid.Column="0" />
                        <Label Grid.Row="2" Grid.Column="1" Text="Airplane mode"/>
                    </Grid>
                 </telerikPrimitives:RadExpander.Content>
         </telerikPrimitives:RadExpander>
Good look with your implementation! 😎 Thanks for reading 💚!
Learn More
Check out the Telerik UI for Xamarin docs to learn more about how this control works.

Leomaris Reyes
Leomaris Reyes is a software engineer from the Dominican Republic specializing in mobile development. She is a 7-time Microsoft MVP and actively builds mobile applications while sharing practical knowledge through technical articles and developer-focused content.
Through her work, she explains programming concepts, developer tools and real-world development practices to help developers grow in their careers.
You can follow her on Instagram and TikTok at @leomarisreyes.dev, read her articles on AskXammy, and connect with her on LinkedIn, where she shares tutorials, insights and resources for developers.