Become a CLI Artisan on Windows

Summarize with AI:
To some developers, it seems like not long ago that we were trying to come to terms with the Graphic User Interface (GUI). The tool of the trade was the Command Line Interface, because it was the only way. Visual Studio slowly transformed Windows developers by abstracting away command line tools until they were no longer a "necessity". Only a rare sighting of the CLI might have been seen in the dimly lit rooms of system admins and dev-ops.
Today there is a resurgence of the CLI among developers. There are many invaluable CLI tools like Git that make developer's lives easier. Developers today are looking for more cross platform opportunities, where Visual Studio isn't front and center. And if you're working with modern JavaScript development, CLI tools are an absolute necessity.
On Windows, the CLI has suffered from its years of obscurity as Microsoft moved to "Visual
Let's look at a few simple tools that can transform your CLI developer experience from dismal to dazzling. It's time to reclaim your CLI and become a CLI artisan on Windows.
For a deeper look at CLI tools and, specifically, the .NET CLI, check out our whitepaper, The Command Line: Reinvented for Modern Developers, which celebrates the resurgence of CLI tools and provides insight into how modern development platforms cater to application development through CLI—for web, desktop and mobile channels.
Chocolatey

The first step in retooling your CLI is to make sure you're using Chocolatey. Think of Chocolatey as the NuGet package manager for Windows software. You can quickly search for apps like: Chrome, Notepad++, and 7-Zip; and manage the installation, configuration, upgrade, and uninstallation of software with just a few keystrokes. In addition, Chocolatey integrates with several infrastructure automation tools.

Installing Chocolatey is just a few simple steps which are nicely laid out for you on their install documentation.
We'll be using Chocolatey to install more CLI tooling, so if you've heard of Chocolatey and just haven't tried it yet, there's no better time than now. If Chocolatey is already installed and you just haven't touched it in a while, no problem, just run choco update chocolatey to update it to the latest version.
Posh-Git
If you spend any time with Git or GitHub, or maybe it's on your developer bucket list, then Posh-Git is the next CLI tool for you. Posh-Git is a powershell module that incorporates a Git repository status right in the prompt. When Posh-Git detects a Git repository at your current location the prompt shows the current branch and the state of files (additions, modifications, deletions) within. The status is also color coded so you can tell at-a-glance the state of the repository.
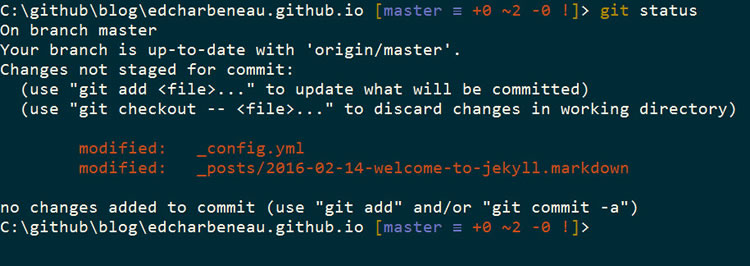
Adding Posh-Git to your CLI is as simple as getting the package through Chocolatey and following the prompts.
choco install poshgitOnce Posh-Git is installed, just navigate to a folder where you have an active Git project and see for yourself how useful Posh-Git can be.

ConEmu
Now that we have our Posh-Git enabled powershell command tool, let's ditch that classic command shell and upgrade to something more versatile.
We'll be ditching the standard Windows command prompt in favor of a shell that can handle different command shell configurations for specific tasks. This will also let us use the Posh-Git/Powershell combo as a default.

We'll be installing a modern Windows console called ConEmu. ConEmu is a Windows console emulator with tabs, which presents multiple consoles and simple GUI applications as one customizable GUI window. ConEmu comes packed with features that simplify the developer experience such as: tabs, presets, copy/paste, themes and much more.
choco install conemuAfter installing, set the default console to PowerShell (Admin) so you'll always start with a developer friendly Posh-Git enabled console.
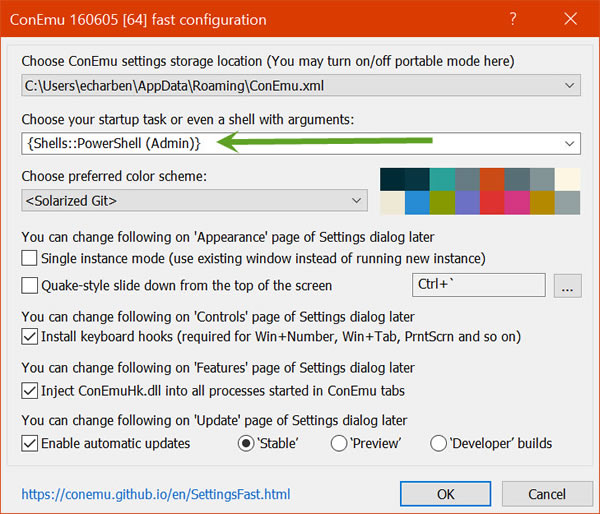
Copy/Paste
Copy/Paste is an indispensable feature for modern development. With the variety of CLI tooling available, there's also a lot of commands to remember. With ConEmu there's no more struggling to copy word-for-word a command from a tutorial, guide, or help resource. Simply press ctrl+v as you would in any app and the command is pasted right in. Sure, this is finally a feature on the default Windows 10 command line tool, but too little, too late.
Split Screen and Tabs
Having organized tabs for your console is another great feature that you may not think you need until you make use of it. Many JavaScript tools use a "watch" mechanism or kicks off a web host. These tools often take control of your console until the process is terminated. With tabs this isn't a problem, simply kick off your watch task then open a new tab and continue working. Checking back in on your watch task or seeing if the a web host has reported errors is just a tab click away.
You can choose to organize consoles with a split screen as well. Just right click on any tab and choose Restart or Duplicate > Split to right. Now you can place processes side by side, or maintain a working console while monitoring a process.
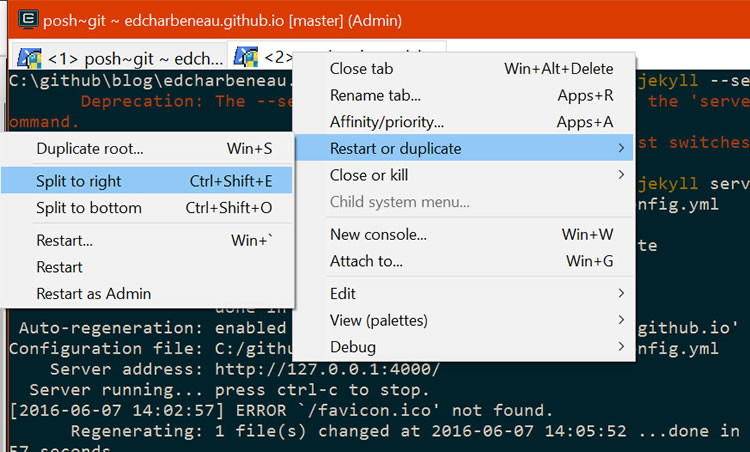
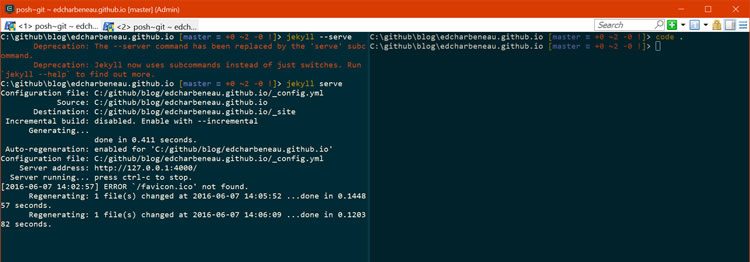
Presenter mode
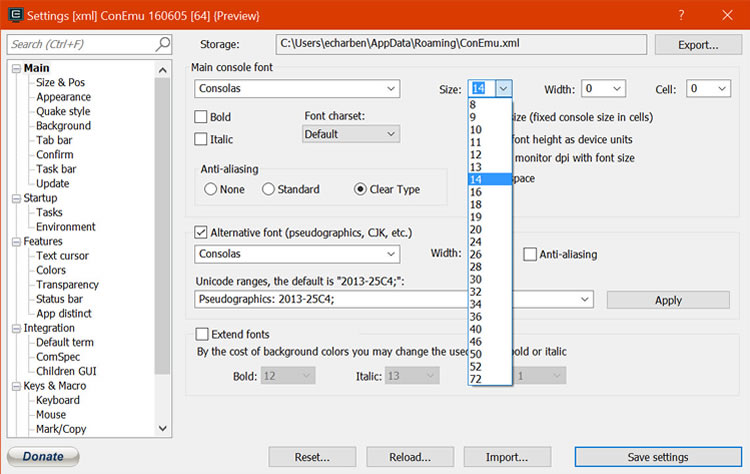
Don't forget to look into the settings for full control over fonts. If you've ever had to present at a stand-up, user group, or simply demo code, you'll understand how important it is to change the font size for your audience.
Create a custom console
ConEmu supplies some useful prompts or "tasks" out-of-the-box. You can easily add your own through the settings panel. For example, we can easily add the Developer Command Prompt for VS2015, so that it's accessible from ConEmu.
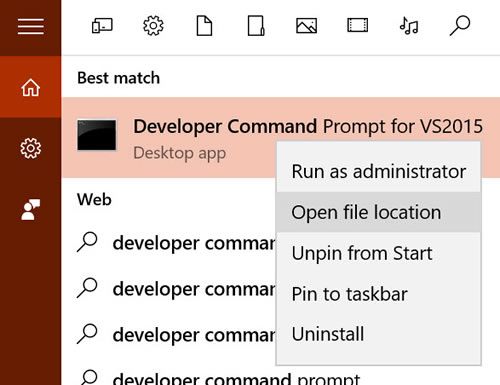
First, you'll need to look at the properties of the Developer Command Prompt for VS2015. This was created for you when VS2015 was installed. Simply search for "Developer Command", then right click and choose "open file location".
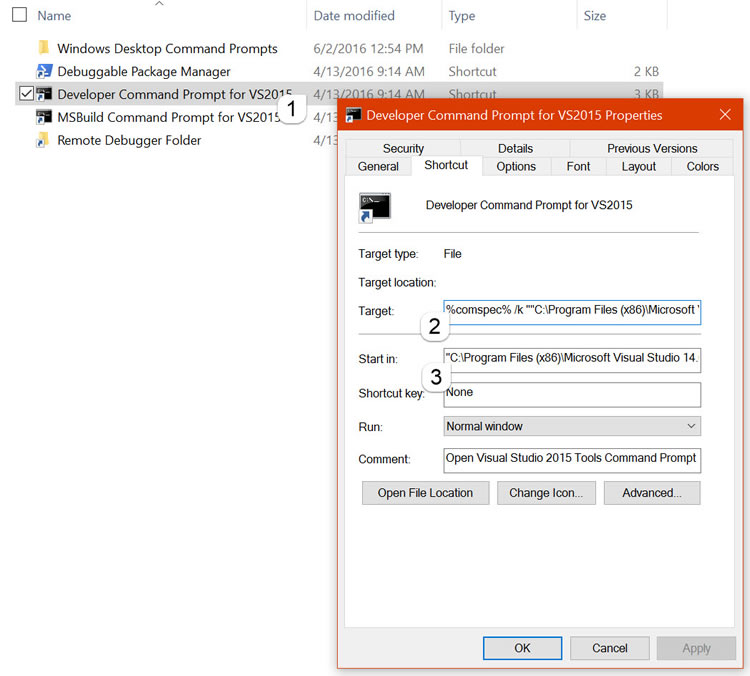
Next, open the properties for the shortcut and leave it open. You'll need the Target and Start in fields for the settings in ConEmu.
In ComEmu click Settings and then navigate to Startup > Tasks. Next:
- Click [+]
- Name the task SDK::VS 14.0 DevCmd
- Copy the Target to the commands text box
- Click Startup Dir, and copy the Start in value.
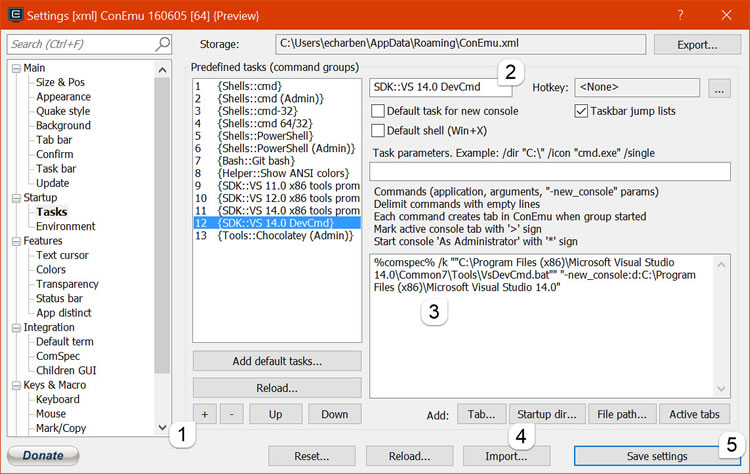
Save your settings and you now have easy access to the Developer Command Prompt for VS2015. In ConEmu, click to open a new tab and navigate to SDK > VS 14.0 DevCmd.
Visual Studio Code
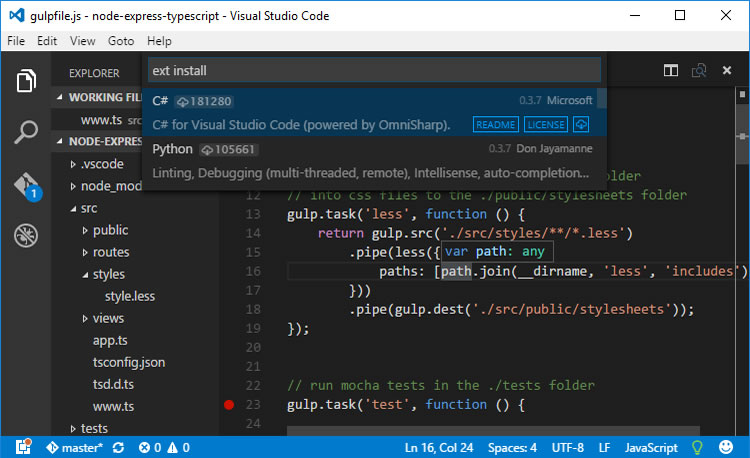
Visual Studio is a great IDE - it handles everything for software development from file-new-project to deployment. However, there are times where you just need a quick editor to work on that one off Markdown or JavaScript file. Or perhaps you would like to work on a project that doesn't need a slick IDE and is designed with CLI tooling in mind. For those situations, the Visual Studio Code editor is a fantastic option. To install VS Code, we'll simply rely on Chocolatey again, just execute the command below and you're ready to go.
choco install visualstudiocodeWith VS Code installed, we now have a complete tool set for CLI craftsmanship. Next we'll focus on some simple tips and tricks that will help with efficiency.
Tips/Tricks
These next few tips are designed to help you navigate from CLI, to file Explorer, to VS Code and back. You can think of this as having a fancy, well organized tool belt where every tool is always within reach.
From CLI to Code
Anytime you're in the console and need to fire up Visual Studio Code, simply type code .. The . parameter will initialize VS code at the current path. You can also start VS Code for just a file using code <filename>. If VS Code is already running, reuse the instance by adding the -r parameter, for example code . -r
From CLI to File Explorer
If you would like to view your current path in file explorer, the same trick applies. In the console just enter explorer . to jump into the GUI.
From File Explorer to CLI
There are many times where the GUI File Explorer is just easier to navigate. While browsing you can jump straight to the CLI on the current folder by enabling the integration feature on ConEmu.
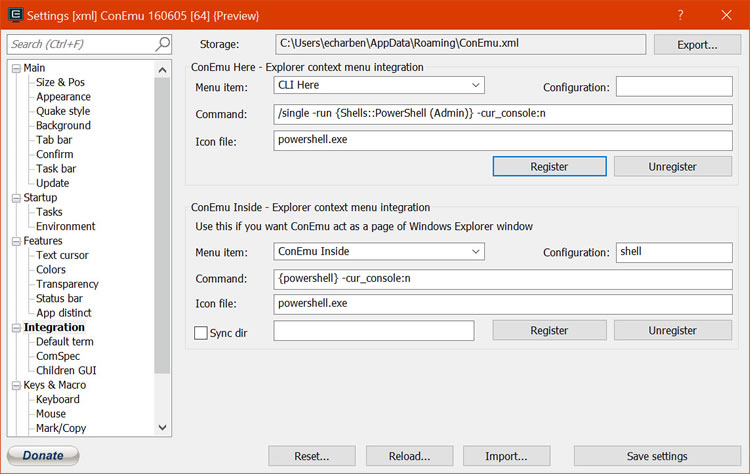
Open the ConEmu settings Win + alt + p and navigate to Integration and add the following settings under ConEmu - Explorer context menu integration:
- Menu Item: CLI Here
- Command: /single -run {Shells::PowerShell (Admin)} -cur_console:n
- Icon file: powershell.exe
Make sure you click Register, and Save settings to complete the setup.
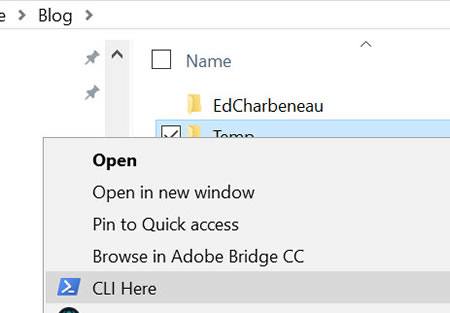
Now you can enter the CLI from a right click on any folder, no more typing long file paths.
From Code to CLI
Visual Studio Code already has a menu shortcut for the CLI, however it only launches the default Windows console. Let's get VS Code to use ConEmu instead, this will let us jump straight into our Powershell prompt.
Open the ConEmu settings Win + alt + p and navigate to Integration and navigate to Default term. Look for the setting, List of hooked executables or windows... and append |code.exe to the setting. Also, enable the setting Use existing ConEmu window if available to make the experience seamless.
Be sure to click Apply and Save settings to complete the setup.
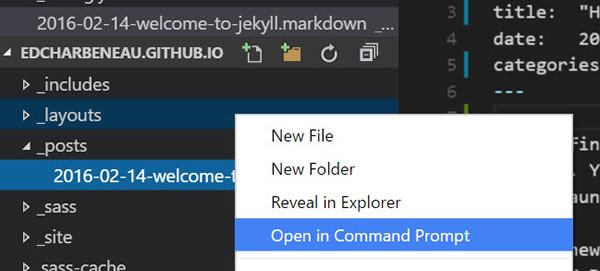
Now clicking "Open in Command Prompt" in VS Code will use ConEmu instead. Note that a restart of VS Code may be required.
Internal VS Code prompt
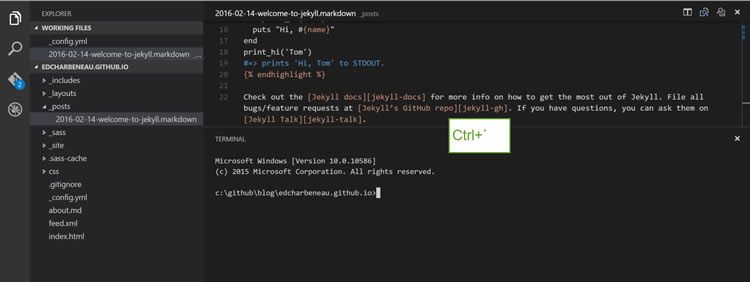
In the May release of Visual Studio Code, an internal command prompt was added. If you would like to access the terminal directly from within the editor simply press Ctrl + `. Now that's easy access!
More Tools
Where you go next with your CLI skills is up to you. There are many great CLI based tools available for all sorts of development endeavors. Below are just a few places to get started:
- The Command Line: Reinvented for Modern Developers (whitepaper)
- Build ReactJS apps by Taming your React setup
- Build Native iOS and Android apps using NativeScript
- Get Started with Telerik AppBuilder
- Get bleeding edge with JavaScript and Choose ES6 modules Today!
- Learn about the .NET Core CLI

Ed Charbeneau
Ed
