Quick Start with Telerik UI for ASP.NET MVC
This article explains how to use the Telerik UI for ASP.NET MVC components in an ASP.NET MVC application. You will set up your Telerik development environment, create a new application from scratch, and finally, add a UI component to a View.
 New to Telerik UI for ASP.NET MVC?Start Free Trial
Prerequisites
To successfully complete the steps in this tutorial, install the .NET Framework and Visual Studio 2019, 2022, or later.
Set Up Telerik Development Environment
The fastest way to set up your Telerik development environment is to use the Telerik CLI .NET tool. Run the following commands in your preferred command shell (Visual Studio Terminal, cmd, PowerShell, Bash, macOS Terminal, or other).
If you have already set up your Telerik development environment and it doesn't need updating, skip to Create New ASP.NET MVC App.
-
Install Telerik CLI
SHdotnet tool install -g Telerik.CLI --source https://api.nuget.org/v3/index.json -
Run the Telerik CLI
setupcommand:SHtelerik setup aspnetmvc
The setup command performs multiple actions to configure your Telerik development environment:
- Create your Telerik account or log in if you already have one.
- Activate a Telerik UI for ASP.NET MVC trial if you don't have an active license.
- Download your Telerik license key.
- Configure the Telerik NuGet package source.
- Install the Telerik UI for ASP.NET MVC MCP server.
Create New ASP.NET MVC App
This section assumes that you have successfully completed the Telerik-specific setup in the previous step.
If you are configuring an existing project, skip this step.
To create a new Telerik ASP.NET MVC app, use your preferred approach:
-
Install the Telerik UI for ASP.NET MVC Visual Studio extension
-
In Visual Studio, create a new Telerik ASP.NET MVC project from the Telerik project templates.
-
Follow Using a Project Template for the complete workflow and screenshots.
When you use the project template approach, the generated application is already configured for Telerik UI and includes Telerik components. Skip the Configure the Application and Add Telerik Component sections.
-
Open Visual Studio and select Create a new project.
-
Search for ASP.NET Web Application (.NET Framework), select the MVC template, and create the project.
-
Add the Telerik UI for ASP.NET MVC NuGet package. Since the Telerik NuGet feed is already configured, open the NuGet Package Manager and install
Telerik.UI.for.AspNet.Mvc5.
Configure the Application
After creating the project and adding the NuGet package, configure the application to use Telerik UI for ASP.NET MVC:
-
Import the
Kendo.Mvc.UInamespace. Add the following to the~/Views/web.configfile inside the<namespaces>node:xml<add namespace="Kendo.Mvc.UI" /> -
Include the client-side resources in
~/Views/Shared/_Layout.cshtml:HTML<head> ... <link rel="stylesheet" href="https://kendo.cdn.telerik.com/themes/14.6.1/default/default-main.css" /> <script src="https://code.jquery.com/jquery-3.7.1.min.js"></script> <script src="https://kendo.cdn.telerik.com/2026.3.1015/js/kendo.all.min.js"></script> <script src="https://kendo.cdn.telerik.com/2026.3.1015/js/kendo.aspnetmvc.min.js"></script> </head>
- The
kendo.all.min.jsandkendo.aspnetmvc.min.jsscripts must be loaded after thejquery.min.jsscript. jQuerymust be loaded only once. Ensure there are no duplicate references elsewhere in the_Layout.
Add Telerik Component
Add a new Telerik component. For example, add a Telerik UI for ASP.NET MVC DatePicker to ~/Views/Home/Index.cshtml:
<div class="text-center">
    <h2>Kendo UI DatePicker</h2>
    @(Html.Kendo().DatePicker()
        .Name("my-picker")
    )
</div>
Press F5 in Visual Studio to build and run the application.
Upon successful run in a web browser, the new Telerik ASP.NET MVC app looks like this:
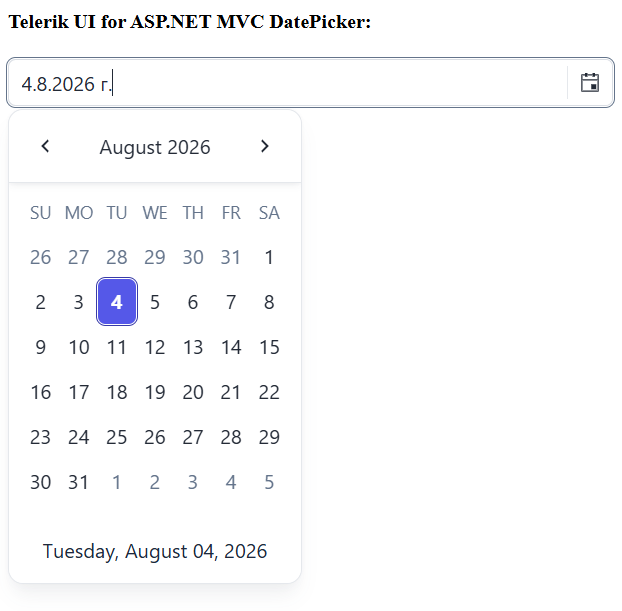
Well done! Now you have your first Telerik UI for ASP.NET MVC component running in your ASP.NET MVC application.
Next Steps