Getting Started with the ContextMenu
This tutorial explains how to set up a basic Telerik UI for ASP.NET Core Context Menu and highlights the major steps in the configuration of the component.
You will initialize a ContextMenu control with two items and a submenu. Finally, you can run the sample code in Telerik REPL and continue exploring the components.
Prerequisites
To successfully complete the tutorial, you need a project that is already configured to use the Telerik UI for ASP.NET Core components:
-
You can use the Telerik REPL playground and skip installing the components on your system and configuring a project.
-
You can prepare a Visual Studio project by following the following guide:
- Creating a new pre-configured project for the Telerik UI for ASP.NET Core components from a project template.
1. Prepare the CSHTML File
The first step is to add the required directives at the top of the .cshtml document:
-
To use the Telerik UI for ASP.NET Core HtmlHelpers:
cshtml@using Kendo.Mvc.UI -
To use the Telerik UI for ASP.NET Core TagHelpers:
cshtml@addTagHelper *, Kendo.Mvc
Optionally, you can structure the document by adding the desired HTML elements like headings, divs, paragraphs, and apply some basic styles.
In this step, you will also configure a ListView component that will serve as a target for the ContextMenu. Right-clicking a ListView item will open the ContextMenu. For more information about configuring the ListView control, refer to the Getting Started with the ListView article.
    @using Kendo.Mvc.UI

    <script type="text/x-kendo-template" id="template">
        <div class="product">
            <img src="@Url.Content("~/shared/images/employees/")#: FromID #.png" alt="#: From #" />

            <h3>#:Title#</h3>
            <p class="date">#:Date#</p>
            <p>#:From#</p>
        </div>
    </script>

    <div class="demo-section wide">
        <h4>WebMail</h4>
        @(Html.Kendo().ListView<Kendo.Mvc.Examples.Models.WebMail>()
        .Name("listview-context-menu")
        .TagName("div")
        .ClientTemplateId("template")
        .DataSource(dataSource => dataSource
            .Ajax()
            .Read(read => read.Action("WebMailData", "Menu"))
            .PageSize(5)
        ))

        <!-- configure Context Menu here -->
    </div>


    <style>
        #listview-context-menu {
            padding: 0;
            margin-bottom: -1px;
            min-height: 300px;
        }

        .product {
            position: relative;
            height: 62px;
            margin: 0;
            padding: 0;
            border-bottom: 1px solid rgba(128,128,128,.3);
        }

        .product img {
            width: 40px;
            height: 40px;
            border-radius: 40px;
            margin: 10px;
            border: 1px solid #000;
            float: left;
        }

        .product h3 {
            margin: 0;
            padding: 15px 5px 1px 0;
            overflow: hidden;
            line-height: 1em;
            font-size: 1.1em;
            font-weight: bold;
        }

        .product p {
            font-size: .9em;
        }

        .product .date {
            float: right;
            margin: -8px 15px 0 0;
        }

        .k-listview:after {
            content: ".";
            display: block;
            height: 0;
            clear: both;
            visibility: hidden;
        }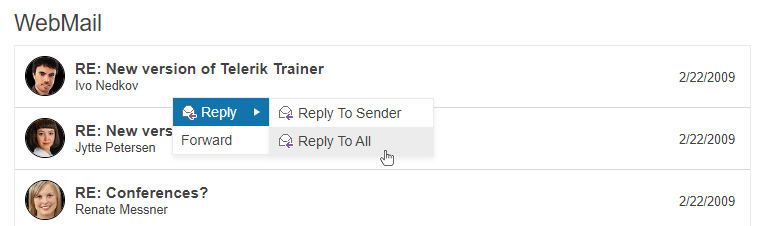
</style>2. Initialize the ContextMenu
Use the ContextMenu HtmlHelper or TagHelper to add the component to a page:
-
Assign a name to the component by using the
Name()configuration method—this is mandatory as the assigned value is used for theidand thenameattributes of the ContextMenu element. -
Use the
TargetandFilterconfiguration properties to determine over which elements on the page a right mouse opens the ContextMenu. -
The
Itemsconfiguration method lets you add the desired Context Menu items. In this tutorial, you will define two root items and two submenu items for the first root item. -
Add images for the context menu items through the
ImageUrlproperty.
    @using Kendo.Mvc.UI

    <script type="text/x-kendo-template" id="template">
        <div class="product">
            <img src="@Url.Content("~/shared/images/employees/")#: FromID #.png" alt="#: From #" />

            <h3>#:Title#</h3>
            <p class="date">#:Date#</p>
            <p>#:From#</p>
        </div>
    </script>

    <div class="demo-section wide">
        <h4>WebMail</h4>
        @(Html.Kendo().ListView<Kendo.Mvc.Examples.Models.WebMail>()
        .Name("listview-context-menu")
        .TagName("div")
        .ClientTemplateId("template")
        .DataSource(dataSource => dataSource
            .Ajax()
            .Read(read => read.Action("WebMailData", "Menu"))
            .PageSize(5)
        ))

        @(Html.Kendo().ContextMenu()
            .Name("menu")
            .Target("#listview-context-menu")
            .Filter(".product")
            .Items(items =>
            {
                items.Add()
                    .Text("Reply")
                    .ImageUrl(Url.Content("~/shared/web/toolbar/reply.png"))
                    .Items(children =>
                    {
                        children.Add().Text("Reply To Sender").ImageUrl(Url.Content("~/shared/web/toolbar/reply.png"));
                        children.Add().Text("Reply To All").ImageUrl(Url.Content("~/shared/web/toolbar/reply.png"));
                    });

                items.Add()
                    .Text("Forward");
            })
        )
    </div>

    <style>
        #listview-context-menu {
            padding: 0;
            margin-bottom: -1px;
            min-height: 300px;
        }

        .product {
            position: relative;
            height: 62px;
            margin: 0;
            padding: 0;
            border-bottom: 1px solid rgba(128,128,128,.3);
        }

        .product img {
            width: 40px;
            height: 40px;
            border-radius: 40px;
            margin: 10px;
            border: 1px solid #000;
            float: left;
        }

        .product h3 {
            margin: 0;
            padding: 15px 5px 1px 0;
            overflow: hidden;
            line-height: 1em;
            font-size: 1.1em;
            font-weight: bold;
        }

        .product p {
            font-size: .9em;
        }

        .product .date {
            float: right;
            margin: -8px 15px 0 0;
        }

        .k-listview:after {
            content: ".";
            display: block;
            height: 0;
            clear: both;
            visibility: hidden;
        }
</style>3. (Optional) Reference Existing ContextMenu Instances
You can reference the ContextMenu instances that you have created and build on top of their existing configuration:
-
Use the
idattribute of the component instance to establish a reference.JS<script> var contextMenuReference = $("#menu").data("kendoContextMenu"); //contextMenuReference is a reference to the existing instance of the helper. </script> -
Use the ContextMenu client-side API to control the behavior of the widget. In this example, you will use the
enablemethod to disable one of the Context Menu items.JS<script> $(document).ready(function () { var contextMenuReference = $("#menu").data("kendoContextMenu"); //contextMenuReference is a reference to the existing instance of the helper. contextMenuReference.enable("#Roadmap", false); // Disable the desired item in the referenced Context Menu instance. }) </script>
Explore this Tutorial in REPL
You can continue experimenting with the code sample above by running it in the Telerik REPL server playground:
Next Steps
- Binding the ContextMenu to Data
- Subscribing to the ContextMenu Events
- Customizing the Appearance of the ContextMenu