The Telerik UI for Xamarin ListView control provides the core functionality you'd expect from a ListView, including the ability to bind to a data source and display templated collections of items in a nicely formatted list. It can also do much more. Want to implement "pull to refresh" in your app, or use a grid layout similar to that of a XAML GridView? The Telerik ListView supports both. What about item reordering? Check. Wouldn't it be cool if you could just swipe to the right to add or remove a tagged image? Got it. Telerik's ListView even has a "load on demand" option that speeds the initial loading of the page by rendering items that are visible before fetching the remaining items from the data source.

Adding a ListView control to a page is as simple as adding a reference to the appropriate Telerik namespaces, dropping in a ListView, setting a few properties, and wiring it up to the view-model:
<telerikDataControls:RadListView x:Name="listView" ItemsSource="{Binding Source}">
<telerikDataControls:RadListView.BindingContext>
<local:ViewModel/>
</telerikDataControls:RadListView.BindingContext>
<telerikDataControls:RadListView.ItemTemplate>
<DataTemplate>
<telerikListView:ListViewTemplateCell>
<telerikListView:ListViewTemplateCell.View>
<Grid>
<Label Margin="10" Text="{Binding Name}"/>
</Grid>
</telerikListView:ListViewTemplateCell.View>
</telerikListView:ListViewTemplateCell>
</DataTemplate>
</telerikDataControls:RadListView.ItemTemplate>
</telerikDataControls:RadListView>
Our first application for the ListView control will be adding an image picker to Tagit. The purpose of the image picker is to show the images stored on the device and allow the user to pick which ones to upload and tag. ListView is perfect for this scenario since its ListViewGridLayout mode allows images to be aligned in rows and columns rather than in a vertical list.
After adding a picker page to Tagit and wiring up a ListView, we are rewarded with a thumbnail view of the images on the device:
.png?sfvrsn=4a014972_5)
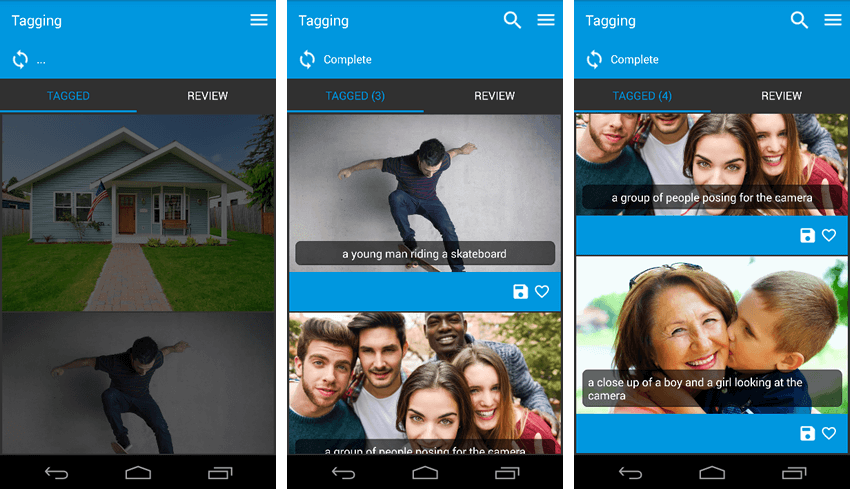
Once images are selected, Tagit submits each image to Microsoft Cognitive Services Computer Vision API, which returns a JSON payload containing one or more captions generated for the image as well as a list of tags identifying attributes of the image. Tagit lets you know when each call is complete. Tagged images and the computer-generated captions created for them are displayed in another ListView control, this time using the conventional linear layout mode. Here's how it looks on Android:

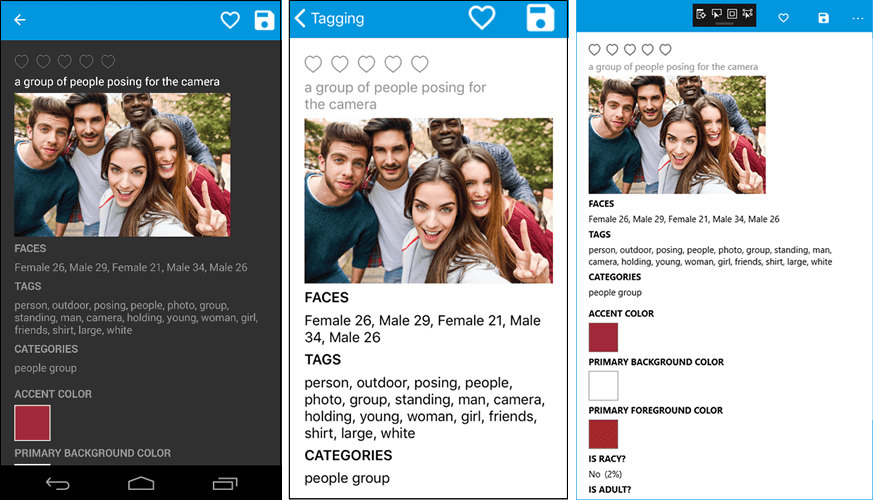
Of course, ListView does an equally great job rendering on other platforms as well. Here's how it looks on Windows, where it conforms to UI guidelines for the Universal Windows Platform and is equally at home on a PC, tablet, phone, Xbox, or even a HoloLens:
.png?sfvrsn=806d49ac_5)
So what exactly did the Computer Vision API do for us? Look at some of the information it returned, which includes information about the faces in the image complete with genders and ages, as well as objects in the image, colors, and even keywords for grouping images by category.

In addition to analyzing images this way, the Computer Vision API can also read text in images, recognize famous people and landmarks, and analyze video. For more information about the Computer Vision API, its methods, and its capabilities, see https://azure.microsoft.com/en-us/services/cognitive-services/computer-vision.
With the image tagging feature rockin’ and rollin’, we need to add one more small but very important element to the user experience. Since images might take a while to upload, it is considered best practice to employ a wait or progress indicator. The brains at Progress know that this is critical and have supplied the customizable Busy Indicator control for precisely this purpose.
The Busy Indicator control supports eight different visuals right out of the box and can be customized with visuals of your own. In our semi-humble opinion, the Telerik UI for Xamarin Busy Indicator is the coolest on any platform.

For Tagit, we selected the mysterious "Animation 5" with the wobbling up-and-down circles and themed it to match the app's secondary "alien green" accent color:
.png?sfvrsn=1189b8f2_5)
You can see how Telerik UI for Xamarin makes short work of building rich UIs. And now that Tagit supports image tagging, it's an easy next-step to make images searchable as well. In Part 4, we will add a rich image-search experience and provide users with the ability to rate images and select favorites.
Featuring the ListView and BusyIndicator controls and the Computer Vision API.