Speech-to-Text Button
The RadSpeechToTextButton control allows you to capture spoken input and convert it to text.
The component has a built-in speech recognizer based on Web Speech API utilized via WebView2. The button automatically detects microphone input when it is in listening state and converts the audio to text. The default recognizer allows you to also set the language for speech recognition, ensuring accurate transcription of spoken words.

Basic Usage
To start using the RadSpeechToTextButton control, just define it in the view. To get the processed text, use the SpeechRecognized event.
The default speech recognizer of the button requires you to install the Microsoft.Web.WebView2 NuGet package (minimum version: 1.0.3650.58). Also, when the button gets loaded, the WebView2 will prompt you to allow listening to microphone input.
Setting up a RadSpeechToTextButton
<telerik:RadSpeechToTextButton SpeechRecognized="RadSpeechToTextButton_SpeechRecognized"/>Using the SpeechRecognized event
private void RadSpeechToTextButton_SpeechRecognized(object sender, Telerik.SpeechRecognizer.SpeechRecognizerSpeechRecognizedEventArgs e)
{
    string fullText = e.FullText;
}
Processing Recognized Text
Each time when the speech recognizer manages to process audio input, it raises the SpeechRecognized event which contains information about the converted text.
The SpeechRecognizerSpeechRecognizedEventArgs provides the recognized text and a confidence score. The score is a value between 0 and 1, indicating how confident the speech-to-text transcription is. A value of -1 indicates no score could be provided.
Defining a SpeechRecognized event handler
private void RadSpeechToTextButton_SpeechRecognized(object sender, Telerik.SpeechRecognizer.SpeechRecognizerSpeechRecognizedEventArgs e)
{
    string fullText = e.FullText;
    double confidenceScore = e.FullTextConfidenceScore;
}
The default speech recognizer uses the Web Speech API via the WebView2 engine, which does not provide usable confidence score.
Continuous vs. One-Time Recognition
By default when the RadSpeechToTextButton is pressed this will start a continuous listening action which will process speech until the button is pressed again to stop listening. This behavior can be changed by setting the IsContinuousRecognition property to false. In this case, the recognizer will stop automatically after a single utterance or pause.
Disabling continuous speech recognition
<telerik:RadSpeechToTextButton IsContinuousRecognition="False" />Recognizer States
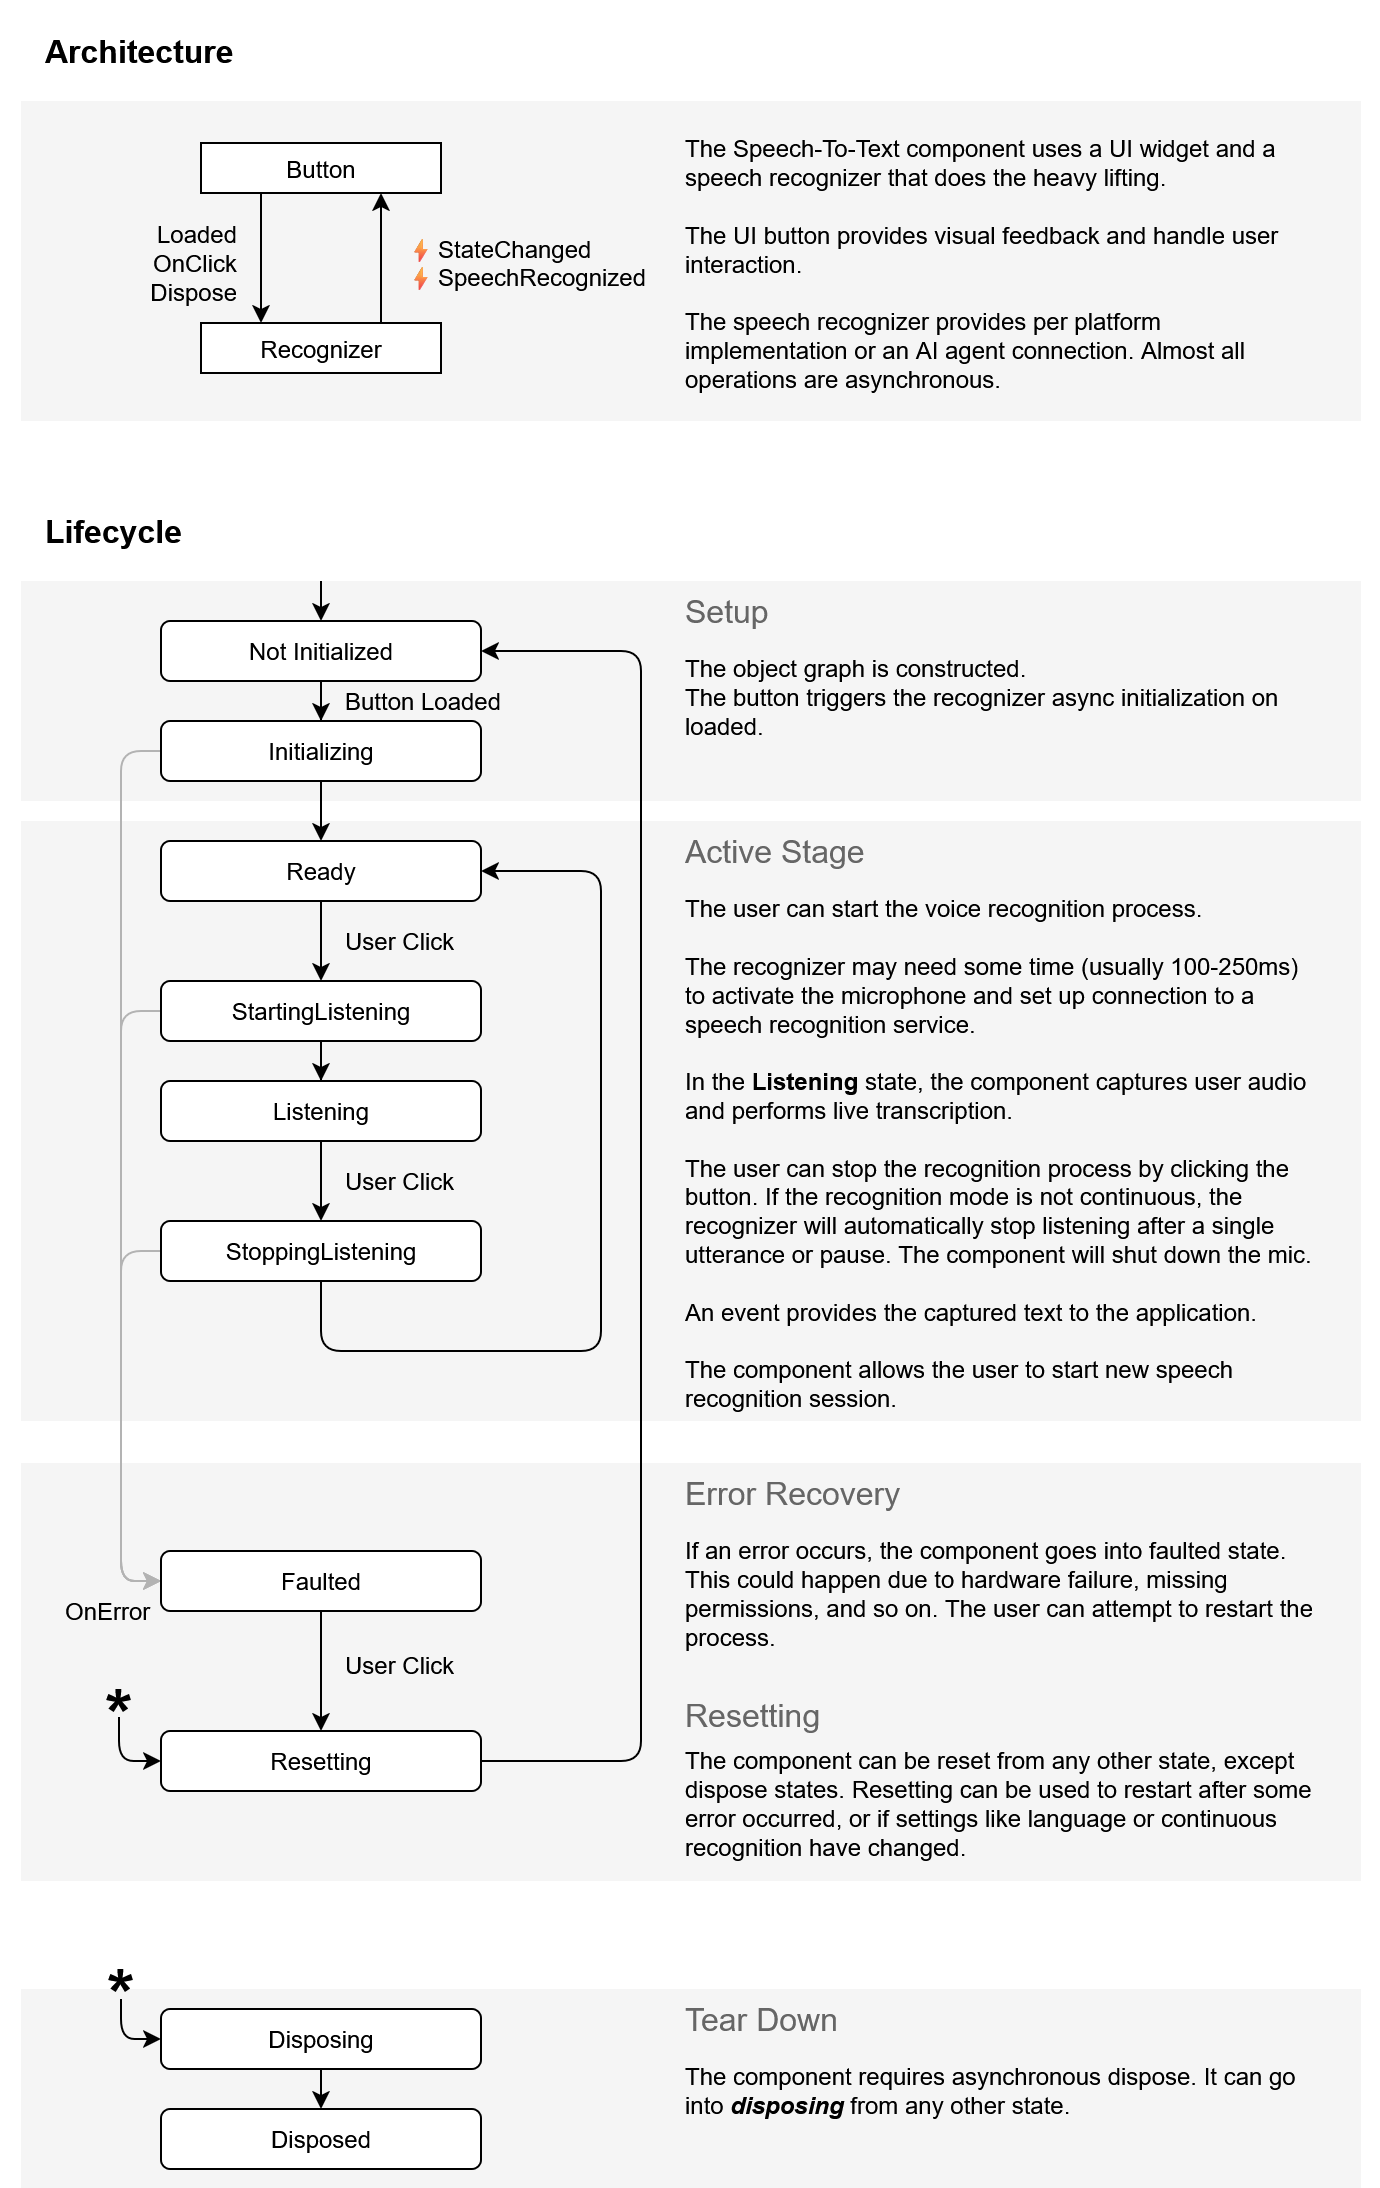
The speech recognizer can be in few different states - read, listening, stop listening, etc. The current state can be acquired using the State property of RadSpeechToTextButton.
The recognizer can be in the following states:
NotInitializedInitializingReadyStartingListeningListeningStoppingListeningFaultedResettingDisposingDisposed
Getting the current status of the recognizer
SpeechRecognizerState state = this.speechToTextButton.State;The states lifecycle is shown in the Architecture and States section of this article.
Handling Speech Recognition Errors
To handle errors related to the speech recognition service, use the ErrorOccurred event. The SpeechRecognizerErrorOccurredEventArgs provide information about the error message via the Message and Exception properties.
Defining a ErrorOccurred event handler
private void Btn_ErrorOccurred(object? sender, Telerik.SpeechRecognizer.SpeechRecognizerErrorOccurredEventArgs e)
{
	string errorMessage = e.Message;
	Exception exception = e.Exception;
}
Language Support
The service used by the default WebView2 speech recognizer supports multiple languages. The default language comes from the current culture of the system, but this can be changed via the LanguageTag property. The property works with the IETF language tags (e.g., "en-US", "de-DE", "fr-FR", etc.).
Setting the language of the default speech recognizer to German
<telerik:RadSpeechToTextButton LanguageTag="de-DE"/>Customizing the ToolTip
RadSpeechToTextButton displays a tooltip (callout) on mouse over, which shows the current state of the button. By default the tooltip is displayed for the Ready and Listening states.
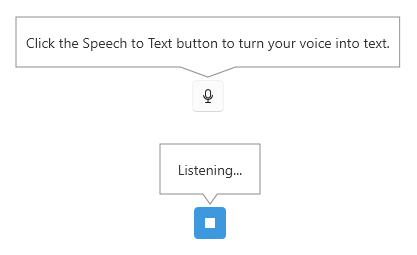
The tooltip content and behavior can be customized using the CalloutOpening event.
Replacing the tooltip content of the button when in Ready and Listening states
private void RadSpeechToTextButton_CalloutOpening(object? sender, SpeechToTextTooltipOpeningEventArgs e)
{
    var button = (RadSpeechToTextButton)sender;
    if (button.State == SpeechRecognizerState.Ready)
    {
        e.Callout.Content = "Click when you're ready to speak";
    }
    else if (button.State == SpeechRecognizerState.Listening)
    {
        e.Callout.Content = "I’m listening";
    }
}
The event is invoked only for the states added in the ToolTipStates collection of RadSpeechToTextButton. By default the collection contains only the Ready and Listening states. If the recognizer is in another state the tooltip won't be displayed.
To show the tooltip for other states as well, add these in the ToolTipStates collection, and then use the CalloutOpening event handler to add content for the extra states.
Adding extra states and adjust their content
public MainWindow()
{
    InitializeComponent();

	this.speechToTextButton.ToolTipStates.Add(SpeechRecognizerState.StartingListening);
	this.speechToTextButton.ToolTipStates.Add(SpeechRecognizerState.Faulted);
}

private void RadSpeechToTextButton_CalloutOpening(object? sender, SpeechToTextTooltipOpeningEventArgs e)
{
    var button = (RadSpeechToTextButton)sender;
    if (button.State == SpeechRecognizerState.StartingListening)
    {
        e.Callout.Content = "Starting listening...";
    }
    else if (button.State == SpeechRecognizerState.Faulted)
    {
        e.Callout.Content = "Error";
    }
}
In the example above, only the content for the StartingListening and Faulted states is set in the event handler, because the internal logic of the control manages the only content for the Ready and Listening states by default.
To prevent the tooltip from opening, set the e.Cancel property of the event arguments to true.
Using the CalloutOpening event to cancel the tooltip opening
private void RadSpeechToTextButton_CalloutOpening(object? sender, SpeechToTextTooltipOpeningEventArgs e)
{
    e.Cancel = true;
}
The tooltip visual is implemented with the RadCallout control. The SpeechToTextTooltipOpeningEventArgs provide settings for customizing the callout via the CalloutPopupSettings property of the event args.
Using the CalloutOpening event to change the show/close animation
private void RadSpeechToTextButton_CalloutOpening(object? sender, SpeechToTextTooltipOpeningEventArgs e)
{
    CalloutPopupSettings settings = e.CalloutPopupSettings;
    settings.CloseAnimationType = CalloutAnimation.FadeAndScale;
    settings.ShowAnimationType = CalloutAnimation.FadeAndScale;
}
Customizing the Button Content
The content of the button can be changed via the the ContentTemplateSelector property. This can be used to replace the default icons displayed for Ready, Listening and Faulted states and to include extra content for other states like StartingListening, StoppingListening.
Defining custom content template selector
 public class CustomContentTemplateSelector : DataTemplateSelector
 {
     public DataTemplate ReadyTemplate { get; set; }
     public DataTemplate StartingListeningTemplate { get; set; }
     public DataTemplate ListeningTemplate { get; set; }

     public override DataTemplate SelectTemplate(object item, DependencyObject container)
     {
         var state = (SpeechRecognizerState)item;
         if (state == SpeechRecognizerState.Ready)
         {
             return ReadyTemplate;
         }
         else if (state == SpeechRecognizerState.StartingListening)
         {
             return StartingListeningTemplate;
         }
         else if (state == SpeechRecognizerState.Listening)
         {
             return ListeningTemplate;
         }
         return ReadyTemplate;
     }
 }
Defining custom content
<telerik:RadSpeechToTextButton>
<telerik:RadSpeechToTextButton.ContentTemplateSelector>
<local:CustomContentTemplateSelector>
<local:CustomContentTemplateSelector.ReadyTemplate>
<DataTemplate>
<telerik:RadGlyph Glyph="" Foreground="Green" />
</DataTemplate>
</local:CustomContentTemplateSelector.ReadyTemplate>
<local:CustomContentTemplateSelector.ListeningTemplate>
<DataTemplate>
<telerik:RadGlyph Glyph="" Foreground="#ffffff" />
</DataTemplate>
</local:CustomContentTemplateSelector.ListeningTemplate>
<local:CustomContentTemplateSelector.StartingListeningTemplate>
<DataTemplate>
<telerik:RadGlyph Glyph=""/>
</DataTemplate>
</local:CustomContentTemplateSelector.StartingListeningTemplate>
</local:CustomContentTemplateSelector>
</telerik:RadSpeechToTextButton.ContentTemplateSelector>
</telerik:RadSpeechToTextButton>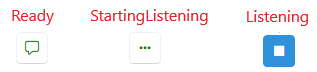
Implementing Custom Speech Recognizer
The RadSpeechToTextButton allows you to implement custom speech recognizer in order to integrate a speech-to-text service or a library of your choice.
A custom recognizer is created by implementing the IRadSpeechRecognizer interface. The custom implementation can be enabled with the SpeechRecognizerCreator property of the control.
Implementing custom speech recognizer
public class CustomSpeechRecognizer : IRadSpeechRecognizer
{
	private const string MockText = "This is a mocked speech recognizer response for testing purposes and it will not really do a voice transcription in your system.";

	private SpeechRecognizerState state;
	private int reportingSessionId;

	public SpeechRecognizerState State
	{
		get => this.state;
		private set
		{
			if (this.state != value)
			{
				this.state = value;
				this.StateChanged?.Invoke(this, EventArgs.Empty);
			}
		}
	}

	public event EventHandler StateChanged;
	public event EventHandler<SpeechRecognizerErrorOccurredEventArgs> ErrorOccurred;
	public event EventHandler<SpeechRecognizerSpeechRecognizedEventArgs> SpeechRecognized;

	public Task Init(SpeechRecognizerInitializationContext context)
	{
		this.State = SpeechRecognizerState.Ready;
		this.reportingSessionId++;
		return Task.CompletedTask;
	}

	public Task StartListening()
	{
		this.State = SpeechRecognizerState.StartingListening;
		this.reportingSessionId++;
		int localSessionId = this.reportingSessionId;

		Task.Run(() =>
		{
			this.State = SpeechRecognizerState.Listening;
			int i = 0;
			string[] words = MockText.Split(' ', StringSplitOptions.RemoveEmptyEntries);
			string fullText = string.Empty;

			while (true)
			{
				string word = words[i % words.Length];
				fullText += $" {word}";
				i++;

				Thread.Sleep(333);

				if (localSessionId != this.reportingSessionId)
				{
					break;
				}

				this.SpeechRecognized?.Invoke(this, new SpeechRecognizerSpeechRecognizedEventArgs(fullText));
			}
		});

		return Task.CompletedTask;
	}

	public async Task StopListening()
	{
		this.State = SpeechRecognizerState.Ready;
		this.reportingSessionId++;
		await Task.Yield();
	}

	public Task Reset()
	{
		this.State = SpeechRecognizerState.NotInitialized;
		this.reportingSessionId++;
		return Task.CompletedTask;
	}

	public ValueTask DisposeAsync()
	{
		this.State = SpeechRecognizerState.Disposed;
		this.reportingSessionId++;
		return new ValueTask(Task.CompletedTask);
	}
}
Defining example view with RadSpeechToTextButton
 <StackPanel Orientation="Horizontal">
     <telerik:RadWatermarkTextBox x:Name="tbInput" Width="200" TextWrapping="Wrap" AcceptsReturn="True"/>
     <telerik:RadSpeechToTextButton x:Name="speechToTextButton" SpeechRecognized="RadSpeechToTextButton_SpeechRecognized" Focusable="False"/>
 </StackPanel>
Assigning the custom speech recognizer and handling the result
public MainWindow()
{
    InitializeComponent();

    this.speechToTextButton.SpeechRecognizerCreator = () =>
    {
        return new CustomSpeechRecognizer();
    };
}

private void RadSpeechToTextButton_SpeechRecognized(object sender, Telerik.SpeechRecognizer.SpeechRecognizerSpeechRecognizedEventArgs e)
{
    string fullText = e.FullText;
    this.tbInput.Text = fullText;
    this.tbInput.CaretIndex = this.tbInput.Text.Length;
}
Architecture and States
The image below explains how the control works and how the states are managed: