Getting Started with Telerik WPF MCP Server
The Telerik WPF MCP (Model Context Protocol) Server enhances your AI-powered development experience by providing specialized context about Telerik UI for WPF components.
This MCP server enables AI-powered IDEs and tools to generate more accurate, tailored code that leverages Telerik UI for WPF components and APIs. You can ask complex questions about Telerik components, request specific implementations, and generate comprehensive code solutions.
How to Install the Telerik WPF MCP Server
The MCP Server is available as a NuGet package. Beginning with .NET 10 it can be executed directly via the dnx command. For .NET 8 and .NET 9 (where dnx is not available) you can install it as a local dotnet tool and invoke its executable.
Install with Telerik CLI (Recommended)
The easiest way to install and configure the Telerik WPF MCP Server is through the Telerik CLI. A single command line sets up the MCP server for your IDE automatically:
telerik mcp config wpfThis command automatically creates or updates the .mcp.json configuration file for all supported IDEs. You can also specify a target IDE with the --ide option (for example, telerik mcp config wpf --ide vscode). For more details, see Telerik CLI - Install WPF MCP Server.
Install with .NET CLI Commands
Another approach to install the Telerik WPF MCP Server is to use .NET10 or .NET8/9 commands.
Prerequisites
| Target Runtime | Required SDK | Invocation Method | Notes |
|---|---|---|---|
| .NET 10 (recommended) | .NET 10 SDK (Preview 6 or newer) | dnx dynamic execution | Simplest approach; no prior install step |
| .NET 8 / .NET 9 | .NET 8 or .NET 9 SDK | Local dotnet tool (telerik-wpf-assistant.exe) | dnx not supported; install tool manually |
Common requirements:
- An MCP-compatible client that supports MCP tools (latest version recommended).
- A WPF project targeting
net10.0-windows(recommended),net8.0-windowsornet9.0-windows - A valid Telerik license key.
Summary of Installation Approaches
| Aspect | .NET 10 | .NET 8 / 9 |
|---|---|---|
Availability of dnx | Available | Not available |
| Install Command | None (resolved on demand) | dotnet tool install --tool-path ./.tools Telerik.WPF.MCP |
| Executable Path | Handled by dnx | ./.tools/telerik-wpf-assistant.exe |
| .mcp.json Command | dnx | .\\.tools\\telerik-wpf-assistant.exe |
| .mcp.json Args | Telerik.WPF.MCP, --yes | None |
| Update Version | Handled by latest package resolved by dnx | Re-run tool install with --version or tool update |
| Offline Use | Requires prior NuGet cache warm-up | Requires prior tool install |
.NET 10
No manual install step is needed. The dnx command will download and execute the NuGet package on demand.
.NET 8 / .NET 9
Install the MCP server as a local tool in your solution root (or another chosen path):
dotnet tool install --tool-path ./.tools Telerik.WPF.MCPIf updating:
dotnet tool update --tool-path ./.tools Telerik.WPF.MCPThis creates the executable at ./.tools/telerik-wpf-assistant.exe.
Server Configuration
.NET 10 (recommended) Configuration (.mcp.json)
Use these settings when configuring the server in your MCP client:
| Setting | Value |
|---|---|
| Package Name | Telerik.WPF.MCP |
| Type | stdio |
| Command | dnx |
| Arguments | Telerik.WPF.MCP, --yes |
| Server Name | telerik-wpf-assistant (customizable) |
.NET 8 / .NET 9 Configuration (.mcp.json)
Add a .mcp.json file to your solution root (or to %USERPROFILE% for global usage):
{
  "servers": {
    "telerik-wpf-assistant": {
      "type": "stdio",
      "command": ".\\.tools\\telerik-wpf-assistant.exe",
      "env": {
        "TELERIK_LICENSE_PATH": "THE_PATH_TO_YOUR_LICENSE_FILE"
      }
    }
  }
}
If you prefer embedding the license string directly:
"env": {
  "TELERIK_LICENSE": "YOUR_LICENSE_KEY"
}
Workspace-Specific Setup
Add a .mcp.json file to your solution (root) folder. Choose the variant that matches your target .NET runtime:
.NET 10 Example (using dnx)
{
  "servers": {
    "telerik-wpf-assistant": {
      "type": "stdio",
      "command": "dnx",
      "args": ["Telerik.WPF.MCP", "--yes"],
      "env": {
        "TELERIK_LICENSE_PATH": "THE_PATH_TO_YOUR_LICENSE_FILE"
      }
    }
  }
}
.NET 8 / .NET 9 Example
{
  "servers": {
    "telerik-wpf-assistant": {
      "type": "stdio",
      "command": ".\\.tools\\telerik-wpf-assistant.exe",
      "env": {
        "TELERIK_LICENSE_PATH": "THE_PATH_TO_YOUR_LICENSE_FILE"
      }
    }
  }
}
You may substitute TELERIK_LICENSE instead of TELERIK_LICENSE_PATH (see License Configuration section below for details and recommendations). The inputs array is optional and not required for current functionality.
After saving the file, restart Visual Studio and enable the telerik-wpf-assistant tool in the Copilot Chat window's tool selection dropdown.
Global Setup
To enable the server globally for all projects, add the .mcp.json file to your user directory (%USERPROFILE%, e.g., C:\Users\YourName\.mcp.json). The same distinction applies: use the executable path for .NET 8/9, or dnx for .NET 10.
Telerik Visual Studio Extension Setup:
The .mcp.json file can be created and updated by using the Telerik Visual Studio Extension menu in Visual Studio.
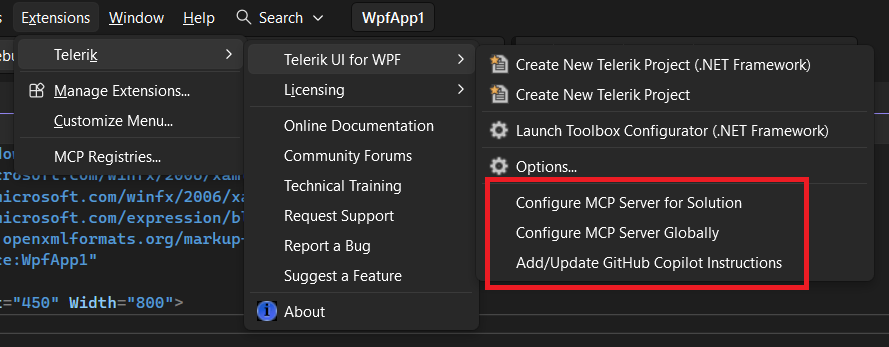
The Configure MCP Server Globally option creates (or updates if existing) the global %USERPROFILE%\.mcp.json file and adds the Telerik server entry.
The Configure MCP Server for Solution option is visible only if you have a project opened in Visual Studio. The option creates (or updates if existing) the .mcp.json file in the solution directory.
The Add/Update GitHub Copilot Instructions option is visible only if you have a project opened in Visual Studio. The option creates (or updates if existing) an copilot-instructions.md file in the .github\ folder of the solution (\SolutionDir\.github\copilot-instructions.md), which includes extra context that is automatically used with the prompt given to the Copilot chat in Visual Studio.
License Configuration
Add your Telerik license key using one of these options in the env section.
Option 1: License File Path (Recommended)
"env": {
  "TELERIK_LICENSE_PATH": "THE_PATH_TO_YOUR_LICENSE_FILE"
}
The THE_PATH_TO_YOUR_LICENSE_FILE should point to the telerik-license.txt file, usually in the AppData folder. Often it will look like:
"TELERIK_LICENSE_PATH": "%appdata%/Telerik/telerik-license.txt"
Option 2: Direct License Key
"env": {
  "TELERIK_LICENSE": "YOUR_LICENSE_KEY_HERE"
}
Option 1 is recommended unless you're sharing settings across different systems. Remember to update your license key when necessary.
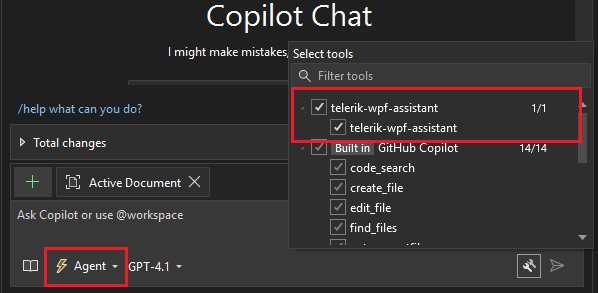
Visual Studio Usage
For complete setup instructions, see Use MCP servers in Visual Studio.
After configuration and restart:
-
Open Copilot Chat.
-
Enable the
telerik-wpf-assistanttool. -
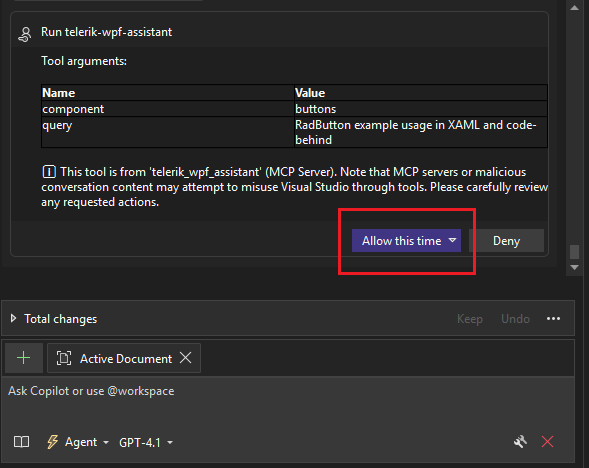
Grant permissions when prompted (per session, workspace, or always).
Start fresh sessions for unrelated prompts to avoid context pollution. You can check the Output pane of Visual Studio for diagnostics (select output from GitHub Copilot).

Troubleshooting
Known Issue: Hanging tool calls in Visual Studio
When using Telerik AI tools in Visual Studio, GitHub Copilot may:
- hang during tool invocation;
- show UI for a successful tool response, but actually fail silently;
- continue generation without waiting for parallel tool calls.
In these cases, the response may be generated but not provided to the Copilot Agent UI. This is a known issue in Visual Studio Copilot, not related to Telerik MCP servers or AI tools, and does not reproduce in VS Code. For more details, see the related Visual Studio Developer Community issue:
https://developercommunity.visualstudio.com/t/Copilot-stopped-working-after-latest-upd/10936456Microsoft has acknowledged the issue and marked it as Fixed - Pending Release. A future Visual Studio update is expected to resolve it.
Usage
Begin prompts with any of these triggers to explicitly invoke the server:
-
/telerik/@telerik/#telerik -
/telerikwpf/@telerikwpf/#telerikwpf -
#telerik-wpf-assistant
Grant permissions when prompted (per session, workspace, or always).
Start fresh sessions for unrelated prompts to avoid context pollution.
You can check the Output pane of Visual Studio for diagnostics information related to Copilot. To display the relevant information, select to show output from GitHub Copilot.
Sample Prompts
Examples you can try:
/telerik Give me an example of binding an ObservableCollection<Customer> to a RadGridView, including sorting and grouping./telerikWPF Create a RadComboBox bound to a list of countries in MVVM, displaying country names but binding the SelectedValue to a CountryCode property./telerik Show XAML and ViewModel code for a RadTreeView bound to a hierarchical ObservableCollection<Category> where each category contains products. Expand all categories by default.
Improving Server Usage
To increase the likelihood of the Telerik MCP server being used, add custom instructions to your AI tool:
Number of Requests
A Telerik Subscription license is required in order to use the Telerik WPF AI Coding Assistant. Trial users can make a limited number of requests per year.
Local AI Model Integration
You can use the Telerik WPF MCP server with local large language models (LLMs):
- Run a local model, for example, through Ollama.
- Use a bridge package like MCP-LLM Bridge.
- Connect your local model to the Telerik MCP server.
This setup allows you to use the Telerik AI Coding Assistant without cloud-based AI models.