Getting Started with WinForms RadialGauge
This article shows how you can start using RadRadialGauge.
Adding Telerik Assemblies Using NuGet
To use RadRadialGauge when working with NuGet packages, install the Telerik.UI.for.WinForms.AllControls package. The package target framework version may vary.
Read more about NuGet installation in the Install using NuGet Packages article.
With the 2025 Q1 release, the Telerik UI for WinForms has a new licensing mechanism. You can learn more about it here.
Adding Assembly References Manually
When dragging and dropping a control from the Visual Studio (VS) Toolbox onto the Form Designer, VS automatically adds the necessary assemblies. However, if you're adding the control programmatically, you'll need to manually reference the following assemblies:
- Telerik.Licensing.Runtime
- Telerik.WinControls
- Telerik.WinControls.UI
- TelerikCommon
The Telerik UI for WinForms assemblies can be install by using one of the available installation approaches.
Defining the RadRadialGauge
This article shows how you can add the control at design time or with code
Design Time
When you drag a RadRadialGauge from the Toolbox and drop it onto the form, the gauge gallery will offer you to pick up the desired type:
Figure 1: Gallery Types
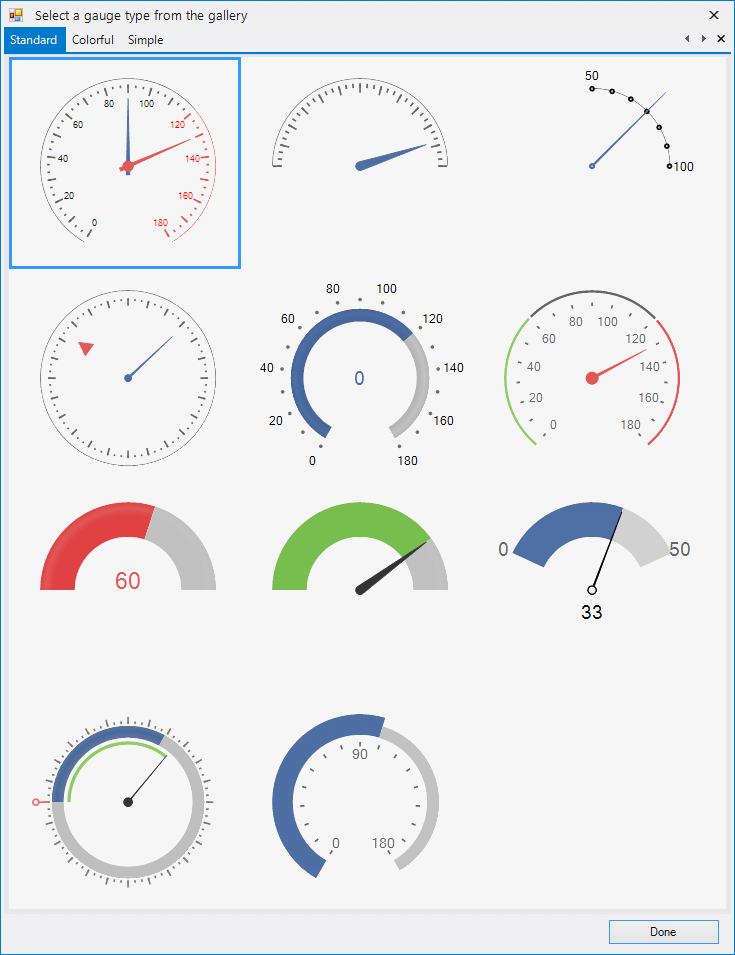
If you do not choose a gauge's style and just close the gallery, an empty RadRadialGauge will be created.
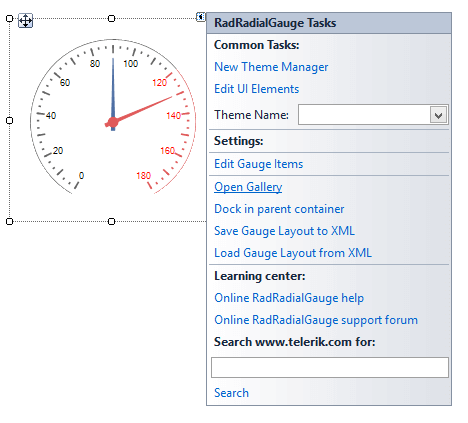
You can change the gauge's style via the Smart tag's option Open Gallery as well.
Figure 2: Change Style
Adding Items Programmatically
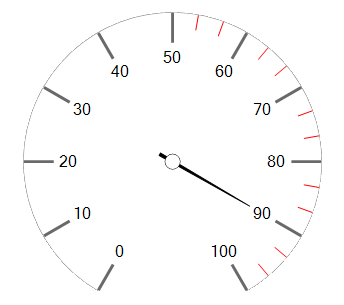
You can create your own gauge's style programmatically from the scratch by adding the desired labels, ticks, needles, arcs to the RadRadialGauge.Items collection. Here is a sample code snippet:
Figure 3: Programmatically Added Items
Add Items
RadialGaugeLabels labels = new RadialGaugeLabels();
RadialGaugeTicks smallTicks = new RadialGaugeTicks();
RadialGaugeTicks bigTicks = new RadialGaugeTicks();
RadialGaugeNeedle needle = new RadialGaugeNeedle();
RadialGaugeArc arc = new RadialGaugeArc();

labels.LabelFontSize = 4;
smallTicks.TickColor = Color.Red;
smallTicks.TickThickness = 0.5f;
smallTicks.TicksCount = 30;
smallTicks.TickStartIndexVisibleRange = 15;
bigTicks.TickColor = Color.DimGray;
bigTicks.TickThickness = 1f;
bigTicks.TicksCount = 10;
bigTicks.TicksLenghtPercentage = 20;
bigTicks.TicksRadiusPercentage = 80;
needle.LenghtPercentage = 60;
arc.Width = 0.5f;
arc.BackColor = Color.Gray;

radRadialGauge1.Items.Add(labels);
radRadialGauge1.Items.Add(smallTicks);
radRadialGauge1.Items.Add(bigTicks);
radRadialGauge1.Items.Add(needle);
radRadialGauge1.Items.Add(arc);Adding Additional Elements
Drag a RadRadialGauge from the Toolbox and drop it onto the form. The gauge gallery will offer you to pick up the desired type. Select the first gauge type. Now, we will customize the gauge in order to obtain the result illustrated on the screen-shot below:
Figure 4: Additional Element
Additional Element
Timer timer = new Timer();
float step = 0f;

private void AdvancedExample()
{
    this.AVGRadialGauge1.RangeStart = 0;
    this.AVGRadialGauge1.RangeEnd = 9;
    this.AVGRadialGauge1.ValueChanged += AVGRadialGauge1_ValueChanged;
    step = -(float)(AVGRadialGauge1.RangeEnd - AVGRadialGauge1.RangeStart) / 10f;

    this.radialGaugeLabels1.LabelFormat = "#,##0.00#";
    this.radialGaugeLabels1.LabelRadiusPercentage = 70;
    this.radialGaugeLabels1.LabelEndVisibleRange = 5;
    this.radialGaugeLabels2.LabelRadiusPercentage = 70;
    this.radialGaugeLabels2.LabelFormat = "#,##0.00#";
        this.radialGaugeLabels2.LabelStartVisibleRange=6;

    this.radialGaugeNeedle1.Visibility = ElementVisibility.Collapsed;
    this.radialGaugeNeedle2.Value = 4.25f;
    this.radialGaugeNeedle2.BackColor = Color.Black;
    this.radialGaugeNeedle2.BackColor2 = Color.Black;
    this.radialGaugeNeedle2.BackLenghtPercentage = 0;
    this.radialGaugeNeedle2.Thickness = 0.2f;
    this.radialGaugeNeedle2.BindValue = true;

    RadialGaugeTicks firstCircleTick = new RadialGaugeTicks();
    this.AVGRadialGauge1.Items.Add(firstCircleTick);

    firstCircleTick.TicksCount = 18;
    firstCircleTick.TickStartIndexVisibleRange = 5;
    firstCircleTick.TickEndIndexVisibleRange = 5;
    firstCircleTick.TicksLenghtPercentage = 3;
    firstCircleTick.TicksRadiusPercentage = 115;
    firstCircleTick.CircleTicks = true;
    firstCircleTick.TickThickness = 1;
    firstCircleTick.TickColor = Color.DimGray;

    RadialGaugeTicks firstTick = new RadialGaugeTicks();
    this.AVGRadialGauge1.Items.Add(firstTick);

    firstTick.TicksCount = 18;
    firstTick.TickStartIndexVisibleRange = 5;
    firstTick.TickEndIndexVisibleRange = 5;
    firstTick.TicksRadiusPercentage = 103;
    firstTick.CircleTicks = false;
    firstTick.TickThickness = 1;
    firstTick.TickColor = Color.DimGray;

    RadialGaugeTicks secondCircleTick = new RadialGaugeTicks();
    this.AVGRadialGauge1.Items.Add(secondCircleTick);

    secondCircleTick.TicksCount = 18;
    secondCircleTick.TickStartIndexVisibleRange = 9;
    secondCircleTick.TickEndIndexVisibleRange = 9;
    secondCircleTick.TicksLenghtPercentage = 3;
    secondCircleTick.TicksRadiusPercentage = 115;
    secondCircleTick.CircleTicks = true;
    secondCircleTick.TickThickness = 1;
    secondCircleTick.TickColor = Color.DimGray;

    RadialGaugeTicks secondTick = new RadialGaugeTicks();
    this.AVGRadialGauge1.Items.Add(secondTick);

    secondTick.TicksCount = 18;
    secondTick.TickStartIndexVisibleRange = 9;
    secondTick.TickEndIndexVisibleRange = 9;
    secondTick.TicksRadiusPercentage = 103;
    secondTick.CircleTicks = false;
    secondTick.TickThickness = 1;
    secondTick.TickColor = Color.DimGray;

    timer.Interval = 1000;
    timer.Tick += timer_Tick;
    timer.Start();
}

private void AVGRadialGauge1_ValueChanged(object sender, EventArgs e)
{
    if (this.AVGRadialGauge1.Value >= 6f)
    {
        this.radialGaugeNeedle2.BackColor = Color.FromArgb(224, 90, 90);
        this.radialGaugeNeedle2.BackColor2 = Color.FromArgb(224, 90, 90);
    }
    else
    {
        this.radialGaugeNeedle2.BackColor = Color.Black;
        this.radialGaugeNeedle2.BackColor2 = Color.Black;
    }
}

private void timer_Tick(object sender, EventArgs e)
{
    if (AVGRadialGauge1.Value + step > AVGRadialGauge1.RangeEnd || AVGRadialGauge1.Value + step < AVGRadialGauge1.RangeStart)
    {
        step = -step;
    }
    AnimatedPropertySetting setting = new AnimatedPropertySetting(RadRadialGaugeElement.ValueProperty,
        AVGRadialGauge1.Value, AVGRadialGauge1.Value + step, 12, 40);
    setting.ApplyEasingType = RadEasingType.OutBounce;
    setting.ApplyValue(AVGRadialGauge1.GaugeElement);
}Clock Example
The following code snippet is purposed to demonstrate how to create a simple clock. For this purpose we will add the necessary clock's elements to the RadRadialGauge.Items collection. Afterwards, we need to drag a timer from the Toolbox and drop it onto the form. Set the timer's Interval property to 1000. Subscribe to its Tick event where we should update the time.
Figure 5: Clock
Clock
RadialGaugeNeedle hoursNeedle ;
RadialGaugeNeedle minutesNeedle;
RadialGaugeNeedle secondsNeedle;

private void RadialGaugeGettingStarted_Load(object sender, EventArgs e)
{
    RadialGaugeLabels hoursLabels = new RadialGaugeLabels();
    RadialGaugeTicks minutesTicks = new RadialGaugeTicks();
    RadialGaugeTicks bigTicks = new RadialGaugeTicks();

    hoursNeedle = new RadialGaugeNeedle();
    minutesNeedle = new RadialGaugeNeedle();
    secondsNeedle = new RadialGaugeNeedle();

    RadialGaugeArc arc = new RadialGaugeArc();

    hoursLabels.LabelFontSize = 4;
    bigTicks.TickColor = Color.DimGray;
    bigTicks.TickThickness = 1f;
    bigTicks.TicksCount = 12;
    bigTicks.TicksLenghtPercentage = 20;
    bigTicks.TicksRadiusPercentage = 80;

    minutesTicks.TicksCount = 60;
    minutesTicks.TickColor = Color.Black;
    minutesTicks.TickThickness = 0.5f;

    hoursNeedle.LenghtPercentage = 40;
    hoursNeedle.BackColor = Color.Gray;
    hoursNeedle.BackColor2 = Color.Gray;
    minutesNeedle.LenghtPercentage = 60;
    minutesNeedle.BackColor = Color.Gray;
    minutesNeedle.BackColor2 = Color.Gray;
    secondsNeedle.LenghtPercentage = 80;
    secondsNeedle.BackColor = Color.CadetBlue;
    secondsNeedle.BackColor2 = Color.CadetBlue;

    arc.Width = 0.5f;
    arc.BackColor = Color.Gray;

    radRadialGauge1.StartAngle = 270;
    radRadialGauge1.SweepAngle = 360;
    radRadialGauge1.RangeStart = 0;
    radRadialGauge1.RangeEnd = 12;
    hoursLabels.LabelStartVisibleRange = 1;
    hoursLabels.LabelFormat = "N0";
    hoursLabels.LabelsCount = 12;

    radRadialGauge1.Items.Add(hoursLabels);
    radRadialGauge1.Items.Add(minutesTicks);
    radRadialGauge1.Items.Add(bigTicks);

    radRadialGauge1.Items.Add(hoursNeedle);
    radRadialGauge1.Items.Add(minutesNeedle);
    radRadialGauge1.Items.Add(secondsNeedle);

    radRadialGauge1.Items.Add(arc);

    this.timer1.Start();
}

private void timer1_Tick(object sender, EventArgs e)
{
    float angleHour = (float)(DateTime.Now.Hour * 30 + DateTime.Now.Minute * 0.5);
    hoursNeedle.Value = angleHour % 360 / 360 * 12 ;
    minutesNeedle.Value = 12 * ((float)DateTime.Now.Minute / 60);
    secondsNeedle.Value = 12 * ((float)DateTime.Now.Second / 60);
}