
UIElement3D Tips and Tricks
Summarize with AI:
It has been a while since I last blogged and after changing teams in the company I decided that it’s time to brush the dust off my blog. So far the move from the ASP.NET world to WPF has been both challenging and enlightening at the same time. There are many new programming concepts going on in WPF and I will try to keep a series of blog posts which will reveal my experiences and thoughts from the viewpoint of an ex-ASP.NET developer diving into the brave new world of WPF.
These days I am dealing with a lot of 3D modeling in WPF. Until WPF, if you wanted to include 3D in your .NET application you would have to use some separate technology such as OpenGL or Direct3D. Now you get your 3D APIs at your fingertips and developing cool 3D interfaces is easier than ever. Soon after creating my first models, however, I started thinking how I could reuse some of my code that began appearing over and over in different files. Obviously you wouldn’t want to code complex models by hand each time - you will rather build them out of simpler 3D primitive objects that can be reused for other models as well. Creating such primitives in WPF is what this blog post is about.
In many commercial 3D modeling products you get a lot of primitives out of the box: cube, sphere, cone, prism, etc. WPF, however, does not provide any primitives, but does offer an excellent infrastructure to create your own “3D Controls” or building blocks that you could reuse in your scenes. An excellent starting point for such 3D primitive is the UIElement3D class. It provides lot of functionality straight out of the box. It is a Visual3D meaning you get all the functionality of that class AND rich event model for input and focus which allows sophisticated interaction with the object.
Today I will walk you through the process of creating a base class for 3D primitives that inherits from UIElement3D and create a cube implementation that will serve as a demonstration. At the very least a 3D Model should contain two things: A MeshGeometry3D which will describe the geometric shape of the model and a Material which is basically the substance used to create the model which determines how it interacts with light sources. I’ll name my base class ReusableUIElement3D:
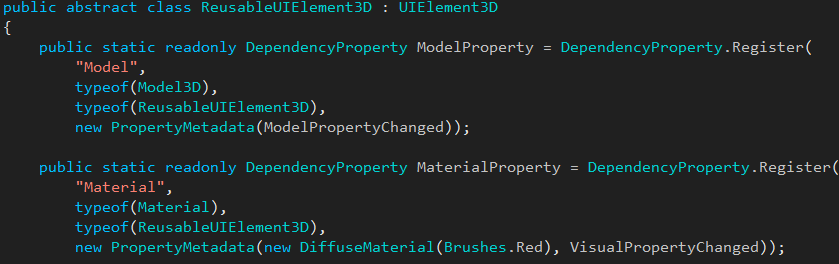
In the above snippet you will see several interesting things. As discussed above, the 3D Primitive needs to have a shape and material. The material is exposed through the Material property and the model (shape + material) is stored in the Model property. The interesting bit here is the VisualPropertyChanged callback. This callback is part of our mechanism to invalidate the 3D primitive whenever we change a property which affects the visual appearance of the element. See the code below:
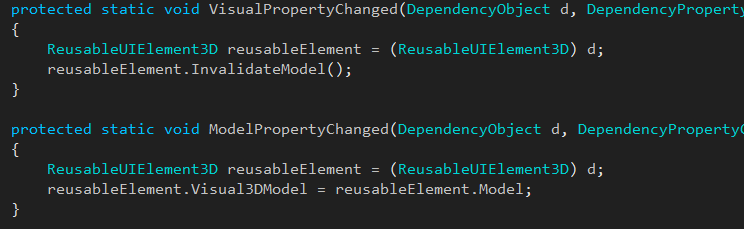
The other callback shown in the snippet will be called whenever the Model property is updated and will set the Visual3DModel property (final model) of the UIElement3D. This happens in response to the InvalidateModel() call.
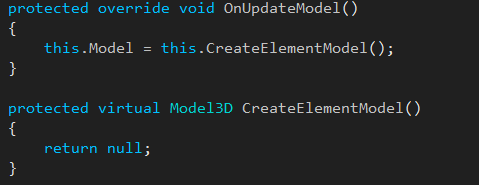
Whenever we invalidate the model, the UIElement3D class will call it’s OnUpdateModel() in response and we can recreate the final 3D model there. In this way, you can make multiple changes to properties that affect the visual appearance of the UIElement3D and only make one final change to the model, rather than having to regenerate it each time a change is made. To ease development, I have created a separate virtual method that could be easily overridden from implementations of our class.
This about concludes the plumbing required for our base class. Now we will create a simple implementation of ReusableUIElement3D. Let’s take a look at some code again:

Everything seems normal here, we inherit our base class, and provide a model specific property – Size which basically determines the length of the side of the cube. However, what’s noteworthy about this dependency property declaration is that we have included the VisualPropertyChanged callback in the property meta data. Having done all the plumbing correctly in the base class all we need to do when implementing new models is include this callback for the appropriate properties which will notify the element that it needs to be invalidated. These notifications are especially handy when you start to animate your models via some of these visual properties.
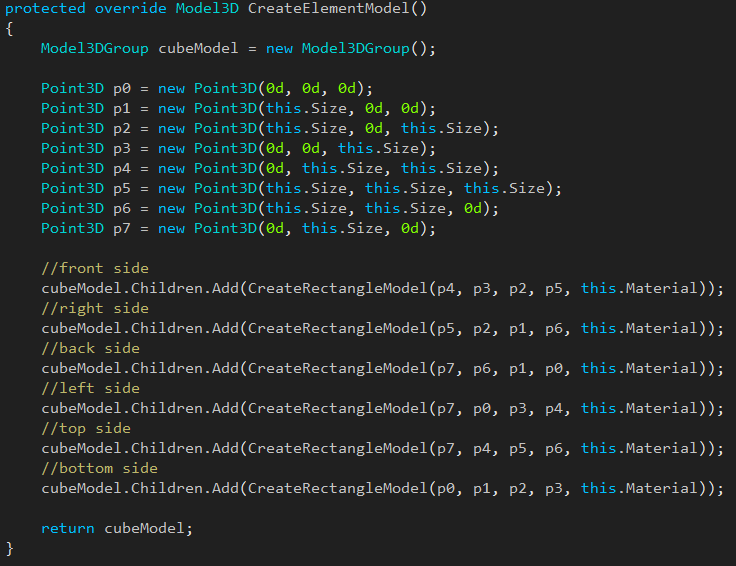
We’re almost done! What’s left is to override our CreateElementModel method and create the appropriate mesh and models. Here is how I’ve done this:
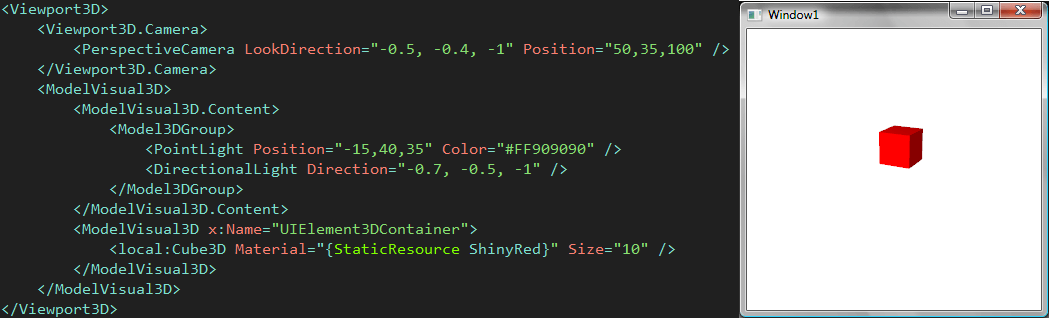
Now let’s put our cube to the test. I’ve created a sample application where I’ve placed an instance of our cube:
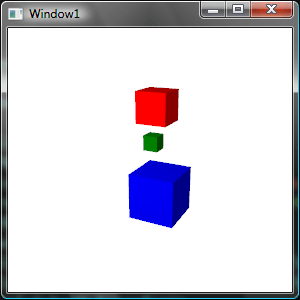
You can of course reuse your model and add a few more instances to create a busier scene in seconds:
Well, that’s about it. You can now go on to create your own primitives without worrying about invalidation plumbing, input and focus events. I have included the full source code of my classes and the sample application needed to run the demo. Let me know if you like this approach and if you have any comments.
Sample Application Source
These days I am dealing with a lot of 3D modeling in WPF. Until WPF, if you wanted to include 3D in your .NET application you would have to use some separate technology such as OpenGL or Direct3D. Now you get your 3D APIs at your fingertips and developing cool 3D interfaces is easier than ever. Soon after creating my first models, however, I started thinking how I could reuse some of my code that began appearing over and over in different files. Obviously you wouldn’t want to code complex models by hand each time - you will rather build them out of simpler 3D primitive objects that can be reused for other models as well. Creating such primitives in WPF is what this blog post is about.
In many commercial 3D modeling products you get a lot of primitives out of the box: cube, sphere, cone, prism, etc. WPF, however, does not provide any primitives, but does offer an excellent infrastructure to create your own “3D Controls” or building blocks that you could reuse in your scenes. An excellent starting point for such 3D primitive is the UIElement3D class. It provides lot of functionality straight out of the box. It is a Visual3D meaning you get all the functionality of that class AND rich event model for input and focus which allows sophisticated interaction with the object.
Today I will walk you through the process of creating a base class for 3D primitives that inherits from UIElement3D and create a cube implementation that will serve as a demonstration. At the very least a 3D Model should contain two things: A MeshGeometry3D which will describe the geometric shape of the model and a Material which is basically the substance used to create the model which determines how it interacts with light sources. I’ll name my base class ReusableUIElement3D:
In the above snippet you will see several interesting things. As discussed above, the 3D Primitive needs to have a shape and material. The material is exposed through the Material property and the model (shape + material) is stored in the Model property. The interesting bit here is the VisualPropertyChanged callback. This callback is part of our mechanism to invalidate the 3D primitive whenever we change a property which affects the visual appearance of the element. See the code below:
The other callback shown in the snippet will be called whenever the Model property is updated and will set the Visual3DModel property (final model) of the UIElement3D. This happens in response to the InvalidateModel() call.
Whenever we invalidate the model, the UIElement3D class will call it’s OnUpdateModel() in response and we can recreate the final 3D model there. In this way, you can make multiple changes to properties that affect the visual appearance of the UIElement3D and only make one final change to the model, rather than having to regenerate it each time a change is made. To ease development, I have created a separate virtual method that could be easily overridden from implementations of our class.
This about concludes the plumbing required for our base class. Now we will create a simple implementation of ReusableUIElement3D. Let’s take a look at some code again:
Everything seems normal here, we inherit our base class, and provide a model specific property – Size which basically determines the length of the side of the cube. However, what’s noteworthy about this dependency property declaration is that we have included the VisualPropertyChanged callback in the property meta data. Having done all the plumbing correctly in the base class all we need to do when implementing new models is include this callback for the appropriate properties which will notify the element that it needs to be invalidated. These notifications are especially handy when you start to animate your models via some of these visual properties.
We’re almost done! What’s left is to override our CreateElementModel method and create the appropriate mesh and models. Here is how I’ve done this:
Now let’s put our cube to the test. I’ve created a sample application where I’ve placed an instance of our cube:
You can of course reuse your model and add a few more instances to create a busier scene in seconds:
Well, that’s about it. You can now go on to create your own primitives without worrying about invalidation plumbing, input and focus events. I have included the full source code of my classes and the sample application needed to run the demo. Let me know if you like this approach and if you have any comments.
Sample Application Source
About the Author
Vladimir Milev
Vladimir Milev is a developer manager.
Comments
Comments are disabled in preview mode.