
SSO Comes to DevCraft Complete and Ultimate Subscription Licenses: A Simpler, More Secure Way to Access Your Account

Summarize with AI:
Progress Telerik DevCraft Complete and Ultimate subscription licenses will now offer single sign-on for streamlined authentication.
We’re thrilled to introduce single sign-on (SSO) to Progress Telerik DevCraft Complete and Ultimate subscription licenses—a new way to streamline authentication and enhance security for your organization. Whether you’re managing a large team or just want a smoother login experience, SSO is here to help.
With SSO, users can log in using their organization’s identity provider, eliminating the need to remember separate credentials. And the best part? You can now set up SAML-based SSO directly through a self-guided process—no support ticket required.
What’s Available Today?
We currently support two paths for enabling SSO:
1. ✅ Self-Guided SAML Setup (Recommended)
You can now configure SSO using SAML directly from your account dashboard. This option supports:
- Microsoft Entra ID (formerly Azure AD)
- AD FS
- Okta
This is the fastest way to get started with SSO and gives you full control over the setup process.
2. 🤝 Assisted Setup for Other Providers
If your organization uses a non-SAML identity provider, don’t worry—we’ve got you covered. Our support team is ready to help you configure SSO through a guided process tailored to your setup.
How to Set Up SAML SSO (Self-Guided)
Here’s a quick overview of the steps involved in setting up SAML-based SSO:
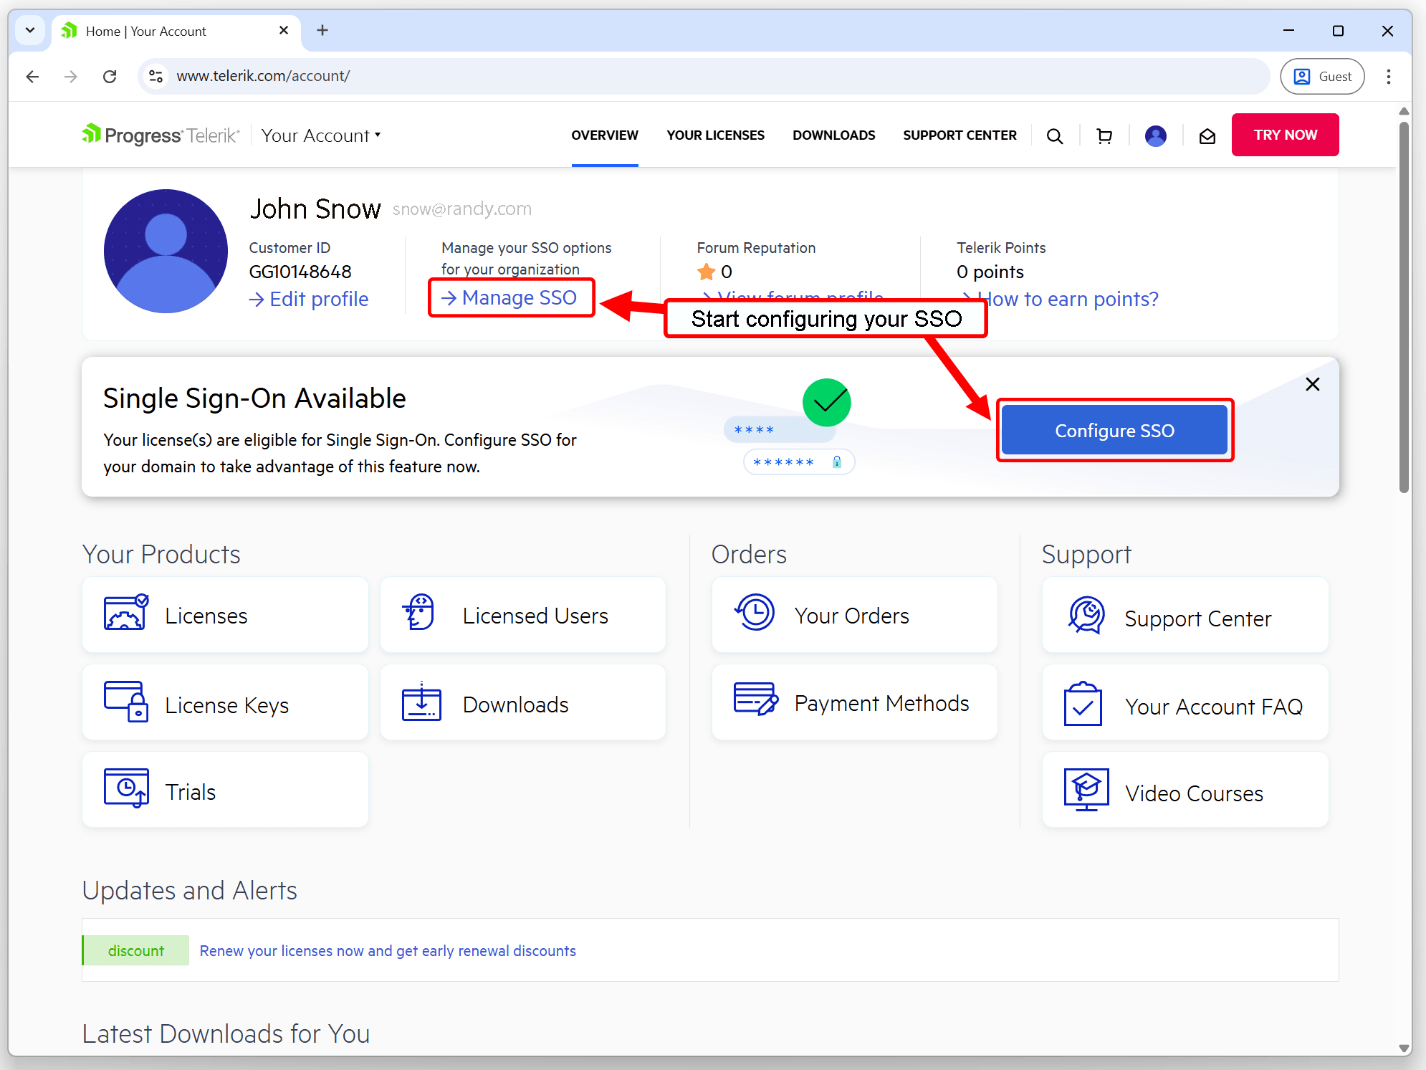
Step 1: Configure SSO
- Log in to your account.
- If your license is eligible and you are a License Holder or License Manager, you’ll see a banner to Configure SSO or can navigate to Manage SSO from your account settings.
Step 2: Verify Your Domain
To confirm domain ownership:
- Ask your IT team to add the provided challenge key to your domain’s DNS records.
- Wait until the key is visible via DNS lookup.
- Click Verify Domain.
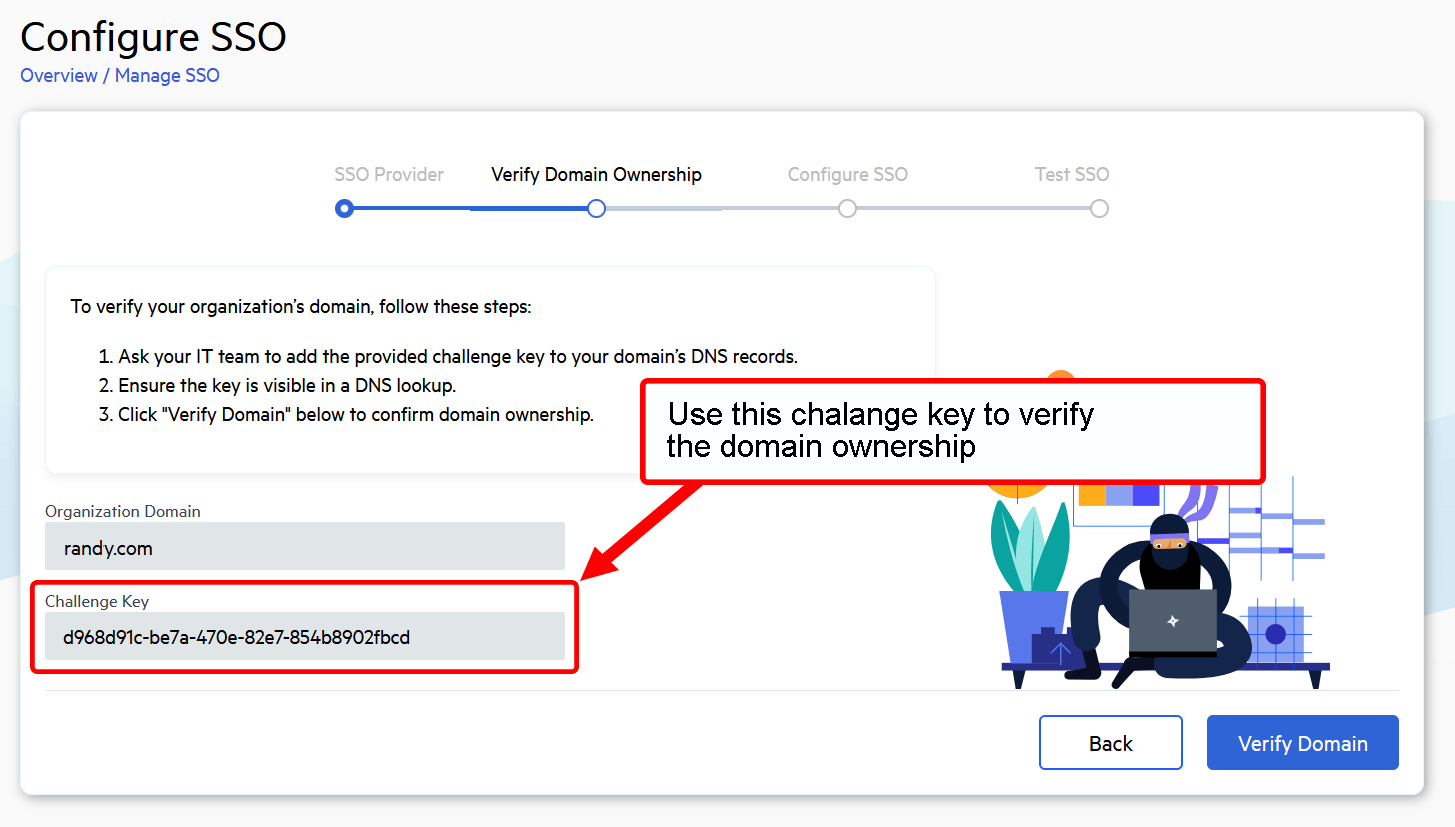
⏳ Your progress is saved, so you can return later to complete verification.
Step 3: Configure Your Identity Provider
Once your domain is verified:
- Register the SAML configuration with your IdP.
- Enter your Metadata URL.
- Map the required claims: email address, first name and last name.
- Verify all URLs are correctly mapped.
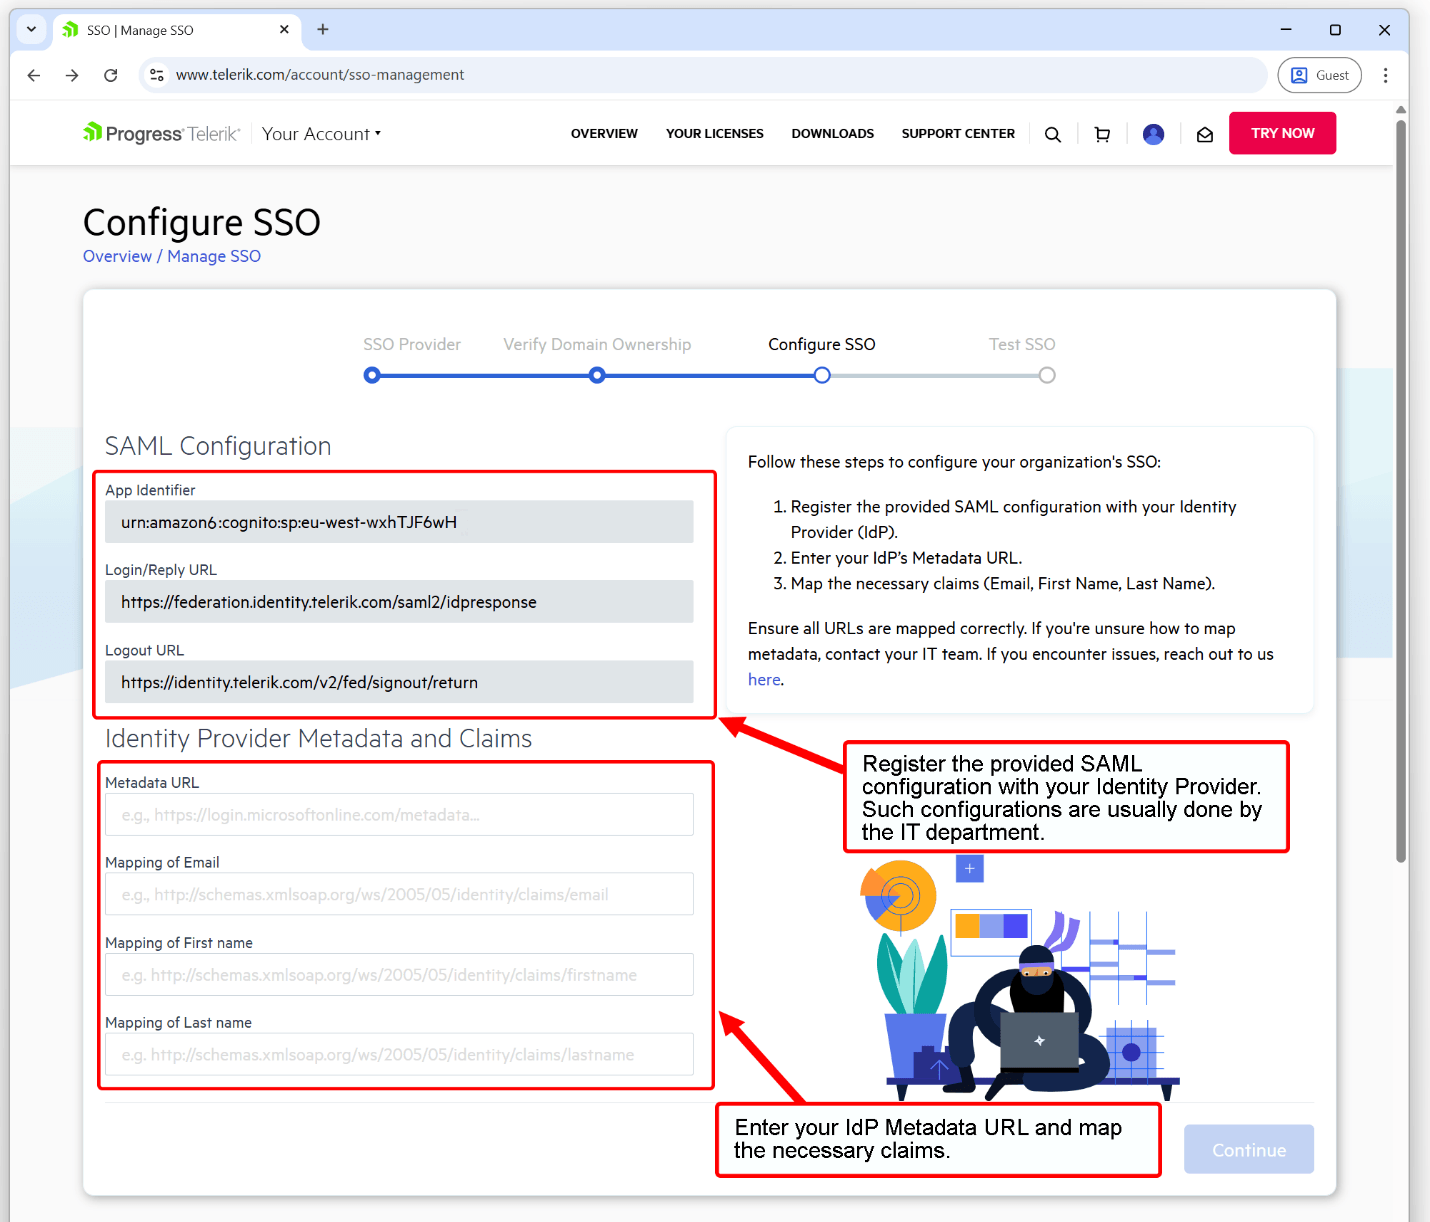
⚠️ Important: Incorrect claim mappings will result in login failures. For Okta, make sure to use Name attributes when setting identifiers and claims.
Step 4: Test and Confirm
Test the login URL to verify everything is working. Once successful, you’ll receive a confirmation message that SSO is active.
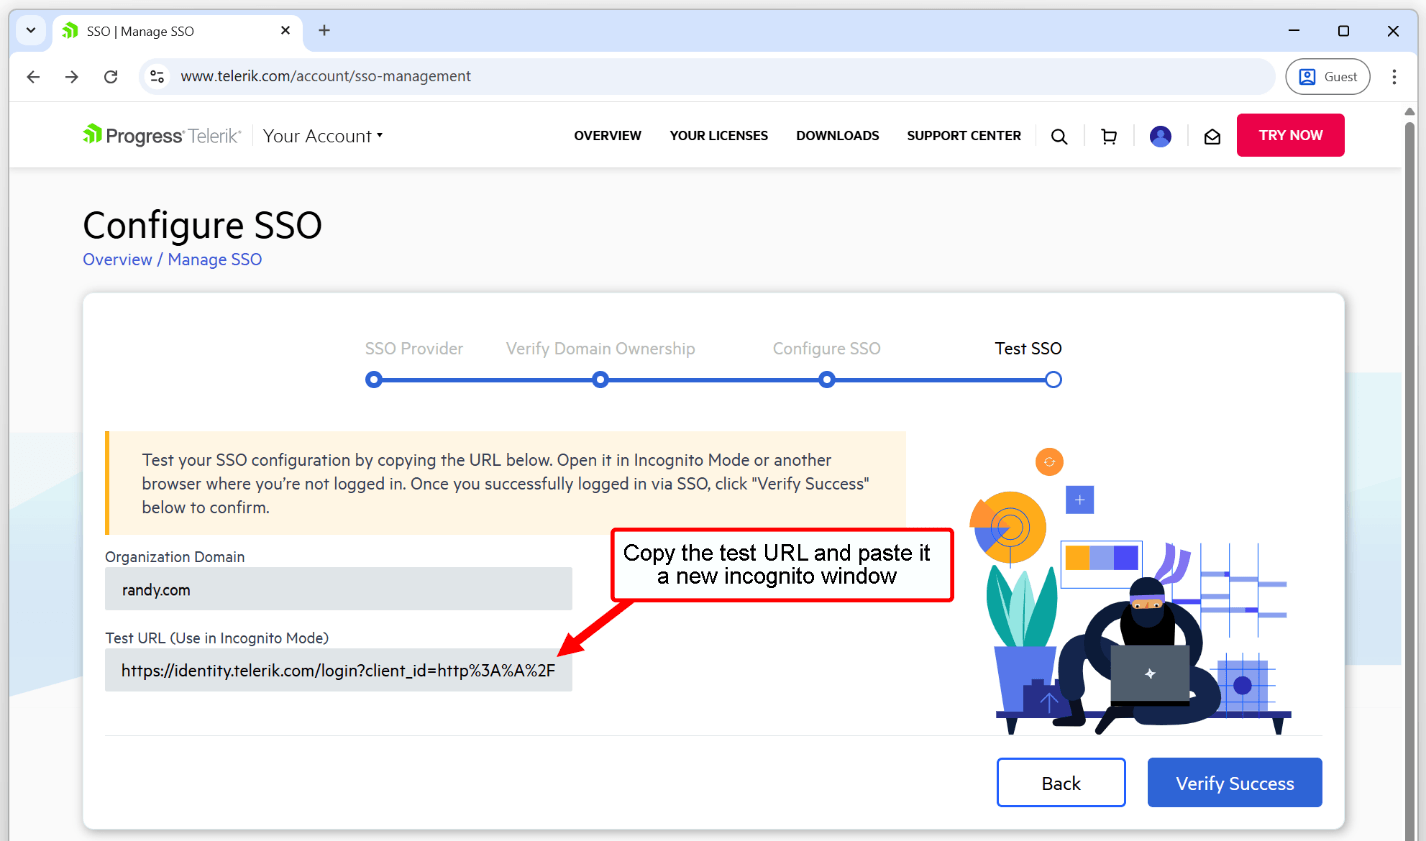
⚠️ Important: This step is crucial to complete the SSO setup and should not be skipped. You should only proceed to enabling SSO for a specific license after you see the “SSO Successfully Configured” confirmation message.
Step 5: Enable SSO
- Review and confirm that the correct domain is selected for provisioning.
- Click Enable SSO to initiate the setup for the selected license.
- To complete the process, click Apply Changes. This will enable SSO access for all applicable users associated with the license.

🔄 Need to enable SSO for additional licenses later?
Simply return to the Manage SSO section in Your Account and repeat this step for any new or existing licenses.
What Happens After SSO Is Enabled?
- Only users assigned to the enabled license(s) with email addresses matching the verified domain will log in via SSO exclusively. Even if these users previously logged in with a username and password, SSO will become the only authentication method, providing a more consistent and secure login experience across your organization.
- These users will receive an email notification with login instructions.
- If a license expires, users can still access via SSO for 10 days. After that, they’ll need to recover their password and log in with their username and password.
👉 Looking to go further? You can also automate user access and license assignments through SCIM. Learn more in our SCIM Provisioning Blog.
Using SSO with NuGet and Visual Studio Extensions
If you’re using the Telerik NuGet server or Visual Studio Extensions (VSX) with SSO enabled:
- Use the literal string
api-keyas the username. - Use your personal Telerik NuGet Key as the password.
- You can generate a new Telerik NuGet Key on Your Account | NuGet Keys page.
⚠️ Important: Before enabling SSO for a license, verify that all developers assigned to that license are already using NuGet Keys instead of password-based authentication when accessing the Telerik NuGet feed. This enables uninterrupted access once SSO is enforced and password-based login is no longer available.
For more information about using NuGet Keys, visit Announcing Telerik NuGet Keys.
Ready to Get Started?
SSO is a powerful way to simplify access and improve security across your organization. Whether you’re setting it up yourself with SAML or working with our support team for a custom provider, we’re here to help every step of the way.

Dragan Grigorov
Dragan is a Senior Technical Support Engineer Lead who enjoys helping customers and solving complex challenges. He takes a practical, solution-focused approach to every situation. Outside of work, he enjoys spending time with his family, traveling, playing sports and reading comic books.
Related Posts
Comments
All articles
Topics
Web MobileMobile
Desktop
Design
Productivity
People
