
A Rust Introduction to WebAssembly

Summarize with AI:
Let's look at how Wasm + Rust unlocks really exciting potential for the future of frontend web development. It's not a replacement for JavaScript — it enhances and complements it.
Prerequisites:
This article assumes the following:
- A little bit of Rust knowledge and the standard tool-chain, including rustup, rustc and cargo
- HTML, CSS and JavaScript basics
What is WebAssembly?
According to the official documentation, WebAssembly (abbreviated Wasm) is a binary instruction format for a stack-based virtual machine. Wasm is designed as a portable target for compilation of high-level languages like C/C++/Rust, enabling deployment on the web for client and server applications.
Let's break this down into simpler grammar. Essentially all that means is that Wasm is:
- A compile target: It's a way of taking code written in any other language (other than JavaScript of course) and running it on a web browser.
- An improvement (not replacement) to JavaScript: Essential/Computationally critical parts of your code base can be implemented in Wasm and imported like a standard JavaScript module.
- A new language: Wasm code defines an AST (Abstract Syntax Tree) represented in a binary format. Should you decide to, you can author and debug it in text format, it's absolutely readable.
- A browser rendering improvement: Because Wasm is in binary format, which is closer to machine level code, browsers can render Wasm faster and achieve native-like speed compared to standard text JavaScript we have today. It's important to note that compile-time optimization opportunities are vital for this to be the case.
Why Wasm?
As many devs will agree, it's way harder to achieve significant milestones when you're coding directly in assembly language, and JavaScript is a pretty great language to write most of the code required by any software we can dream of. So why do we need this WebAssembly to start with?
- WebAssemby brings diversity to the web and diversity is a good thing. Meaning you can write in any language you choose and it runs in the browser — imagine the possibilities.
- It is fast, as it's encoded in a size- and load-time-efficient binary format, executing at native speed by taking advantage of common hardware capabilities available on a wide range of platforms. Put Rust into the mix, and you have incredibly small bundle sizes and consequently more speed.
- Existing code bases don't need to be thrown away. You can start by porting your most performance-sensitive JavaScript functions to Wasm to gain immediate benefits. You could even stop there, should you so decide.
Getting Started
Rust + Wasm Setup
Now that we're up to speed with what Wasm is, the next is to set up your machine for Wasm development with Rust. We'll work through how to set up the toolchain for compiling Rust programs to WebAssembly and integrate them into JavaScript. After which we'll build a very basic app that asks users to input two numbers they wish to add.
Make sure you have the standard Rust toolchain installed. You can find the installation here.
To proceed, make sure you have Rust 1.30 or newer. Use the command below to check your Rust version.
rustc -Vor
rustc --versionNote: The above command depends on your version.

Next we install wasm-pack , which is a one-stop shop for building, testing, and publishing Rust-generated WebAssembly. For demonstration purposes, I'll be using a Unix machine (Mac and Linux Distributions). If you are on a Windows machine, you can download an installer for wasm-pack here.
Run the command below in your terminal and follow the prompt to install it on your machine.
curl https://rustwasm.github.io/wasm-pack/installer/init.sh -s Sf | shYou should have this output:

Next, we install cargo-generate, which helps to get up and running quickly with a new Rust project by leveraging a preexisting git repository as a template. Install with this command:
cargo install cargo-generate Note : If this fails, a typical reason is that pkg-config isn't installed on your machine. You can fix this by running the following command for Linux machines. Use brew if you're on a Mac.
sudo apt install pkg-configNext up is npm. It is a JavaScript package manager. We will use it to install and run a JavaScript bundler and development server. Follow these instructions to install npm. If you have npm already installed, make sure it's up to date with this command.
npm install npm@latest -gHello, World!
We'll see how to build our first Rust and WebAssembly program: a Web page that alerts "Hello, World!"
First, we clone a project template which comes pre-configured with the same defaults, so you can quickly build, integrate, and package your code for the web.
Clone the template with this command:
cargo generate --git https://github.com/rustwasm/wasm-pack-tem plate This should prompt you for the new project's name. We will use rust-calculate.
rust-calculateBreakdown of Project Structure
Enter into the new project directory
cd rust-calculateDepending on when you're reading this, its content should look like this:
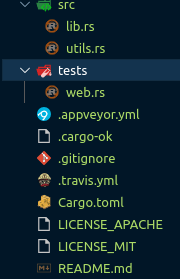
Let's have a look at some of these files in detail.
rust-calculate/Cargo.tomlThe Cargo.toml file specifies dependencies and metadata for cargo, Rust's package manager and build tool. This one comes pre-configured with a wasm-bindgen dependency, a few optional dependencies and the crate-type properly initialized for generating .wasm libraries.
rust-calculate/src/lib.rsThe src/lib.rs file is the root of the Rust crate that we are compiling to WebAssembly. It uses wasm-bindgen to interface with JavaScript. It imports the window.alert JavaScript function, and exports the greet Rust function, which alerts a greeting message.
mod utils;
use wasm_bindgen::prelude::*;
// When the `wee_alloc` feature is enabled, use `wee_alloc` as the global
// allocator.
#[cfg(feature = "wee_alloc")]
#[global_allocator]
static ALLOC: wee_alloc::WeeAlloc = wee_alloc::WeeAlloc::INIT;
#[wasm_bindgen]
extern {
    fn alert(s: &str);
}
#[wasm_bindgen]
pub fn greet() {
    alert("Hello, rust-calculate!");
}
rust-calculate/src/utils.rsThe src/utils.rs module provides common utilities to make working with Rust compiled to WebAssembly easier.
Build the Project
wasm-pack is used to orchestrate the following build steps:
- Ensure that we have Rust 1.30 or newer and the
wasm32-unknown-unknowntarget installed viarustup. - Compile our Rust sources into a WebAssembly
.wasmbinary viacargo. - Use
wasm-bindgento generate the JavaScript API for using our Rust-generated WebAssembly.
To do all of that, run this command inside the project directory:
wasm-pack buildWhen the build has completed, we can find its artifacts in the pkg directory, and it should have these contents:
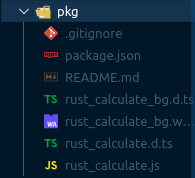
The README.md file is copied from the main project, but the others are completely new.
rust-calculate/pkg/rust_calculate_bg.wasmThe .wasm file is the WebAssembly binary that is generated by the Rust compiler from our Rust sources. It contains the compiled-to-wasm versions of all of our Rust functions and data. For example, it has an exported "greet" function.
rust-calculate/pkg/rust_calculate.jsThe .js file is generated by wasm-bindgen and contains JavaScript glue for importing DOM and JavaScript functions into Rust and exposing a nice API to the WebAssembly functions to JavaScript. For example, there is a JavaScript greet function that wraps the greet function exported from the WebAssembly module. Right now, this glue isn't doing much, but when we start passing more interesting values back and forth between Wasm and JavaScript, it will help shepherd those values across the boundary.
import * as wasm from './rust_calculate_bg.wasm'
/**
*/
export function greet() {
    wasm.greet();
}
let cachedTextDecoder = new TextDecoder('utf-8', { ignoreBOM: true, fatal: true });
let cachegetUint8Memory = null;
function getUint8Memory() {
    if (cachegetUint8Memory === null || cachegetUint8Memory.buffer !== wasm.memory.buffer) {
        cachegetUint8Memory = new Uint8Array(wasm.memory.buffer);
    }
    return cachegetUint8Memory;
}
function getStringFromWasm(ptr, len) {
    return cachedTextDecoder.decode(getUint8Memory().subarray(ptr, ptr + len));
}
export const __wbg_alert_264313fba916676f = function(arg0, arg1) {
    alert(getStringFromWasm(arg0, arg1));
};
rust-calculate/pkg/rust_calculate.tsThe .d.ts file contains TypeScript type declarations for the JavaScript glue. If you are using TypeScript, you can have your calls into WebAssembly functions type checked, and your IDE can provide autocompletions and suggestions! If you aren't using TypeScript, you can safely ignore this file.
/* tslint:disable */
/**
*/
export function greet(): void;
rust-calculate/pkg/package.jsonThe package.json(https://docs.npmjs.com/files/package.json) file contains metadata about the generated JavaScript and WebAssembly package. This is used by npm and JavaScript bundlers to determine dependencies across packages, package names, versions, and a bunch of other stuff. It helps us integrate with JavaScript tooling and allows us to publish our package to npm.
{
  "name": "rust-calculate",
  "collaborators": [
    "Obinna Ekwuno <obinnacodes@gmail.com>"
  ],
  "version": "0.1.0",
  "files": [
    "rust_calculate_bg.wasm",
    "rust_calculate.js",
    "rust_calculate.d.ts"
  ],
  "module": "rust_calculate.js",
  "types": "rust_calculate.d.ts",
  "sideEffects": "false"
}
Putting it into a Web Page
To take our rust-calculate package and use it in a Web page, we use the create-wasm-app JavaScript Project Template .
Run this command inside the rust-calculate project directory:
npm init wasm-app wwwThe command creates a new rust-calculate/www directory, the contents are:
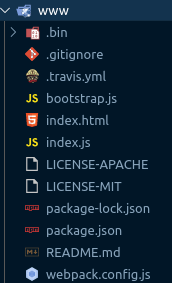
Once again, let's take a closer look at some of these files.
rust-calculate/www/package.jsonThis package.json comes pre-configured with webpack and webpack-dev-server dependencies, as well as a dependency on hello-wasm-pack, which is a version of the initial wasm-pack-template package that has been published to npm.
rust-calculate/www/weback.config.jsThis file configures webpack and its local development server. It comes pre-configured, and you shouldn't have to tweak this at all to get webpack and its local development server working.
rust-calculate/www/index.htmlThis is the root HTML file for the web page. It doesn't do much other than load bootstrap.js, which is a very thin wrapper around index.js.
<!DOCTYPE html>
<html>
  <head>
    <meta charset="utf-8">
    <title>Hello wasm-pack!</title>
  </head>
  <body>
    <noscript>This page contains webassembly and javascript content, please enable javascript in your browser.</noscript>
    <script src="./bootstrap.js"></script>
  </body>
</html>
rust-calculate/www/index.jsThe index.js is the main entry point for our web page's JavaScript. It imports the hello-wasm-pack npm package, which contains the default wasm-pack-template's compiled WebAssembly and JavaScript glue, then it calls hello-wasm-pack's greet function.
import * as wasm from "hello-wasm-pack";
wasm.greet();
Install the Dependencies
First, ensure that the local development server and its dependencies are installed by running npm install within the rust-calculate/www subdirectory:
npm installThis command only needs to be run once, and will install the webpack JavaScript bundler and its development server.
Note: webpack is not required for working with Rust and WebAssembly, it is just the bundler and development server we've chosen for convenience here. Parcel and Rollup should also support importing WebAssembly as ECMAScript modules. You can also use Rust and WebAssembly without a bundler if you prefer!
Using our Local rust-calculate Package in www
Rather than use the hello-wasm-pack package from npm, we want to use our local rust-calculate package. This will allow us to incrementally develop our simple demo app.
Open up rust-calculate/www/package.json and edit the "dependencies" to include a "rust-calculate": "file:../pkg" entry
{
  // ...
  "dependencies": {
    "rust-calculate": "file:../pkg", // Add this line!
    // ...
  }
}
Next, modify rust-calculate/www/index.js to import rust-calculate instead of the hello-wasm-pack package:
import * as wasm from "rust-calculate";
wasm.greet();
Since we declared a new dependency, we need to install it:
npm installCongratulations. Our web page is now ready to be served locally!
Serving Locally
Next, open a new terminal for the development server. Running the server in a new terminal lets us leave it running in the background, and doesn't block us from running other commands in the meantime. In the new terminal, run this command from within the wasm-game-of-life/www directory:
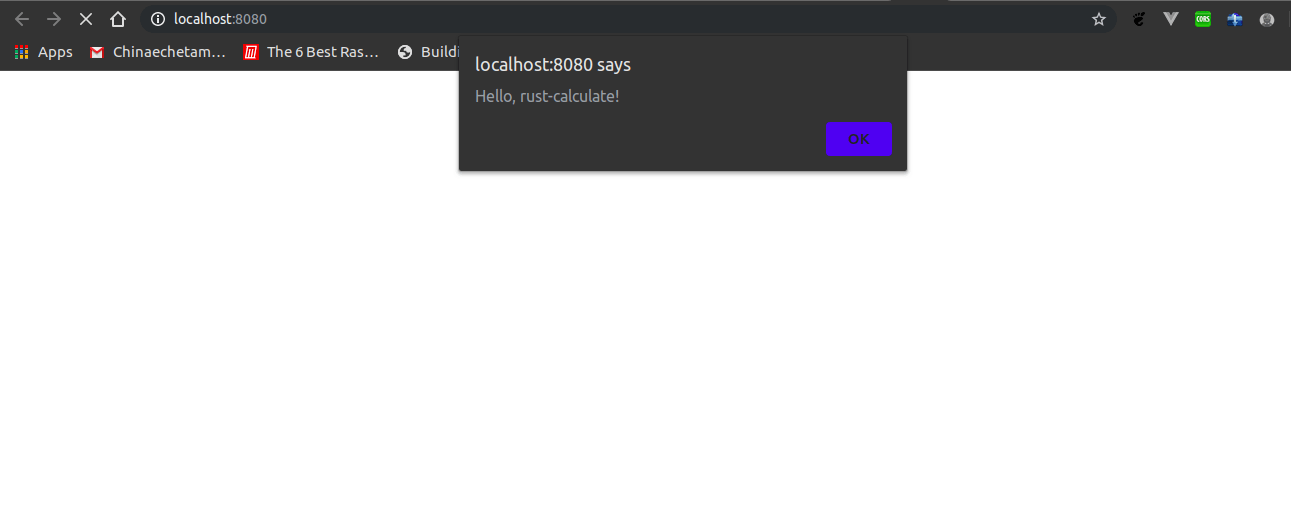
npm run startNavigate your web browser to http://localhost:8080/ and you should be greeted with an alert message:
Anytime you make changes and want them reflected on http://localhost:8080/, just re-run the wasm-pack build command within the rust-calculate directory.
Finishing up our Demo App
Next we edit the index.html file to reflect a new simple UI for the demo app we want to build. The file includes some simple CSS styles and markup.
<!DOCTYPE html>
<html>
  <head>
    <meta charset="utf-8">
    <title>Rust Calculate</title>
    <style>
      #rust-calculate{
        margin-top: 10%;
        margin-left: 30%;
      }
      #rstitle{
        /* text-align: center; */
        color: rgb(9, 44, 44);
      }
      #answerDisplay{
        width: 500px;
        height: 30px;
        border: 1px solid rgb(43, 145, 114);
        color: rgb(43, 145, 114);
      }
      .rsInput{
        border-radius: 50px;
        padding: 5px;
        color: darkslategray;
        border: 1px solid darkslategray;
        outline: none;
      }
      #addBtn{
        outline: none;
        background-color: rgb(9, 148, 51);
        padding: 5px;
        border: 1px solid rgb(9, 148, 51);
        width: 100px;
        border-radius: 50px;
        color: #ffffff;
        margin-left: 2%;
      }
    </style>
  </head>
  <body>
    <noscript>This page contains webassembly and javascript content, please enable javascript in your browser.</noscript>
    <section id="rust-calculate">
      <h1 id="rstitle">RUST CALCULATE</h1>
      <p id="answerDisplay"></p>
      <input type="number" class="rsInput" id="firstValue">
      <input type="number" class="rsInput" id="secondValue">
      <button id="addBtn">ADD</button>
    </section>
    <script src="./bootstrap.js"></script>
  </body>
</html>
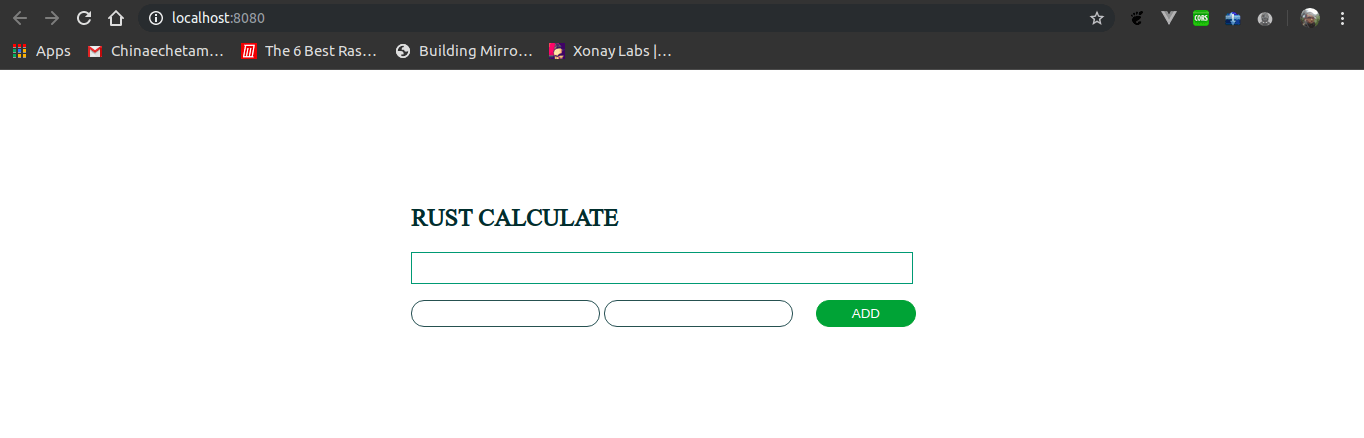
The webpack-server automatically reloads and your page should look like this:
Next we create a rust function to perform our addition. Open the lib.rs located in rust-calculate/src/lib.rs. Change the greet function to:
pub fn add(x: i32, y: i32) -> i32 {
    let z = x + y;
    return z;
}
The function is pretty straightforward. It takes two numbers and returns their sum.
We now re-run our build command to bundle our new rust code to Wasm. The build automatically overwrites the previous one in the pkg directory so leave it as it is. Run this command in the rust-calculate directory:
wasm-pack build
Once it's done, take a look at the rust_calculate.js file and you should see our new add function:
export function add(x, y) {
    const ret = wasm.add(x, y);
    return ret;
}
Now we can now use it in our index.js file found in rust-calculate/www/index.js.
Update the index.js code to:
import * as wasm from "rust-calculate";
document.querySelector('#addBtn').addEventListener('click', () => {
   let x = document.querySelector('#firstValue').value;
   let y = document.querySelector('#secondValue').value;
   if (!x && !y) {
    alert("please input values")
    return
   }
   let z = wasm.add(x, y)
   document.querySelector('#answerDisplay').innerHTML = z
})
The code is fairly straightforward.
This imports our generated Wasm binary from the pkg directory.
import * as wasm from "rust-calculate";Then a click event listener is attached to the button.
document.querySelector('#addBtn').addEventListener('click', () =>We then get the values from the input fields.
let x = document.querySelector('#firstValue').value;
let y = document.querySelector('#secondValue').value;
Next we check to make sure the fields are not empty before we pass it to our add function.
if (!x && !y) {
    alert("please input values")
    return
   }
Now we pass in our values in values to the add function, which we access with wasm.
let z = wasm.add(x, y)Finally, we then update our UI with the result of the calculation.
document.querySelector('#answerDisplay').innerHTML = z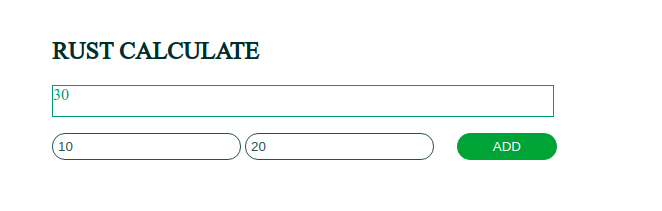
To learn more about how to build with Wasm + Rust, here's an amazing resource. It works you through the very basics to advanced concepts like debugging, optimizations, etc.
Conclusion
In this article we looked at how Wasm + Rust unlocks really exciting potential for the future of frontend web development. It doesn't replace JavaScript — it enhances and complements it. As you go forth to explore this new frontier, may the force be with you. Happy coding.
.jpg?sfvrsn=9250549c_0 "Obinna Ekwuno (002)")
Obinna Ekwuno
Writer of all things technical and inspirational, developer and community advocate. In a love-love relationship with JavaScript, a web accessibility nerd.