Get Your WPF Apps Automated With Appium

Summarize with AI:
Test automation plays an important part in application development. Let me share a walkthrough on how you can automate your WPF application using Appium along with Windows Application Driver and UI Recorder tool.
Every test automation needs a framework that it can rely on. One such framework is Appium—used for native, hybrid and mobile web apps. It covers iOS, Android and Windows platforms. Today I will focus on how your WPF app can benefit from it.
What to expect in this story?
- Prerequisites
- Test project setup
- Base class and tests session
- Tests setup
- Locating elements with WinAppDriver UI Recorder tool
- Write several tests
I will skip the setup of the WPF app, as this is not our goal here. It is a simple mail app demo with limited functionality for the purpose of this article. What I am going to do is to walk you through the process of creating your test project, setting it up and then writing several test scenarios. A full working demo is available in the following repo: Get-your-WPF-apps-automated-with-Appium.
Prerequisites
- Download the Windows Application Driver. It is a service that supports testing Universal Windows Platform (UWP), Windows Forms (WinForms), Windows Presentation Foundation (WPF), and Classic Windows (Win32) apps on Windows 10.
- Enable Developer Mode for your Windows by typing "for developers" in the Start menu and then turn the feature on.
- Install the Windows Application Driver.
- Download the WinAppDriver source code so you can benefit from the UI Recorder tool. More on this later.
Test Project Setup
- Open your Visual Studio and create a new Unit Test (.NET Core) project with .NET 5.0 as a target framework. Let’s call it MailApp.Tests.
- Right-click on the project and select “Manage NuGet Packages”. Alternatively use the keyboard sequence Alt T N N without holding the Alt key.
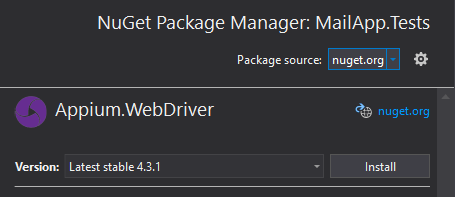
- Select nuget.org as package source and install the Appium.WebDriver NuGet.
Base Class and Tests Session
- Create a new class called TestsBase where all the Appium settings and the session initialization will be described.
- Create a StartWinAppDriver() method for starting the service.The WinAppDriverPath parameter is the path to the service.
privatestaticvoidStartWinAppDriver(){ProcessStartInfo psi =newProcessStartInfo(WinAppDriverPath);psi.UseShellExecute =true;psi.Verb ="runas";// run as administratorwinAppDriverProcess = Process.Start(psi);} - At the beginning of our class, we define several constants to hold specific information used for setting up our session.The WindowsApplicationDriverUrl is the WinAppDriver service URL. It can be seen in the command line tool that appears when the service starts. We have some more constants specifying other paths and settings we want to pass on.
privateconststringWindowsApplicationDriverUrl ="http://127.0.0.1:4723";privateconststringApplicationPath = @"..\..\..\..\MailApp\bin\Release\net5.0-windows\MailApp.exe";privateconststringDeviceName ="WindowsPC";privateconstintWaitForAppLaunch = 5;privateconststringWinAppDriverPath = @"C:\Program Files (x86)\Windows Application Driver\WinAppDriver.exe";privatestaticProcess winAppDriverProcess;publicWindowsDriver<WindowsElement> AppSession {get;privateset; }publicWindowsDriver<WindowsElement> DesktopSession {get;privateset; } - Create Initialize method that uses the constants from above. The method will be later called in a test class containing our tests. We set different options by using AppiumOptions’ AddAdditionalCapability method. The “app” capability is mandatory—it contains the identifier of our test application.You have probably noticed that we have two WindowsDriver sessions—one called AppSession and the other called DesktopSession. AppSession controls the application we are testing while DesktopSession controls additional dialogs that might appear. They are not part of the same visual tree, and Appium will not be able to find the elements. To search through all the open desktop apps, we should create another DesktopSession with Root identifier for the “app” capability.
publicvoidInitialize(){StartWinAppDriver();var appiumOptions =newAppiumOptions();appiumOptions.AddAdditionalCapability("app", ApplicationPath);appiumOptions.AddAdditionalCapability("deviceName", DeviceName);appiumOptions.AddAdditionalCapability("ms:waitForAppLaunch", WaitForAppLaunch);this.AppSession =newWindowsDriver<WindowsElement>(newUri(WindowsApplicationDriverUrl), appiumOptions);Assert.IsNotNull(AppSession);Assert.IsNotNull(AppSession.SessionId);AppSession.Manage().Timeouts().ImplicitWait = TimeSpan.FromSeconds(1.5);AppiumOptions optionsDesktop =newAppiumOptions();optionsDesktop.AddAdditionalCapability("app","Root");optionsDesktop.AddAdditionalCapability("deviceName", DeviceName);DesktopSession =newWindowsDriver<WindowsElement>(newUri(WindowsApplicationDriverUrl), optionsDesktop);CloseTrialDialog();}
Our demo app uses trial Telerik UI for WPF binaries and we need to close the Trial warning dialog before each test. We do this with the CloseTrialDialog() method.protectedvoidCloseTrialDialog(){this.GetElementByName("Telerik UI for WPF Trial").FindElementByName("Cancel").Click();} - In the TestsBase class, we create two more methods:
- CleanUp() – for closing the application when we no longer need it
- StopWinAppDriver() – for closing the WinAppDriver service
publicvoidCleanup(){// Close the sessionif(AppSession !=null){AppSession.Close();AppSession.Quit();}// Close the desktopSessionif(DesktopSession !=null){DesktopSession.Close();DesktopSession.Quit();}}publicstaticvoidStopWinappDriver(){// Stop the WinAppDriverProcessif(winAppDriverProcess !=null){foreach(var processinProcess.GetProcessesByName("WinAppDriver")){process.Kill();}}} - Let’s create some useful methods for performing keyboard operations and selecting text. We will add them to the TestBase class.
Appium has solution for such operations—Actions. We create Actions instance by passing the session as a parameter—in our case, the AppSession. Then, we need to register the keyboard operations that we want and, at the end, call Perform() to execute the sequence of actions.protectedvoidSelectAllText(){Actions action =newActions(AppSession);action.KeyDown(Keys.Control).SendKeys("a");action.KeyUp(Keys.Control);action.Perform();}protectedvoidPerformDelete(){Actions action =newActions(AppSession);action.SendKeys(Keys.Delete);action.Perform();}protectedvoidPerformEnter(){Actions action =newActions(AppSession);action.SendKeys(Keys.Enter);action.Perform();}protectedvoidWriteText(stringtext){Actions action =newActions(AppSession);action.SendKeys(text);action.Perform();}
Tests Setup
Now that we have our TestsBase ready, we can move into writing some tests.
- Create a new class called MailAppTests or simply rename the default one—UnitTest1 that comes with the Unit Test project template.
- Add the [Test Class] attribute to the class. It is required on any class containing test methods. This way your tests will be visible in the Test Explorer.
- Remember how we created the Initialize() method in our TestsBase class? Here comes the time to use it. And because we need other methods from that very same class (MailAppTests), it should derive from the TestsBase class.
[TestClass]publicclassMailAppTests : TestsBase{[TestInitialize]publicvoidTestInitialize(){this.Initialize();}. . .} - Despite the [TestClass] attribute, there are a few more you should get familiar with:
- [TestInitialize] – called prior to every test
- [TestCleanup] – called after a test has finished
- [ClassCleanup] – called once all tests from a class have been executed
[TestClass]publicclassMailAppTests : TestsBase{[TestInitialize]publicvoidTestInitialize(){this.Initialize();}[TestCleanup]publicvoidTestCleanup(){this.Cleanup();}[ClassCleanup]publicstaticvoidClassCleanusp(){StopWinappDriver();} - We also need to mark our methods as executable tests. For this, there is one more attribute named [TestMethod] which should be added along with every test method we create.
Locating Elements Using the WinAppDriver UI Recorder Tool
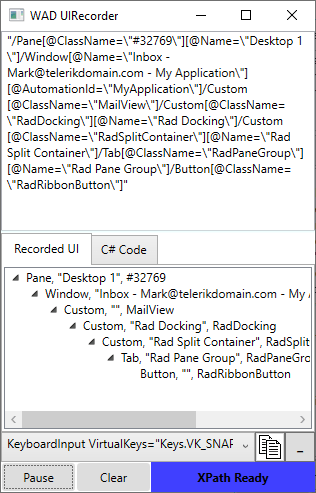
Our tests should be able to locate elements so we can react with them. UI Recorder is an open-source tool for selecting UI elements and viewing their attributes’ data. You can find the tool in the WinAppDriver source code downloaded earlier at the beginning of this article. It is located in the ...\WinappDriver\Tools\UIRecorder folder. Simply open and run the solution. You can now select the elements you need and use their attributes by clicking the “Record” button and hovering on the target element.
One way to find elements is to use session’s FindElementsByXPath(string XPath) method, which takes the XPath string as a parameter. The XPath can be taken using the UI Recorder tool.
Another faster and more convenient approach if possible is to use FindElementByAccessibilityId(string automationID) method, also exposed by the session. The AccessibilityID is the identifier assigned to the elements in our test app. It can be applied using the attached property AutomationProperties.AutomationId. For example:
<telerik:RadRibbonButton Text="Reply"LargeImage="..\Images\Reply.png"Command="{Binding ReplyCommand}"Size="Large"CollapseToSmall="WhenGroupIsMedium"telerik:ScreenTip.Title="Reply"telerik:ScreenTip.Description="Reply to the sender of this message."telerik:KeyTipService.AccessText="R"AutomationProperties.AutomationId="buttonReply"/>For our convenience and for code readability, we create another class named TestsBaseExtensions. The purpose of this class is to hold in one place all logic we need for locating our elements.
Yet another way to find elements is by their names—FindElementByName(string elementName) where you pass the name of the element as a string.
Write Several Tests
Our first test will verify that the email fields of a selected email are properly filled in.
[TestMethod]public void AssureEmailFieldsAreFilledInTest(){string replyTo = "SethBarley@telerikdomain.es";string replyCC = "SethCavins@telerikdomain.uk";string subject = "RE: Let's have a party for new years eve";this.GetButtonReply().Click();Thread.Sleep(1000);Assert.AreEqual(replyTo, this.GetFieldReplyTo().Text);Assert.AreEqual(replyCC, this.GetFieldReplyCc().Text);Assert.AreEqual(subject, this.GetFieldSubject().Text);}public static class TestsBaseExtensions{private const string ButtonReplydId = "buttonReply";. . . . .public static WindowsElement GetButtonReply(this TestsBase testsBase){return testsBase.AppSession.FindElementByAccessibilityId(ButtonReplydId);}Using XPath can be trickier when you have elements that correspond to the same path. In such cases using FindElementsByXPath is useful as in the code above. This way you can further specify which element exactly you are trying to locate.
private const string fieldsReplyToCcSubjectXPath = "/Window[@Name=\"Inbox - Mark@telerikdomain.com - My Application\"][@AutomationId=\"MyApplication\"]/Custom[@ClassName=\"MailView\"]/Custom[@ClassName=\"RadDocking\"][@Name=\"Rad Docking\"]/Custom[@ClassName=\"RadSplitContainer\"][@Name=\"Rad Split Container\"]/Tab[@ClassName=\"RadPaneGroup\"][@Name=\"Rad Pane Group\"]/Edit[@ClassName=\"TextBox\"]";public static WindowsElement GetFieldReplyTo(this TestsBase testsBase){return testsBase.AppSession.FindElementsByXPath(fieldsReplyToCcSubjectXPath)[0];}Our second test is about replying to an email. Finding and locating elements is done the same way as in the previous example. See how the SelectAllText(), PerformDelete(), WriteText(string text) from our parent class TestsBase are used here. They use the Actions we mentioned earlier.
[TestMethod]public void ReplyToAnEmailTest(){string textToWrite = "Writing some text here...";this.GetButtonReply().Click();this.GetRichTextBoxReply().Click();this.SelectAllText();this.PerformDelete();this.WriteText(textToWrite);Assert.AreEqual(textToWrite, this.GetRichTextBoxReply().Text);this.GetButtonSendEmail().Click();Assert.AreEqual(@"Send's command executed.", this.GetElementByName(@"Send's command executed.").Text);this.GetElementByName("OK").Click();}I would like to draw your attention to the GetElementByName(string name) method. After the SendEmail button is clicked, a dialog that is not part of the same visual tree appears on the screen. To get that dialog and find the element, we first try to find the element using the AppSession , but, if this fails, then we use the DesktopSession from the base class. As you probably remember, the DesktopSession uses the whole desktop visual tree to find the element.
public static WindowsElement GetElementByName(this TestsBase testsBase, string elementName){try{return testsBase.AppSession.FindElementByName(elementName);}catch{Logger.LogMessage("Element was not found using the AppSession. Trying to locate the element using the DesktopSession.");}return testsBase.DesktopSession.FindElementByName(elementName);}In the third and final test in our test project, we verify that emails are properly marked as read.
[TestMethod]public void MarkMessageAsReadTest(){this.GetTabUnreadEmail().Click();this.GetUnreadEmailCellByFromAddress("SethCavins@telerikdomain.uk").Click();this.GetUnreadEmailCellByFromAddress("JimmieFields@telerikdomain.eu").Click();Assert.AreEqual("[31]", this.GetUInboxUnreadMessagesCount().Text);}Sum-up
In this walk-through article we were able to cover:
- What are Appium and WinAppDriver
- How to create a test project and to set up a test environment
- Different approaches on locating UI elements
- How to extract the XPath of an element using UI Recorder tool
- Writing several tests demonstrating a small part of Appium’s abilities.
Feel free to download and explore the full demo app and the test project we worked on. I hope this walkthrough will help you get started with automating your WPF applications using Appium and WinAppDriver. Any feedback or comments on the topic are more than welcome.

Petar Horozov
Petar Horozov is a Principal QA Engineer at Progress with more than 12 years of experience. He holds a master degree in Software Technologies. He is keen on cooking and loves sports, especially skiing and CrossFit.


