Azure DevOps and Telerik NuGet Packages

Summarize with AI:
Learn how to use the Telerik NuGet server, or NuGet packages with Azure Artifacts, in an Azure DevOps build pipeline.
As a Support Engineer, I frequently come across questions on how to use the Telerik NuGet server in Azure DevOps build pipelines. Since our NuGet server is a private feed that requires credentials, this can be confusing to set up the first time.
Let me help demystify this today by showing you two options you can use to restore Telerik NuGet packages in your build definitions.
- A Service Connection
- Manually with a PowerShell Task
- Azure Artifacts
Let's start with the more traditional approach and use the Service Connection and a nuget.config file to connect to the Telerik NuGet server to restore packages. Then, I'll explain how you host your own Telerik NuGet package(s) in an Azure Artifacts feed and restore packages from there instead.
Package Sources
In Visual Studio, you would add a private NuGet feed by going into the Tools > Options > NuGet > Package Sources and add a Package Source.
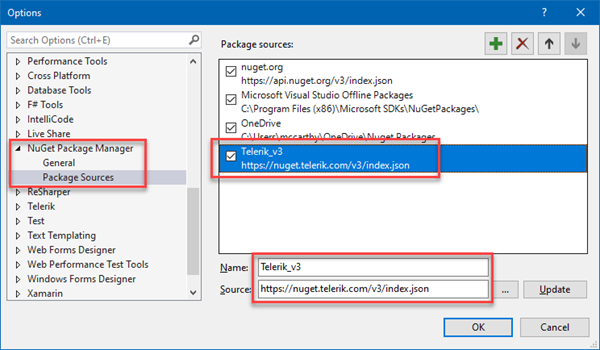
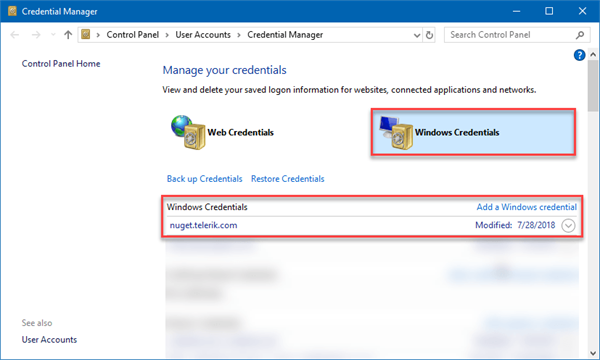
Visual Studio will prompt you for your Telerik credentials the first time the feed is accessed. These credentials can be later accessed via the Windows Credentials tab in the Credential Manager app (e.g. to update password).
However, what if your project is being built in an Azure DevOps build pipeline? How does the pipeline restore a package that is only in a private feed? This is where a NuGet config file comes into play. It allows you to set package sources as well as where to get the credentials.
Below is an example of a nuget.config file that will pull packages from the Telerik NuGet server. Notice the following important parts:
- The <packageSources> section. It contains a Telerik_NuGet package source, which points to the Telerik server's URL at https://nuget.telerik.com/v3/index.json
- The <packageSourceCredentials> section, it contains a child node with same name as one of the packageSources; "Telerik_NuGet". This is just one of the ways you can authenticate in an automated workflow (security note: do not use plain text for credentials use environment variables here instead).
<?xml version="1.0" encoding="utf-8"?>
<configuration>
  <packageSources>
    <add key="NuGet" value="https://api.nuget.org/v3/index.json" protocolVersion="3"/>
    <add key="Telerik_NuGet" value="https://nuget.telerik.com/v3/index.json" protocolVersion="3" />
  </packageSources>

  <!-- Use DevOps Service Connection instead of this section -->
  <packageSourceCredentials>
    <Telerik_NuGet>
       <add key="Username" value="%TELERIK_USERNAME%" />
      <add key="ClearTextPassword" value="%TELERIK_PASSWORD%" />
    </Telerik_NuGet>
  </packageSourceCredentials>
</configuration>
Note: We have released a new feature; NuGet Keys, which lets you use a token instead of your email and password. See Announcing Telerik NuGet Keys to learn more.
However, this could be a security issue in a CI/CD environment where another user might be able to read the values of environment variables when they are not stored safely as secrets. This is where the Azure pipelines Service Connection comes in handy.
The Azure DevOps Service Connection lets you enter credentials in a secure manner without unnecessarily exposing account details and that Service Connection can now be used by multiple pipelines to authenticate private NuGet feeds (and other services that need authentication).
Service Connection
In the following 4 minute video, I take you through the steps to set up the Service connection and how to use it in 3 different build Pipeline types:- Adding a Service connection at 0:00
- Classic pipeline for .NET Core at 1:14
- Classic .NET Framework pipeline at 1:47
- YAML pipeline setup for .NET Core at 2:25
Live Demos
If you are a hands-on learner, you can see the real thing by going to my DevOps Demo on GitHub. I constantly maintain that repo so that it is up to date with the latest CI guidance and Telerik packages.Bonus: That repo also includes GitHub Actions workflows for every project, GitLab CI and AppCenter and an Azure DevOps YAML pipeline.
Service Connection Walkthrough
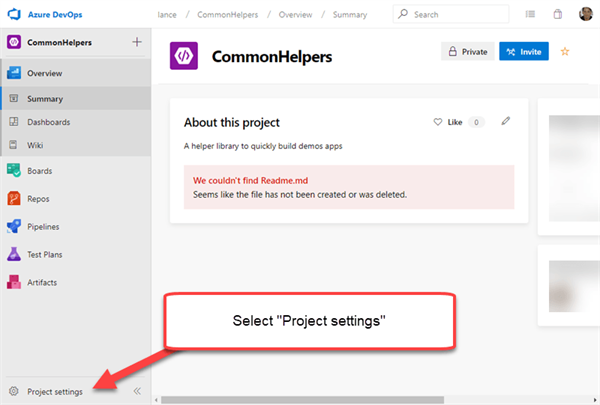
Let's walk through adding a Service Connection to the Telerik NuGet server. To start, go to the Project Settings in your DevOps project portal.
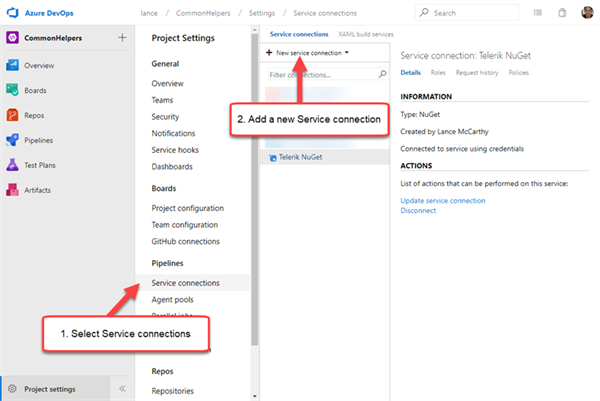
On the Project Settings page, select the Service Connections menu item under Pipelines and then open the New Service Connection drop down.
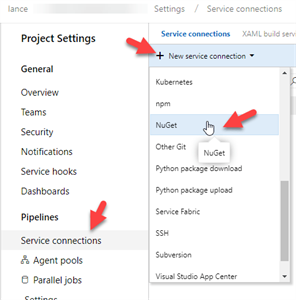
Select NuGet from the drop-down list.
You'll be presented with a dialog that lets you enter the URL and authentication credentials. For the Telerik NuGet server, you'll want to select Basic Authentication. Once that selection is made, you can enter the Telerik server URL and use your Telerik account credentials.
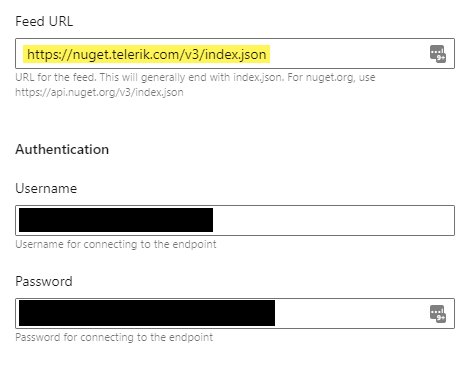
Once that is saved, your build pipelines can now fetch packages from the Telerik NuGet feed. Next, let's take a look at how a build pipeline uses the nuget.config and the Service Connection together to fetch the Telerik packages.
Using Telerik Service Connection
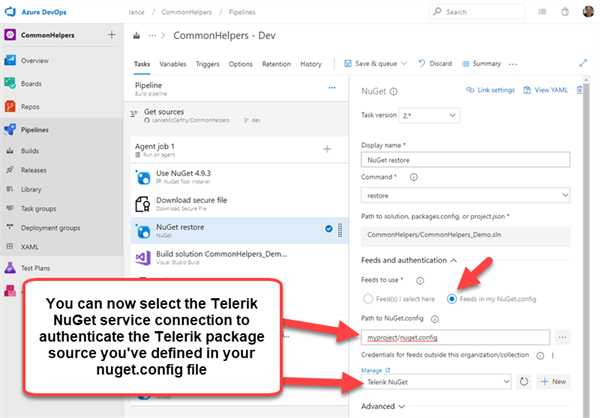
In your build pipeline, there's a NuGet Restore step. Select that step and look to the properties panel. Change the Feeds to Use selection to Feeds in my NuGet.config. A new drop-down will appear titled " Credentials for feeds outside this organization/collection." Open it and select the newly available Telerik NuGet Service Connection.
That's it! When you queue and run the pipeline, the Telerik NuGet packages will be restored.
Using a PowerShell Task
Sometimes a Service connection might not be available to you and you can't create one, or you might be using a different CI system like GitHub Actions. In every possible situation, you can always rely on adding a simple PowerShell (or Bash) step to your build that will restore the packages. Here's an example:# Use secrets to set nuget.config packageSourceCredentials's environment variables
$env:TELERIK_USERNAME = '$(MyTelerikEmail)'
$env:TELERIK_PASSWORD = '$(MyTelerikPassword)'
# Restore the dependencies
dotnet restore src/MyApp.sln --configfile src/nuget.config --runtime any
To do this yourself, you will need to first define the MyTelerikEmail and MyTelerikPassword secrets. "Secrets" might be called something different depending on the platform. For Azure DevOps, they're set on the Variables tab, come from the pipeline's
Library or Azure KeyVault. For GitHub, they're set on the Settings > Secrets tab.
Here is a screenshot of what that looks like in Azure: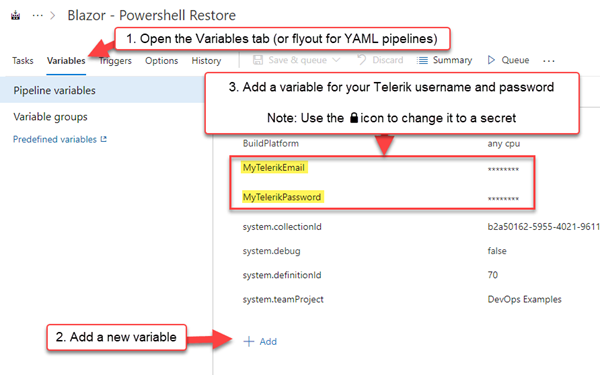
Now, you can add the restore step, which will pull in the packages from all the package sources in the nuget.config file, using the defined packageSourceCredentials!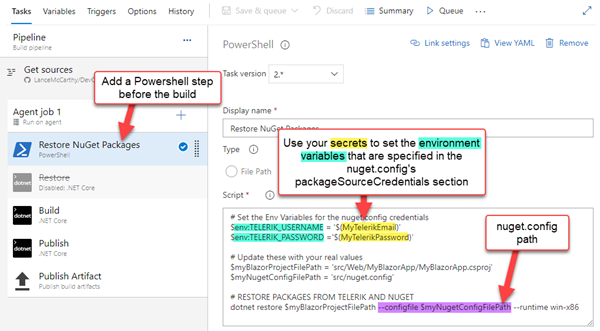
Using Azure Artifacts
Using a Service connection is our recommend approach. However there are scenarios where you don't have internet access in your DevOps environment (i.e. on-prem, high security) or you don't want the pipeline to be able to access other products in the Service
connection.
In these cases, you can still restore from a feed, but it'll be an Azure Artifacts feed.
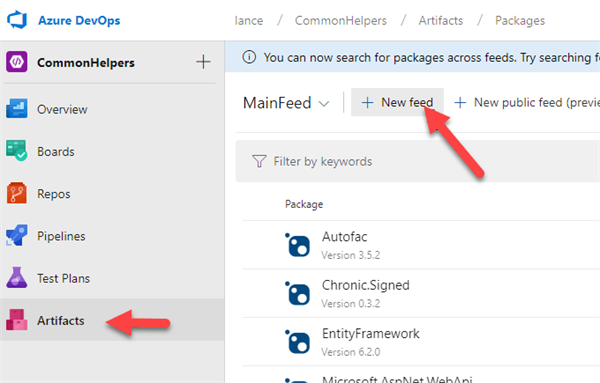
In the project's main menu, select Artifacts and then click the New Feed button at the top.
Give the feed a name (e.g. TelerikPackages), select the "Only use packages published to this feed" option, then click the Create button. You will now have your own feed that you can push nupkg files to, or drag and drop on, and it will handle the heavy lifting of the server duties.
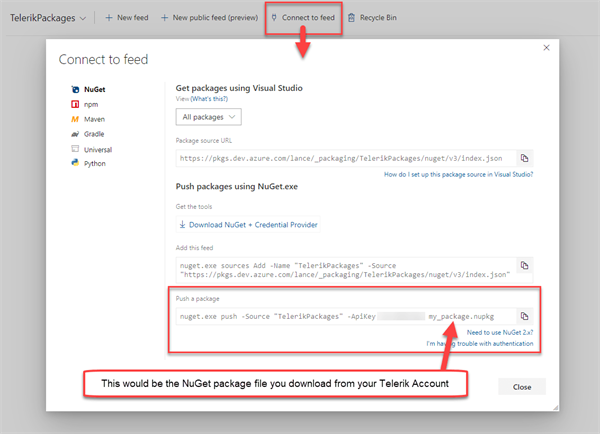
To see how to push packages to this feed, click the "Connect to feed" option at the top. A dialog will appear with helpful information on how you can push packages to that specific feed.
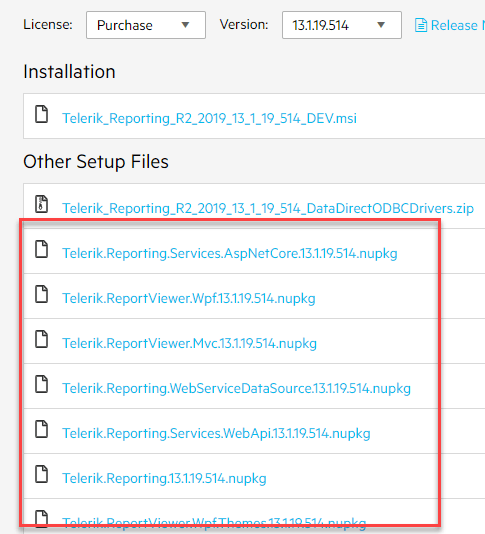
You can get the NuGet package file (nupkg) for any Telerik product you're using by going to the downloads page for that product. You can start at the My Account - All Products page.
Underneath the installer for the product, you'll see an Other Setup Files section where the nupkg files will be. For example, here's what it looks like for the Telerik Reporting packages.
The last piece of this puzzle is to go to the build pipeline and select that feed for a NuGet Restore step.
Using an Artifact Feed
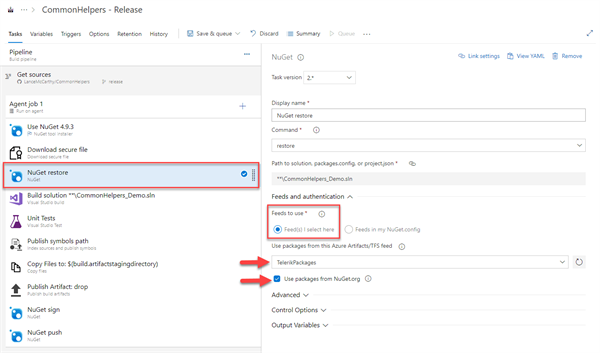
Just like we did above for the Service Connection, go to the build pipeline and select the NuGet Restore step. Except this time, you'd choose Feed(s) I select here and choose the TelerikPackages feed in the Use packages from this Azure Artifacts/TFS feed drop-down list.
Important: If you have nuget.org packages to restore in addition to the Telerik packages, leave the "Use packages from NuGet.org" option selected.
Wrapping Up
I hope this information helps show how you can use Telerik NuGet packages in your Azure DevOps pipelines. you can take Service Connection route or go with a more controlled Azure Artifacts option.
You can find more information on using Azure DevOps or Azure Artifacts in the following documentation:
If you have any questions, don't hesitate to reach out. I'm available on Twitter @l_anceM. If you're having problems with, or have questions about, the Telerik packages, you can talk directly to the engineers for that product by opening a Support Ticket.
Thanks for stopping by and have a great day!

Lance McCarthy
Lance McCarthy is a Senior Manager Technical Support for DevTools & Sitefinity, responsible for the Americas with additional responsibilities in product security and AI tooling. He's also a multiple-awarded Microsoft MVP (.NET & Windows Dev) who enjoys working with the developer community, sharing knowledge, presenting at events, and loves hackathons.
Lance still provides technical support for DevTools customers, answering cases focusing on security, .NET (desktop, mobile, web components), and CI/CD. Say hi the next time he answers one of your support tickets!

