Bind RadTreeView to Hierarchical Data and Use Style Binding
This tutorial demonstrates the usage of HierarchicalDataTemplate and Style Bindings in RadTreeView.
For more information about HierarchicalDataTemplate take a look at the HierarchicalDataTemplates topic.
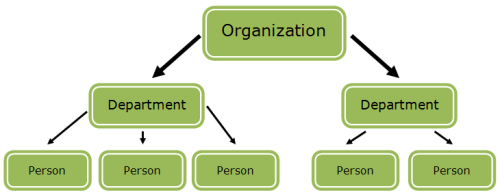
Imagine the following scenario. You have an Organization that has several Departments, and each Department has several Employees.
It is not that difficult to create a data source reflecting the above structure. This is how the three classes look like:
-
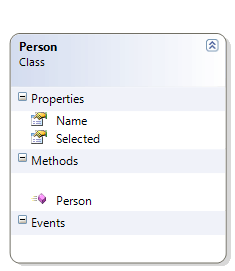
Person class:
 C#
C#public class Person { public Person() { } public string Name { get; set; } public bool Selected { get; set; } } -
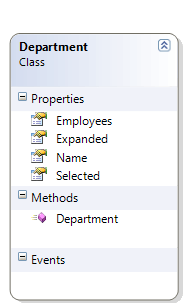
Department class:
 C#
C#public class Department { public Department() { this.Employees = new List<Person>(); } public string Name { get; set; } public bool Selected { get; set; } public bool Expanded { get; set; } public List<Person> Employees { get; set; } } -
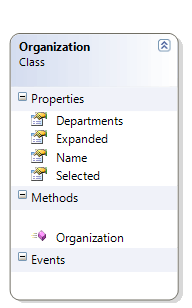
Organization class
 C#
C#public class Organization { public Organization() { this.Departments = new List<Department>(); } public string Name { get; set; } public bool Selected { get; set; } public bool Expanded { get; set; } public List<Department> Departments { get; set; } }
As you can see, an Organization has a Name and a list of Departments. A Department also has a Name, as well as a list of people that work in that Department. A Person has a Name. There are two more properties - Selected and Expanded. They will be explained further in the article, but in short, they will be used to control whether a certain RadTreeViewItem is expanded or selected.
Having the above three classes set up, it is time to create and populate a data source, which will be passed to the RadTreeView's ItemsSource property.
	public class DataSource : List<Organization>
	{
	    public DataSource()
	    {
	        Organization telerik = new Organization()
	        {
	            Name = "Telerik"
	        };
	        Department silverlight = new Department()
	        {
	            Name = "Silverlight"
	        };
	        Department wpf = new Department()
	        {
	            Name = "WPF"
	        };
	        telerik.Departments.Add( silverlight );
	        telerik.Departments.Add( wpf );
	        silverlight.Employees.Add( new Person()
	        {
	            Name = "John"
	        } );
	        silverlight.Employees.Add( new Person()
	        {
	            Name = "Ben"
	        } );
	        silverlight.Employees.Add( new Person()
	        {
	            Name = "Ann"
	        } );
	        wpf.Employees.Add( new Person()
	        {
	            Name = "Karoline"
	        } );
	        wpf.Employees.Add( new Person()
	        {
	            Name = "Simone"
	        } );
	        wpf.Employees.Add( new Person()
	        {
	            Name = "Eduard"
	        } );
	        this.Add( telerik );
	    }
}And setting RadTreeView's ItemsSource property in XAML:
	<UserControl.Resources>
	    <example:DataSource x:Key="TreeViewDataSource"/>
</UserControl.Resources> <telerik:RadTreeView Margin="8"
SelectionMode="Multiple"
ItemsSource="{Binding Source={StaticResource TreeViewDataSource}}"/>Now it is time to define how each level of the RadTreeView will look like. You should use HierarchicalDataTemplate.
	<!--Data template for the Person object-->
	<DataTemplate  DataType="{x:Type sampleData:Person}">
	    <TextBlock Text="{Binding Name}" Foreground="Red" FontSize="16" FontFamily="Verdana" />
	</DataTemplate>

	<!--Data template for the Department object-->
	<HierarchicalDataTemplate DataType="{x:Type sampleData:Department}"
	    ItemsSource="{Binding Employees}">
	    <TextBlock Text="{Binding Name}" Foreground="Blue" FontSize="22" FontFamily="Verdana" />
	</HierarchicalDataTemplate>

	<!--Data template for the Organization object-->
	<HierarchicalDataTemplate  DataType="{x:Type sampleData:Organization}"
	    ItemsSource="{Binding Departments}">
	    <TextBlock Text="{Binding Name}" Foreground="Green" FontSize="28" FontFamily="Verdana" />
	</HierarchicalDataTemplate>
But what if you want to expand only the "Silverlight" node and to select the "John" node, leaving the WPF node collapsed. This is where the Style Binding comes in hand.
Define a new style with RadTreeViewItem for target type.
	<Style x:Key="ItemContainerStyle" TargetType="{x:Type telerik:RadTreeViewItem}">
	    <Setter Property="IsSelected" Value="{Binding Path=Selected}"/>
	    <Setter Property="IsExpanded" Value="{Binding Path=Expanded}"/>
	</Style>
Find your treeview declaration and set the ItemContainerStyle property.
	<telerik:RadTreeView  Margin="8"
	    SelectionMode="Multiple"
	    ItemsSource="{Binding Source={StaticResource TreeViewDataSource}}"
	    ItemContainerStyle="{StaticResource ItemContainerStyle}"/>
As you can see, the IsSelected property of each RadTreeViewItem is bound to the Selected property in the data source. The same is with the IsExpanded property. That's why now you have to update your data source.
	public DataSource()
	{
	    Organization telerik = new Organization()
	    {
	        Name = "Telerik",
	        Expanded = true,
	        Selected = false
	    };
	    Department silverlight = new Department()
	    {
	        Name = "Silverlight",
	        Expanded = true,
	        Selected = false
	    };
	    Department wpf = new Department()
	    {
	        Name = "WPF",
	        Expanded = false,
	        Selected = false
	    };
	    telerik.Departments.Add( silverlight );
	    telerik.Departments.Add( wpf );
	    silverlight.Employees.Add( new Person()
	    {
	        Name = "John",
	        Selected = true
	    } );
	    silverlight.Employees.Add( new Person()
	    {
	        Name = "Ben",
	        Selected = false
	    } );
	    silverlight.Employees.Add( new Person()
	    {
	        Name = "Ann",
	        Selected = false
	    } );
	    wpf.Employees.Add( new Person()
	    {
	        Name = "Karoline",
	        Selected = false
	    } );
	    wpf.Employees.Add( new Person()
	    {
	        Name = "Simone",
	        Selected = false
	    } );
	    wpf.Employees.Add( new Person()
	    {
	        Name = "Eduard",
	        Selected = false
	    } );
	    this.Add( telerik );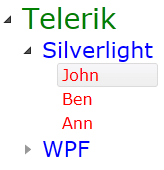
}So now, if you run the project, you will see the following result:
If you want to implement two way data binding, your business objects should implement the INotifyPropertyChanged interface. Additionally, you should set the Binding's Mode to TwoWay in the Style declaration.
<Style x:Key="ItemContainerStyle" TargetType="{x:Type telerik:RadTreeViewItem}"><Setter Property="IsSelected" Value="{Binding Path=Selected, Mode=TwoWay}"/><Setter Property="IsExpanded" Value="{Binding Path=Expanded, Mode=TwoWay}"/></Style>