Data Annotations
This article will show you how to use Data Annotations with RadPropertyGrid.
We will discuss the following attributes:
They allow you to categorize different properties into separate groups, set some of them as read-only or define description for each one of them.
Creating RadPropertyGrid Application
First, for the purpose of this article, we will create a new Employee class with a couple of properties:
Example 1: Creating the Employee class
	public class Employee
	{
	    public string FirstName { get; set; }
	    public string LastName { get; set; }
	    public string PhoneNum { get; set; }
	    public int Salary { get; set; }
	    public string Occupation { get; set; }
	    public DateTime StartingDate { get; set; }
}The declaration of RadPropertyGrid control inside the Grid:
Example 2: Declaring RadPropertyGrid
<telerik:RadPropertyGrid x:Name="propertyGrid1" />Once the class Employee is defined, you may use it for creating an object of this type and bind it to RadPropertyGrid:
Example 3: Binding Employee instance to RadPropertyGrid
	this.propertyGrid1.Item = new Employee()
	{
	    FirstName = "Sarah",
	    LastName = "Blake",
	    PhoneNum = "(555) 943-231",
	    Occupation = "Supplies Manager",
	    Salary = 3500,
	    StartingDate = new DateTime(2005, 12, 4)
};After you run the application you should see the following:
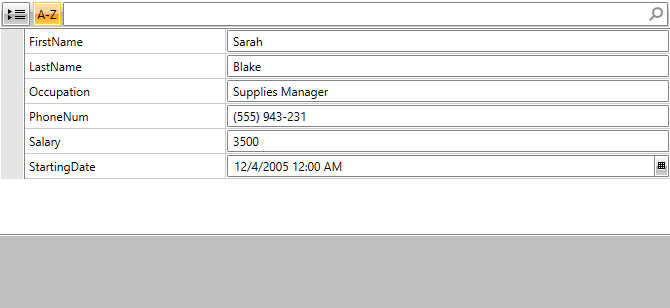
Figure 1: RadPropertyGrid bound to an Employee instance
If you want to use Data Annotations in your application, you have to add a reference to the System.ComponentModel.DataAnnotations assembly.
Display
The Display attribute specifies localizable strings for data types and members that are used in the user interface. You can use its following properties:
-
Name: The value to be displayed instead of the property name.
-
Description: A description of the property. This will be shown in RadPropertyGrid's DescriptionPanel.
-
GroupName: Used when you want to categorize different properties into separate groups.
-
Order: Used when you want to set a property's display order.
Example 4 demonstrates how you can specify a Display attribute for a property:
Example 4: Setting Display attribute
	//Rename the StartingDate property to Year in the UI
	[Display(Name = "Year")]
	public DateTime StartingDate { get; set; }
	//Set a description to the FirstName property and categorize it to be from the group "Personal Information"
	[Display(Description = "Employee's first name.", GroupName = "Personal Information")]
	public string FirstName { get; set; }
	//Set a description to the LastName property and categorize it to be from the group "Personal Information"
	[Display(Description = "Employee's last name.", GroupName = "Personal Information")]
public string LastName { get; set; }Browsable
The Browsable attribute specifies whether a property should be displayed or not.
Example 5: Setting Browsable attribute
	//Hide StartingDate from the UI
	[Browsable(false)]
public DateTime StartingDate { get; set; }ReadOnly
The ReadOnly attribute specifies whether the property this attribute is bound to is read-only or read/write.
Example 6: Setting ReadOnly attribute
	//Set StartingDate as Read-Only
	[ReadOnly(true)]
public DateTime StartingDate { get; set; }To see these attributes in action, let's modify the Employee class and see the result in RadPropertGrid.
Example 7: Modifying sample data
	[Display(Description = "Employee's first name.", GroupName = "Personal Information")]
	public string FirstName { get; set; }
	[Display(Description = "Employee's last name.", GroupName = "Personal Information")]
	public string LastName { get; set; }
	[Display(Name = "Occupation", GroupName = "Job Description")]
	public string Occupation { get; set; }
	[Browsable(false)]
	public int Salary { get; set; }
	[Display(Name = "Number", GroupName = "Job Description")]
	public string PhoneNum { get; set; }
	[ReadOnly(true)]
public DateTime StartingDate { get; set; }Here's the resulting RadPropertyGrid sorted alphabetically and in grouped mode:
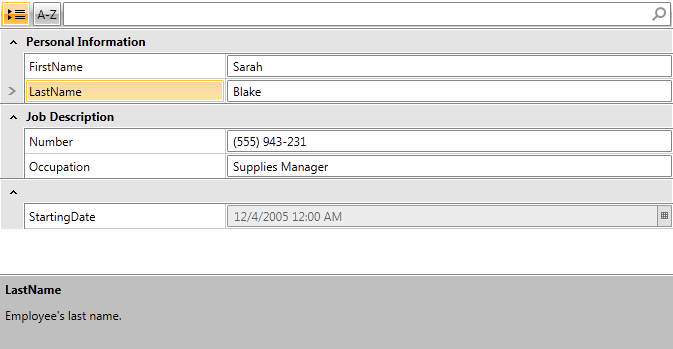
Figure 2: RadPropertyGrid with data annotations sorted alphabetically
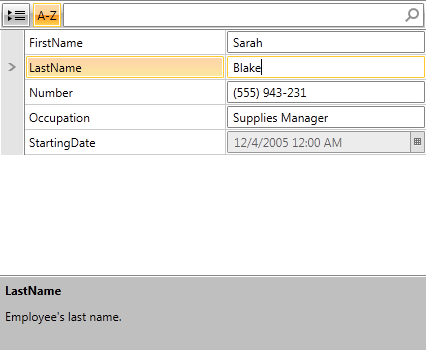
Figure 3: RadPropertyGrid with data annotations in grouped mode