GanttView Styles
You can check how to set a theme to the control in this topic. Using implicit styles makes it much easier to customize different parts of the control.
Before proceeding, check the Implicit Style article.
You can modify the look of the RadGanttView and its elements separately by simply creating an implicit style with the correct TargetType. Also you will have the option to create a Style based on the default Style for a certain element.
Let’s for example have a GanttView control defined like this:
<telerik:RadGanttView x:Name="ganttView" TasksSource="{Binding Tasks}" >
<telerik:RadGanttView.TimeRulerLines>
<telerik:GroupTickLine>
<telerik:TickInterval Interval="OneWeek" />
</telerik:GroupTickLine>
<telerik:MajorTickLine>
<telerik:TickInterval Interval="OneDay" />
</telerik:MajorTickLine>
<telerik:MinorTickLine>
<telerik:TickInterval Interval="ThreeHours" />
</telerik:MinorTickLine>
</telerik:RadGanttView.TimeRulerLines>
<telerik:RadGanttView.Columns>
<telerik:TreeColumnDefinition MemberBinding="{Binding Title}" Header="Title" Width="AutoHeaderAndContent"/>
<telerik:ColumnDefinition MemberBinding="{Binding Start}" Header="Start" Width="AutoHeaderAndContent"/>
<telerik:ColumnDefinition MemberBinding="{Binding End}" Header="End" Width="AutoHeaderAndContent"/>
</telerik:RadGanttView.Columns>
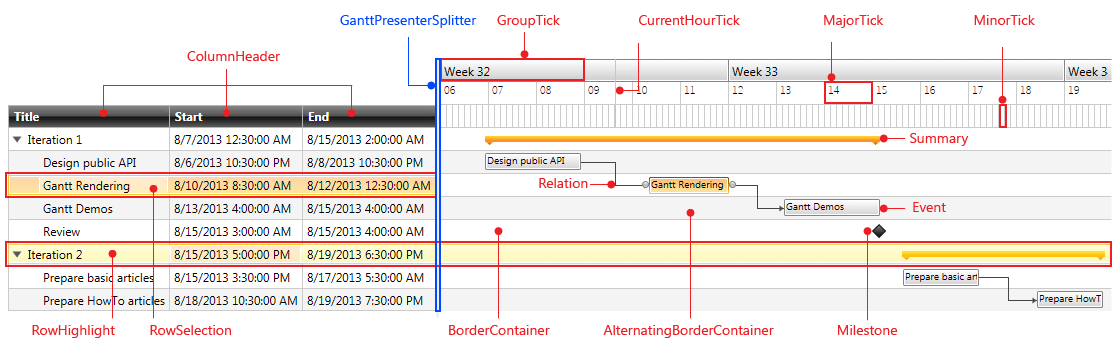
</telerik:RadGanttView>The following scheme shows the name of each element that can be styled:
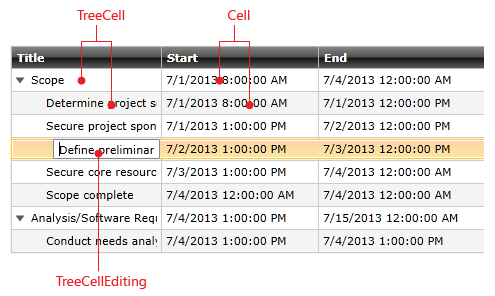
In the next screenshots we will focus on the Columns part of the GanttView control:
CellHighlight and TreeCellHighlight are used for both highlighted and selected states of the Cell/TreeCell respectively.
If we have CellTemplate and/or CellEditTemplate defined, the generated containers are different. For example, let&s change our GanttView Columns like this:
<telerik:RadGanttView x:Name="ganttView2" TasksSource="{Binding Tasks}" >
<!--...-->
<telerik:RadGanttView.Columns>
<telerik:TreeColumnDefinition Header="Title" MemberBinding="{Binding Title}" Width="AutoHeaderAndContent">
<telerik:TreeColumnDefinition.CellTemplate >
<DataTemplate>
<TextBlock Text="{Binding Title}" />
</DataTemplate>
</telerik:TreeColumnDefinition.CellTemplate>
<telerik:TreeColumnDefinition.CellEditTemplate>
<DataTemplate>
<TextBox Text="{Binding Title,Mode=TwoWay}" />
</DataTemplate>
</telerik:TreeColumnDefinition.CellEditTemplate>
</telerik:TreeColumnDefinition>
<telerik:ColumnDefinition MemberBinding="{Binding Start}" Header="Start" Width="AutoHeaderAndContent">
<telerik:ColumnDefinition.CellTemplate >
<DataTemplate>
<TextBlock Text="{Binding Start}" />
</DataTemplate>
</telerik:ColumnDefinition.CellTemplate>
<telerik:ColumnDefinition.CellEditTemplate>
<DataTemplate>
<telerik:RadDateTimePicker SelectedValue="{Binding Start,Mode=TwoWay}" />
</DataTemplate>
</telerik:ColumnDefinition.CellEditTemplate>
</telerik:ColumnDefinition>
<!--...-->
</telerik:RadGanttView.Columns>
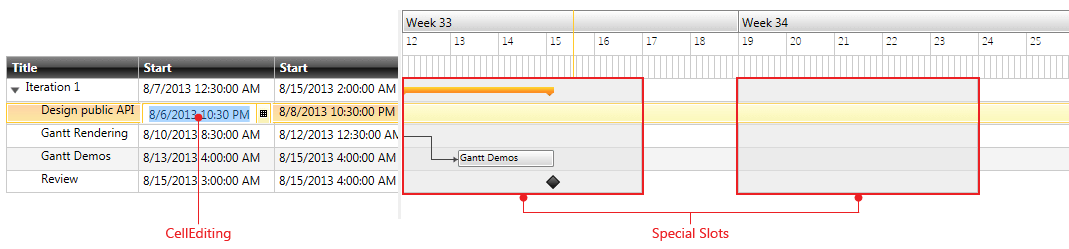
</telerik:RadGanttView>The containers in the grid will be Cell/TreeCell instead of SimpleCell/SimpleTreeCell. Also the containers for editing will be CellEditing/TreeCellEditing:
In case we have SpecialSlots defined:
	<telerik:RadGanttView x:Name="ganttView1" TasksSource="{Binding Tasks}" >
	    <!--...-->
	    <telerik:RadGanttView.SpecialSlotsGenerator>
	        <telerik:WeekDaysGenerator FirstDay="Monday" DaysCount="5" />
	    </telerik:RadGanttView.SpecialSlotsGenerator>
	</telerik:RadGanttView>
We can style them as well:
The next screenshots show all the elements used for DragDrop and Resize functionality of the control:
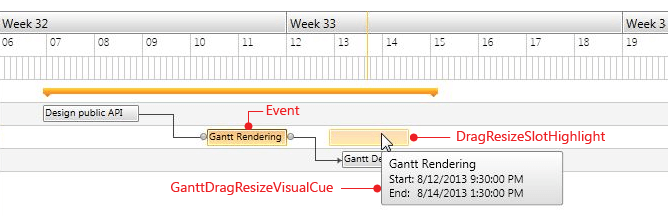
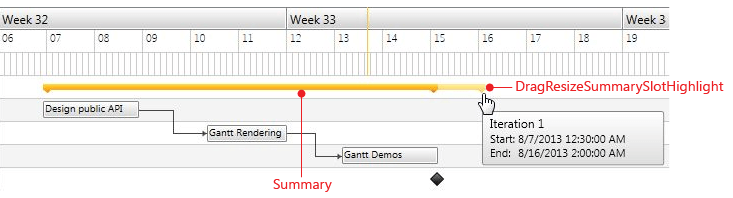
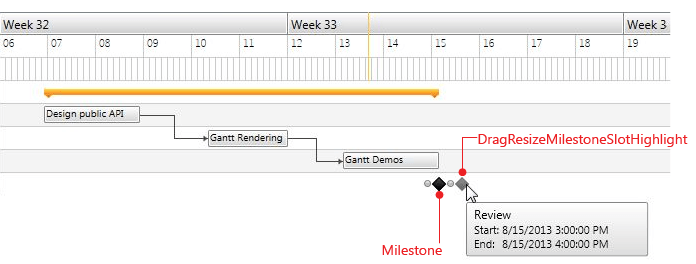
In the following table you will find the corresponding TargetType for each of these elements:
| Element | TargetType |
|---|---|
| Relation | RelationContainer |
| Event | EventContainer |
| Summary | SummaryContainer |
| Milestone | MilestoneContainer |
| ColumnHeader | ColumnHeaderContainer |
| SimpleCell | SimpleCellContainer |
| Cell | CellContainer |
| CellHighlight | CellHighlightContainer |
| CellEditing | CellEditingContainer |
| SimpleTreeCell | SimpleTreeCellContainer |
| TreeCell | TreeCellContainer |
| TreeCellHighlight | TreeCellHighlightContainer |
| TreeCellEditing | TreeCellEditingContainer |
| BorderContainer | BorderContainer |
| AlternatingBorderContainer | AlternatingBorderContainer |
| SpecialSlot | SpecialSlotContainer |
| GroupTick | GroupTickContainer |
| MinorTick | MinorTickContainer |
| MajorTick | MajorTickContainer |
| CurrentHourTick | CurrentHourTickContainer |
| RowHighlight | RowHighlightContainer |
| RowSelection | RowSelectionContainer |
| DragResizeSlotHighlight | DragResizeSlotHighlightContainer |
| DragResizeMilestoneSlotHighlight | DragResizeMilestoneSlotHighlightContainer |
| DragResizeSummarySlotHighlight | DragResizeSummarySlotHighlightContainer |
| GanttDragResizeVisualCue | GanttDragResizeVisualCue |
| GanttPresenterSplitter | GanttPresenterSplitter |
| ExpandToggleButton | ToggleButton |
| Deadline | DeadlineContainer |
Examples
We will go through two examples:
Basing Styles on a theme Style
Each of these containers listed in the table has a style formed by the name of the container type followed by a “Style” suffix. For example, for the EventContainer there is a style with x:Key=”EventContainerStyle”.
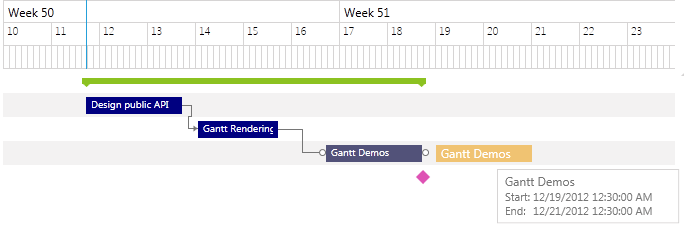
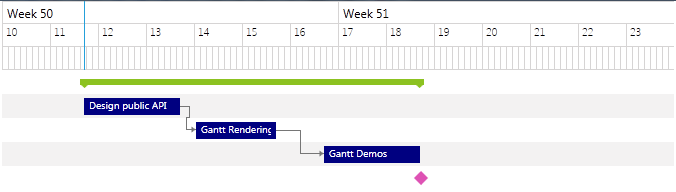
So, let’s create the following implicit style:
	<Style TargetType="telerik:EventContainer" BasedOn="{StaticResource EventContainerStyle}">
	    <Setter Property="Foreground" Value="White" />
	    <Setter Property="Background" Value="Navy" />
	</Style>
This will lead to the following result:
Setting implicit style to a certain element
In case you need to further customize an element, you could create an implicit style for it. Here is a simple example for the DragResizeSlotHighlightContainer element:
	<Style TargetType="gantt:DragResizeSlotHighlightContainer">
	    <Setter Property="BorderBrush" Value="{x:Null}" />
	    <Setter Property="BorderThickness" Value="0" />
	    <Setter Property="HorizontalContentAlignment" Value="Stretch" />
	    <Setter Property="VerticalContentAlignment" Value="Stretch" />
	    <Setter Property="VerticalAlignment" Value="Center" />
	    <Setter Property="MinHeight" Value="17" />
	    <Setter Property="Padding" Value="5 0" />
	    <Setter Property="Background" Value="Orange" />
	    <Setter Property="Foreground" Value="{StaticResource MainBrush}" />
	    <Setter Property="scheduling:ZIndexManager.ZIndex" Value="35" />
	    <Setter Property="Template">
	        <Setter.Value>
	            <ControlTemplate TargetType="gantt:DragResizeSlotHighlightContainer">
	                <Grid>
	                    <Border Background="{TemplateBinding Background}" HorizontalAlignment="Stretch" VerticalAlignment="Stretch" Opacity="0.7"></Border>
	                    <Border Background="{StaticResource BasicBrush}" Opacity="0.3" HorizontalAlignment="Stretch" VerticalAlignment="Stretch" />
	                    <TextBlock Text="{Binding Task.Title}" Foreground="{TemplateBinding Foreground}" Margin="{TemplateBinding Padding}" />
	                </Grid>
	            </ControlTemplate>
	        </Setter.Value>
	    </Setter>
	</Style>
After adding this Style, the element will look like this: