Custom Busy Content
RadBusyIndicator provides the option to customize what's shown in the RadBusyIndicator's content while the indicator is active through its BusyContent and BusyContentTemplate properties. We will cover them in the following sections:
Setting BusyContent property
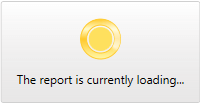
BusyContent property sets the loading message while the indicator is active as shown in the following example:
Setting BusyContent
	<telerik:RadBusyIndicator BusyContent="The report is currently loading..." >
        <!-- the content here -->
    </telerik:RadBusyIndicator>
Here is the result:
Setting BusyContentTemplate property
RadBusyIndicator exposes a BusyContentTemplate property which allows you to customize the DataTemplate shown while the indicator is in Busy state.
In this section we will show you how to create and apply a simple BusyContentTemplate to your RadBusyIndicator control. For the purpose of this example we will create a DispatcherTimer timer and while this timer is on, the RadBusyIndicator will also be active. To start the timer the user will have to click on a button. The example also includes a counter representing the progress value which will count down from 100 to 0 percent and will be visible through the RadBusyIndicator's busy content.
To do this, first you have to define your RadBusyIndicator control:
Defining RadBusyIndicator
	<telerik:RadBusyIndicator x:Name="radBusyIndicator"
	                          Background="Transparent"
	                          BusyContentTemplate="{StaticResource BusyContentDataTemplate}">
	    <Grid>
	         <TextBlock Text="Some Content"
	                    TextAlignment="Center" />
	         <Button Content="Show RadBusyIndicator"
	                 VerticalAlignment="Bottom"
	                 Click="showIndicatorButton_Click"
	                 Width="150" />
	    </Grid>
	</telerik:RadBusyIndicator>
Notice that the RadBusyIndicator's Background property is set to Transparent. This will be the background applied to the indicator's content and the Grid hosting the RadBusyIndicator's progress bar and content elements.
In the RadBusyIndicator's definition you have indicated the BusyContentTemplate, that's why you have to define this DataTemplate as well. Here is an example:
Defining DataTemplate
	<DataTemplate x:Key="BusyContentDataTemplate">
	    <StackPanel Orientation="Horizontal"
	                DataContext="{Binding DataContext, ElementName=radBusyIndicator}">
	        <TextBlock Text="Loading... "
	                   FontWeight="Bold" />
	        <TextBlock Text="{Binding ProgressValue}"
	                   FontWeight="Bold" />
	        <TextBlock Text="%"
	                   FontWeight="Bold" />
	    </StackPanel>
	</DataTemplate>
In the code behind you have to:
-
Create and initialize the DispatcherTimer object.
-
Handle the click event for the button:
-
Enable the RadBusyIndicator by setting its IsBusy property to True.
-
Start the timer that will count down some period of time.
-
-
Handle the tick event for the timer:
-
Modify the counter (progress) property.
-
Disable the RadBusyIndicator by setting its IsBusy property to False in a specific condition.
-
You can also create a determined RadBusyIndicator control which provides a straightforward way to report a changing progress value.
In order to use the DispatcherTimer and the INotifyPropertyChanged interface you will need to add the following usings/imports:
- System.ComponentModel
- System.Windows.Threading
BusyContentTemplateSample class implementation
	public partial class BusyContentTemplateSample : UserControl, INotifyPropertyChanged
	{
	    private int progressValue;
	    private DispatcherTimer progressTimer;
	    public event PropertyChangedEventHandler PropertyChanged;
	    public BusyContentTemplateSample()
	    {
	        InitializeComponent();
	        this.DataContext = this;

	        this.progressTimer = new DispatcherTimer();
	        this.progressTimer.Interval = TimeSpan.FromSeconds( 1 );
	        this.progressTimer.Tick += new EventHandler( this.progressTimer_Tick );
	    }
	    public int ProgressValue
	    {
	        get
	        {
	            return this.progressValue;
	        }
	        set
	        {
	            if ( this.progressValue == value )
	                return;
	            this.progressValue = value;
	            if ( this.PropertyChanged != null )
	                this.PropertyChanged( this, new PropertyChangedEventArgs( "ProgressValue" ) );
	        }
	    }
	    private void showIndicatorButton_Click( object sender, RoutedEventArgs e )
	    {
	        this.progressTimer.Start();
	        this.ProgressValue = 100;
	        this.radBusyIndicator.IsBusy = true;
	    }
	    private void progressTimer_Tick( object sender, EventArgs e )
	    {
	        this.ProgressValue--;
	        if ( this.ProgressValue == 0 )
	        {
	            this.progressTimer.Stop();
	            this.radBusyIndicator.IsBusy = false;
	        }
	    }
	}
BusyContentTemplateSample class implementation
	Public Partial Class BusyContentTemplateSample
	 Inherits UserControl
	 Implements INotifyPropertyChanged
	 Private m_progressValue As Integer
	 Private progressTimer As DispatcherTimer
	 Public Event PropertyChanged As PropertyChangedEventHandler
	 Public Sub New()
	  InitializeComponent()
	  Me.DataContext = Me
	  Me.progressTimer = New DispatcherTimer()
	  Me.progressTimer.Interval = TimeSpan.FromSeconds(1)
	  Me.progressTimer.Tick += New EventHandler(Me.progressTimer_Tick)
	 End Sub
	 Public Property ProgressValue() As Integer
	  Get
	   Return Me.m_progressValue
	  End Get
	  Set
	   If Me.m_progressValue = value Then
	    Return
	   End If
	   Me.m_progressValue = value
	   RaiseEvent PropertyChanged(Me, New PropertyChangedEventArgs("ProgressValue"))
	  End Set
	 End Property
	 Private Sub showIndicatorButton_Click(sender As Object, e As RoutedEventArgs)
	  Me.progressTimer.Start()
	  Me.ProgressValue = 100
	  Me.radBusyIndicator.IsBusy = True
	 End Sub
	 Private Sub progressTimer_Tick(sender As Object, e As EventArgs)
	  Me.ProgressValue -= 1
	  If Me.ProgressValue = 0 Then
	   Me.progressTimer.[Stop]()
	   Me.radBusyIndicator.IsBusy = False
	  End If
	 End Sub
	End Class
Here is the final result:
