Storage (S3)
The Amazon Simple Storage Service (Amazon S3) is a storage service that allows you to upload any kind of data at any time, from anywhere. This article will demonstrate how one can use this service from a WPF application and manage the uploaded files.
Step 1: Create the WPF Application
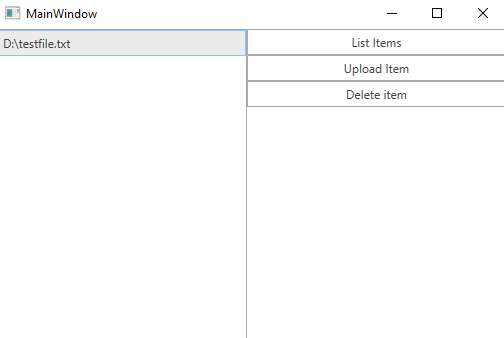
Create a standard WPF application and add 3 RadButtons and a RadListBox to it. The first button will list all of the files uploaded in our storage. The second button will upload a file and the third one will delete the selected file in the RadListBox.
Example 1: Defining the view
    <Grid>
        <Grid.ColumnDefinitions>
            <ColumnDefinition Width="250" />
            <ColumnDefinition />
        </Grid.ColumnDefinitions>

        <telerik:RadListBox x:Name="radListBox" ItemsSource="{Binding FileNames}" SelectedItem="{Binding SelectedItem, Mode=TwoWay}" />

        <Grid Grid.Column="1">
            <Grid.RowDefinitions>
                <RowDefinition Height="Auto" />
                <RowDefinition Height="Auto"/>
                <RowDefinition Height="Auto"/>
            </Grid.RowDefinitions>

            <telerik:RadButton Command="{Binding ListItemsCommand}"  Content="List Items"/>
            <telerik:RadButton Command="{Binding UploadItemCommand}" Content="Upload Item" Grid.Row="1"/>
            <telerik:RadButton Command="{Binding DeleteItemCommand}" Content="Delete item" Grid.Row="2"/>
        </Grid>
    </Grid>
Step 2: Install the NuGet package
Open the NuGet Package Manager and install the AWSSDK.S3 package.

In addition you need to add the following to your App.config file:
Example 2: Adding the AWS Profile in App.config
    <?xml version="1.0" encoding="utf-8" ?>
        <configuration>
            <appSettings>
                <add key="AWSProfileName" value="Telerik"/>
                <add key="AWSRegion" value="eu-west-3" />
            </appSettings>
        </configuration>
If you do not have an AWS account in Visual Studio, please check the Getting Started article.
Step 3: Create a new bucket
Before proceeding with the example you will have to create a new bucket using the AWS Management Console. You can learn how to do that in the Creating a Bucket article.
Step 4: Define the ViewModel
The next step is to create the ViewModel. It will need an IAmazonS3 client object which will be used for managing the data. We also need to implement all of the commands that the RadButtons are bound to.
Example 3: Defining the ViewModel
    public class ViewModel
    {
        string bucketName = "mytestbucket";
        IAmazonS3 client;

        private object selectedItem;
        private ObservableCollection<string> fileNames;
        private IFileDialogService fileDialogService;

        public ViewModel(IFileDialogService fileDialogService)
        {
            this.fileNames = new ObservableCollection<string>();
            this.ListItemsCommand = new DelegateCommand(OnListItems);
            this.UploadItemCommand = new DelegateCommand(OnUploadItem);
            this.DeleteItemCommand = new DelegateCommand(OnDeleteItem);
            this.fileDialogService = fileDialogService;
            this.client = new AmazonS3Client();
        }

        public object SelectedItem
        {
            get { return this.selectedItem; }
            set { this.selectedItem = value; }
        }

        public ObservableCollection<string> FileNames
        {
            get { return this.fileNames; }
            set { this.fileNames = value; }
        }

        private ICommand listItemsCommand;

        public ICommand ListItemsCommand
        {
            get { return this.listItemsCommand; }
            set { this.listItemsCommand = value; }
        }

        private ICommand deleteItemCommand;

        public ICommand DeleteItemCommand
        {
            get { return this.deleteItemCommand; }
            set { this.deleteItemCommand = value; }
        }

        private ICommand uploadItemCommand;

        public ICommand UploadItemCommand
        {
            get { return this.uploadItemCommand; }
            set { this.uploadItemCommand = value; }
        }

        private void OnDeleteItem(object obj)
        {
            if (this.SelectedItem == null)
            {
                MessageBox.Show("Please select an Item");
                return;
            }

            string keyName = this.SelectedItem.ToString();
            DeleteObjectRequest request = new DeleteObjectRequest()
            {
                BucketName = bucketName,
                Key = keyName
            };

            var response = client.DeleteObject(request);
        }

        private void OnUploadItem(object obj)
        {
            var fileName = fileDialogService.OpenFileDialog();
            PutObjectRequest request = new PutObjectRequest()
            {
                BucketName = bucketName,
                Key = fileName
            };

            PutObjectResponse response = client.PutObject(request);
        }

        private void OnListItems(object obj)
        {
            var objects = client.ListObjects(bucketName);

            this.FileNames.Clear();

            foreach (S3Object item in objects.S3Objects)
            {
                this.FileNames.Add(item.Key);
            }
        }
}Step 5: Define the OpenFileDialogService
The only thing left is to define the interface through which we are opening the RadOpenFileDialog. We also need to define the implementation of that interface which will simply open a RadOpenFileDialog and return the path of the opened file.
Example 4: Defining the OpenFileDialogService and IFileDialogService
    public interface IFileDialogService
    {
        string OpenFileDialog();
    }

    public class OpenFileDialogService : IFileDialogService
    {
        public string OpenFileDialog()
        {
            RadOpenFileDialog choosefiledialog = new RadOpenFileDialog();
            choosefiledialog.Filter = "All Files (*.*)|*.*";
            choosefiledialog.FilterIndex = 1;
            choosefiledialog.Multiselect = false;
            choosefiledialog.ShowDialog();

            if (choosefiledialog.DialogResult == true)
            {
                return choosefiledialog.FileName;
            }

            return string.Empty;
        }
}All that is left is to set the DataContext to our ViewModel and pass an instance of the OpenFileDialogService.
Example 5: Set the DataContext
    public MainWindow()
    {
        InitializeComponent();
        this.DataContext = new ViewModel(new OpenFileDialogService());
}Figure 1: Example after uploading a file and listing it in the Office2016 theme