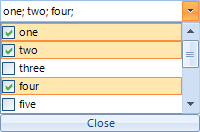
Multi select drop down list
| Date Posted | Product | Author |
|---|---|---|
| Q1 2013 | Telerik UI for WinForms | Tsvetan Raikov |
How To
By default, RadDropDownList does not support selecting multiple items out of the box. This article will guide to through the process of extending the functionality of RadDropDownList to support multi selection with check boxes.
As of Q3 2014 (version 2014.3.1021) Telerik UI for WinForms suite offers RadCheckedDropDownList control which combines RadDropDownList and RadAutoCompleteBox in order to provide functionality to check items in the drop down area and tokenize them in the text area. All previous functionality is preserved, such as visual formatting and data binding, which is now extended.
Solution
First, we will start by creating CustomDropDownList, which inherits from RadDropDownList. We should override the ThemeClassName in order to allow the control to use the RadDropDownList theme and the CreateDropDownListElement, where we will return an instance of a CustomEditorElement and will define the collection editor for our items at design time, so we can add our custom items:
public class CustomDropDownList : RadDropDownList
{
    public override string ThemeClassName
    {
        get
        {
            return typeof(RadDropDownList).FullName;
        }
        set
        {
        }
    }

    protected override RadDropDownListElement CreateDropDownListElement()
    {
        return new CustomEditorElement();
    }

    [DesignerSerializationVisibility(DesignerSerializationVisibility.Content),
    Editor(typeof(CustomListControlCollectionEditor), typeof(UITypeEditor)),
    Category(RadDesignCategory.DataCategory)]
    [Description("Gets a collection representing the items contained in this RadDropDownList.")]
    public new RadListDataItemCollection Items
    {
        get { return base.Items; }
    }
}
Now, we have to create the CustomEditorElement. In the element's constructor we will first initialize the close button and add it accordingly to the sizing grip of the popup. We will also subscribe to its click, where we will close the popup. Next, we will set the SelectionMode to MultiSimple, which means that the users will be able to select item with mouse click or space button. We will also subscribe to the following events:
-
PopupClosing - here we will cancel the popup closure when it contains mouse so we can use it to select items
-
CreatingVisualItem - here replace the default visual item with a custom one
-
ItemDataBinding - replace the default data item with a custom one
In the CreateChildElements override, we will initialize and add the LightVisualElement which will hold the text.
Another useful override we have to add is the the one of the ShowPopup method, where prior calling the base functionality we will save the selected items and restore them after.
Finally, we will create a method that fires the OnTextChanged event, used to set the element's text accordingly:
public class CustomEditorElement : RadDropDownListEditorElement
{
    private LightVisualElement customText;
    private RadButtonElement closeButton;
    private bool textChanged;

    public CustomEditorElement()
    {
        closeButton = new RadButtonElement("Close");
        closeButton.SetValue(DockLayoutPanel.DockProperty, Dock.Bottom);
        closeButton.Click += new EventHandler(closeButton_Click);
        this.Popup.SizingGripDockLayout.Children.Insert(1, closeButton);
        this.SelectionMode = System.Windows.Forms.SelectionMode.MultiSimple;

        this.PopupClosing += new RadPopupClosingEventHandler(CustomEditorElement_PopupClosing);
        this.CreatingVisualItem += new CreatingVisualListItemEventHandler(CustomEditorElement_CreatingVisualItem);
        this.ListElement.ItemDataBinding += this.CustomEditorElement_ItemDataBinding;
    }

    private void deselectAll_Click(object sender, EventArgs e)
    {
        this.SetItemsCheckSelect(false);
    }

    private void selectAll_Click(object sender, EventArgs e)
    {
        this.SetItemsCheckSelect(true);
    }

    private void SetItemsCheckSelect(bool value)
    {
        foreach (CustomListDataItem item in this.Items)
        {
            item.Selected = value;
            item.Checked = value;
        }

        this.SynchronizeText();
    }

    protected override void SyncVisualProperties(RadListDataItem listItem)
    {
    }

    void closeButton_Click(object sender, EventArgs e)
    {
        ClosePopup();
        GridDataCellElement cell = this.Parent as GridDataCellElement;
        if (cell != null)
        {
            cell.GridViewElement.EndEdit();
        }
    }

    private void CustomEditorElement_ItemDataBinding(object sender, ListItemDataBindingEventArgs args)
    {
        args.NewItem = new CustomListDataItem();
    }

    void CustomEditorElement_CreatingVisualItem(object sender, CreatingVisualListItemEventArgs args)
    {
        args.VisualItem = new CustomListVisualItem();
    }

    void CustomEditorElement_PopupClosing(object sender, RadPopupClosingEventArgs args)
    {
        CustomEditorElement editor = (CustomEditorElement)sender;
        if (args.CloseReason == RadPopupCloseReason.Mouse)
        {
            if (editor.PopupForm.Bounds.Contains(Control.MousePosition))
            {
                args.Cancel = true;
            }
        }
    }

    protected override void CreateChildElements()
    {
        base.CreateChildElements();

        customText = new LightVisualElement();
        customText.DrawBorder = false;
        customText.DrawFill = true;
        customText.GradientStyle = GradientStyles.Solid;
        customText.BackColor = Color.White;
        customText.TextAlignment = ContentAlignment.MiddleLeft;
        this.EditableElement.Children.Add(customText);
        this.TextBox.Visibility = ElementVisibility.Collapsed;
        this.MinSize = new Size(0, 21);
    }

    public override void ShowPopup()
    {
        bool[] selected = new bool[this.Items.Count];
        for (int i = 0; i < selected.Length; i++)
        {
            selected[i] = this.Items[i].Selected;
        }

        base.ShowPopup();
        for (int i = 0; i < selected.Length; i++)
        {
            this.Items[i].Selected = selected[i];
        }
    }

    protected override void OnTextChanged(EventArgs e)
    {
        SynchronizeText();
    }

    internal void SynchronizeText()
    {
        if (textChanged)
        {
            return;
        }

        textChanged = true;
        StringBuilder text = new StringBuilder();
        foreach (CustomListDataItem item in this.ListElement.Items)
        {
            if (item.Checked)
            {
                text.AppendFormat("{0}; ", item.Text);
            }
        }

        customText.Text = text.ToString();
        textChanged = false;
    }
}
Next, we will create a custom data item where we will just add a property to store that information about the check operation:
public class CustomListDataItem : RadListDataItem
{
    #region RadProperties

        public static readonly RadProperty CheckedProperty = RadProperty.Register("Checked", typeof(bool), typeof(CustomListDataItem), new RadElementPropertyMetadata(false));

        #endregion

    #region Properties

        public bool Checked
        {
            get
            {
                return (bool)this.GetValue(CustomListDataItem.CheckedProperty);
            }
            set
            {
                this.SetValue(CustomListDataItem.CheckedProperty, value);
            }
        }

        protected override void OnPropertyChanged(RadPropertyChangedEventArgs e)
        {
            base.OnPropertyChanged(e);
        }

        #endregion

    #region Overrides

        protected override void SetDataBoundItem(bool dataBinding, object value)
        {
            base.SetDataBoundItem(dataBinding, value);
            if (value is INotifyPropertyChanged)
            {
                INotifyPropertyChanged item = value as INotifyPropertyChanged;
                item.PropertyChanged += item_PropertyChanged;
            }
        }

        #endregion

    #region Private Methods

        private void item_PropertyChanged(object sender, PropertyChangedEventArgs e)
        {
            if (e.PropertyName == "Checked")
            {
                this.Checked = (this.DataBoundItem  as RadListDataItem).Selected;
            }
        }
        #endregion
}
Finally, we will need to create a custom visual item. To do that, we will inherit from RadListVisualItem. Then, in the CreateChildElements override, we will initialize a StackLayoutElement, which will hold both the check box (RadCheckBoxElement) and the content element (a LightVisualElement). In the ToggleStateChanged event of the check box we will set the data item's Check property (which we have added in the CustomListDataItem class) and in the SynchronizeProperties override we will sync the check box and the text with its data item:
public class CustomListVisualItem : RadListVisualItem
{
    private RadCheckBoxElement checkbox;
    private LightVisualElement content;

    protected override void CreateChildElements()
    {
        base.CreateChildElements();

        StackLayoutElement stack = new StackLayoutElement();
        stack.Orientation = Orientation.Horizontal;
        this.Children.Add(stack);

        checkbox = new RadCheckBoxElement();
        checkbox.ToggleStateChanged += new StateChangedEventHandler(checkbox_ToggleStateChanged);
        stack.Children.Add(checkbox);

        content = new LightVisualElement();
        content.StretchHorizontally = false;
        content.StretchVertically = true;
        content.TextAlignment = ContentAlignment.MiddleLeft;
        content.NotifyParentOnMouseInput = true;
        stack.Children.Add(content);
    }

    void checkbox_ToggleStateChanged(object sender, StateChangedEventArgs e)
    {
        ((CustomListDataItem)this.Data).Checked = this.checkbox.Checked;

        DropDownPopupForm form = this.ElementTree.Control as DropDownPopupForm;
        ((CustomEditorElement)form.OwnerDropDownListElement).SynchronizeText();
    }

    protected override Type ThemeEffectiveType
    {
        get
        {
            return typeof(RadListVisualItem);
        }
    }

    protected override void SynchronizeProperties()
    {
        base.SynchronizeProperties();
        checkbox.IsChecked = this.Data.Selected;
        this.content.Text = this.Data.Text;
        this.Text = "";
    }
}
And finally we need to create our CollectionEditor, for design time support:
public class CustomListControlCollectionEditor : RadListControlCollectionEditor
{
    public CustomListControlCollectionEditor(Type itemType)
        : base(itemType)
    {
    }

    protected override Type[] CreateNewItemTypes()
    {
        Type[] baseTypes =  base.CreateNewItemTypes();
        Type[] newTypes = new Type[baseTypes.Length + 1];
        baseTypes.CopyTo(newTypes, 0);
        newTypes[baseTypes.Length] = typeof(CustomListDataItem);
        return newTypes;
    }
}
Here is how to put this control in action:
public partial class Form1 : Form
  {
      public Form1()
      {
          InitializeComponent();

          DataTable t = new DataTable();
          t.Columns.Add("ID", typeof(int));
          t.Columns.Add("Name", typeof(string));
          t.Rows.Add(1, "one");
          t.Rows.Add(2, "two");
          t.Rows.Add(3, "three");
          t.Rows.Add(4, "four");
          t.Rows.Add(5, "five");
          t.Rows.Add(6, "six");
          t.Rows.Add(7, "seven");
          t.Rows.Add(8, "eight");
          t.Rows.Add(9, "nine");
          t.Rows.Add(10, "ten");

          CustomDropDownList list = new CustomDropDownList();
          list.Location = new Point(50, 50);
          list.Size = new System.Drawing.Size(200, 20);
          list.DataSource = t;
          list.DisplayMember = "Name";
          list.ValueMember = "ID";
          Controls.Add(list);
      }
  }
A complete solution in C# and VB.NET can be found here.