Binding to EntityFramework and Telerik Data Access
Binding to an ORM is similar to binding to a DataSet. First you will need to create the models out of an existing database. You can read how to do that for Entity Framework here. And for Telerik Data Access here.
For the purpose of this tutorial you can download a sample database from the here.
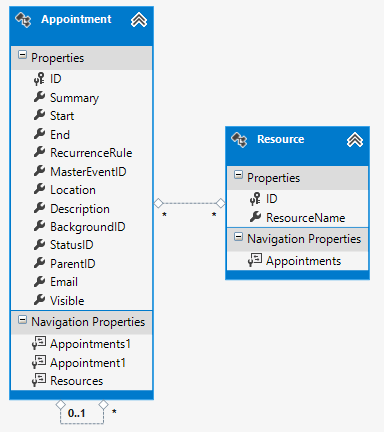
After you have mapped your database to local entities your tables should look like this:
Figure 1: Tables Mapped by the ORM
Now, you need to create a form and add a RadScheduler, in this tutorial it is named scheduler. After this we will need to access out data from the database. For this we will need a DbContext reference. In my case my DbContext is of type SchedulerDataEntities1, so we can create it as follows:
Create DbContext
private SchedulerDataEntities1 dbContext = new SchedulerDataEntities1();Then, we will need a SchedulerBindingDataSource, AppointmentMappingInfo and ResourceMappingInfo which we will use to map our data. You can create them in the Form's constructor.
Data Source Objects
SchedulerBindingDataSource schedulerBindingSource = new SchedulerBindingDataSource();
AppointmentMappingInfo appointmentMappingInfo = new AppointmentMappingInfo();
ResourceMappingInfo resourceMappingInfo = new ResourceMappingInfo();Now you just need to setup the mappings. The approaches for Entity Framework and Telerik Data Access are a bit different.
Create Mappings for Entity Framework
Below you can see the code you need to use with Entity Framework:
dbContext.Appointments.Load();
dbContext.Resources.Load();

appointmentMappingInfo.BackgroundId = "BackgroundID";
appointmentMappingInfo.Description = "Description";
appointmentMappingInfo.End = "End";
appointmentMappingInfo.Exceptions = "FK_Appointments_Appointments";
appointmentMappingInfo.Location = "Location";
appointmentMappingInfo.MasterEventId = "ParentID";
appointmentMappingInfo.RecurrenceRule = "RecurrenceRule";
appointmentMappingInfo.ResourceId = "ID";

appointmentMappingInfo.Resources = "Resources";

appointmentMappingInfo.Start = "Start";
appointmentMappingInfo.StatusId = "StatusID";
appointmentMappingInfo.Summary = "Summary";
appointmentMappingInfo.Visible = "Visible";

schedulerBindingSource.EventProvider.Mapping = appointmentMappingInfo;

resourceMappingInfo.Id = "ID";
resourceMappingInfo.Name = "ResourceName";
schedulerBindingSource.ResourceProvider.Mapping = resourceMappingInfo;

schedulerBindingSource.ResourceProvider.DataSource = dbContext.Resources.Local.ToBindingList();
schedulerBindingSource.EventProvider.DataSource = dbContext.Appointments.Local.ToBindingList();In order to use the Load extension method you need to add System.Data.Entity to your usings(C#) or Imports(VB).
And the following code needs to be used with Telerik Data Access:
Create Mappings for DataAccess
appointmentMappingInfo.BackgroundId = "BackgroundID";
appointmentMappingInfo.Description = "Description";
appointmentMappingInfo.End = "End";
appointmentMappingInfo.Exceptions = "FK_Appointments_Appointments";
appointmentMappingInfo.Location = "Location";
appointmentMappingInfo.MasterEventId = "ParentID";
appointmentMappingInfo.RecurrenceRule = "RecurrenceRule";
appointmentMappingInfo.ResourceId = "ResourceID";
appointmentMappingInfo.Resources = "AppointmentsResources";
appointmentMappingInfo.Start = "Start";
appointmentMappingInfo.StatusId = "StatusID";
appointmentMappingInfo.Summary = "Summary";
appointmentMappingInfo.Visible = "Visible";

this.schedulerBindingSource.EventProvider.Mapping = appointmentMappingInfo1;

resourceMappingInfo.Id = "ID";
resourceMappingInfo.Name = "ResourceName";
schedulerBindingSource.ResourceProvider.Mapping = resourceMappingInfo1;

schedulerBindingDataSource.ResourceProvider.DataSource = entityContext.Resources.ToList();
schedulerBindingDataSource.EventProvider.DataSource = entityContext.Appointments.ToList();The last step that you need to take in order to complete the binding process is to assign the DataSource property of RadScheduler and group it by resource:
Set Data Source
this.scheduler.DataSource = schedulerBindingSource;
this.scheduler.GroupType = GroupType.Resource;As of R1 2021 the EditAppointmentDialog provides UI for selecting multiple resources per appointment. In certain cases (e.g. unbound mode), the Resource RadDropDownList is replaced with a RadCheckedDropDownList. Otherwise, the default drop down with single selection for resources is shown. To enable the multiple resources selection in bound mode, it is necessary to specify the AppointmentMappingInfo. Resources property. The Resources property should be set to the name of the relation that connects the Appointments and the AppointmentsResources tables.
EditAppointmentDialog with multiple resources

Saving changes to the database happens when the SaveChanges method of the DbContext is invoked. You can invoke it on a button click or when the form is closing:
Save Changes
protected override void OnClosing(CancelEventArgs e)
{
    this.dbContext.SaveChanges();
    base.OnClosing(e);
}